Magento 2 Reward Points
Extension Installation
For Magento Marketplace Customers
Find the Composer name and version of the extension in the extension's composer.json file.
Login to your SSH and run:
composer require meetanshi/magento2-reward-points --ignore-platform-reqs
Enter your authentication keys. Your public key is your username; your private key is your password.
Wait for Composer to finish updating your project dependencies and make sure there aren't any errors.
To verify that the extension installed properly, run the command:
php bin/magento module:status Meetanshi_RewardPoints --ignore-platform-reqs
By default, the extension is probably disabled.
Enable the extension and clear static view files:
php bin/magento module:enable Meetanshi_RewardPoints --clear-static-content
php bin/magento setup:upgrade
For Magento version 2.0.x to 2.1.x -
php bin/magento setup:static-content:deploy
For Magento version 2.2.x & above -
php bin/magento setup:static-content:deploy -f
php bin/magento cache:flush
For Meetanshi Customers
Extract the zip folder and upload our extension to the root of your Magento 2 directory via FTP.
Login to your SSH and run below commands step by step:
php bin/magento setup:upgrade
For Magento version 2.0.x to 2.1.x -
php bin/magento setup:static-content:deploy
For Magento version 2.2.x & above -
php bin/magento setup:static-content:deploy -f
php bin/magento cache:flush
Extension Configuration
To configure the Magento 2 Reward Point extension, log into the Magento 2 admin panel and navigate to Stores > Configuration > Meetanshi > Reward Points. The configuration is divided into multiple sections as detailed below.
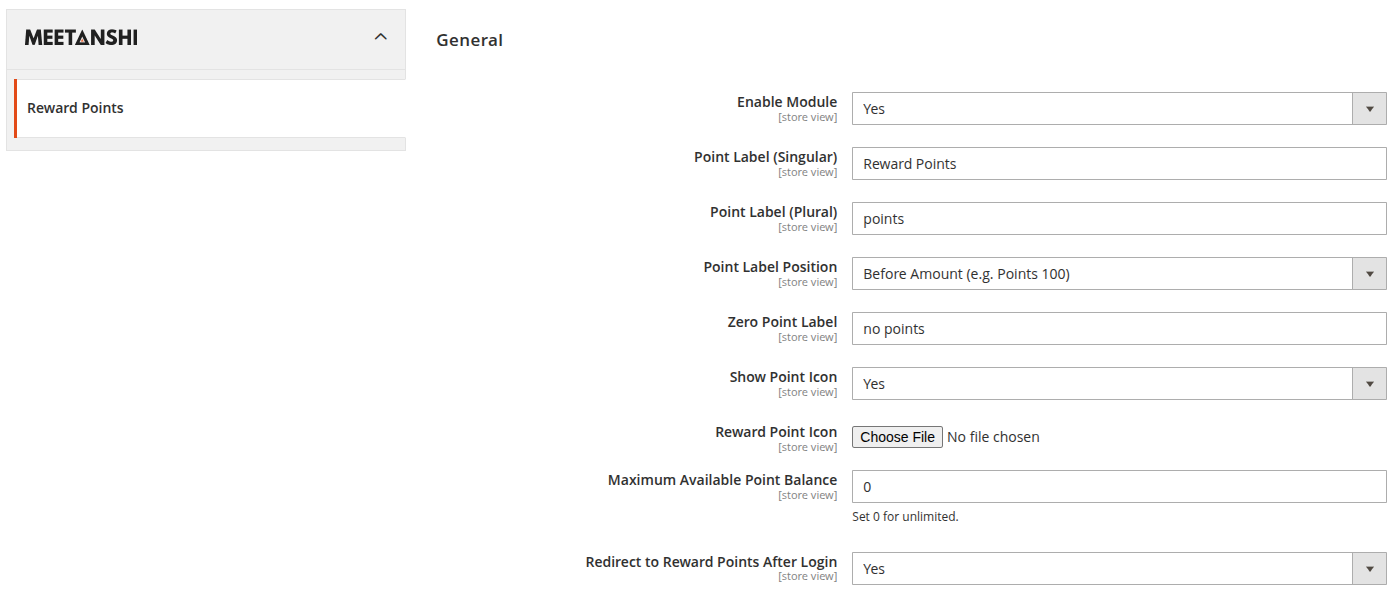
General
- Enable Module: Set to Yes to enable the Reward Points module globally.
- Point Label (Singular): Enter the label for a single reward point (e.g., "Point", "Coin").
- Point Label (Plural): Enter the label for multiple reward points (e.g., "Points", "Coins").
- Point Label Position: Select whether to display the point label before or after the point value.
- Zero Point Label: Enter the label to display when a customer has a zero point balance.
- Show Point Icon: Set to Yes to display a visual icon next to the points.
- Reward Point Icon: Upload the image to be used as the reward point icon.
- Maximum Available Point Balance: Set the maximum point balance a customer can accrue. Set to 0 for unlimited points.
- Redirect to Reward Points After Login: Set to Yes to automatically redirect customers to their reward points dashboard upon logging in.
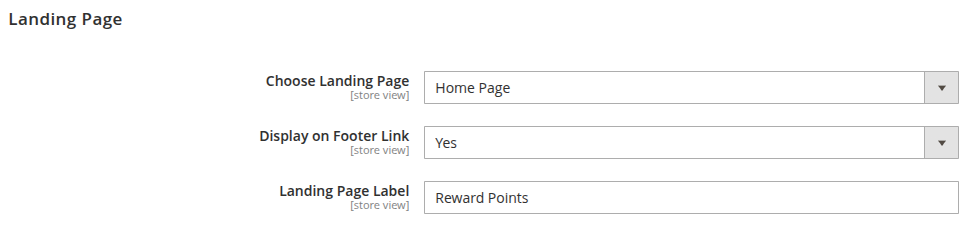
Landing Page
- Choose Landing Page: Select the CMS page you want to use as the dedicated reward points landing page.
- Display on Footer Link: Set to Yes to add a link to the reward points landing page in the website footer.
- Landing Page Label: Enter the text for the footer link. (Depends on: Display on Footer Link being enabled).
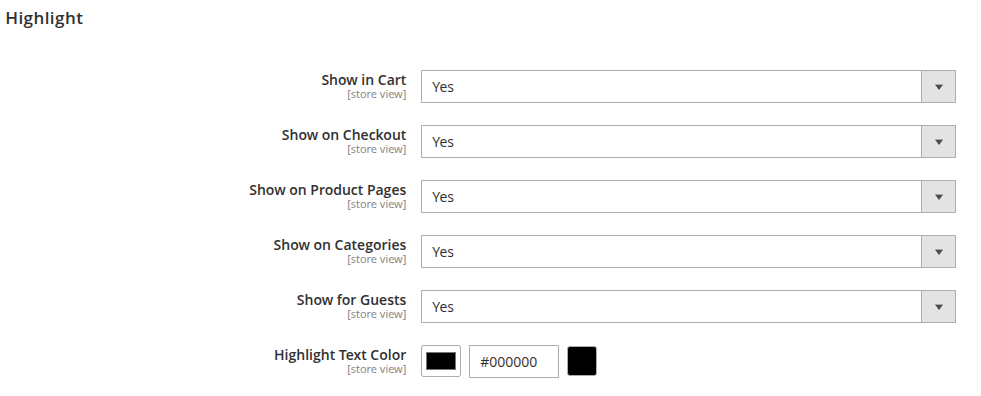
Highlight
- Show in Cart: Choose whether to display potential point earnings or highlight messages on the shopping cart page.
- Show on Checkout: Set to Yes to display point earning potential during the checkout process.
- Show on Product Pages: Set to Yes to highlight how many points a customer can earn by purchasing a specific product.
- Show on Categories: Set to Yes to show point highlights on product listing/category pages.
- Show for Guests: Set to Yes to display reward point highlights to non-logged-in guest users, encouraging them to register.
- Highlight Text Color: Select the specific text color used for the reward points highlight messages across the frontend.
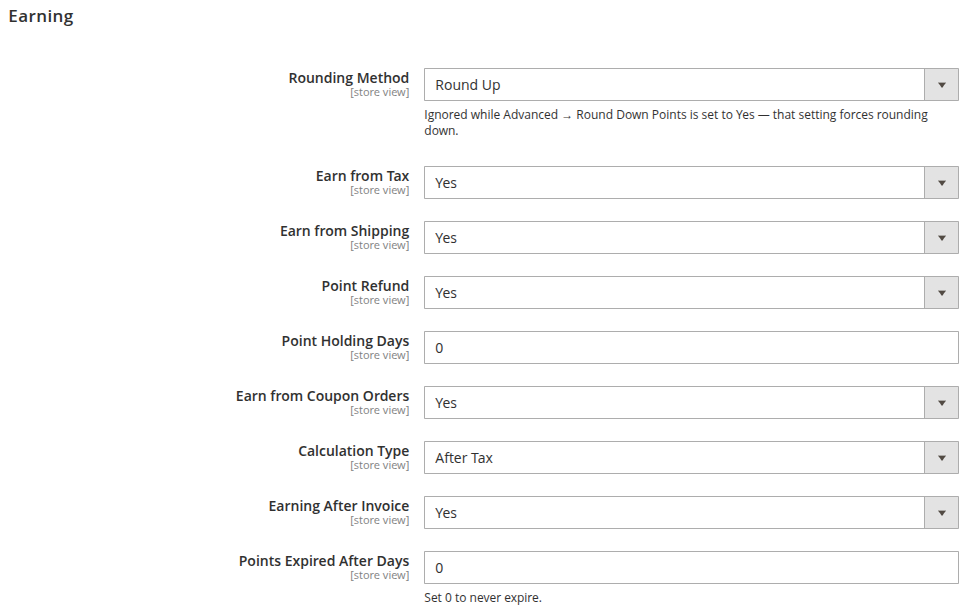
Earning
- Rounding Method: Select how earned points are rounded (e.g., Normal, Round Up, Round Down). Note: This is ignored if Advanced → Round Down Points is set to Yes.
- Earn from Tax: Set to Yes if you want customers to earn points based on the tax amount of their order.
- Earn from Shipping: Set to Yes if you want customers to earn points on the shipping fees.
- Point Refund: Set to Yes to automatically deduct earned points from the customer's balance if their order is refunded.
- Point Holding Days: Enter the number of days earned points are placed on hold before they become available for use.
- Earn from Coupon Orders: Set to Yes to allow customers to earn points even on orders where a discount coupon was applied.
- Calculation Type: Choose the basis for calculating earned points.
- Earning After Invoice: Set to Yes so points are only awarded after the order has been invoiced.
- Points Expired After Days: Enter the number of days after which earned points will expire. Set to 0 if points should never expire.
Spending
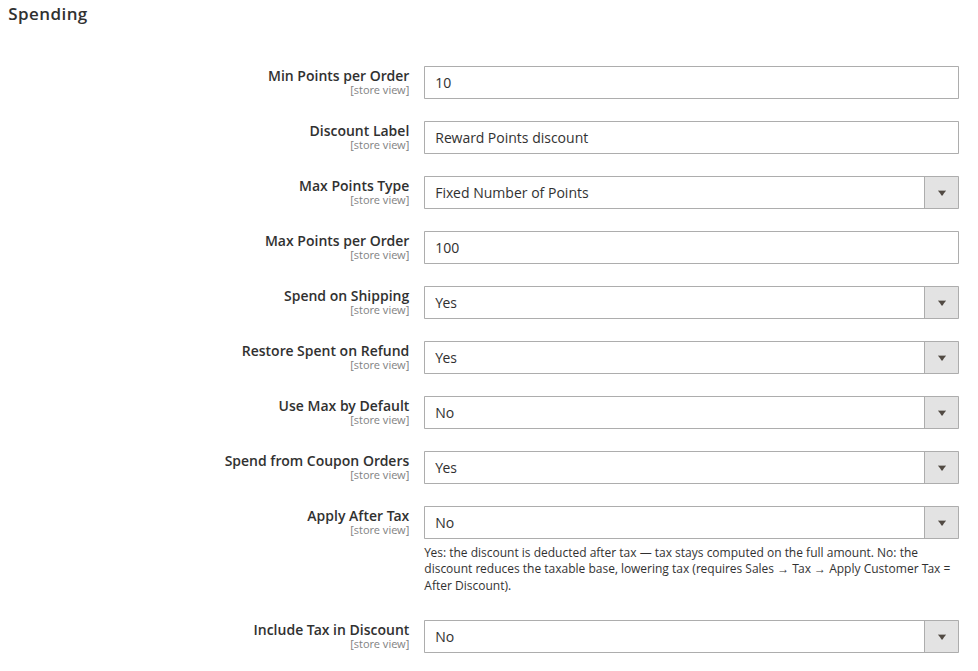
- Min Points per Order: Set the minimum number of points a customer needs to spend in a single order.
- Discount Label: Enter the label displayed for the point discount on the frontend (e.g., "Reward Points Discount").
- Max Points Type: Select how the maximum spending limit is determined (e.g., fixed amount or percentage of grand total).
- Max Points per Order: Enter the maximum number of points a customer can spend on a single order.
- Spend on Shipping: Set to Yes to allow customers to use their points to cover shipping costs.
- Restore Spent on Refund: Set to Yes to restore the points spent by the customer if their order is refunded.
- Use Max by Default: Set to Yes to automatically apply the maximum allowable points during checkout.
- Spend from Coupon Orders: Set to Yes to allow customers to spend points on orders where they also applied a discount coupon.
- Apply After Tax: Set to Yes to deduct the discount after tax is computed. Set to No to reduce the taxable base before tax calculation (requires Sales → Tax → Apply Customer Tax = After Discount).
- Include Tax in Discount: Set to Yes to allow the point discount to cover the tax amount.
Display
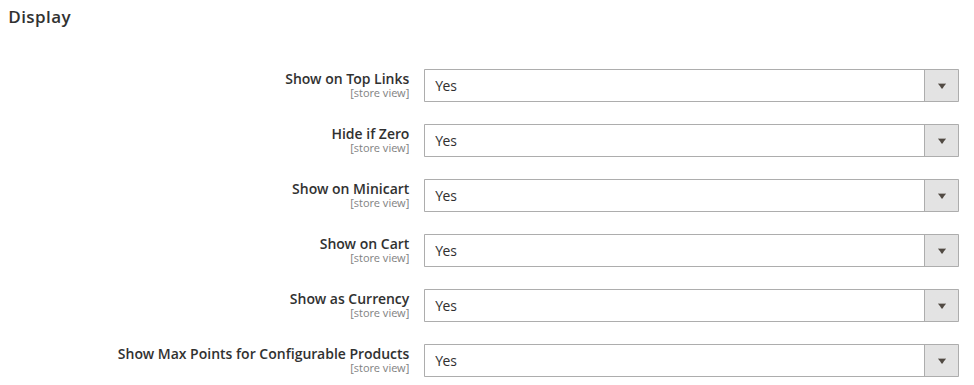
- Show on Top Links: Set to Yes to show the customer's point balance in the header top links.
- Hide if Zero: Set to Yes to hide the point balance from the top links if it is zero.
- Show on Minicart: Set to Yes to display the point balance within the minicart dropdown.
- Show on Cart: Set to Yes to display the point balance summary on the shopping cart page.
- Show as Currency: Set to Yes to display the equivalent currency value of the points alongside the point balance.
- Show Max Points for Configurable Products: Set to Yes to display the maximum possible points a customer could earn when viewing configurable products.
Email Notifications
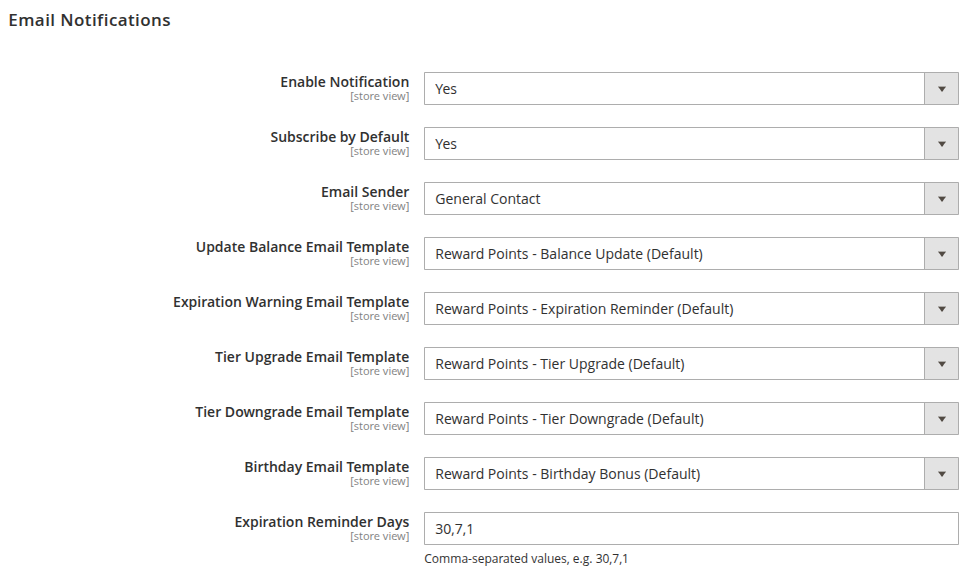
- Enable Notification: Set to Yes to enable all reward points email notifications.
- Subscribe by Default: Set to Yes to automatically subscribe new customers to reward points emails.
- Email Sender: Select the store identity (e.g., General Contact, Sales Representative) used to send reward points emails.
- Update Balance Email Template: Choose the template used when a customer's point balance changes.
- Expiration Warning Email Template: Choose the template used to warn customers about expiring points.
- Tier Upgrade Email Template: Choose the template used to congratulate customers on a tier upgrade.
- Tier Downgrade Email Template: Choose the template used to notify customers of a tier downgrade.
- Birthday Email Template: Choose the template used for sending birthday reward points.
- Expiration Reminder Days: Enter a comma-separated list of days before expiration to send reminders (e.g., 30,7,1).
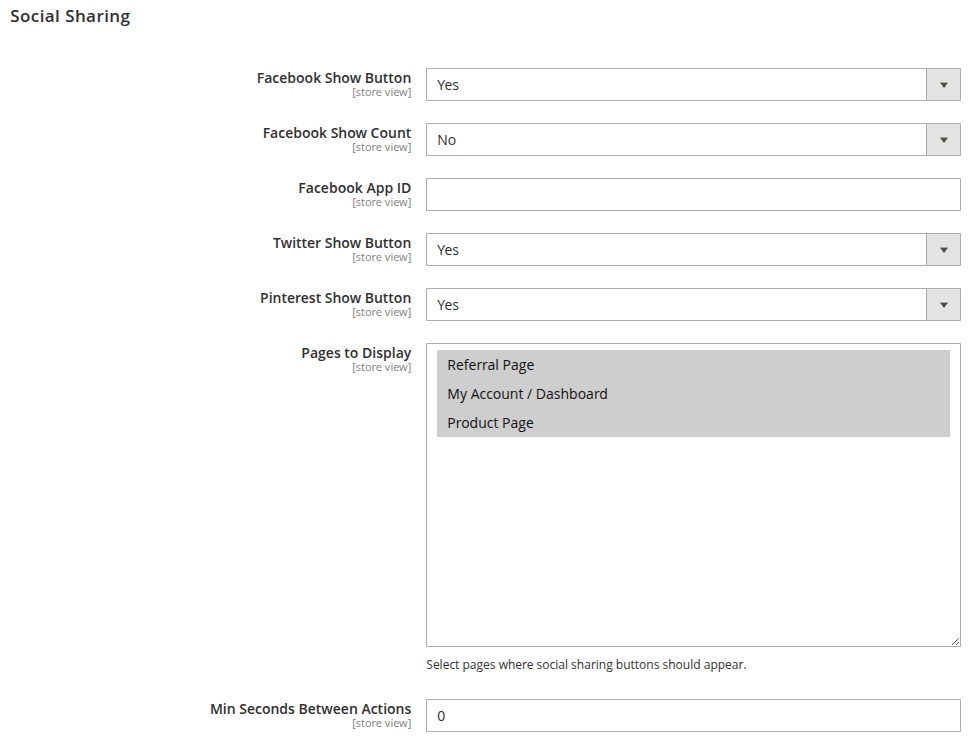
Social Sharing
- Facebook Show Button: Set to Yes to display the Facebook share button to earn points.
- Facebook Show Count: Set to Yes to display the share counter alongside the Facebook button.
- Facebook App ID: Enter your Facebook App ID to properly integrate the sharing functionality.
- Twitter Show Button: Set to Yes to display the Twitter share button to earn points.
- Pinterest Show Button: Set to Yes to display the Pinterest share button to earn points.
- Pages to Display: Select the specific store pages where the social sharing buttons should appear.
- Min Seconds Between Actions: Set the minimum time interval required between social actions for a customer to earn points.
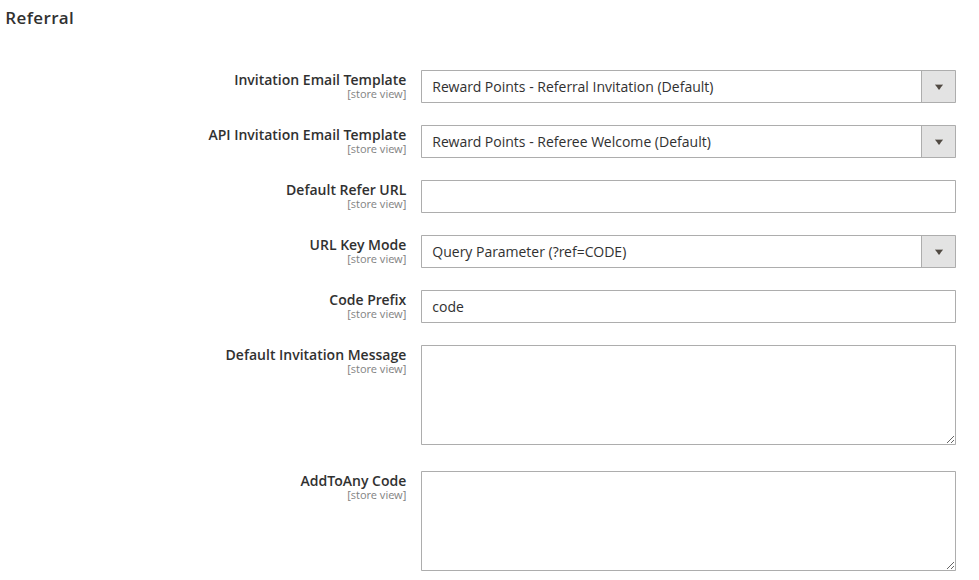
Referral
- Invitation Email Template: Select the template used when customers send referral invitations to friends.
- API Invitation Email Template: Select the template used for referral invitations sent via the API.
- Default Refer URL: Enter the default landing page URL for incoming referral traffic.
- URL Key Mode: Choose how the unique referral URL key is generated for each customer.
- Code Prefix: Enter an optional prefix that will be prepended to auto-generated referral codes.
- Default Invitation Message: Enter the default message text pre-filled when customers send an invitation.
- AddToAny Code: Enter your AddToAny script code if using it for extended social sharing of referral links.
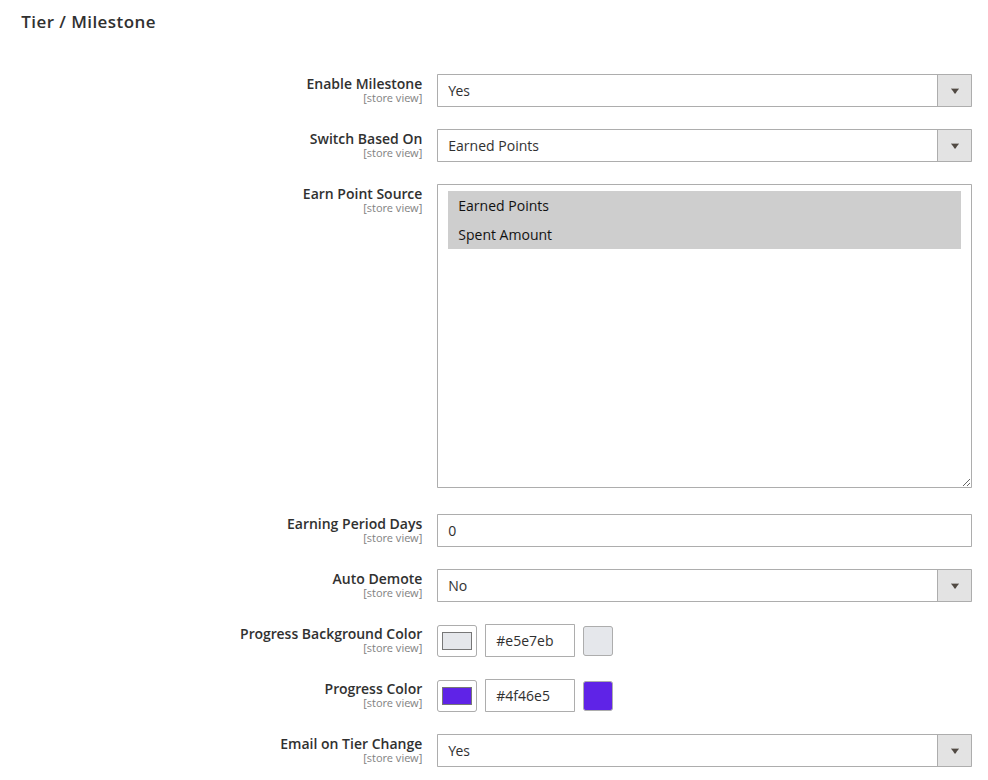
Tier / Milestone
- Enable Milestone: Set to Yes to enable tier-based rewards and milestones.
- Switch Based On: Choose the metric used to determine tier upgrades.
- Earn Point Source: Select which types of earned points qualify towards tier progression.
- Earning Period Days: Specify the rolling period in days for evaluating a customer's tier requirements.
- Auto Demote: Set to Yes to automatically move customers to a lower tier if they fail to meet the requirements within the earning period.
- Progress Background Color: Select the background color for the frontend tier progress bar.
- Progress Color: Select the active fill color for the frontend tier progress bar.
- Email on Tier Change: Set to Yes to send customers an email notification when their tier changes.
Advanced
- Round Down Points: Set to Yes to force all point calculations to round down. Note: This overrides the standard Rounding Method set in the Earning section.
- Custom Behavior Events: Define custom events for earning points. Enter one entry per line in the format:
rulecode,Rule Name.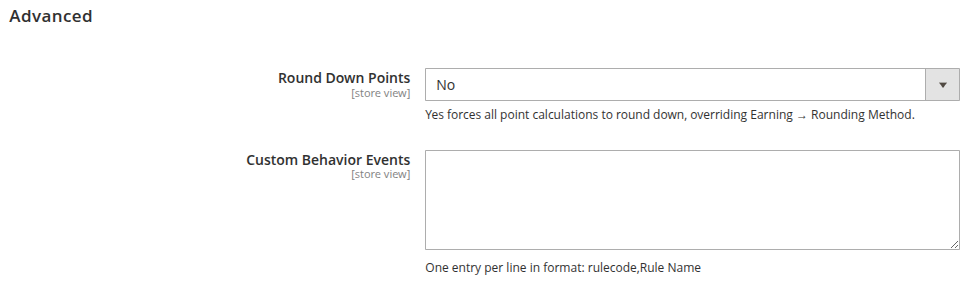
Managing Transactions
Navigate to Marketing > Reward Points > Transactions to view and manage all reward points transactions across all customers.
Transaction Grid
The transaction grid displays the following columns:
- ID: The unique transaction identifier.
- Customer: The customer name (linked to customer edit page).
- Action: The action that triggered the transaction (e.g., order, admin adjustment, behavior rule).
- Points Delta: The number of points added (positive) or deducted (negative) in this transaction.
- Balance After: The customer's total points balance after this transaction.
- Expires At: The date when these points will expire (if applicable).
- Created At: The date and time when the transaction was created.
- Status: The current status of the transaction — Pending, Active, Expired, or Cancelled.
- Comment: Any comment associated with the transaction.
- Order ID: The related order ID (if the transaction is order-related, linked to order view).
- Admin User: The admin user who initiated the transaction (for manual adjustments).
Marketing & Operations
Beyond the standard configuration, the Reward Points extension offers advanced management options under Marketing > Reward Points and Marketing > Reports & Data. These sections allow administrators to granularly control earning and spending rules, manage tiers, manually adjust customer balances, and analyze performance.
Transactions
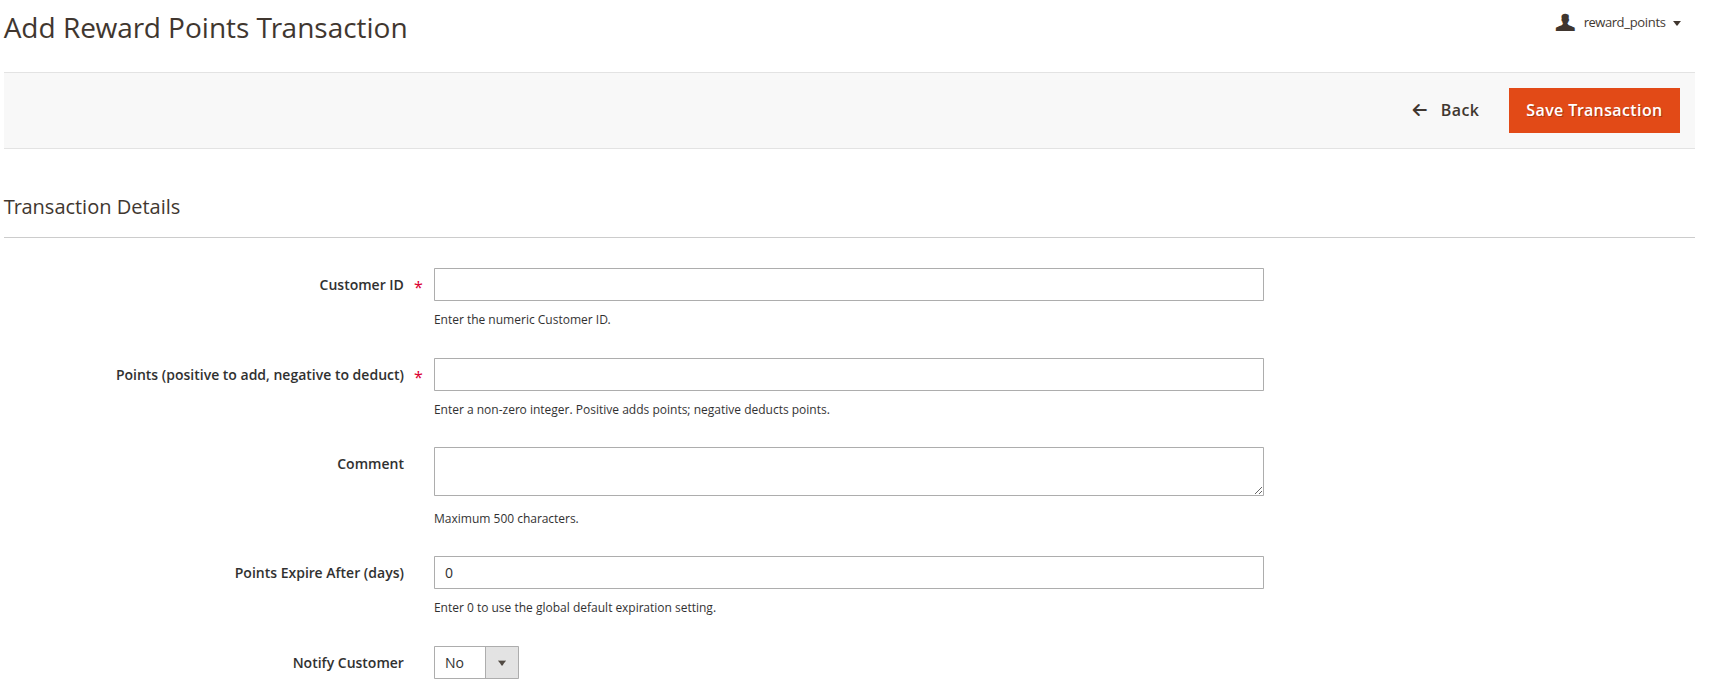
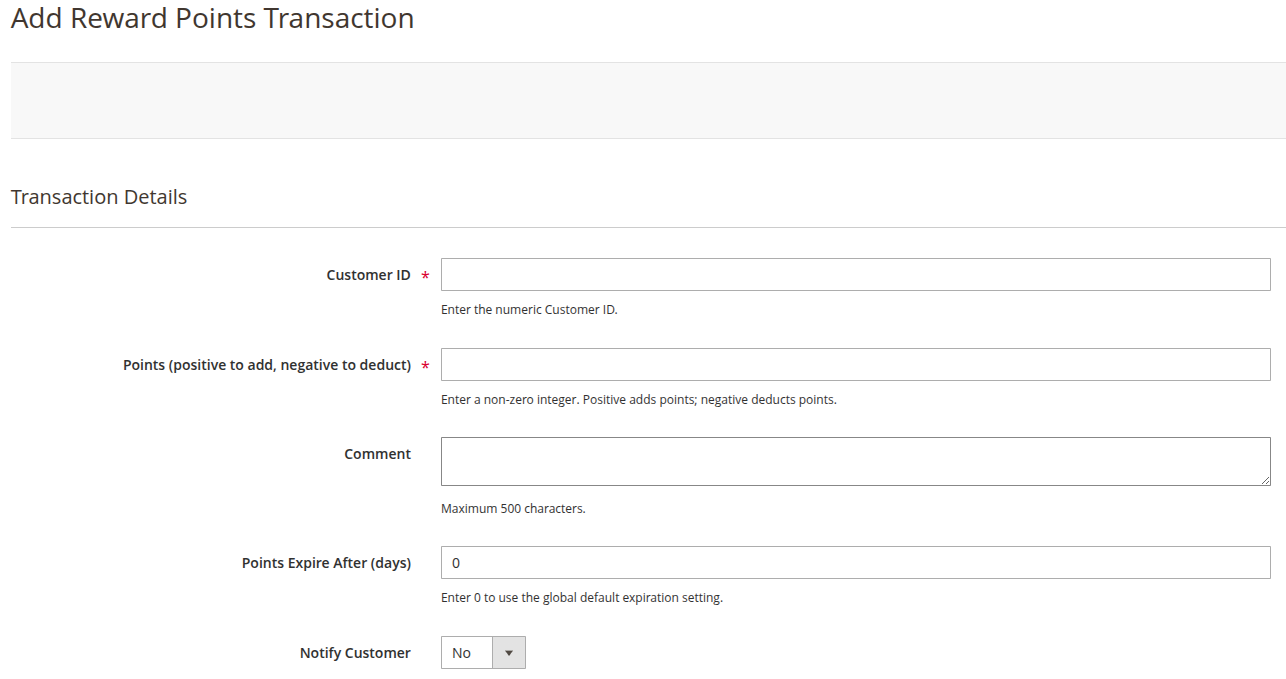
(Found under Marketing > Reward Points > Transactions) Manage and manually adjust individual customer point balances.
- Customer ID: Enter the numeric ID of the customer.
- Points: Enter a positive integer to add points or a negative integer to deduct points.
- Comment: Internal or customer-facing note detailing the reason for the transaction (Max 500 characters).
- Points Expire After (days): Set a specific expiration for this transaction. Enter
0to use the global default. - Notify Customer: Choose whether to send an email notification to the customer regarding this transaction.
Earning
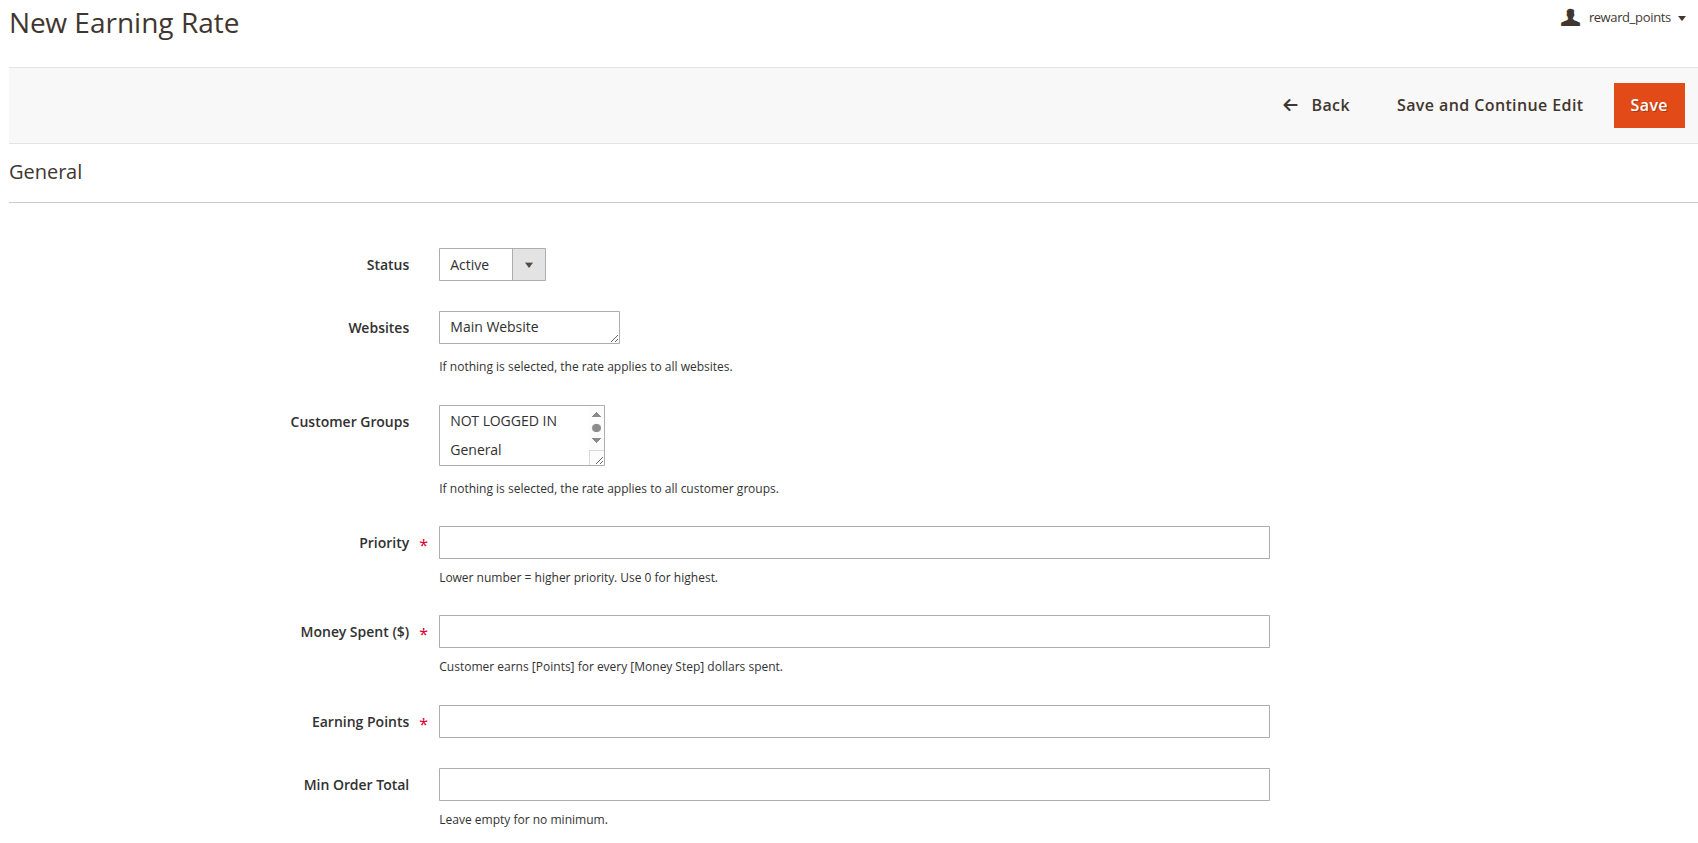
Earning Rate
- Status: Set to Active or Inactive.
- Websites & Customer Groups: Restrict the earning rate to specific storefronts or customer groups.
- Priority: Determines the order of execution. Lower numbers have higher priority (0 is the highest).
- Money Spent ($): The currency step value (e.g., $10).
- Earning Points: The number of points rewarded for every "Money Spent" step.
- Min Order Total: Minimum order amount required to qualify for this earning rate. Leave empty for no minimum.
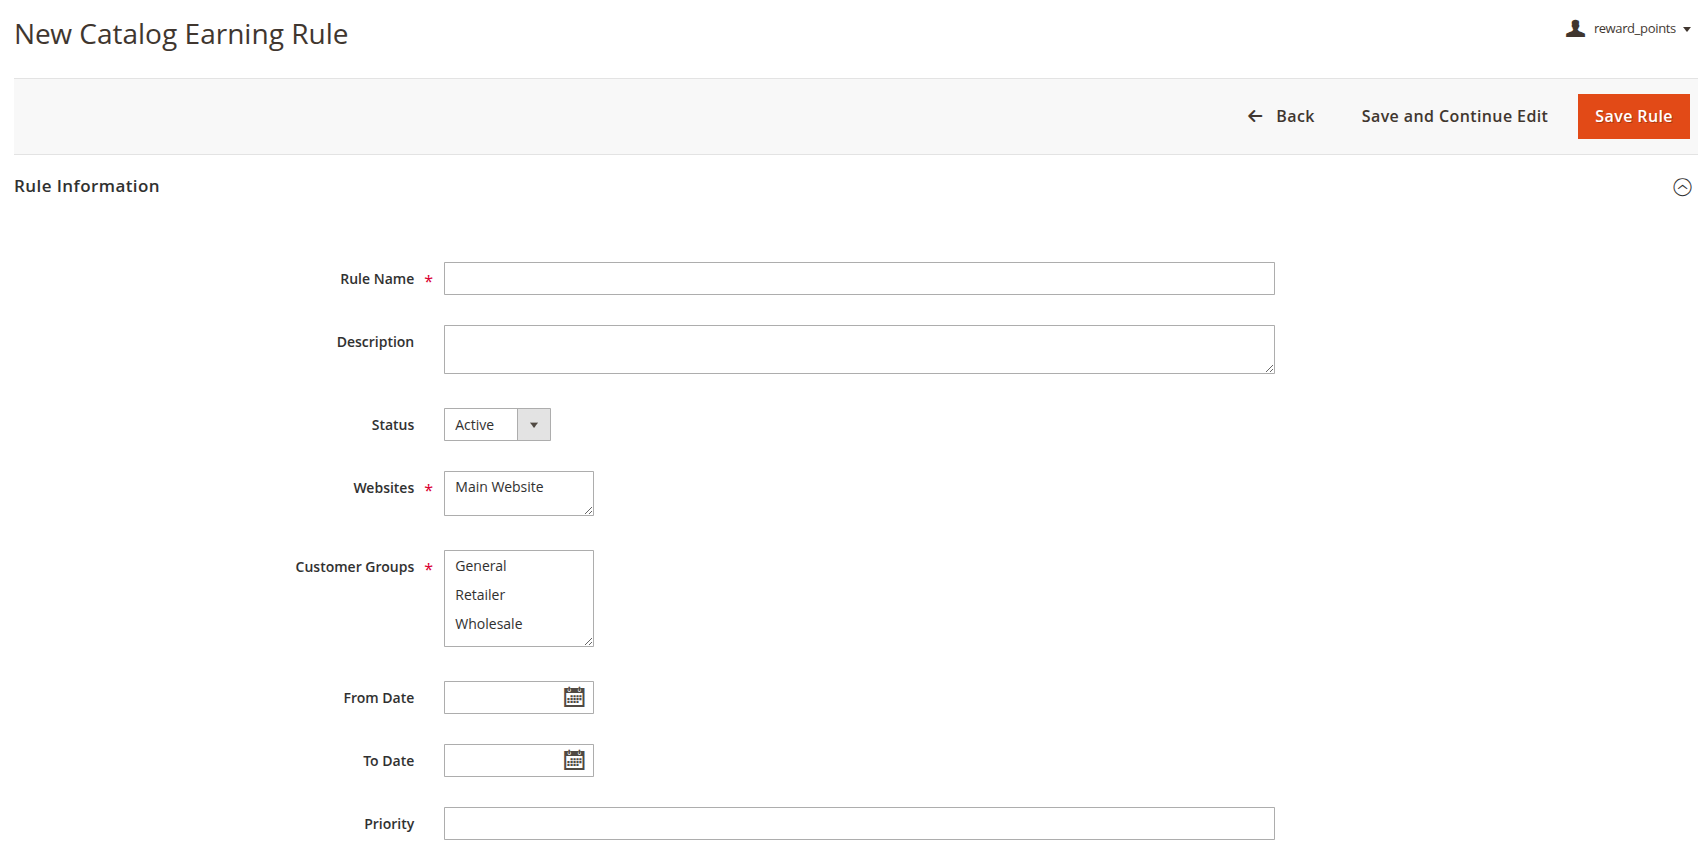
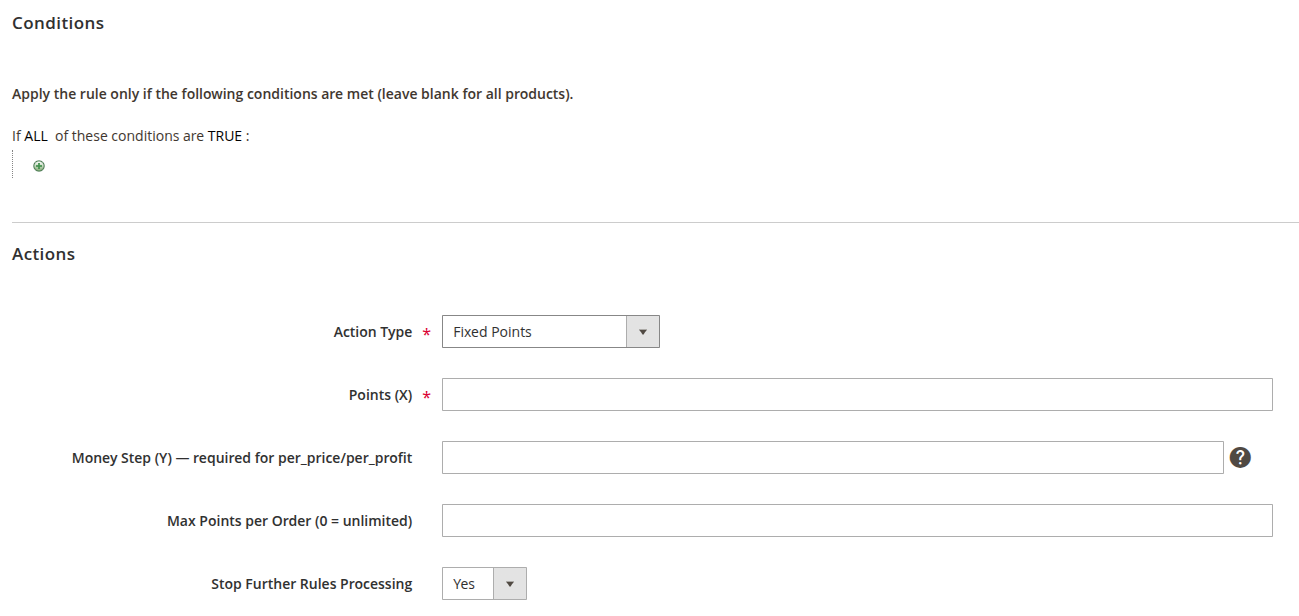
Catalog Rules
- Rule Information: Define Rule Name, Description, Status, Websites, Customer Groups, Priority, and active Date ranges.
- Conditions: Set specific product attributes or category conditions for when the rule applies.
- Action Type: Choose how points are awarded: Fixed Points, Points per Price Amount, or Points per Profit Amount.
- Points (X): The number of points to award.
- Money Step (Y): Required when Action Type is not Fixed. Earn X points for every Y currency spent.
- Max Points per Order: Maximum points a customer can earn via this rule (0 = unlimited).
- Stop Further Rules Processing: Discard subsequent rules if this rule is applied.
Shopping Cart Rules
- Rule Information & Conditions: Define basic rule information and cart-based conditions (e.g., Subtotal, Shipping Country).
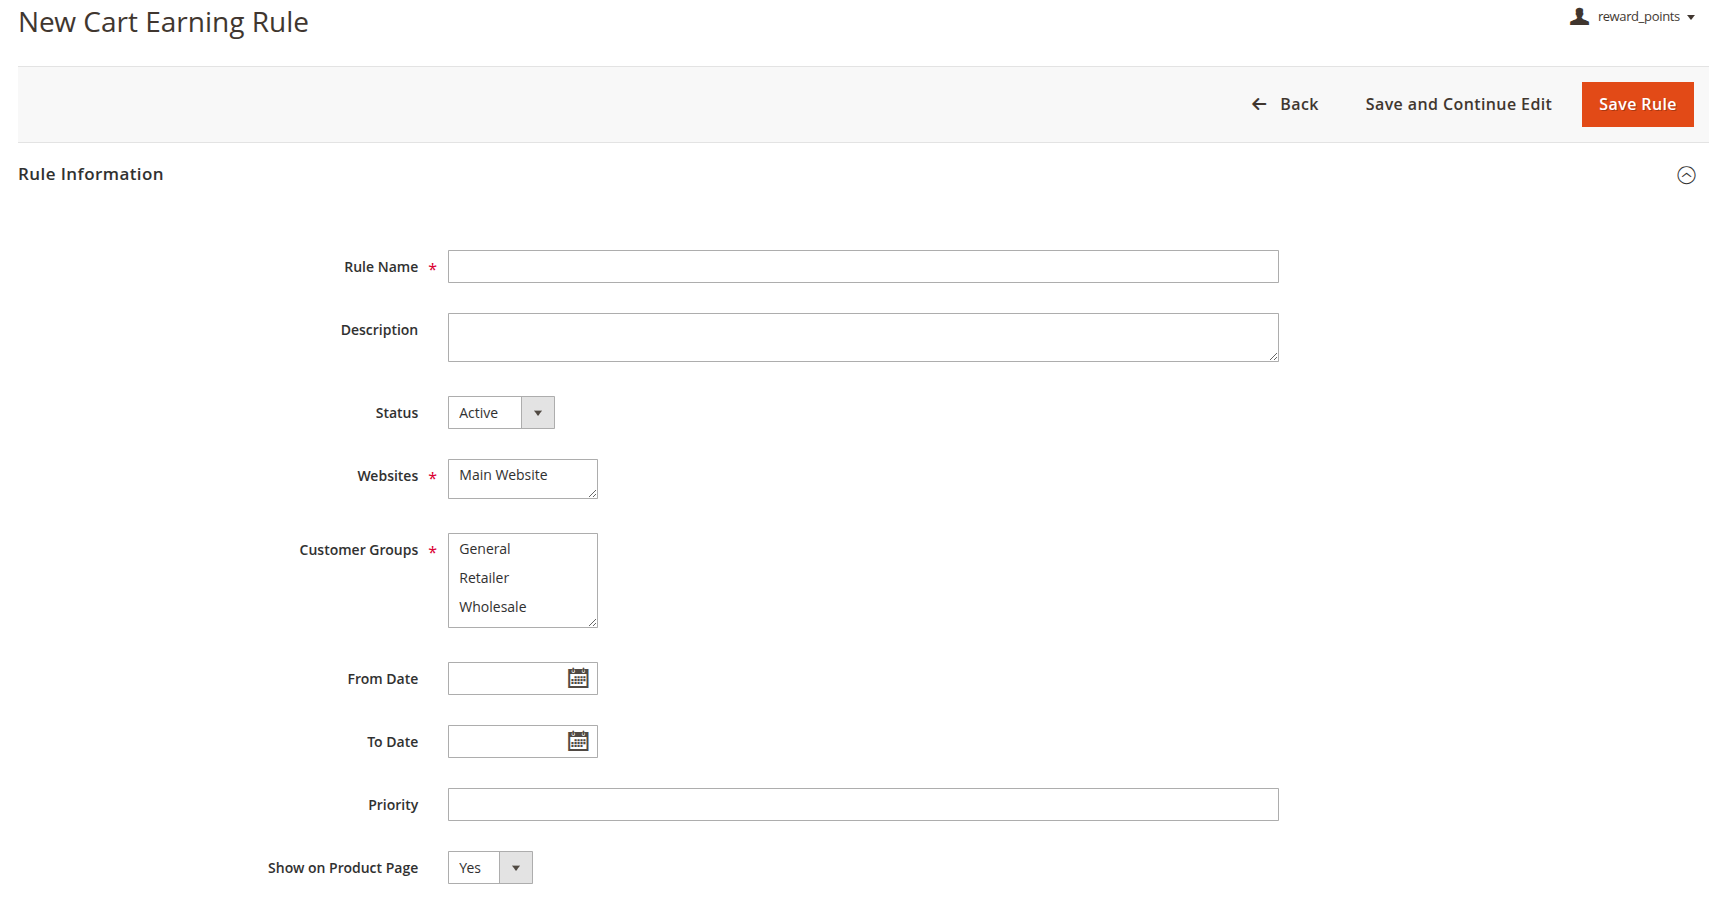
- Show on Product Page: Choose whether to display the potential points on relevant product pages.
- Action Type: Choose Fixed Points, Points per Price Amount, or Points per Item Quantity.
- Points (X) & Money/Qty Step (Y): Set the reward points ratio.
- Max Points per Order: Limit the maximum points earned via this rule.
- Product Page Notification Message: The text displayed on product pages when the rule applies. Supports
{{points}}placeholder.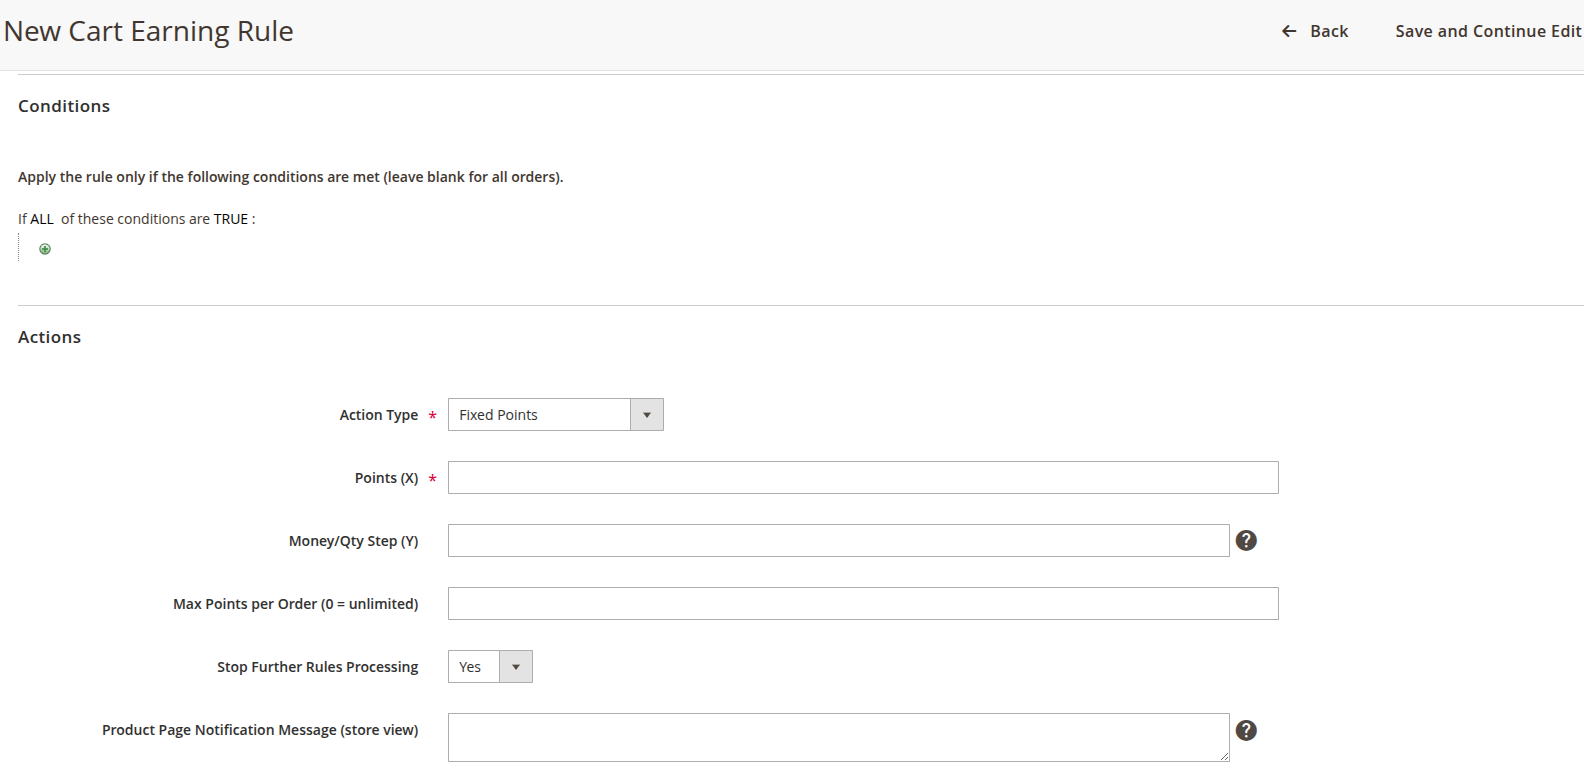
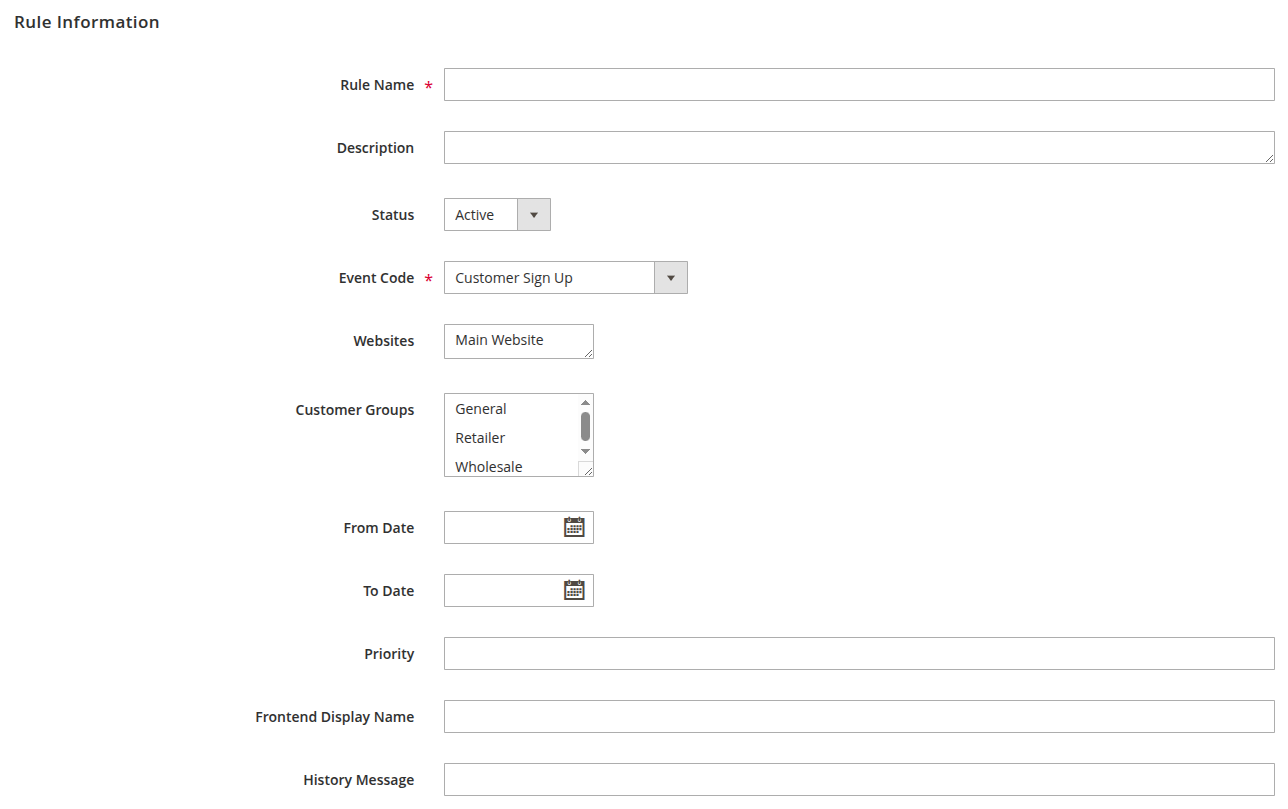
Behavior Rules
- Event Code: Select the customer behavior that triggers the reward (e.g., Customer Registration, Newsletter Sign-up, Product Review).
- Frontend Display Name & Messages: Set names and messages shown in the points history and email notifications.
- Action Type & Points: Set how points are calculated (Fixed or dynamically).
- Caps & Limits: Define limits on how many points can be earned per day, month, year, or lifetime for this specific behavior.
Spending
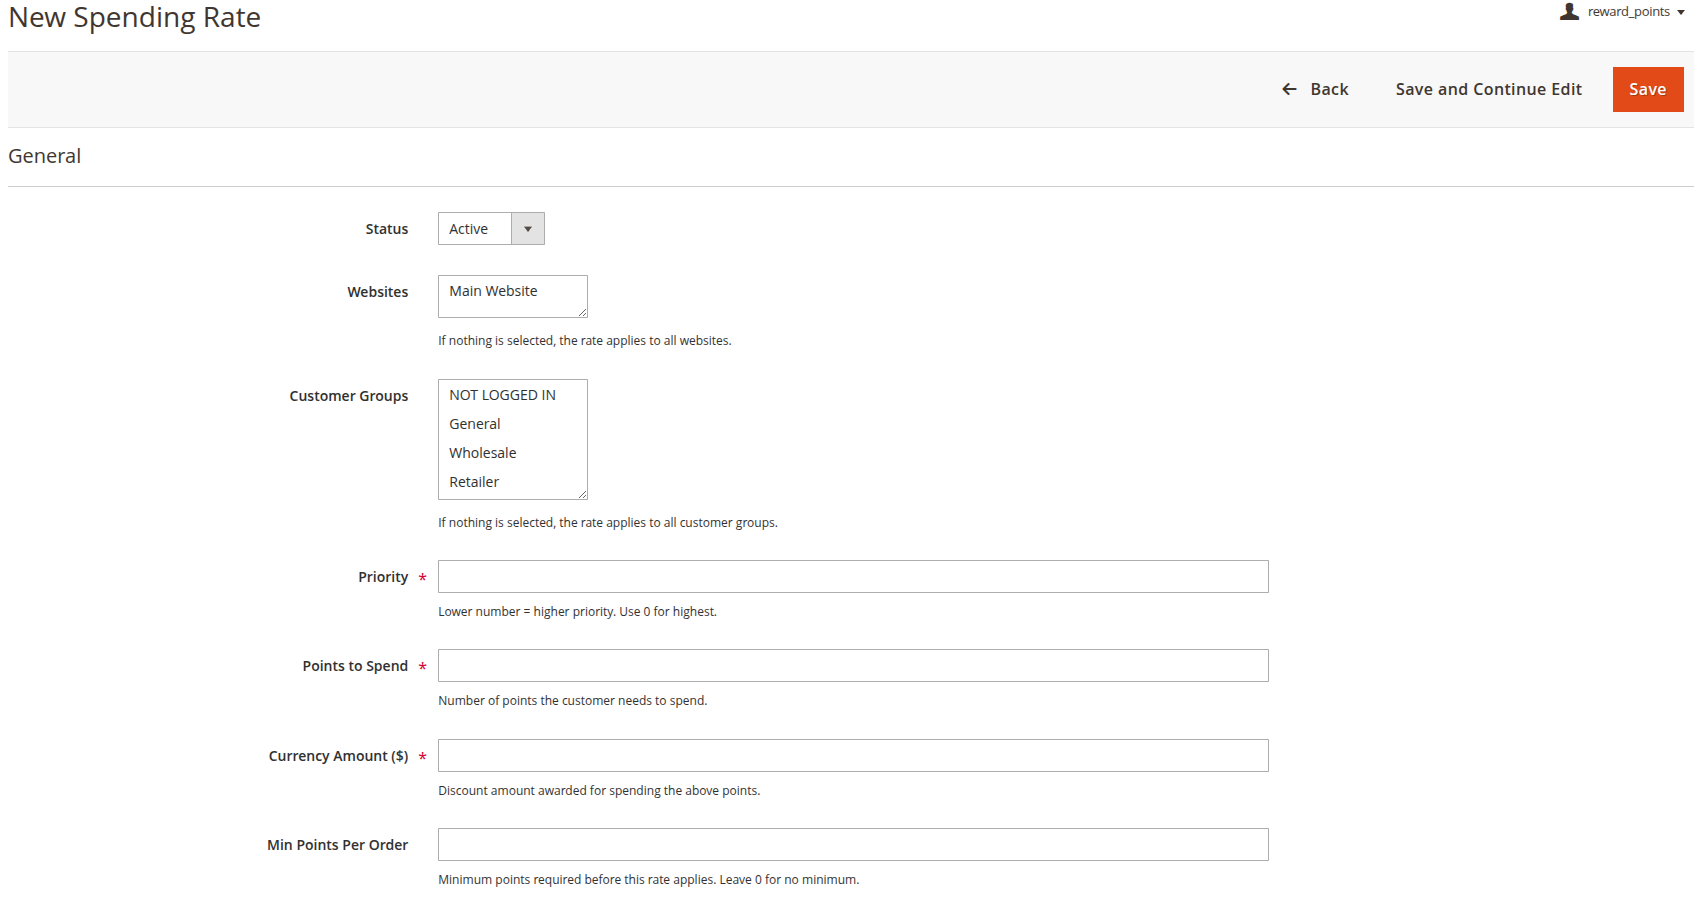
Spending Rate
- Status, Websites, Customer Groups, & Priority: Standard rule constraints.
- Points to Spend: Number of points the customer must redeem.
- Currency Amount ($): The discount amount awarded for redeeming the above points.
- Min Points Per Order: Minimum points a customer must have before this rate becomes available.
Shopping Cart Earning Rules
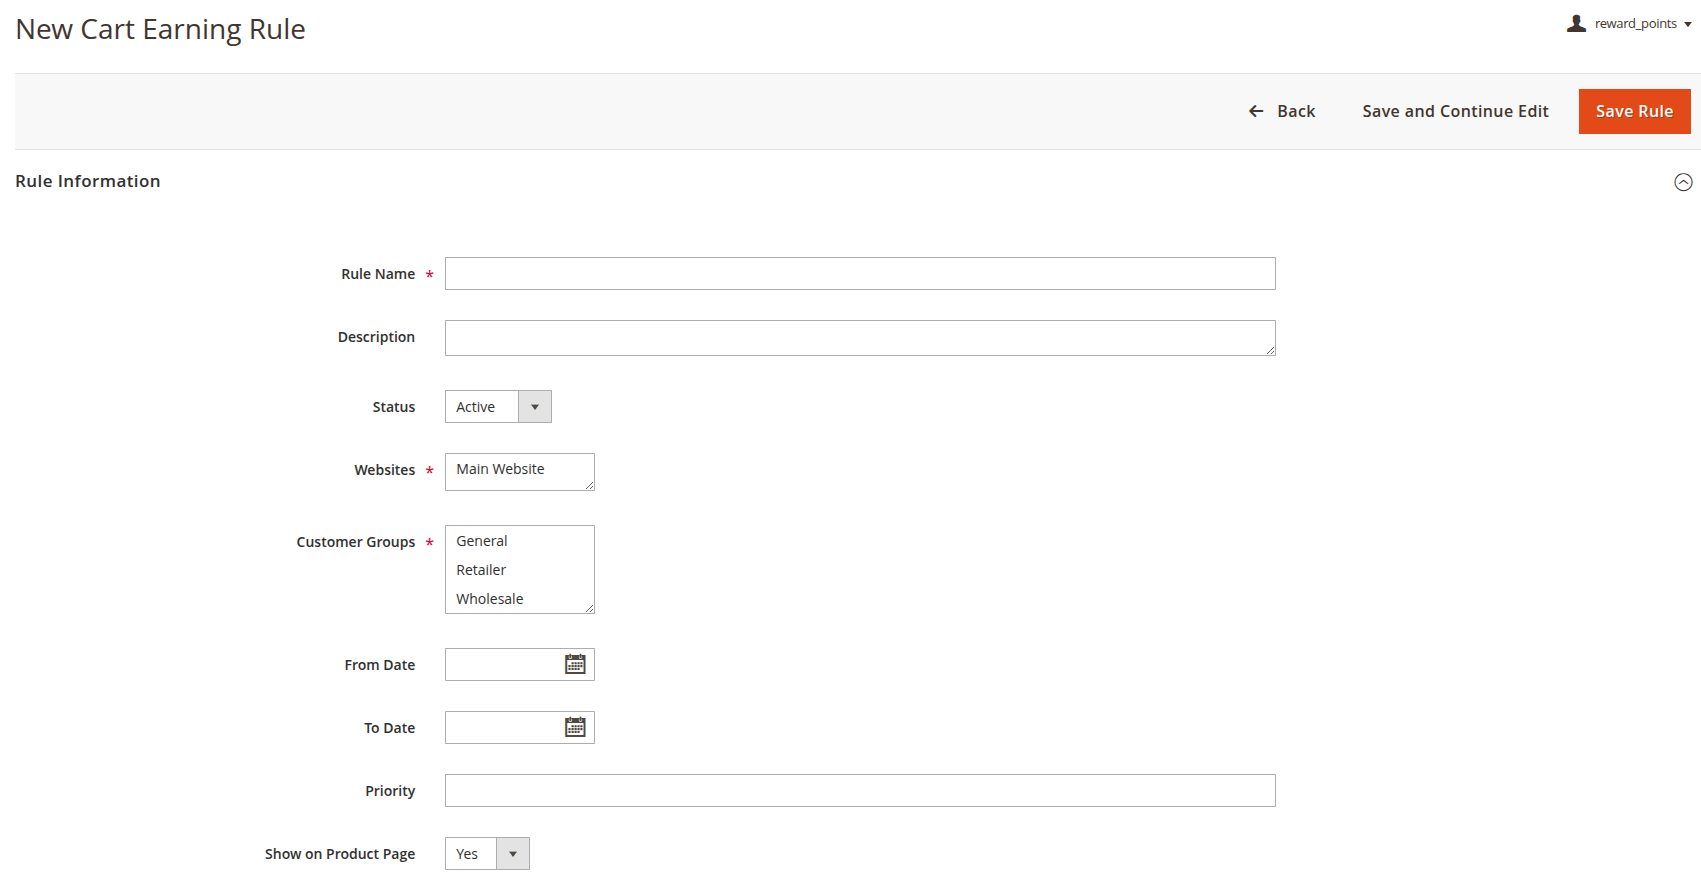
Navigate to Marketing > Reward Points > Earning > Shopping Cart Rules to create cart-level earning rules. Click Add New Rule to configure:
Rule Information tab:
Rule Name: Enter a descriptive name for the cart earning rule.
Description: Add an optional description for the rule.
Status: Enable or disable the rule (Active/Inactive).
Websites: Select the store websites where this rule is active.
Customer Groups: Select the customer groups this rule applies to.
From Date: Set the start date from which the rule becomes active.
To Date: Set the end date after which the rule becomes inactive.
Priority: Set the rule priority. Lower number equals higher priority.
Show on Product Page: Set to Yes to display the earning notification message from this rule on product pages that qualify.
 Conditions tab:
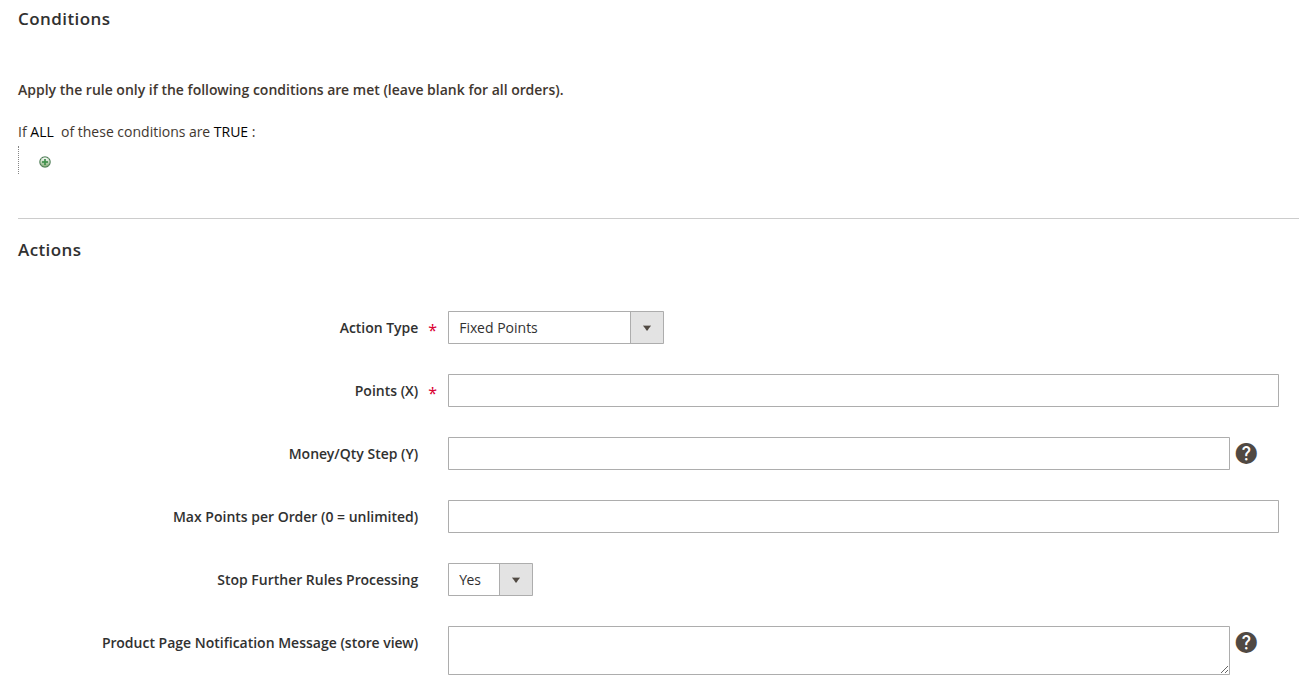
Define shopping cart conditions that determine when this rule is triggered. Use the Magento conditions builder to set rules based on cart attributes (subtotal, total quantity, payment method, shipping method, product combinations, etc.).
Actions tab:
Action Type: Select how points are calculated. Options:
- Fixed Points — award a fixed number of points per order
- Points per Price Amount — award X points for every Y currency amount in the cart
- Points per Item Quantity — award X points for every Y items in the cart
Points (X): Enter the number of points to award.
Money/Qty Step (Y): Enter the monetary amount or quantity step for per_price and per_qty action types. Required when Action Type is not Fixed.
Max Points per Order (0 = unlimited): Set a cap on the maximum points earned per order from this rule. Set 0 for no limit.
Stop Further Rules Processing: Set to Yes to stop evaluating lower-priority cart rules once this rule matches.
Product Page Notification Message (store view): Enter the message displayed on product pages when this rule applies. Supports the
{{points}}placeholder to dynamically show the points amount (e.g., "Earn {{points}} reward points on this purchase!").
Managing Referral Rules
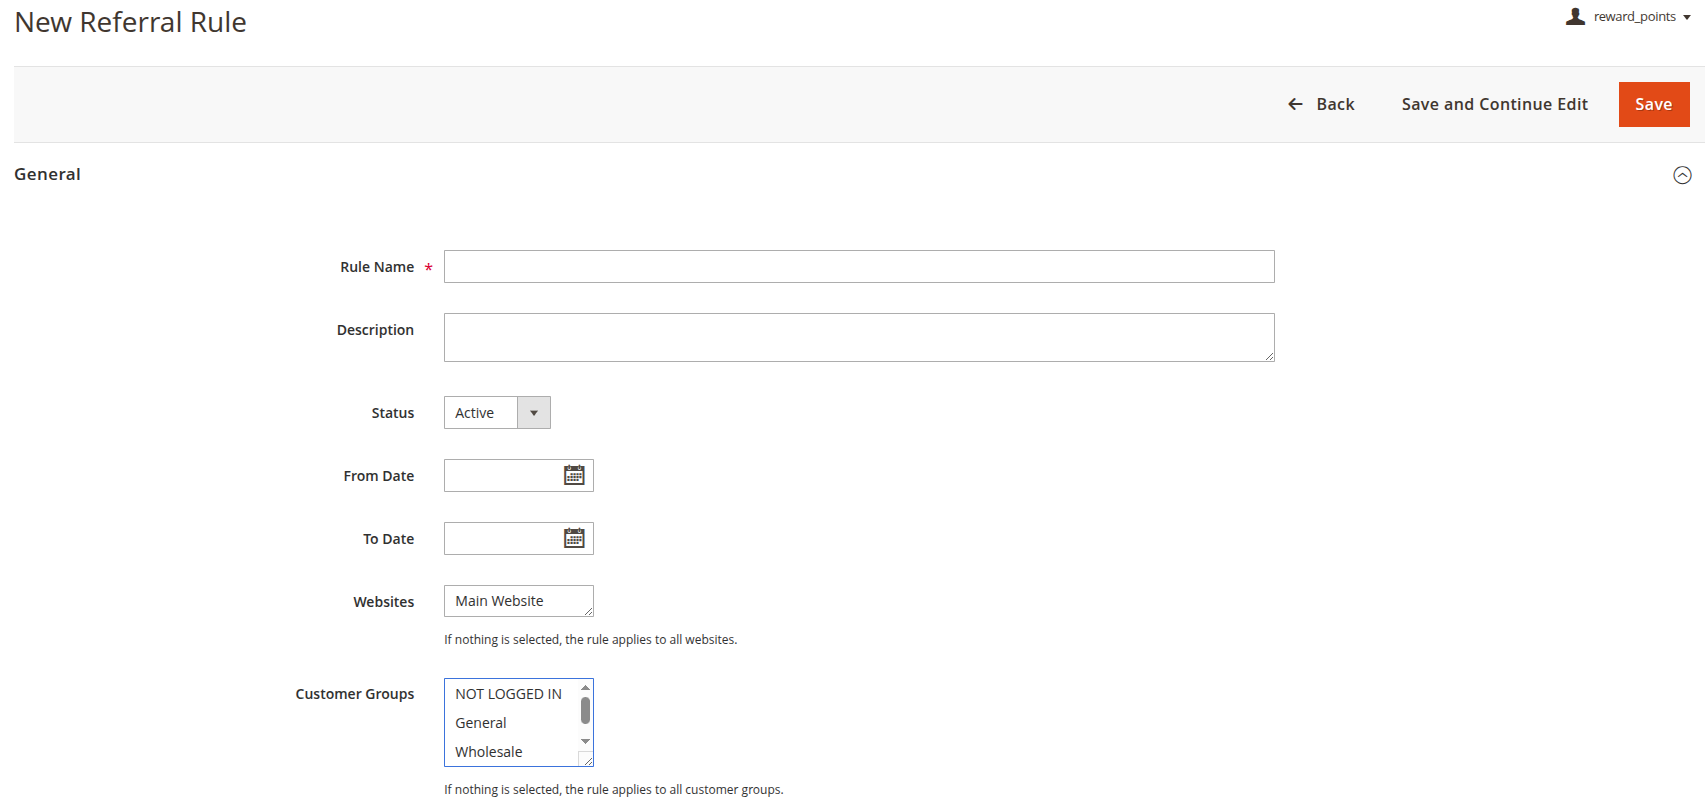
Navigate to Marketing > Reward Points > Referral Rules to create rules that reward customers for referring friends. Click Add New Rule to configure:
General tab:
Rule Name: Enter a descriptive name for the referral rule.
Description: Add an optional description explaining the rule's purpose.
Status: Enable or disable the rule (Active/Inactive).
From Date: Set the start date from which the rule becomes active.
To Date: Set the end date after which the rule becomes inactive.
Websites: Select the store websites where this referral rule is active. If nothing is selected, the rule applies to all websites.
Customer Groups: Select the customer groups eligible for this rule. If nothing is selected, the rule applies to all customer groups.
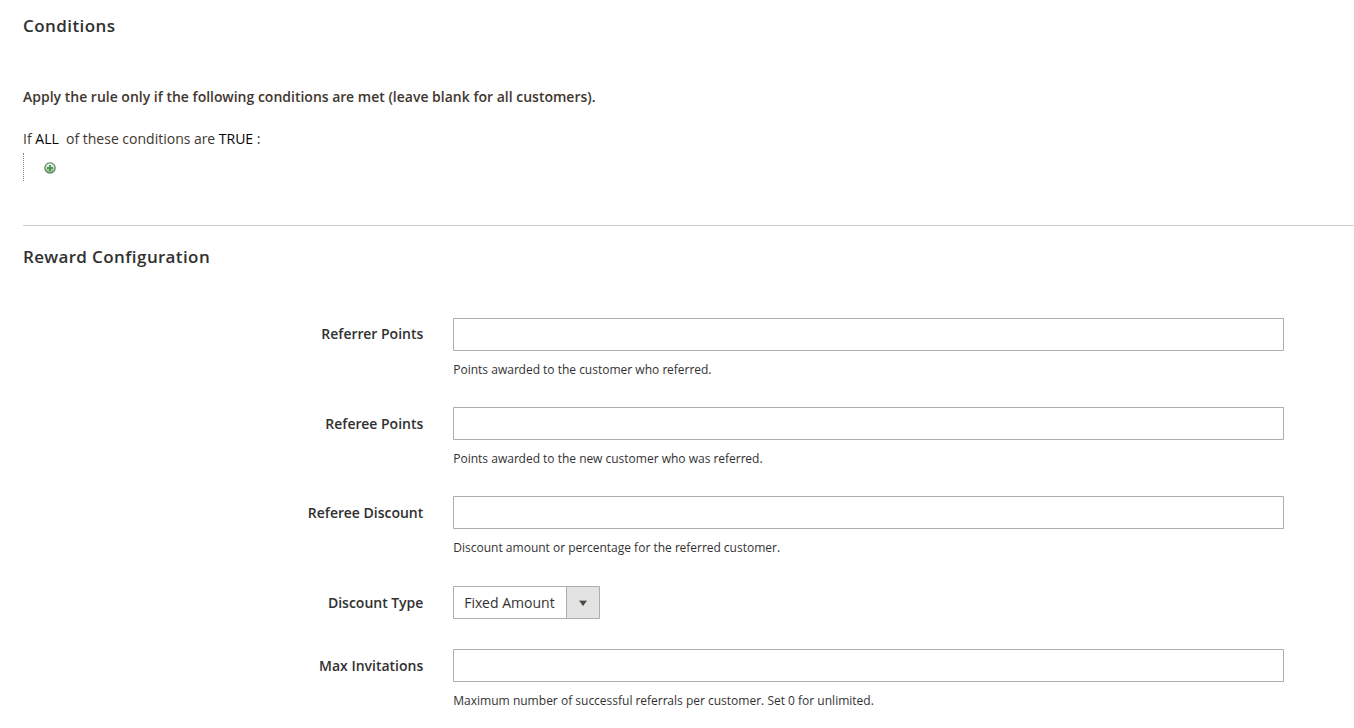
Conditions tab:
Define optional conditions that must be met for the referral reward to trigger (e.g., minimum order amount for the referred customer's first order).
Reward Configuration tab:
Referrer Points: Enter the number of reward points awarded to the customer who made the referral (the referrer). These points are earned when the referral conditions are met.
Referee Points: Enter the number of reward points awarded to the new customer who was referred (the referee). These points are given as a welcome bonus for joining through a referral.
Referee Discount: Enter the discount amount or percentage offered to the referred customer on their first purchase as an incentive.
Discount Type: Select the type of discount offered to the referee. Options:
- Fixed Amount — a fixed dollar amount discount
- Percentage — a percentage discount off the order total
Max Invitations: Set the maximum number of successful referrals a single customer can make. Set 0 for unlimited referrals.
Referral Invitations
Navigate to Marketing > Reward Points > Referral Invitations to view all referral invitations sent by customers. The grid shows the invitation details including the referrer, invited email address, status, and whether the invitation was converted into a registration.
Managing Tiers
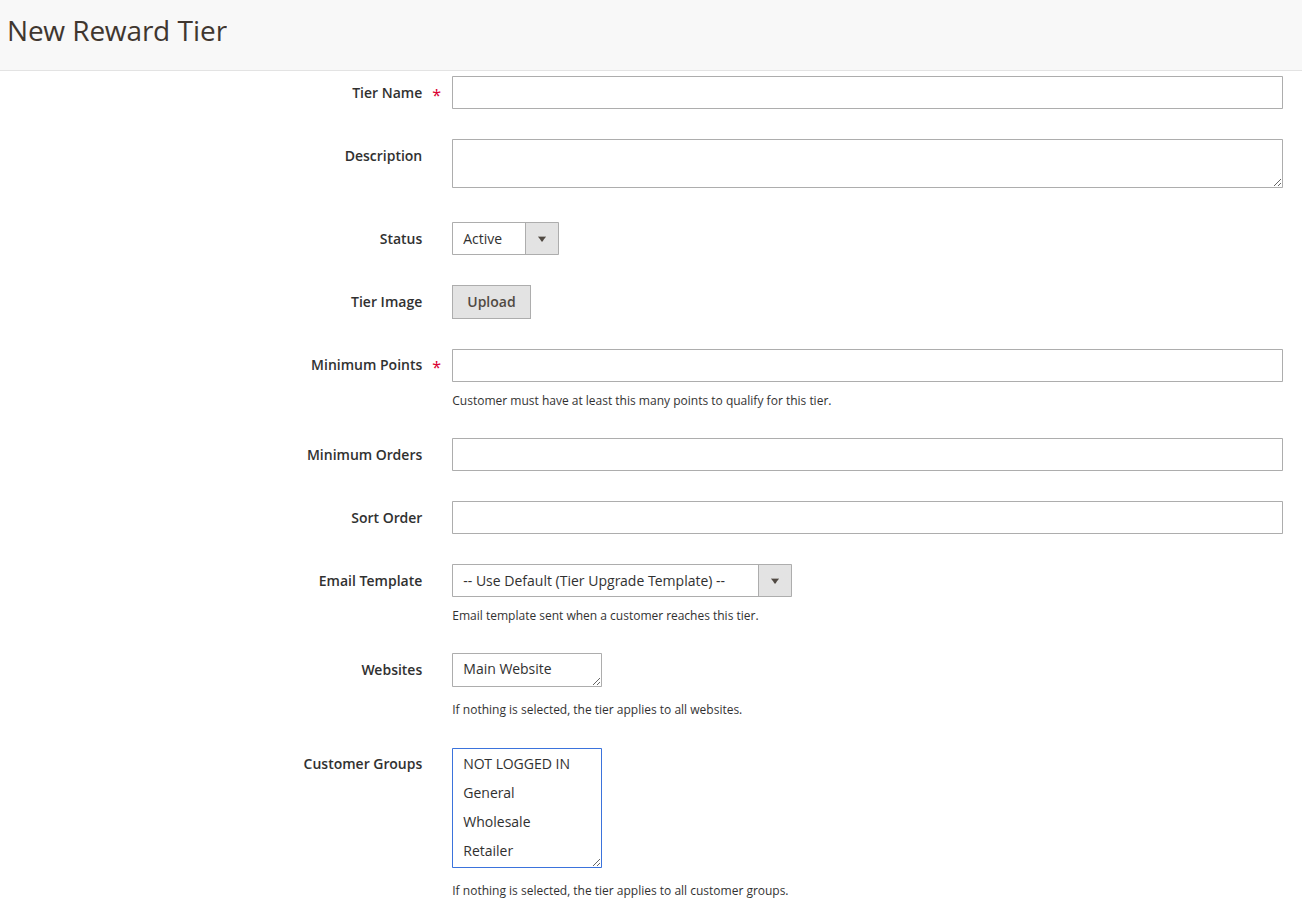
Navigate to Marketing > Reward Points > Tiers to create and manage tier levels for your loyalty program. Click Add New Tier to configure:
General tab:
Tier Name: Enter the name for this tier level (e.g., "Bronze", "Silver", "Gold", "Platinum").
Description: Add an optional description of the tier level and its benefits.
Status: Enable or disable this tier (Active/Inactive).
Tier Image: Upload an image representing this tier level (accepted formats: jpg, jpeg, gif, png, svg; maximum file size: 2MB). This image is displayed on the customer's account page and milestone progress section.
Minimum Points: Enter the minimum points required for a customer to qualify for this tier. The customer must have at least this many points (within the earning period) to be assigned to this tier.
Minimum Orders: Enter the minimum number of orders required for tier qualification. Set 0 for no order requirement.
Sort Order: Set the display order for this tier in listings and progress indicators.
Email Template: Select the email template sent to a customer when they reach this tier.
Websites: Select the store websites where this tier is available. If nothing is selected, the tier applies to all websites.
Customer Groups: Select the customer groups eligible for this tier. If nothing is selected, the tier applies to all customer groups.
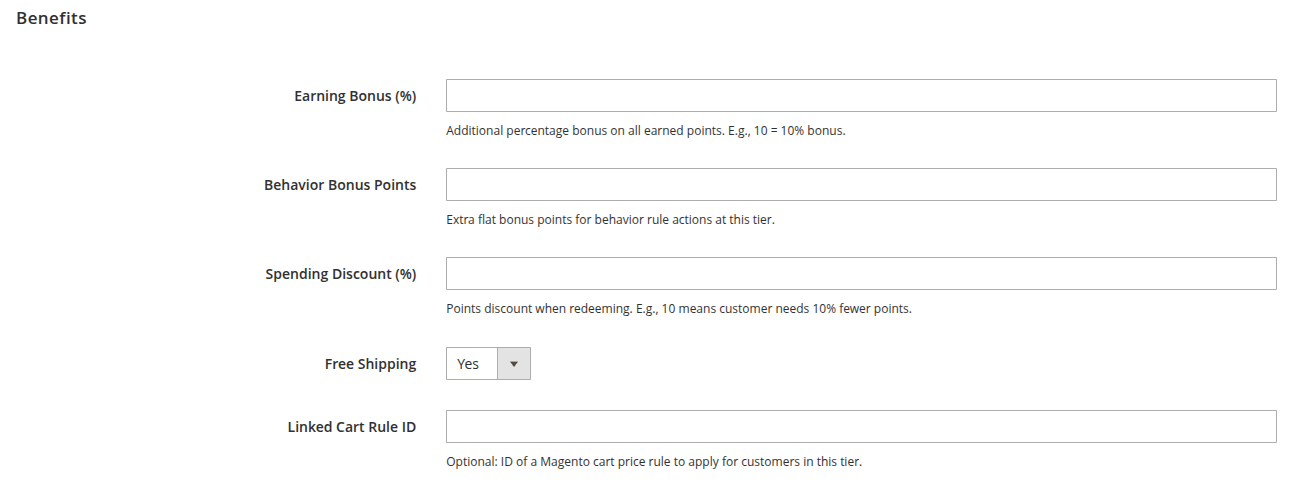
 Benefits tab:
Earning Bonus (%): Enter the additional percentage bonus on all points earned by customers in this tier. For example, entering 10 means customers in this tier earn 10% extra points on all earning activities.
Behavior Bonus Points: Enter the extra flat bonus points awarded for behavior rule actions at this tier level. These extra points are added on top of the regular behavior rule points.
Spending Discount (%): Enter the percentage discount when redeeming points. For example, entering 10 means customers in this tier need 10% fewer points to get the same discount value.
Free Shipping: Set to Yes to offer free shipping to all customers in this tier as a loyalty benefit.
Linked Cart Rule ID: Optionally enter the ID of a Magento cart price rule to automatically apply for customers in this tier. This allows you to chain additional Magento-native promotions with the tier benefit.
 Customers in This Tier tab:
This tab displays a grid showing all customers currently assigned to this tier level, including their names, email addresses, and point balances.
Mass Actions
- Cancel: Cancel selected pending transactions to prevent points from becoming active.
- Force Expire: Immediately expire selected active transactions, removing points from the customer's available balance.
Reports
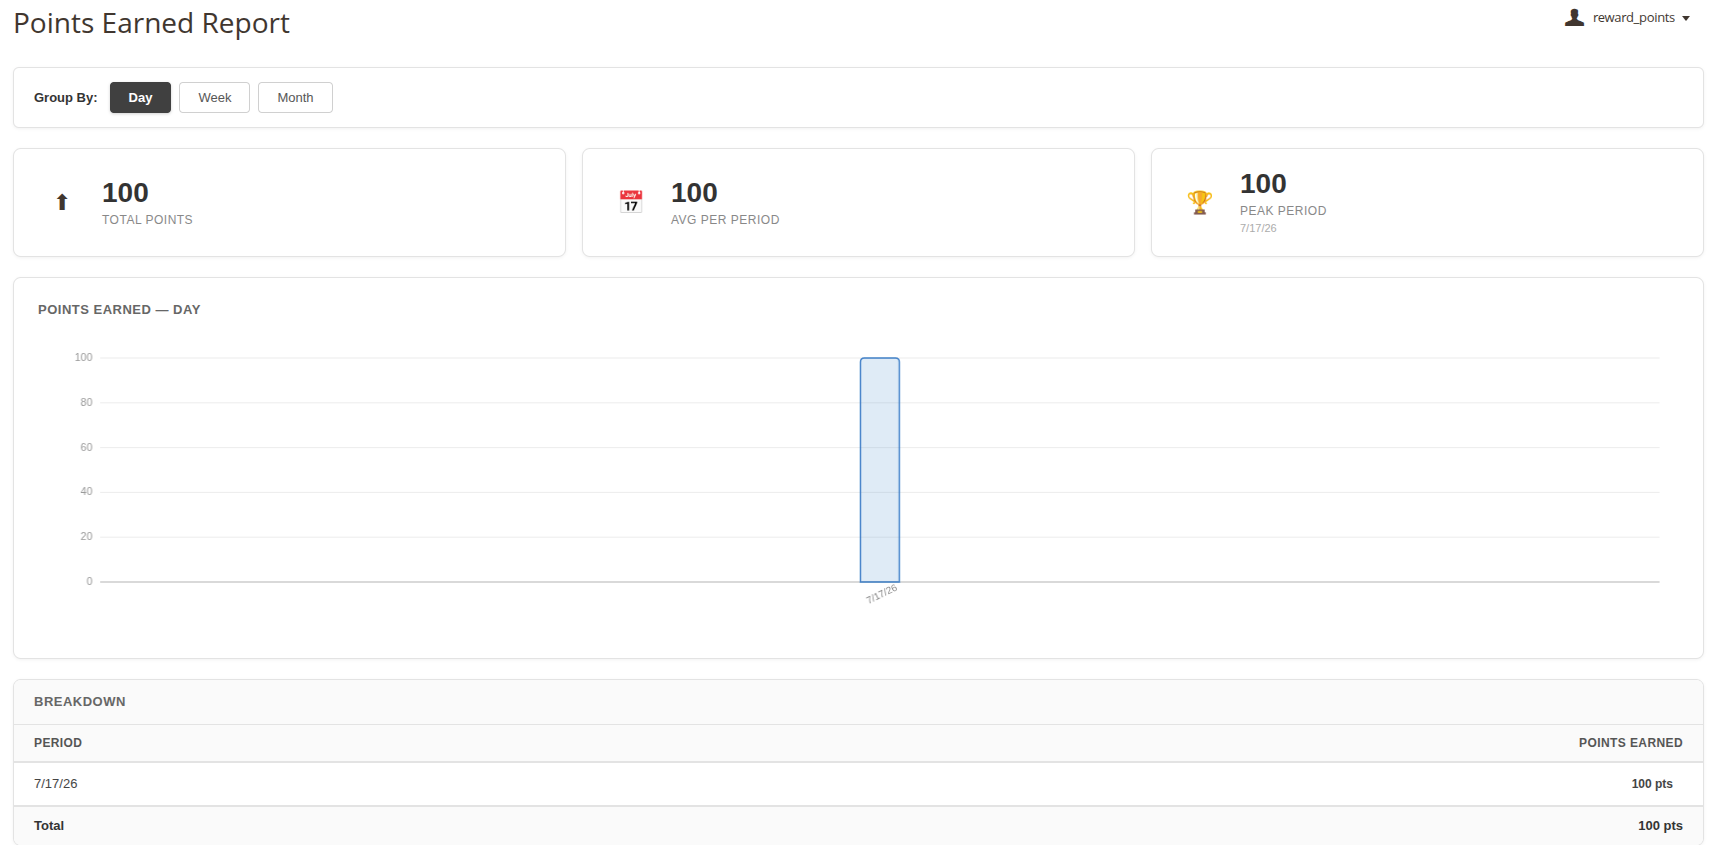
Points Earned Report
Navigate to Marketing > Reports & Data > Points Earned to view a comprehensive report of all points earned across your store. The report allows you to filter by date range, customer group, and website to analyze earning patterns and the effectiveness of your loyalty rules.
Points Spent Report
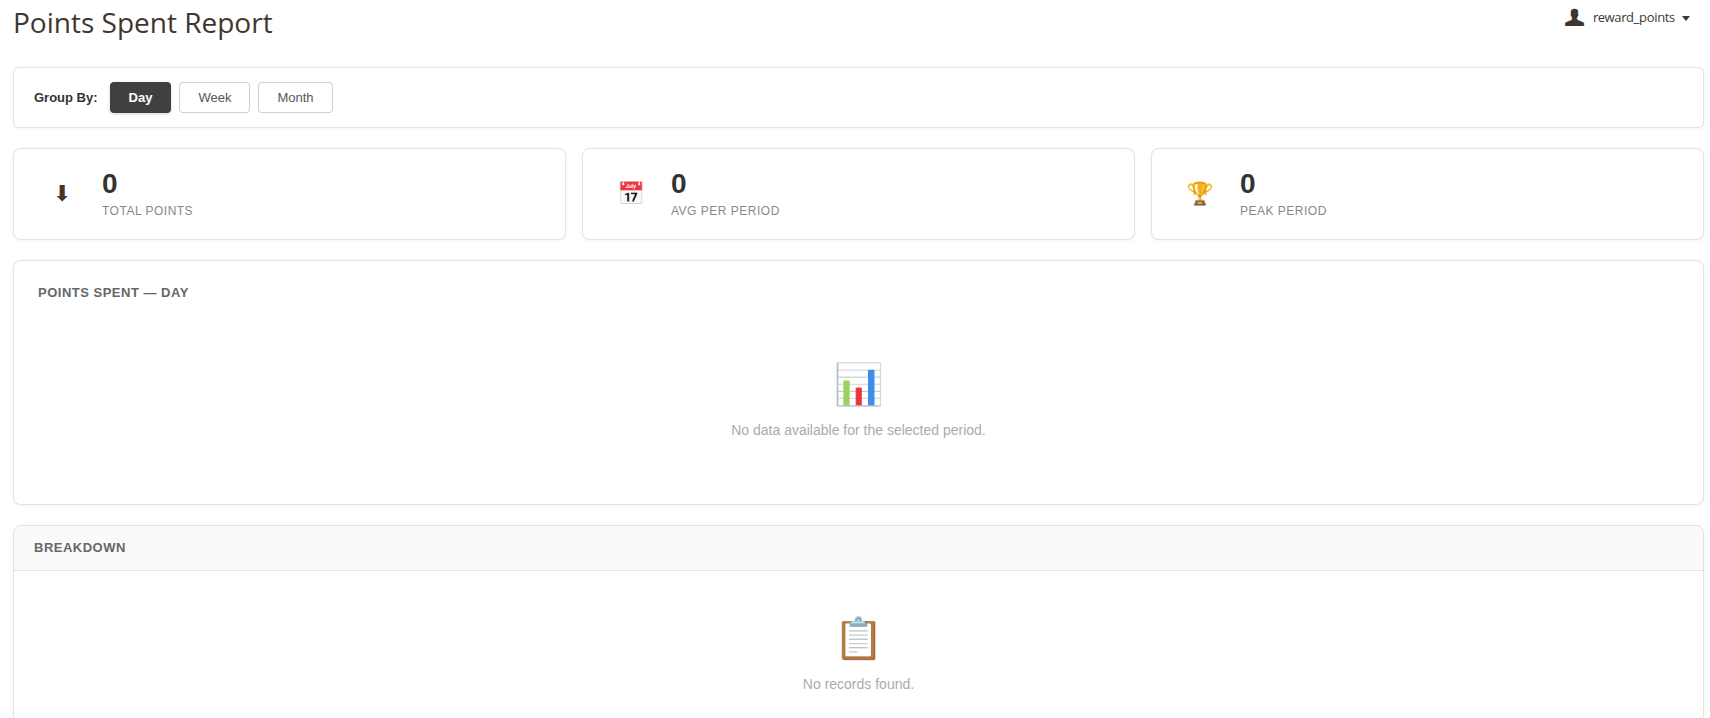
Navigate to Marketing > Reports & Data > Points Spent to view a comprehensive report of all points spent (redeemed) across your store. This report helps you understand redemption behavior and the monetary value of points being used by customers.
Import
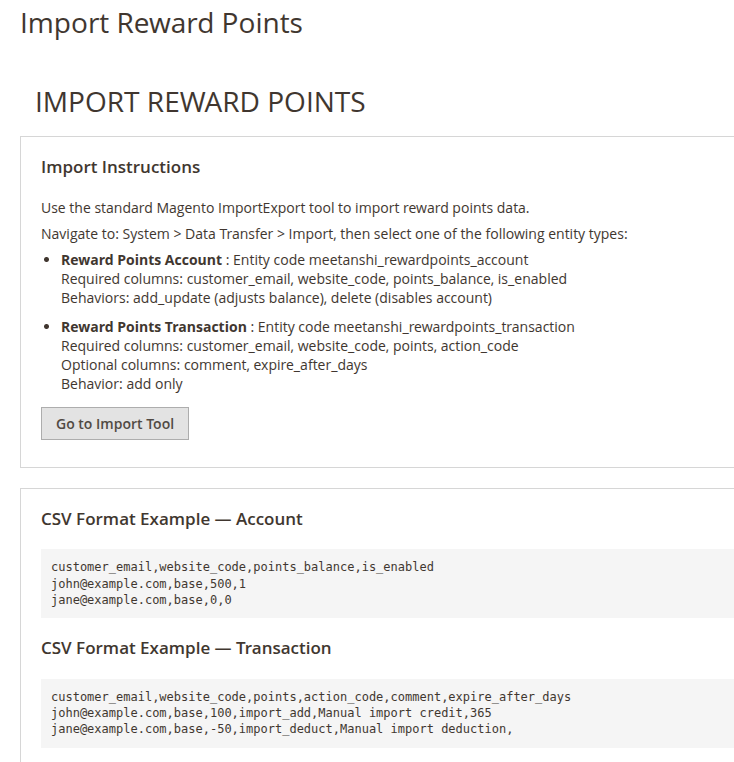
Navigate to Marketing > Reports & Data > Import to bulk import reward points balances. This is useful for:
- Migrating from another loyalty program
- Bulk adjusting customer balances
- Importing promotional point awards for a large group of customers
Prepare a CSV file with customer identifiers and point values, then upload it through the import interface.
Export
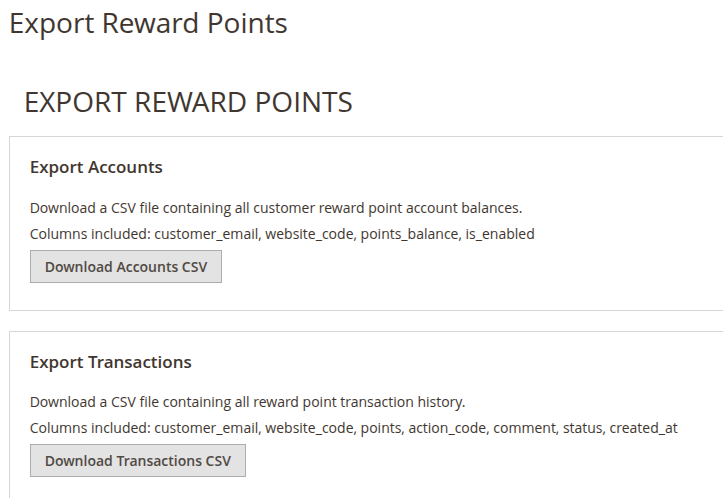
Navigate to Marketing > Reports & Data > Export to export reward points data. You can export customer balances, transaction histories, and other reward points data for reporting, backup, or integration with external systems.
Reward Points Tab in Admin Customer Edit
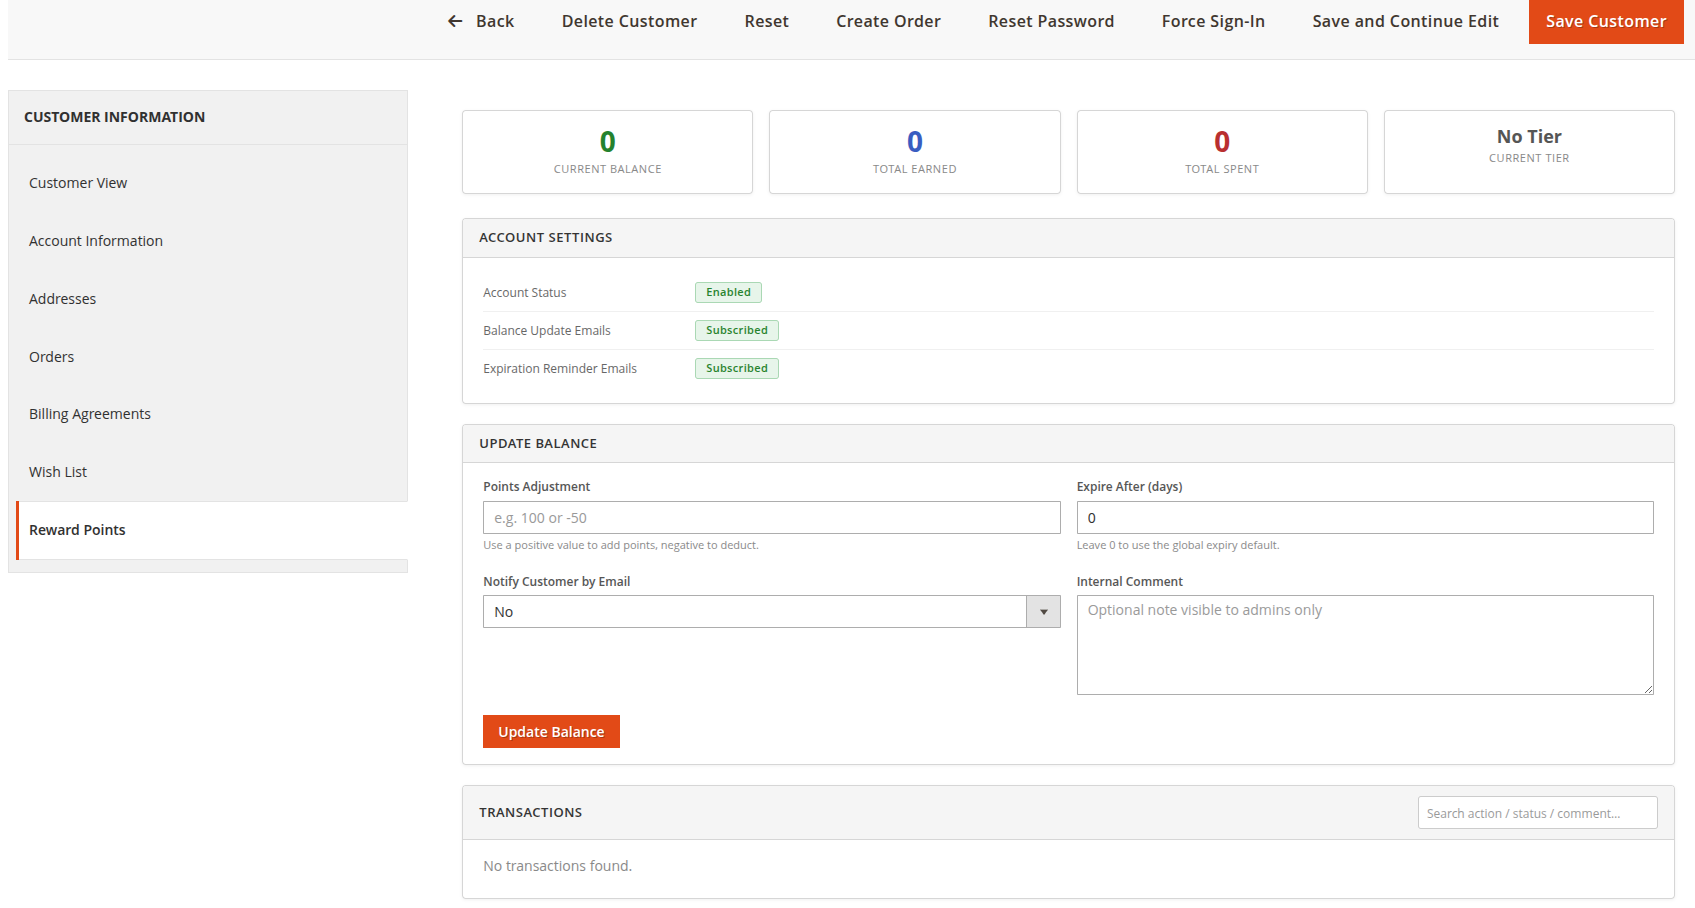
When editing a customer in the admin panel (Customers > All Customers > Edit), a "Reward Points" tab is available showing:
- The customer's current points balance
- Their current tier level
- A grid of all their reward points transactions
- The ability to manually add/deduct points directly from the customer edit page
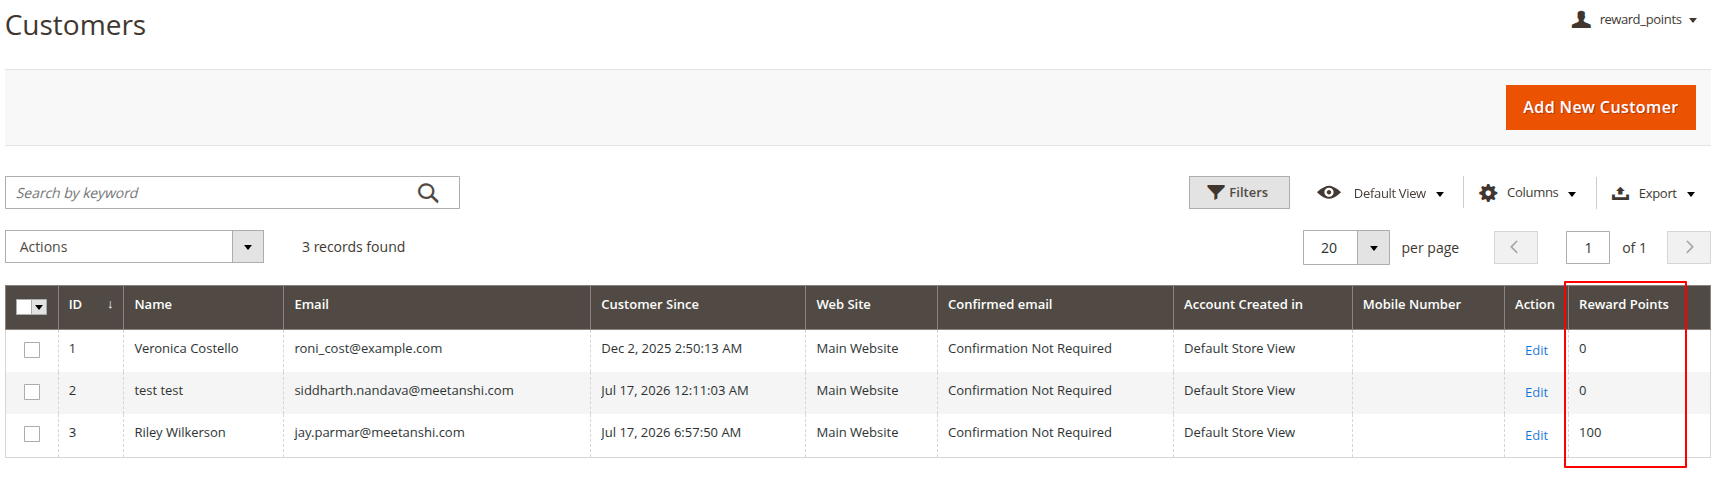
Reward Points Column in Customer Grid
The admin customer grid (Customers > All Customers) includes an additional "Reward Points" column that shows each customer's current points balance, providing quick visibility into loyalty program participation.