Store Locator & Pickup for Magento 2 - User Guide
Extension Installation
For Magento Marketplace Customers
Find the Composer name and version of the extension in the extension's composer.json file.
Login to your SSH and run:
composer require meetanshi/magento-2-store-pickup --ignore-platform-reqs
Enter your authentication keys. Your public key is your username; your private key is your password.
Wait for Composer to finish updating your project dependencies and make sure there aren't any errors.
To verify that the extension installed properly, run the command:
php bin/magento module:status Meetanshi_StorePickup --ignore-platform-reqs
By default, the extension is probably disabled. Enable the extension and clear static view files:
php bin/magento module:enable Meetanshi_StorePickup --clear-static-content
php bin/magento setup:upgrade
php bin/magento setup:static-content:deploy --f
php bin/magento cache:flush
For Meetanshi Customers
Extract the zip folder and upload our extension to the root of your Magento 2 directory via FTP.
Login to your SSH and run below commands step by step:
php bin/magento setup:upgrade
php bin/magento setup:static-content:deploy --f
php bin/magento cache:flush
Configuration
To configure the Store Locator & Pickup for Magento 2 extension, login to Magento 2 admin and move to Store Pickup > Configuration where you can find various settings to control the extension.
Shipping Method Settings
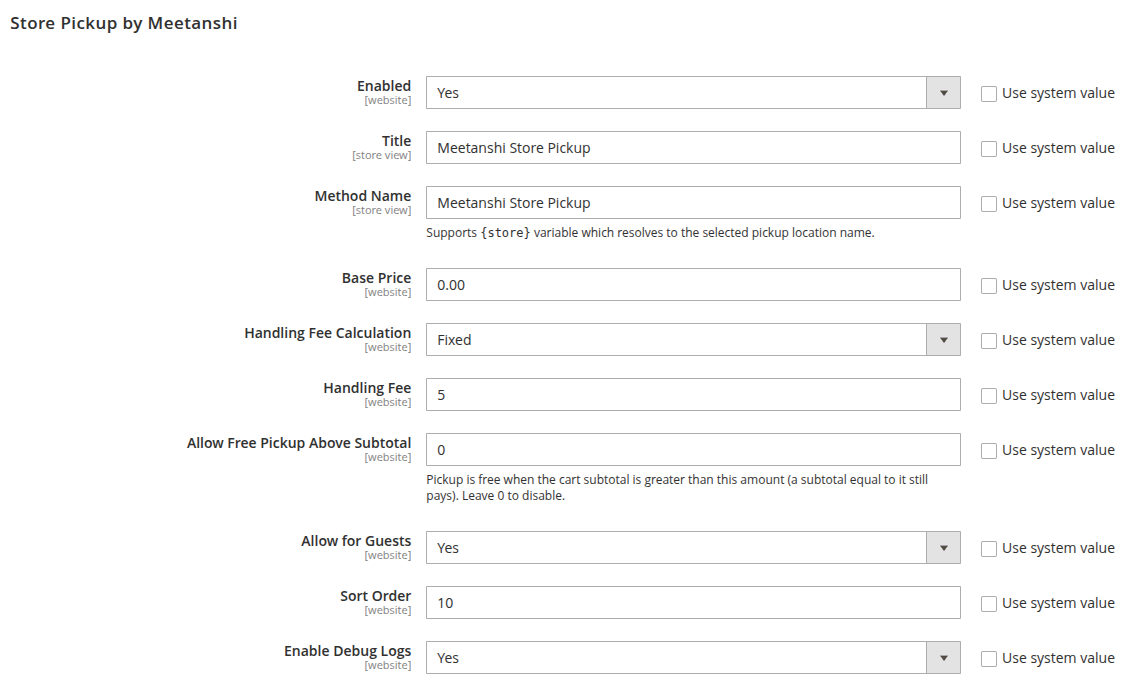
Login to Magento 2 admin and move to Stores > Configuration > Sales > Delivery Methods > Store Pickup by Meetanshi.
Enabled: Set "Yes" to enable the Store Pickup shipping method on the checkout page.
Title: Set the title for the shipping method group to be displayed on the frontend.
Method Name: Set the method name shown next to the price at checkout. Supports the
{store}variable, which resolves to the selected pickup location name.Base Price: Enter the flat fee charged for the pickup method. Set to 0 for free pickup.
Handling Fee Calculation: Choose whether the handling fee is a fixed amount or a percentage of the order subtotal.
Handling Fee: Enter the handling fee value applied on top of the base price.
Allow Free Pickup Above Subtotal: Enter an amount above which pickup becomes free. Leave 0 to disable.
Allow for Guests: Set "Yes" to let guest customers use the store pickup method.
Sort Order: Enter the sort order to control where the pickup method appears among other shipping methods.
Enable Debug Logs: Set "Yes" to log pickup activity for troubleshooting.
Checkout Display Settings
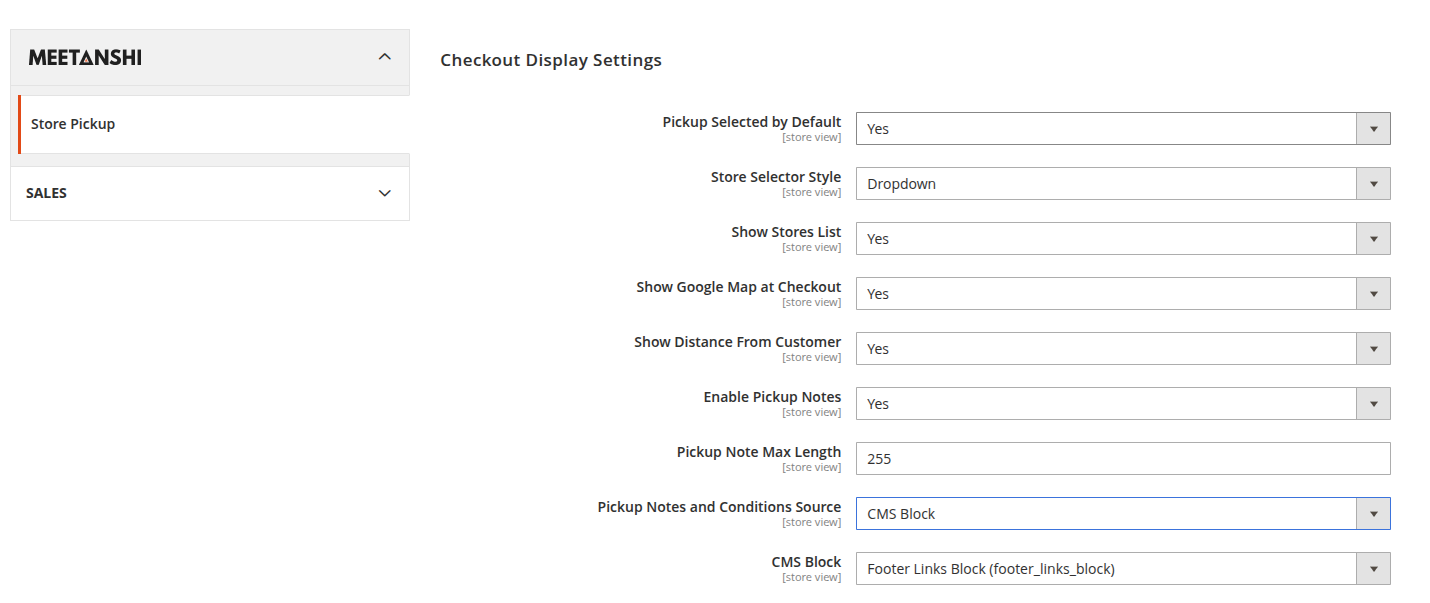
Move to Store Pickup > Configuration > Checkout Display Settings.
Pickup Selected by Default: Set "Yes" to pre-select the pickup option when the checkout loads.
Store Selector Style: Choose how customers select a store at checkout (dropdown, radio list, or popup with map).
Show Stores List: Set "Yes" to display the list of stores along with the dropdown selector.
Show Google Map at Checkout: Set "Yes" to display a Google Map with store locations at checkout.
Show Location Description: Set "Yes" to show each location's description in the radio-list selector.
Show Distance From Customer: Set "Yes" to display how far each store is from the customer.
Enable Pickup Notes: Set "Yes" to let customers add a note for store staff during checkout.
Pickup Note Max Length: Enter the maximum number of characters allowed in the pickup note.
Pickup Notes and Conditions Source: Choose the source of the pickup terms/conditions content (custom text or a CMS block).
Custom Content: Enter the custom pickup conditions text shown at checkout.
CMS Block: Select the CMS block to display as pickup conditions at checkout.
Product Page Settings
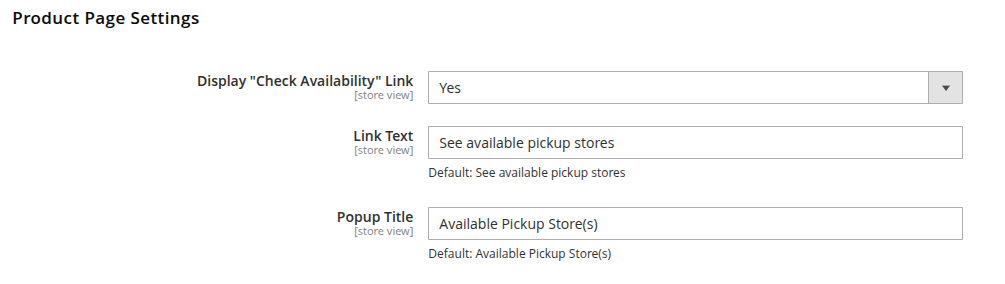
Move to Store Pickup > Configuration > Product Page Settings.
Display "Check Availability" Link: Set "Yes" to show a link on the product page that lists stores where the product is available for pickup.
Link Text: Enter the text for the availability link (default: See available pickup stores).
Popup Title: Enter the title of the popup that lists available pickup stores (default: Available Pickup Store(s)).
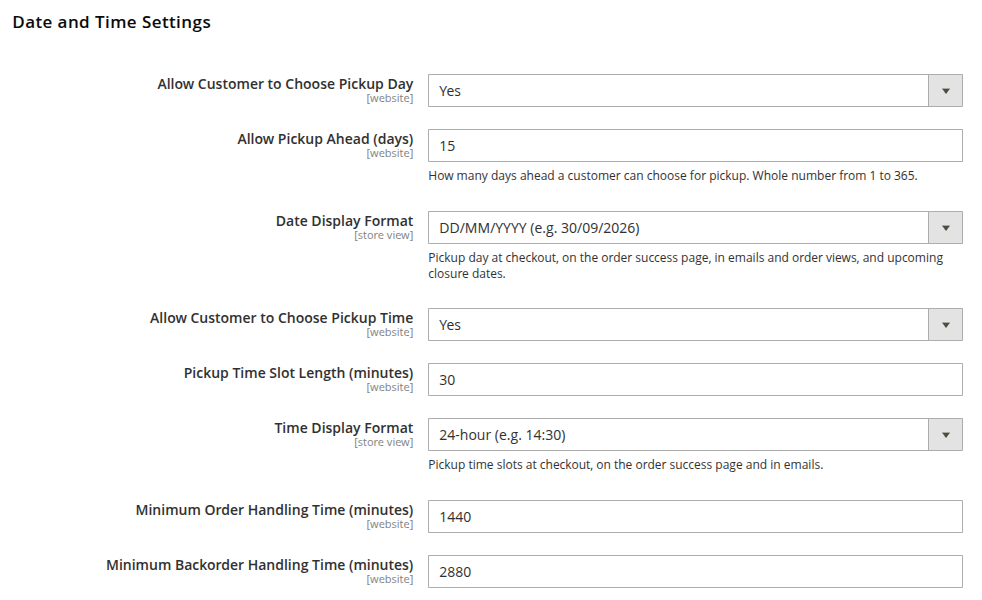
Date and Time Settings
Move to Store Pickup > Configuration > Date and Time Settings.
Allow Customer to Choose Pickup Day: Set "Yes" to show a date picker so customers can select their pickup day.
Allow Pickup Ahead (days): Enter how many days ahead a customer can book a pickup (whole number from 1 to 365).
Date Display Format: Select the date format used at checkout, on the success page, in emails, and in order views.
Allow Customer to Choose Pickup Time: Set "Yes" to show time slots so customers can select their pickup time.
Pickup Time Slot Length (minutes): Enter the duration of each pickup time slot (e.g., 30 minutes).
Time Display Format: Select the time format used for pickup slots at checkout, on the success page, and in emails.
Minimum Order Handling Time (minutes): Enter how soon after ordering the first pickup slot becomes available.
Minimum Backorder Handling Time (minutes): Enter extra delay before pickup for orders containing backordered items.
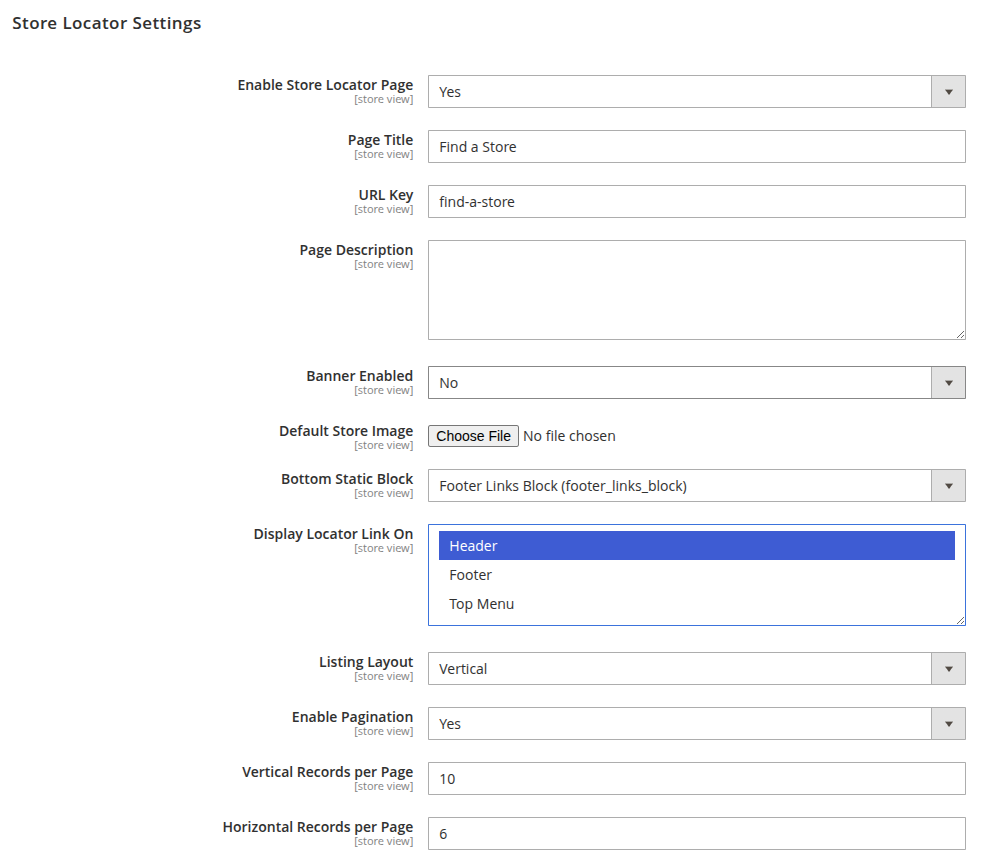
Store Locator Settings
Move to Store Pickup > Configuration > Store Locator Settings.
Enable Store Locator Page: Set "Yes" to enable the public store locator page on the frontend.
Page Title: Enter the heading shown on the store locator page.
URL Key: Enter the URL identifier for the store locator page (e.g., find-a-store).
Page Description: Enter the descriptive text shown on the store locator page.
Banner Enabled: Set "Yes" to display a banner image on the store locator page.
Banner Image: Upload the banner image shown at the top of the store locator page.
Default Store Image: Upload a fallback image used for stores that have no image of their own.
Bottom Static Block: Select a CMS block to display at the bottom of the store locator page.
Display Locator Link On: Choose where the store locator link appears (e.g., header, footer).
Listing Layout: Choose the layout of the store listing on the locator page.
Enable Pagination: Set "Yes" to split the store listing into pages.
Vertical Records per Page: Enter the number of stores shown per page in the vertical layout.
Horizontal Records per Page: Enter the number of stores shown per page in the horizontal layout.
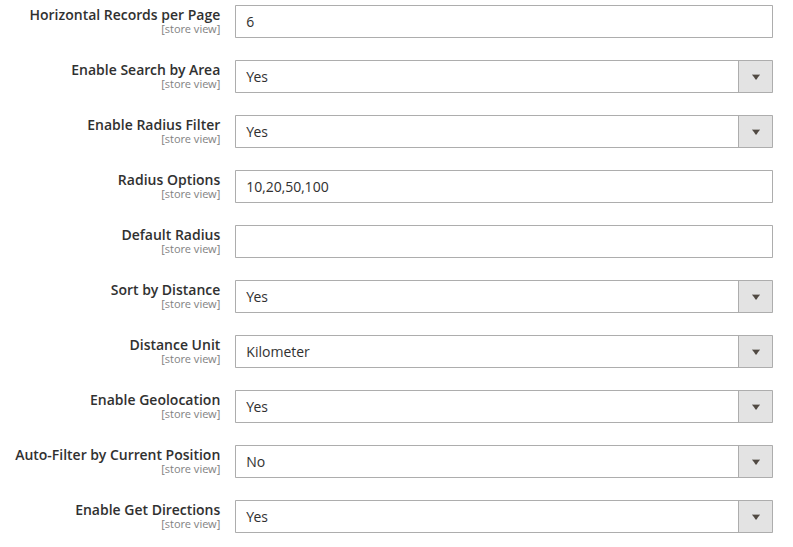
Enable Search by Area: Set "Yes" to let customers search stores by area, city, or postcode.
Enable Radius Filter: Set "Yes" to let customers filter stores within a chosen distance.
Radius Options: Enter the list of selectable radius values offered to customers.
Default Radius: Enter the radius pre-selected when the locator page loads.
Sort by Distance: Set "Yes" to show the nearest stores first.
Distance Unit: Choose the unit used for distance (kilometers or miles).
Enable Geolocation: Set "Yes" to detect the customer's current location in the browser.
Auto-Filter by Current Position: Set "Yes" to automatically filter stores by the customer's detected position.
Enable Get Directions: Set "Yes" to show a "Get Directions" link for each store.
Show Travel Duration: Set "Yes" to display the estimated travel time to each store.
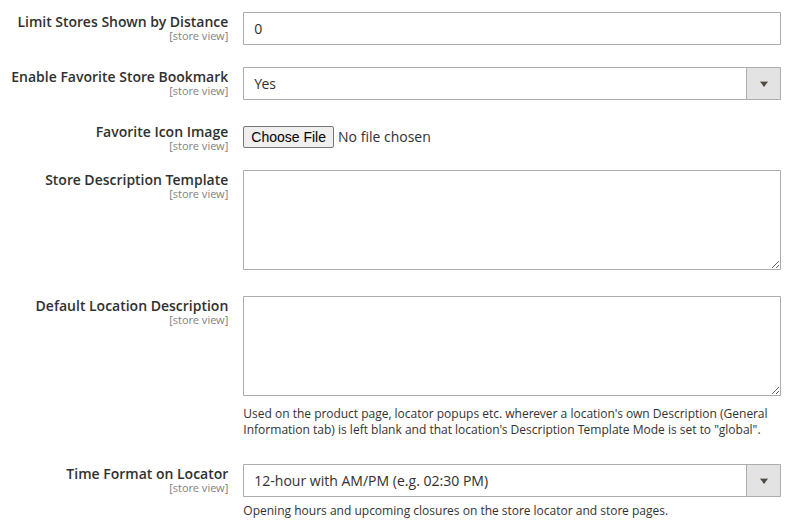
Limit Stores Shown by Distance: Enter the maximum distance beyond which stores are hidden from the listing.
Enable Favorite Store Bookmark: Set "Yes" to let logged-in customers bookmark favorite stores.
Favorite Icon Image: Upload the icon used for the favorite/bookmark button.
Store Description Template: Enter a reusable template used to build store descriptions on the locator.
Default Location Description: Enter a description used wherever a location's own description is left blank.
Time Format on Locator: Select the time format for opening hours and closures on the locator and store pages.
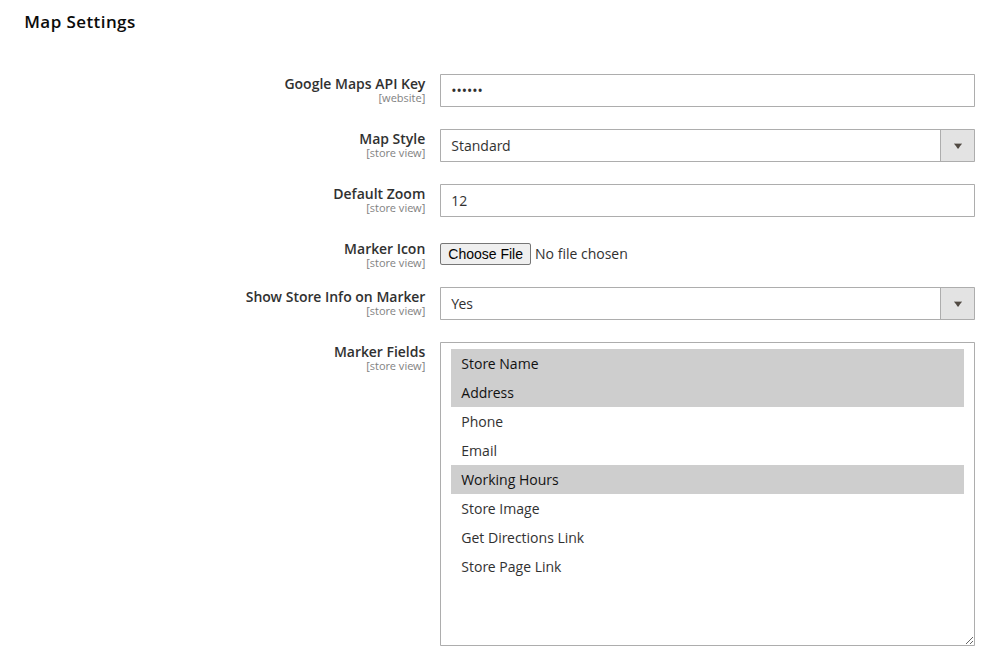
Map Settings
Move to Store Pickup > Configuration > Map Settings.
Google Maps API Key: Enter your Google Maps API key, required for maps to render on the frontend.
Map Style: Choose the visual style of the map (Standard, Silver, Retro, Night, or Custom).
Custom Style JSON: Enter custom Google Maps styling in JSON format when Map Style is set to Custom.
Default Zoom: Enter the initial zoom level of the map (1 = world, higher = closer).
Marker Icon: Upload a custom pin image used for store markers on the map.
Show Store Info on Marker: Set "Yes" to show a store info popup when a marker is clicked.
Marker Fields: Select which store details appear in the marker popup (name, address, phone, email, hours, image, directions, store page).
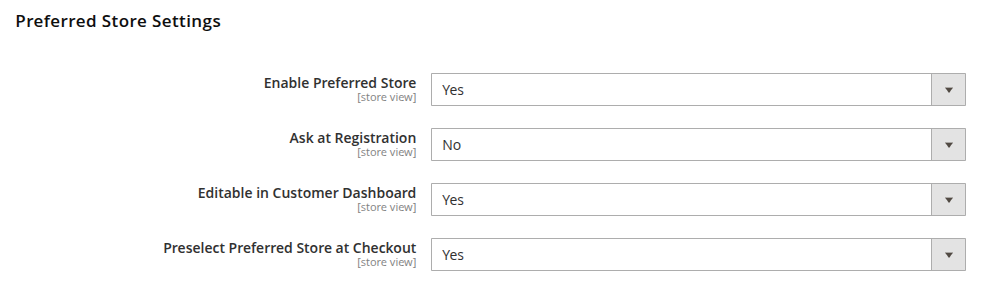
Preferred Store Settings
Move to Store Pickup > Configuration > Preferred Store Settings.
Enable Preferred Store: Set "Yes" to let customers set a default preferred store.
Ask at Registration: Set "Yes" to show a store selector on the account registration form.
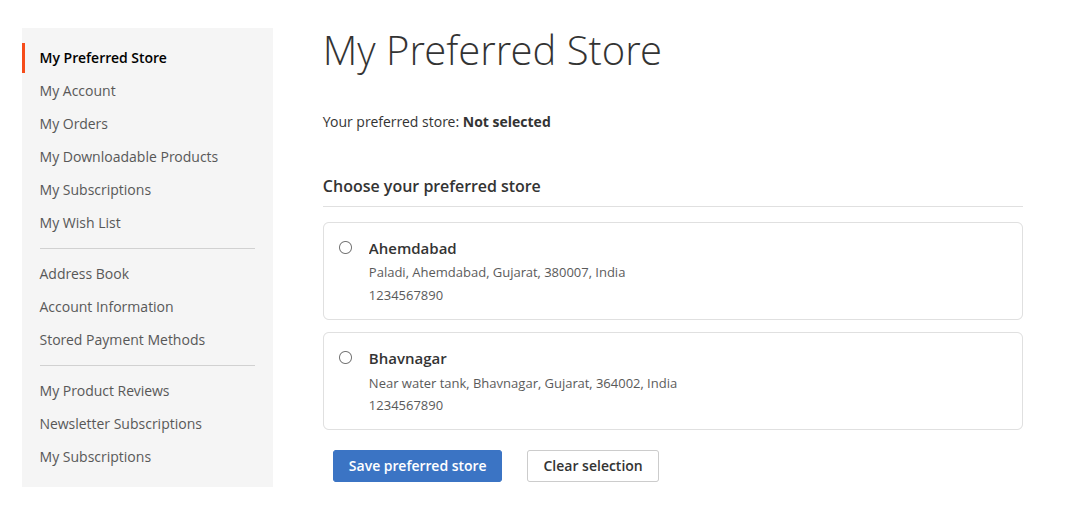
Editable in Customer Dashboard: Set "Yes" to let customers manage their preferred store from the My Account section.
Preselect Preferred Store at Checkout: Set "Yes" to automatically select the customer's preferred store at checkout.
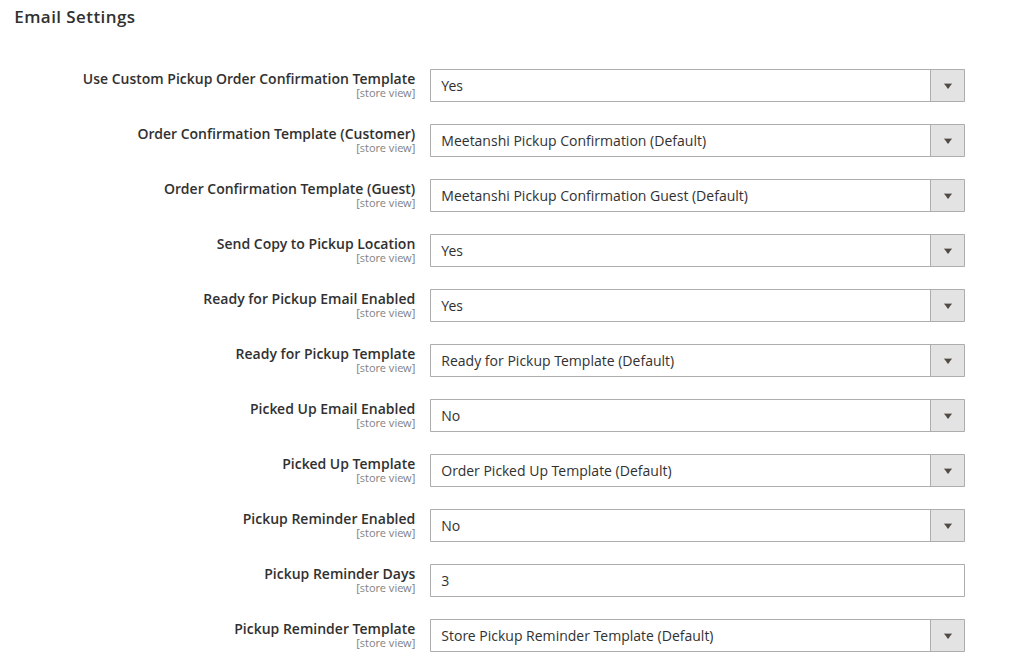
Email Settings
Move to Store Pickup > Configuration > Email Settings.
Use Custom Pickup Order Confirmation Template: Set "Yes" to send a pickup-specific order confirmation email with store details.
Order Confirmation Template (Customer): Select the email template used for registered customers' pickup order confirmation.
Order Confirmation Template (Guest): Select the email template used for guest customers' pickup order confirmation.
Send Copy to Pickup Location: Set "Yes" to also send the confirmation email to the pickup location's email address.
Ready for Pickup Email Enabled: Set "Yes" to email the customer when the order is marked "Ready for Pickup".
Ready for Pickup Template: Select the email template used for the "Ready for Pickup" notification.
Picked Up Email Enabled: Set "Yes" to email the customer when the order is marked "Picked Up".
Picked Up Template: Select the email template used for the "Picked Up" notification.
Pickup Reminder Enabled: Set "Yes" to send a reminder email when an order has not been collected.
Pickup Reminder Days: Enter the number of days after which the reminder email is sent.
Pickup Reminder Template: Select the email template used for the pickup reminder.
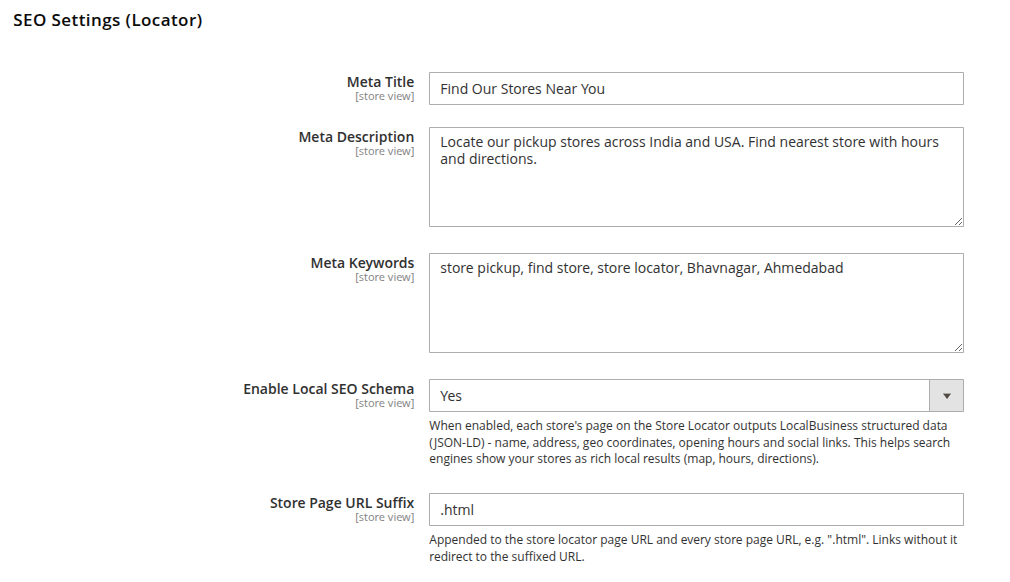
SEO Settings (Locator)
Move to Store Pickup > Configuration > SEO Settings (Locator).
Meta Title: Enter the meta title for the store locator page.
Meta Description: Enter the meta description for the store locator page.
Meta Keywords: Enter the meta keywords for the store locator page.
Enable Local SEO Schema: Set "Yes" to output LocalBusiness structured data (JSON-LD) on each store page for rich local search results.
Store Page URL Suffix: Enter a suffix appended to store locator and store page URLs (e.g., ".html").
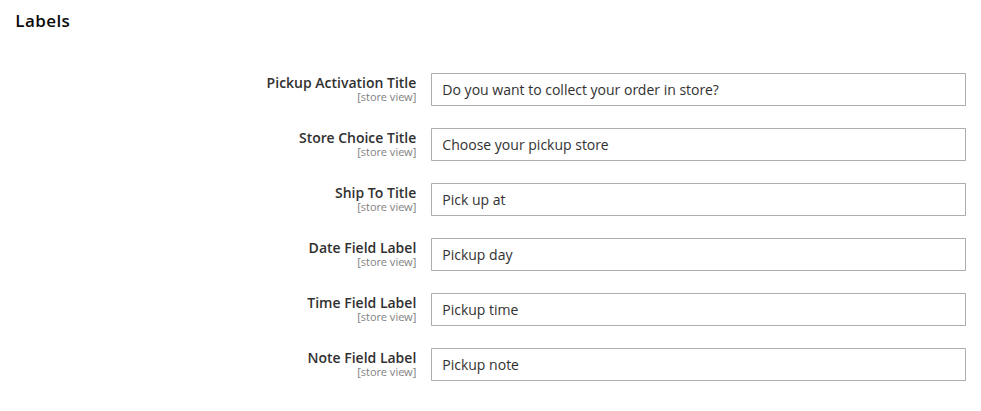
Labels
Move to Store Pickup > Configuration > Labels.
Pickup Activation Title: Enter the heading that asks the customer whether they want to pick up in store.
Store Choice Title: Enter the heading shown above the store selector.
Ship To Title: Enter the label shown before the selected pickup store (e.g., "Pick up at").
Date Field Label: Enter the label for the pickup date field.
Time Field Label: Enter the label for the pickup time field.
Note Field Label: Enter the label for the pickup note field.
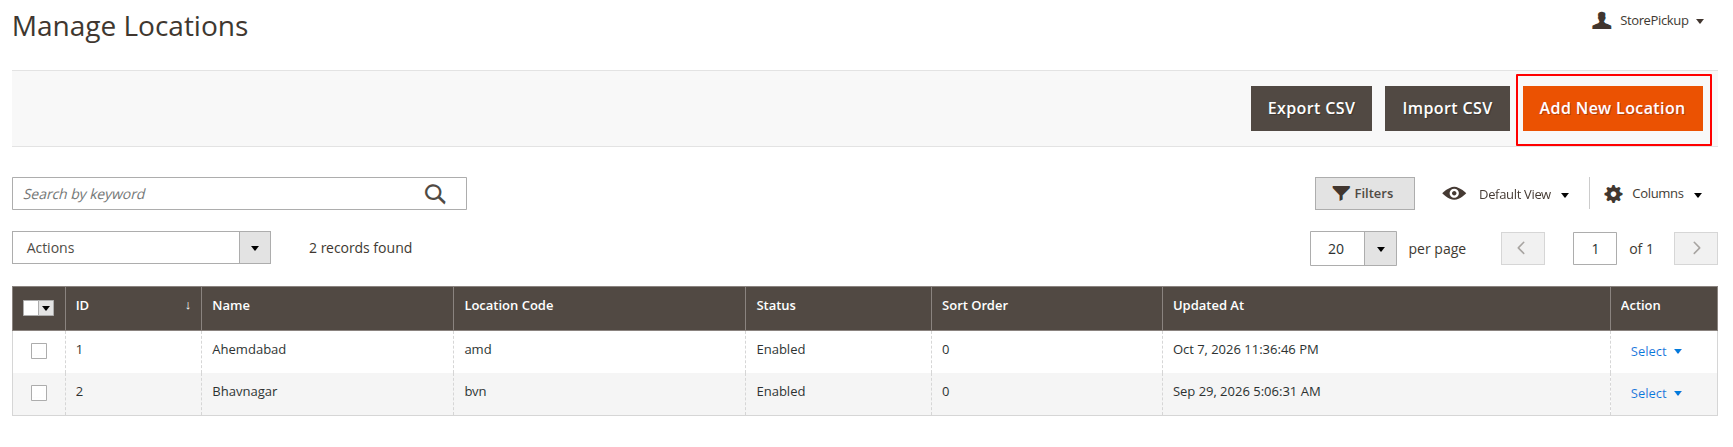
Managing Locations
Login to Magento 2 admin and move to Store Pickup > Manage Locations to add and manage your physical pickup stores. Click Add New Location to create one.
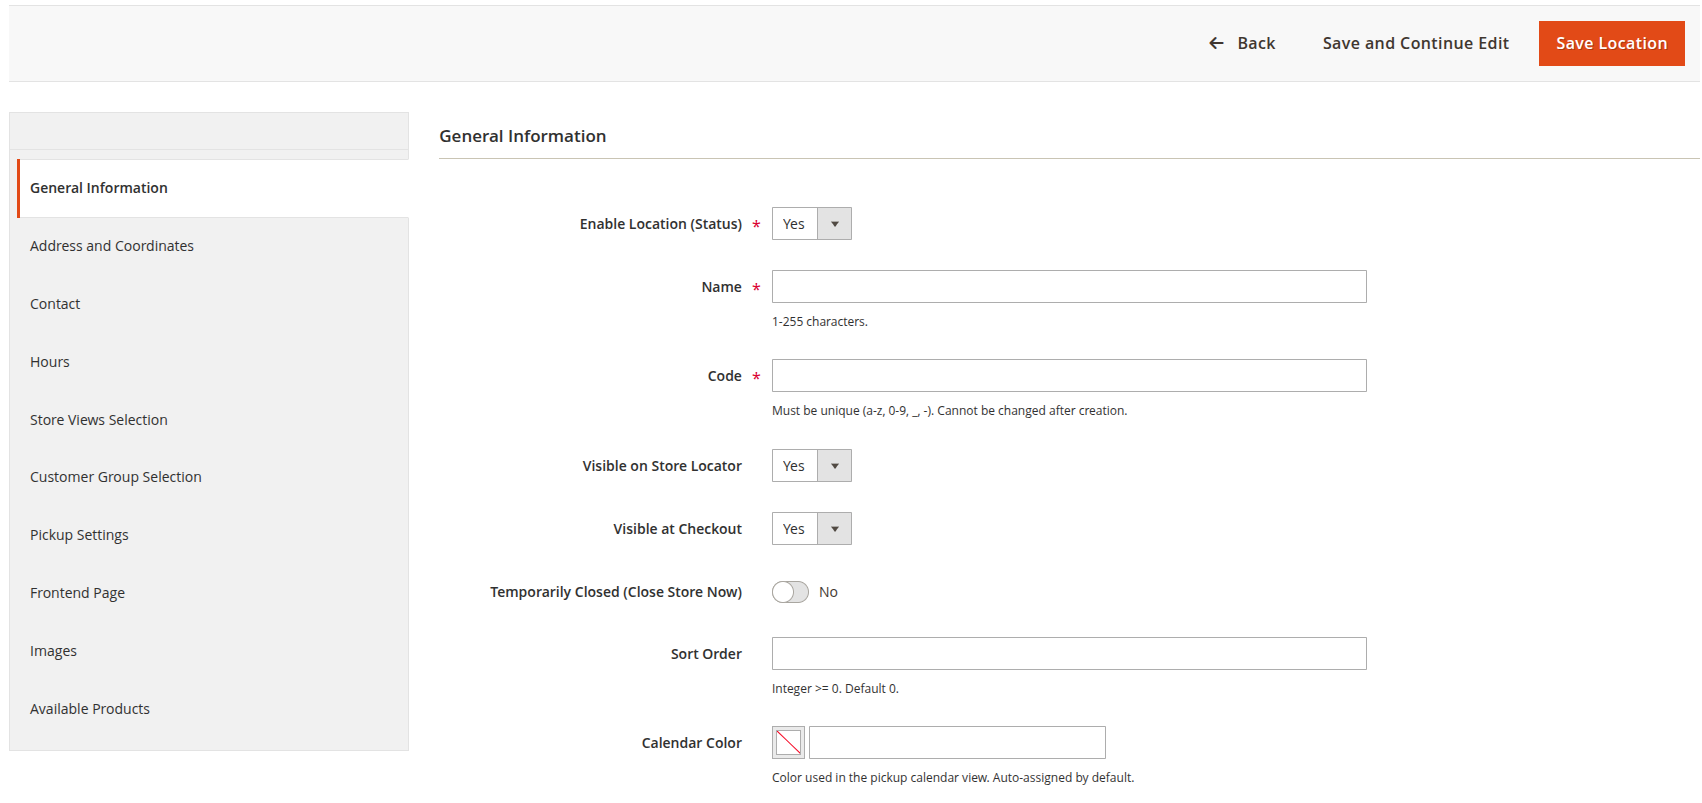
General: Set the name, code, status, temporarily-closed flag, sort order, description, and calendar color for the location.
Address: Enter the full address, GPS coordinates (latitude/longitude), and timezone of the location.
Contact: Enter the phone, email, website, fax, and social links for the location.
Hours: Set opening and closing times per day, break times, days off, and holiday assignments.
Store Views: Choose which store views display this location.
Customer Groups: Choose which customer groups can select this location.
Pickup Settings: Set a per-location fee override, order delay, backorder delay, maximum pickups per slot, and MSI source.
Frontend Page: Set the store detail page content, URL key, and SEO meta tags.
Images: Upload a gallery of photos for the location.
Available Products: Restrict which products can be picked up at this location (or allow all products).
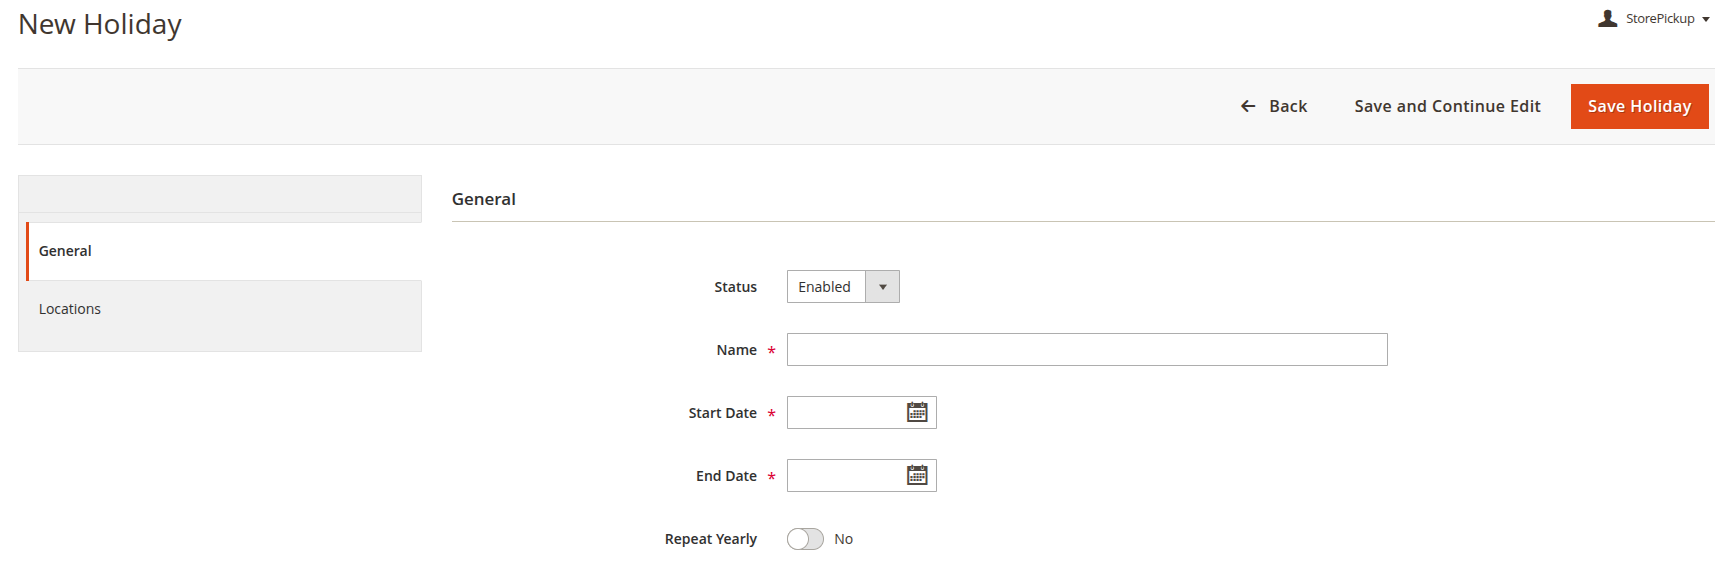
Managing Holidays
Login to Magento 2 admin and move to Store Pickup > Manage Holidays to define closure dates.
Name: Enter a name for the holiday.
Date Range: Set the start and end dates of the closure.
Repeat Yearly: Set "Yes" to repeat the holiday on the same dates every year.
Locations: Assign the locations that are closed during the holiday.
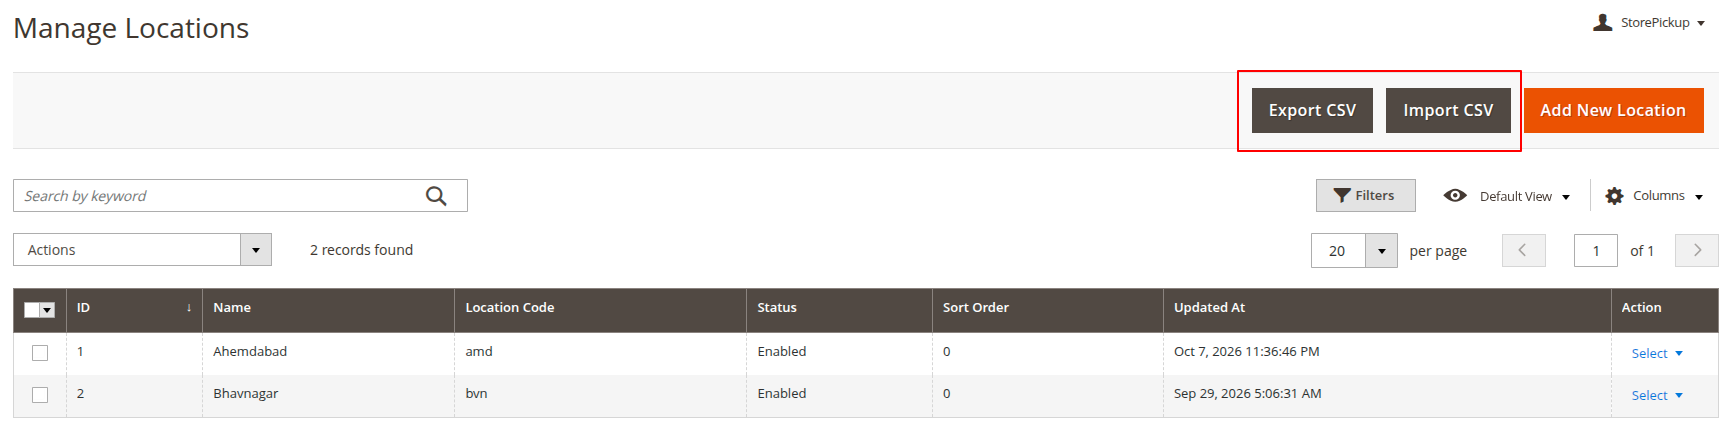
Import / Export Locations
On the Manage Locations grid, use the toolbar buttons to bulk-manage stores.
Export CSV: Download all locations as a CSV file.
Import CSV: Bulk create or update locations by uploading a CSV spreadsheet.
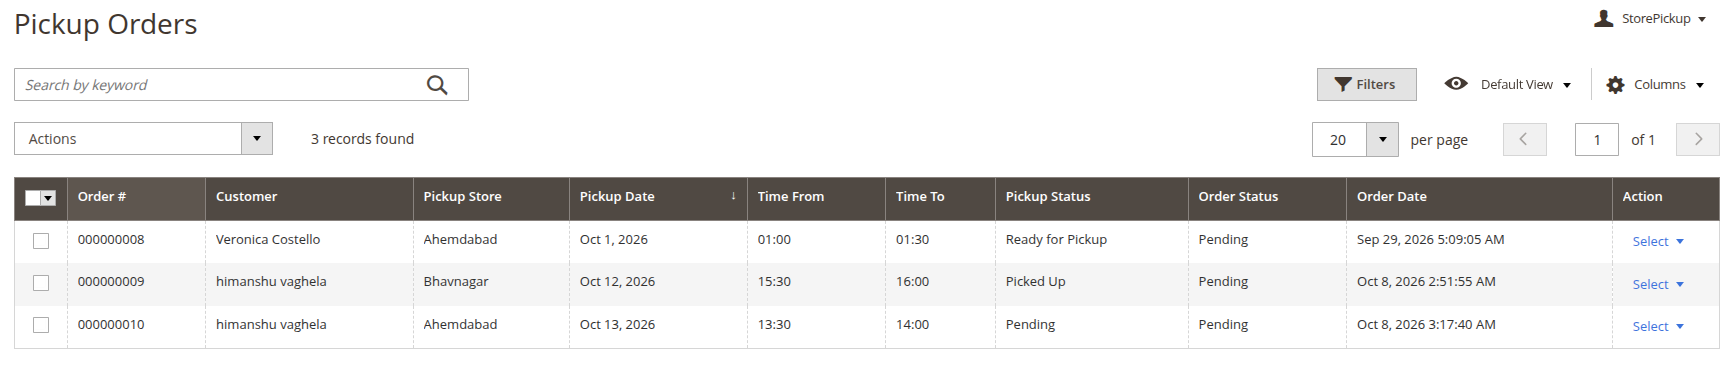
Pickup Orders
Login to Magento 2 admin and move to Store Pickup > Pickup Orders for a dedicated grid of all pickup orders showing the order number, customer, store, date, time, and status.
Mass Actions: Select orders and mark them as Ready, Picked Up, or Expired in bulk.
Status Workflow: Orders move from Pending to Ready for Pickup to Picked Up, or to Expired automatically via cron or manually.
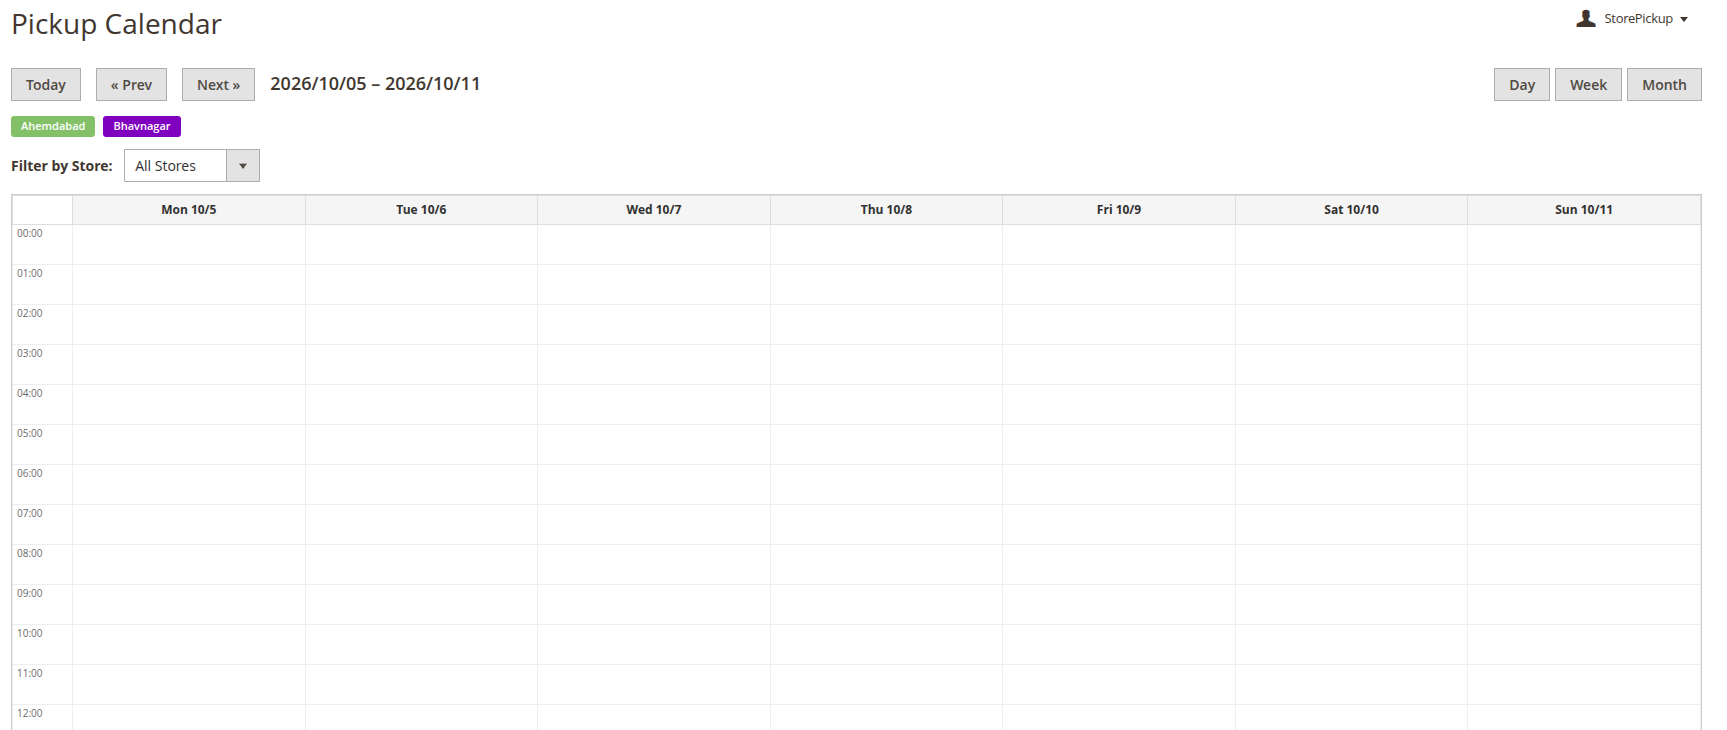
Pickup Calendar
Login to Magento 2 admin and move to Store Pickup > Pickup Calendar for a visual calendar of upcoming pickups, color-coded by location.
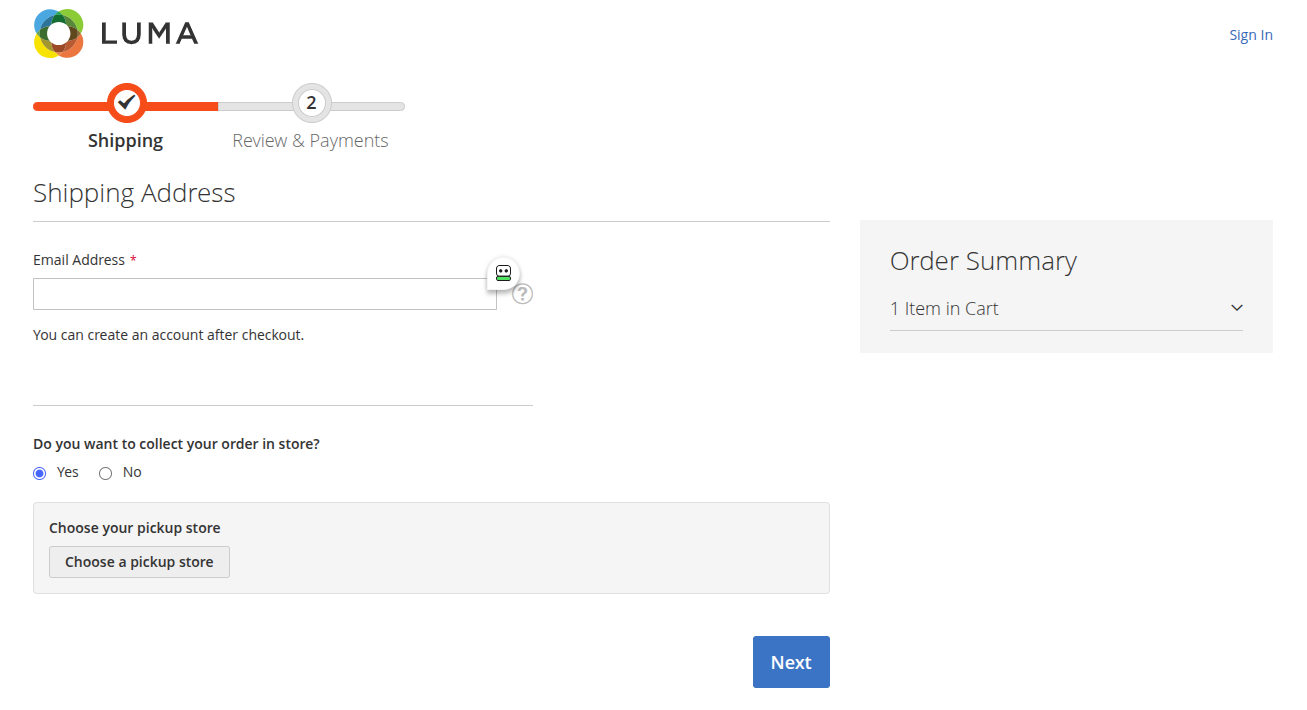
Store Pickup at Checkout - Frontend
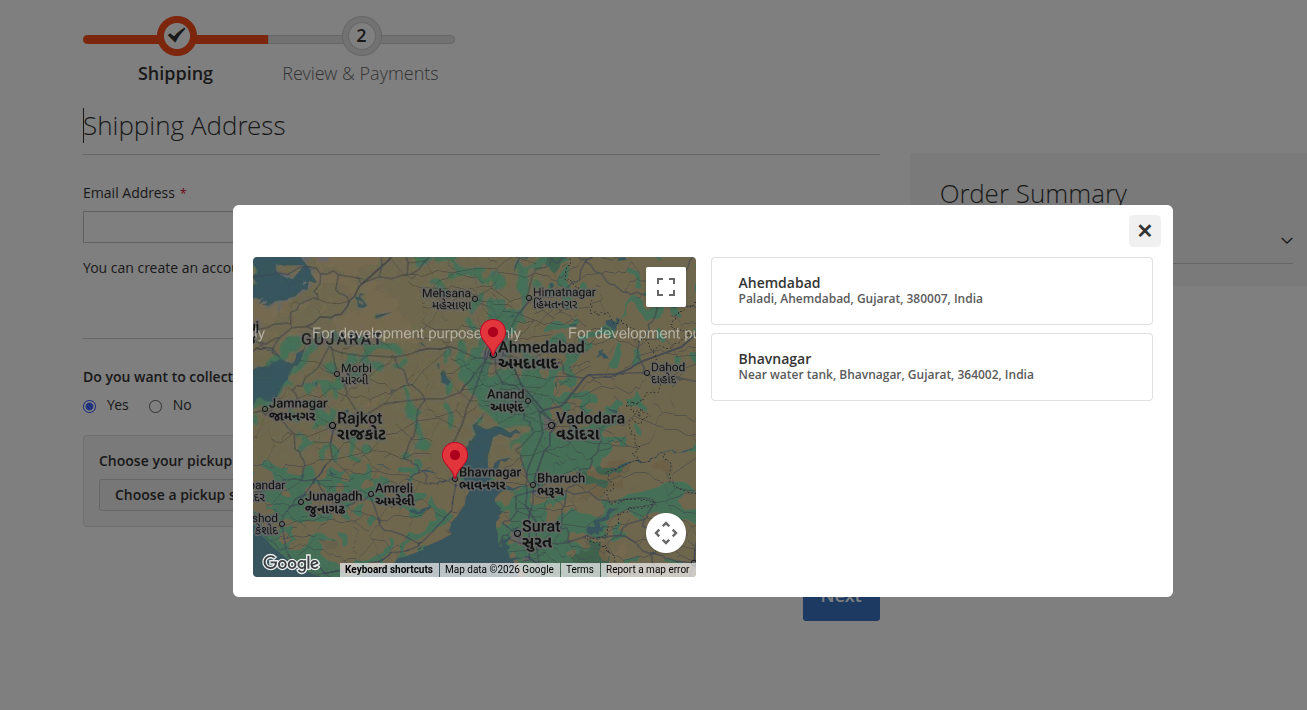
Once configured, when customers add products to the cart and move to the checkout page, the Store Pickup method is shown as a shipping option.
Customers select a store using the configured selector (dropdown, radio list, or popup with map), choose a pickup date and time slot (if enabled), and can add an optional note for store staff. The selected store's address replaces the shipping address automatically.
Store Locator Page - Frontend
The public store locator page (default URL: /find-a-store) lets customers browse all your locations on a Google Map with search, radius filtering, distance sorting, geolocation, directions, favorites, and a "Make this my store" preferred-store option. Each location also has its own detail page with hours, map, directions, and photo gallery.
Pickup Details in Customer's My Account Section
After placing a pickup order, customers can view the pickup store, date, time, and status in their My Account section. If enabled, they can also manage their preferred store from the dashboard.
Pickup Details in Backend
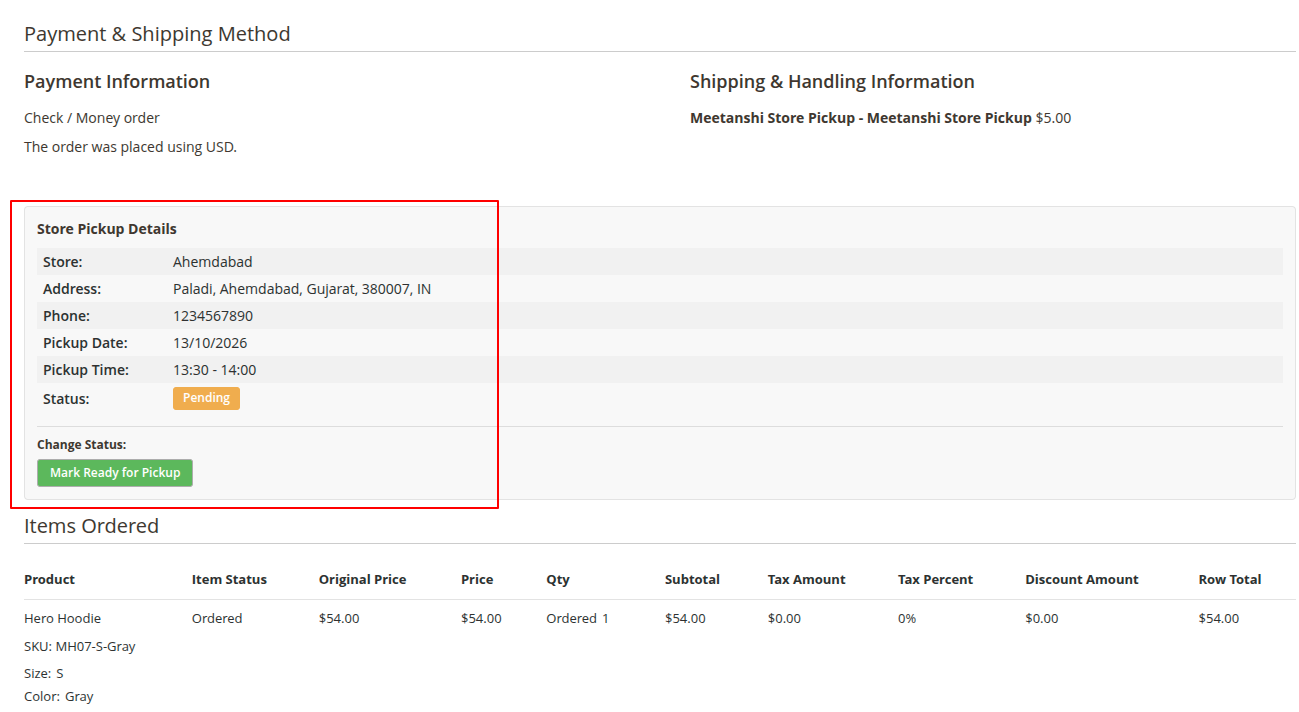
The admin can see pickup details for each order in the backend. Go to Sales > Orders > Order View to see the selected store, pickup date/time, pickup note, and status alongside the order information.