Zoho CRM Integration for Magento 2 - User Guide
Extension Installation
For Magento Marketplace Customers
- Find the Composer name and version of the extension in the extension's composer.json file.
- Login to your SSH and run:
composer require meetanshi/magento-2-zoho-crm-integration --ignore-platform-reqs
- Enter your authentication keys . Your public key is your username; your private key is your password.
- Wait for Composer to finish updating your project dependencies and make sure there aren't any errors.
- To verify that the extension installed properly, run the command:
php bin/magento module:status Meetanshi_Zoho
- By default, the extension is probably disabled.
- Enable the extension and clear static view files:
php bin/magento module:enable Meetanshi_Zoho--clear-static-content
php bin/magento setup:upgrade
- For Magento version 2.0.x to 2.1.x - php bin/magento setup:static-content:deploy
- For Magento version 2.2.x & above - php bin/magento setup:static-content:deploy --f
php bin/magento cache:flush
For Meetanshi Customers
- Extract the zip folder and upload our extension to the root of your Magento 2 directory via FTP.
- Login to your SSH and run below commands step by step:
php bin/magento setup:upgrade
- For Magento version 2.0.x to 2.1.x - php bin/magento setup:static-content:deploy
- For Magento version 2.2.x & above - php bin/magento setup:static-content:deploy --f
php bin/magento cache:flush
Note:
- Make sure to configure the cron job to make the extension work smoothly.
- The extension now uses cURL REST API-based sync instead of the PHP SDK library, making it fully compatible with PHP 8.2, 8.3, and 8.4.
Access Token Generation and Setup
To generate the access token required for the Zoho CRM integration, please follow the steps below:
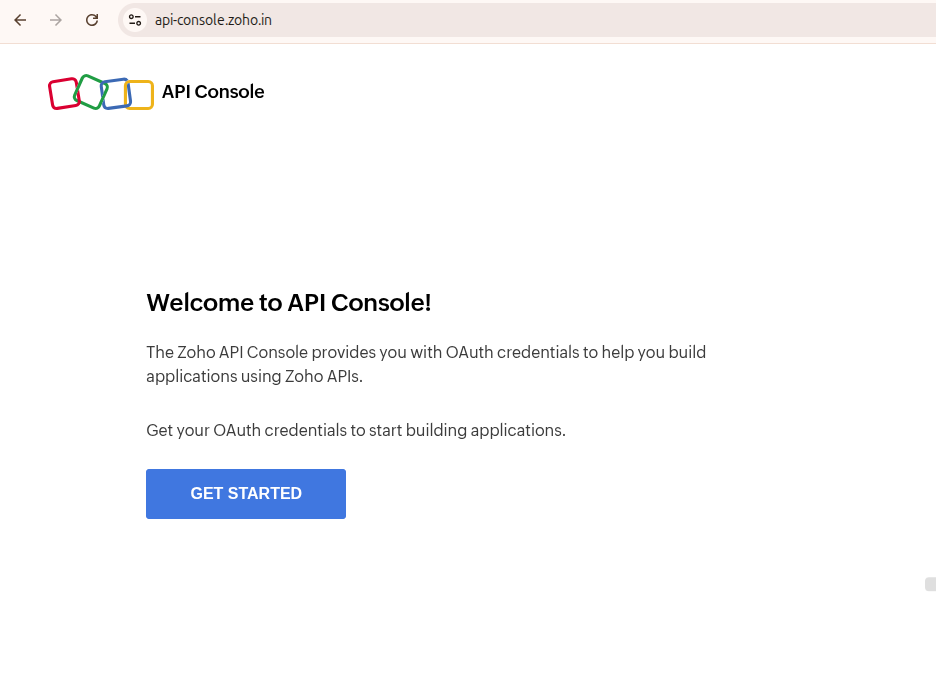
1. Open Zoho API Console
Go to the Zoho API Console and click Get Started.
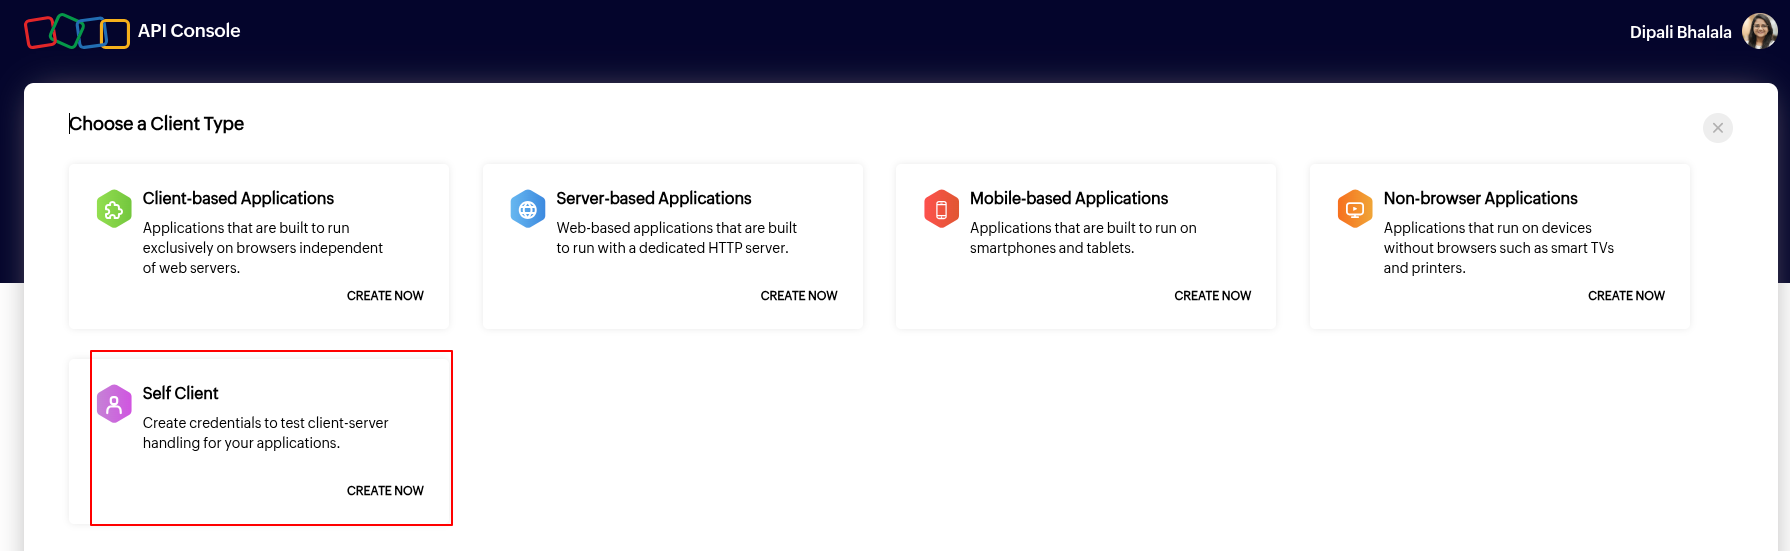
 2. Select the Client Type
Under Choose a Client Type, select Self Client.
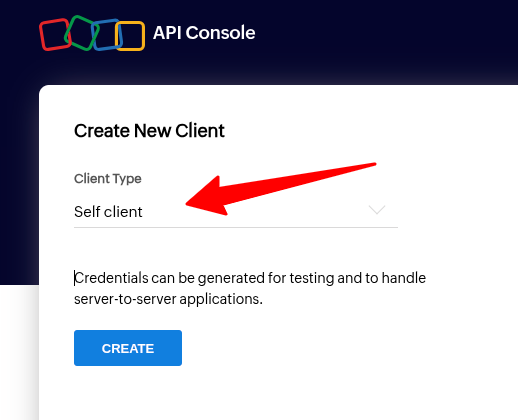
 3. Create a Self Client
Create a new client with the client type set to Self Client.
4. Generate the Authorization Code
Once the Self Client is created, go to Generate Code and enter the following scopes:
- ZohoCRM.modules.ALL,ZohoCRM.settings.ALL,ZohoCRM.org.ALL
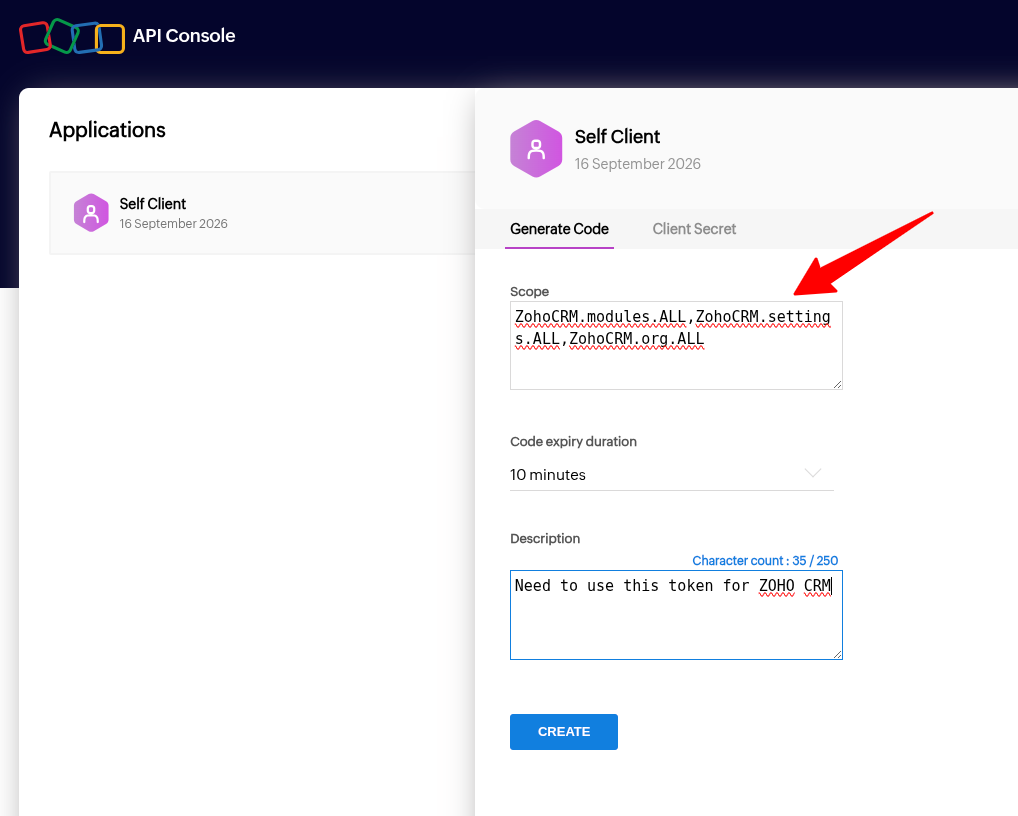
Set the required Code Expiry Duration and enter a suitable Description.
After submitting the details, an Authorization Code will be generated.
Copy this authorization code and paste it into the Magento configuration field named:
Sandbox Auth Code
5. Get the Client ID and Client Secret
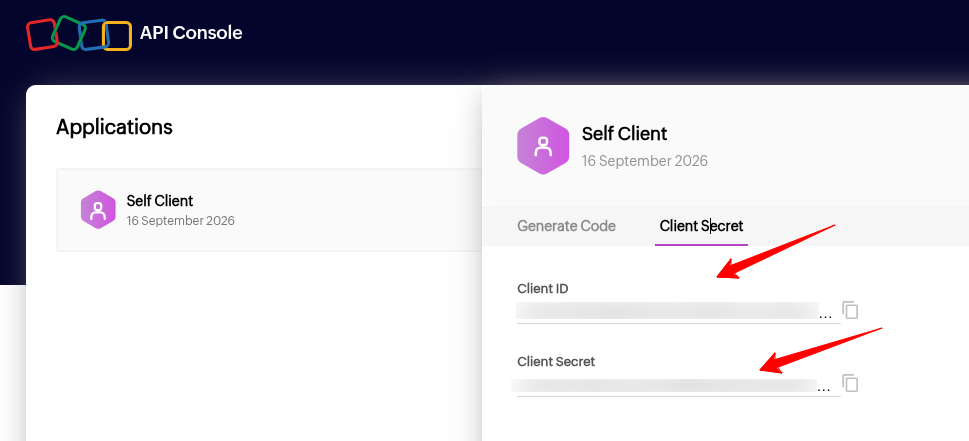
In the Zoho API Console, open the Client Secret tab.
From there, copy the following credentials:
Client ID
Client Secret
These credentials can then be entered into the corresponding fields in the Magento configuration.
Configuration
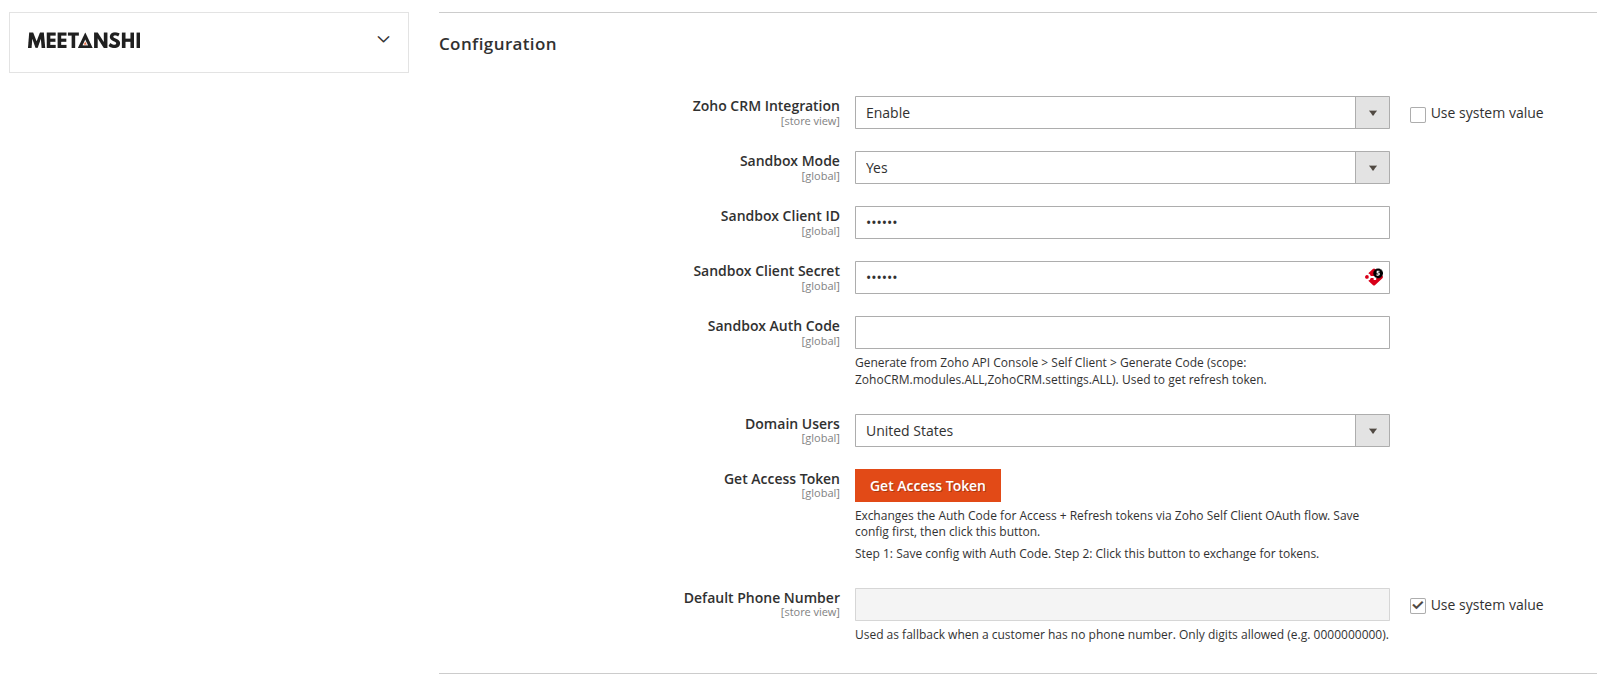
For configuring the extension, login to Magento 2, move to Zoho CRM Integration > Configuration > Meetanshi > Zoho CRM Integration, where you can find various settings to configure the extension.
- Zoho CRM Integration: Enable or disable the Zoho CRM Integration extension from here.
- Sandbox Mode: Set YES to connect the extension to your Zoho sandbox environment, or NO to connect to your live Zoho CRM account. The credential fields below change based on this selection.
When Sandbox Mode is set to YES, configure the sandbox credentials:
- Sandbox Client ID: Enter the client ID you copied from the Zoho API Console for your sandbox client.
- Sandbox Client Secret: Enter the client secret you copied from the Zoho API Console for your sandbox client.
- Sandbox Auth Code: Generate this from Zoho API Console > Self Client > Generate Code (with scope
ZohoCRM.modules.ALL,ZohoCRM.settings.ALL) and paste it here. It is used to get the refresh token.
When Sandbox Mode is set to NO, configure the live credentials:
Client ID: Enter the client ID you copied from the Zoho API Console.
Client Secret: Enter the client secret you copied from the Zoho API Console.
Auth Code: Generate this from Zoho API Console > Self Client > Generate Code (with scope
ZohoCRM.modules.ALL,ZohoCRM.settings.ALL) and paste it here. It is used to get the refresh token.Domain Users: Select the data center/domain of your Zoho account (for example, United States) as per your requirement.
Get Access Token: Exchanges the Auth Code for access and refresh tokens via the Zoho Self Client OAuth flow. Step 1: Save the configuration with the Auth Code entered. Step 2: Click this button to exchange it for tokens.
Default Phone Number: Enter a fallback phone number used when a customer has no phone number. Only digits are allowed (e.g. 0000000000).
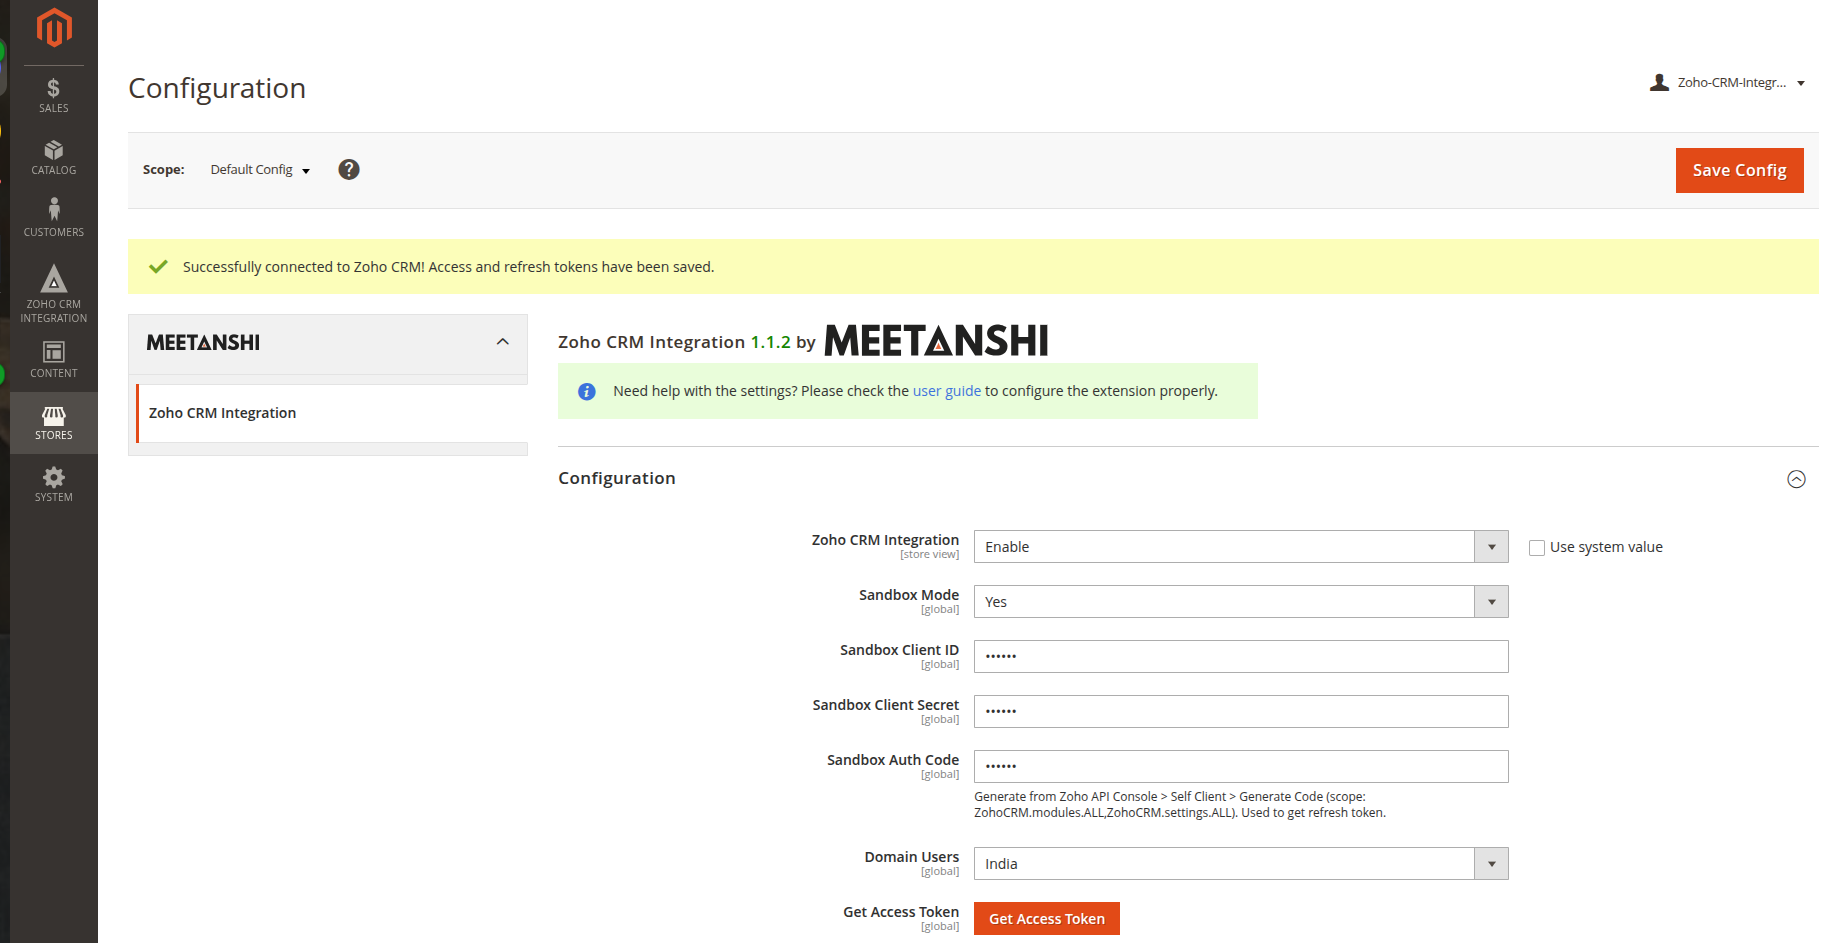
After configuring the settings, save the configuration and click "Get Access Token" for the API connectivity.
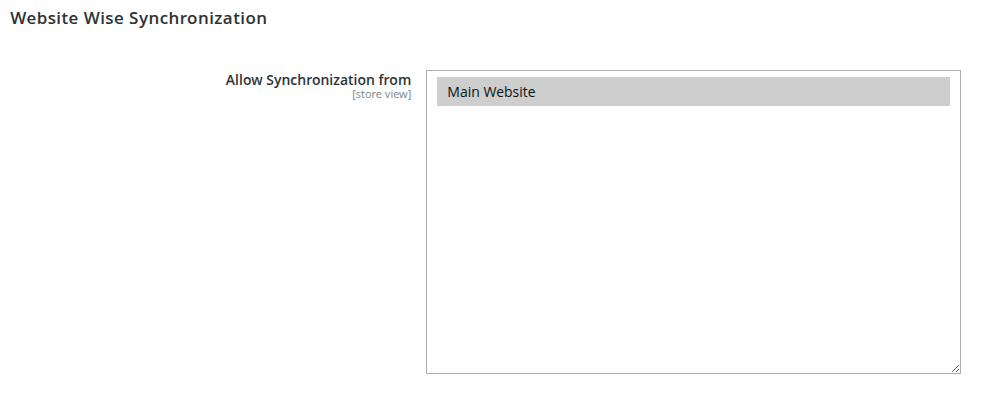
Website wise Synchronization
Select the website from which you want to synchronize the data in Zoho.
Campaign Synchronization Settings
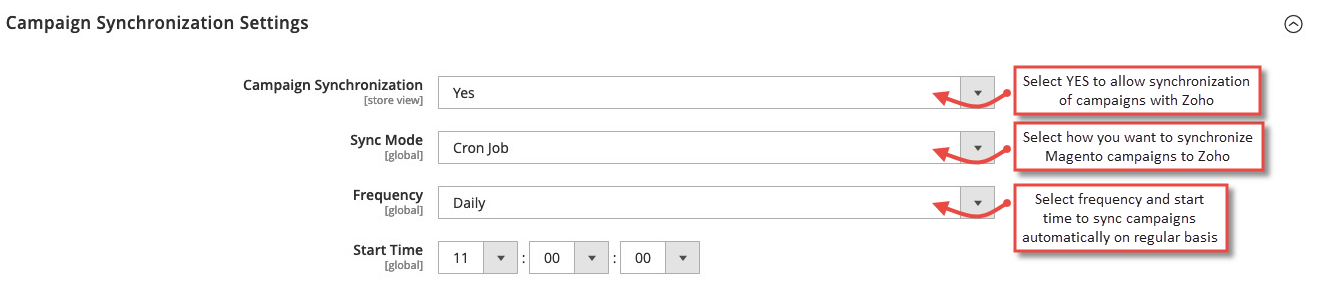
To synchronize the Magento 2 campaigns with the Zoho API, configure the settings below.
Campaign Synchronization: Select YES to allow synchronization of campaigns with Zoho.
Sync Mode: Select how you want to synchronize Magento 2 campaigns to Zoho.
Immediately: Syncs campaigns immediately on creation.
Cron Job: Syncs campaigns on cron job run time and frequency.
Frequency: Select cron job frequency to automate campaign sync with Zoho.
Start Time: Set start time of the cron job based on the set frequency.
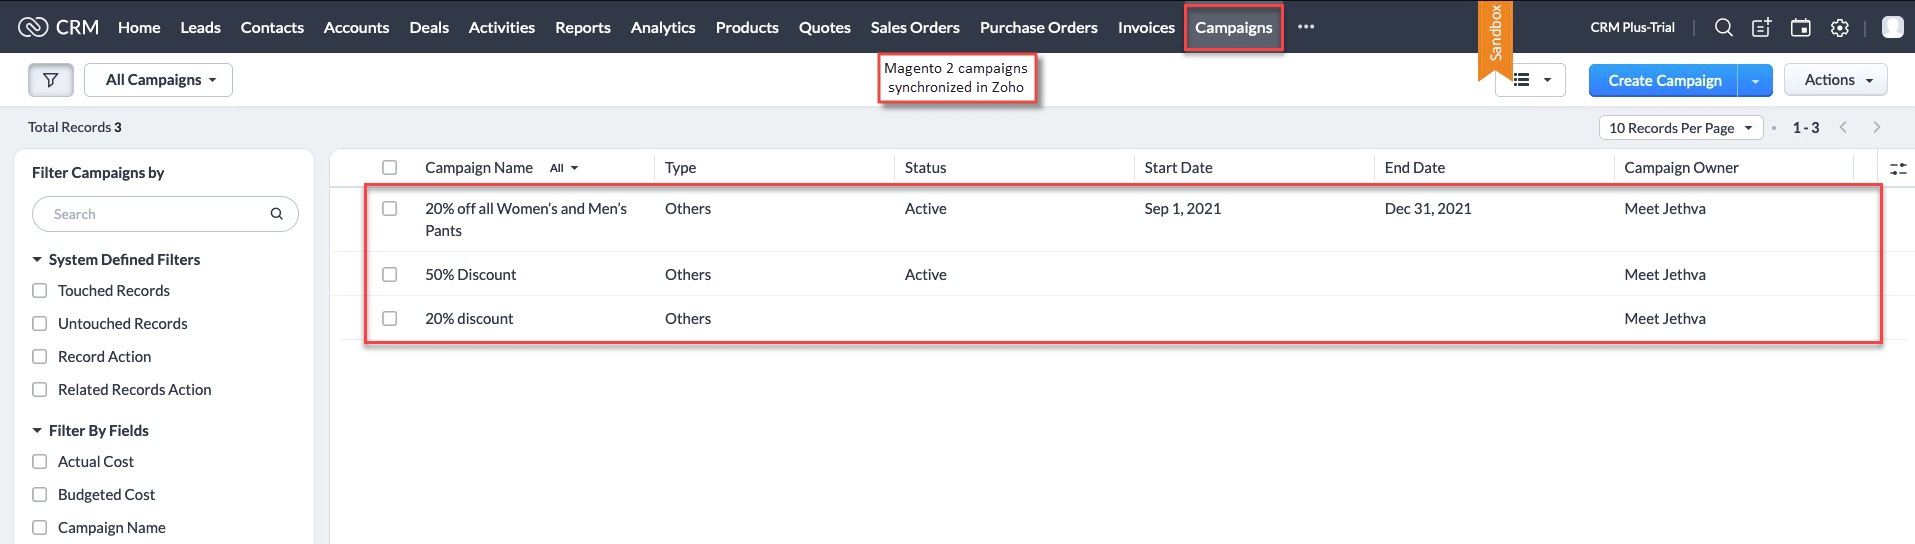
Immediately after the synchronization, you can see the campaigns in Zoho.
Account Synchronization Settings
To synchronize the Magento 2 customer accounts with the Zoho API, configure the settings below.
- Account Synchronization: Select YES to allow synchronization of customer accounts with Zoho.
- Sync Mode: Select how you want to synchronize Magento 2 customer accounts to Zoho.
- Immediately: Syncs customer accounts immediately on creation.
- Cron Job: Syncs customer accounts on cron job run time and frequency.

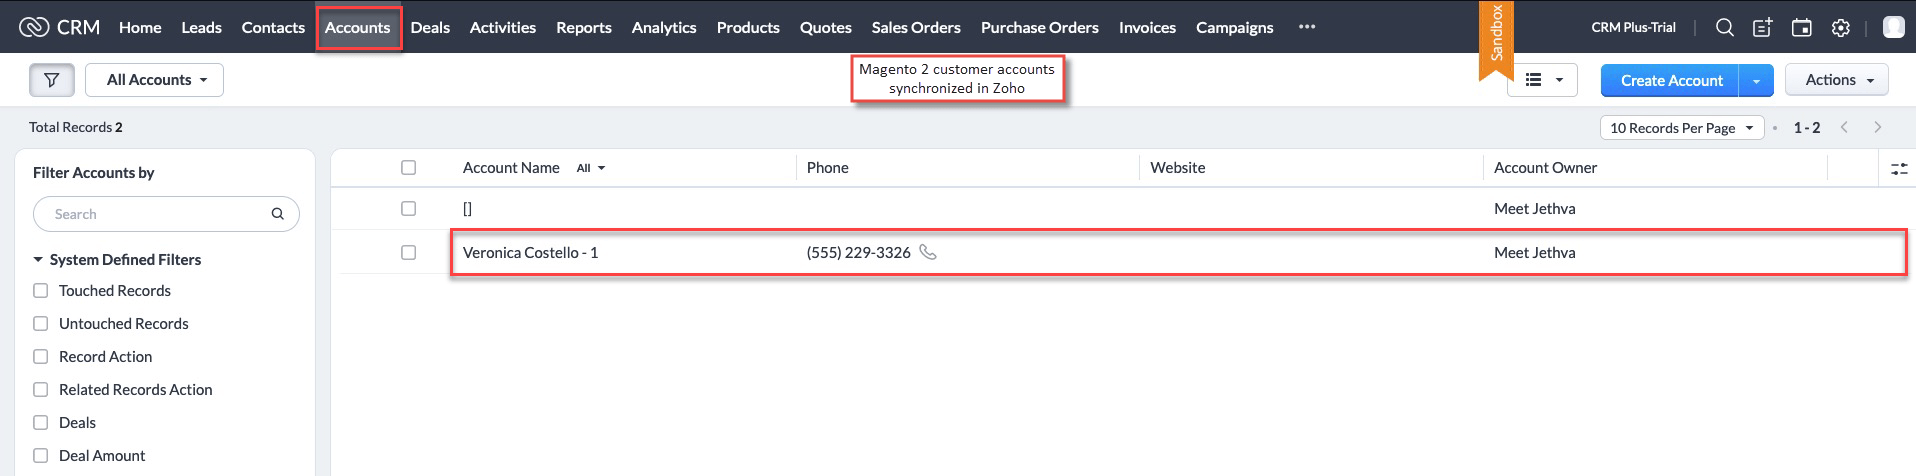
Immediately after the synchronization, you can see the customer accounts in Zoho.
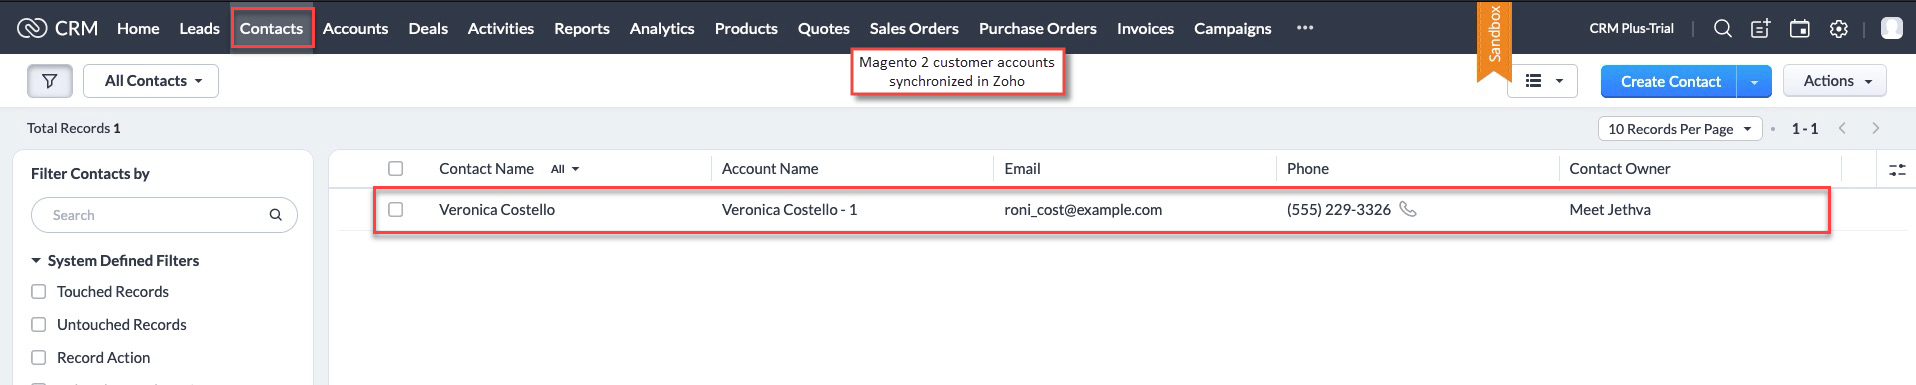
Contact Synchronization Settings
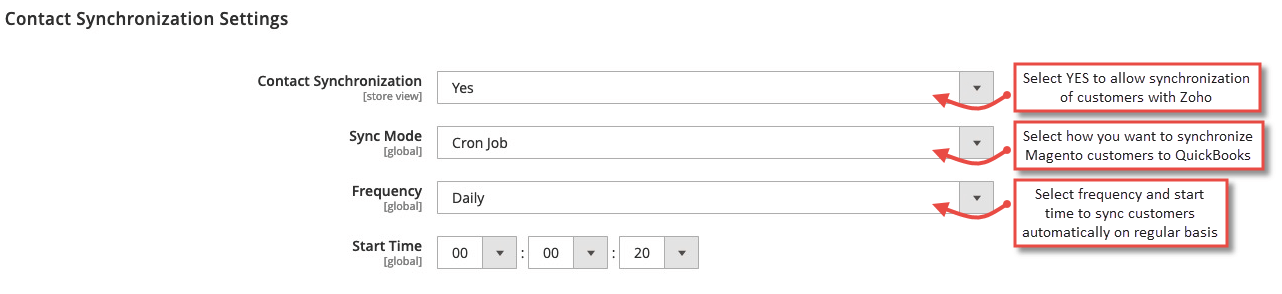
To synchronize the Magento 2 contacts with the Zoho API, configure the settings below.
- Contact Synchronization: Select YES to allow synchronization of contacts with Zoho.
- Sync Mode: Select how you want to synchronize Magento 2 contacts to Zoho.
- Immediately: Syncs contacts immediately on account creation.
- Cron Job: Syncs contacts on cron job run time and frequency.
- Frequency: Select cron job frequency to automate contact sync with Zoho.
- Start Time: Set start time of the cron job based on the set frequency.
Immediately after the synchronization, you can see the contacts in Zoho.
Lead Synchronization Settings
To synchronize the Magento 2 leads with the Zoho API, configure the settings below.
Lead Synchronization: Select YES to allow synchronization of leads with Zoho.
Sync Mode: Select how you want to synchronize Magento 2 leads to Zoho.
Immediately: Syncs leads immediately on account creation.
Cron Job: Syncs leads on cron job run time and frequency.

Immediately after the synchronization, you can see the leads in Zoho.

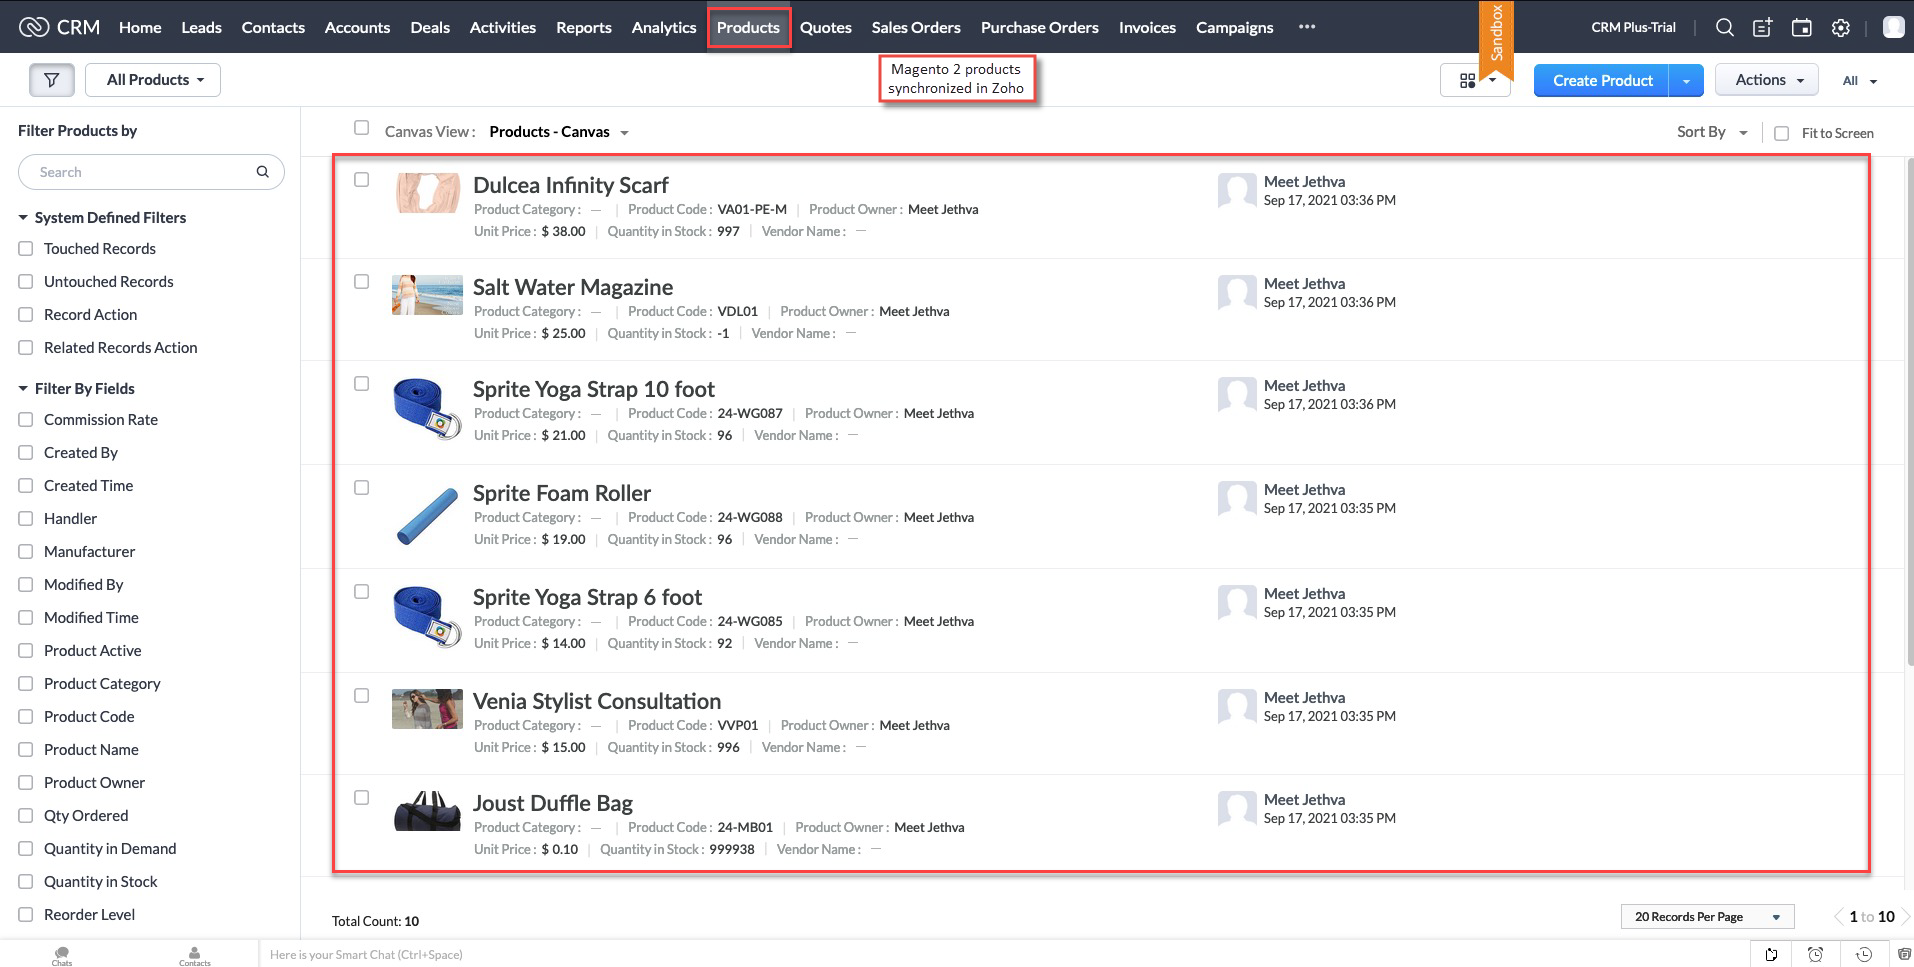
Products Synchronization Settings
To synchronize the Magento 2 products with the Zoho API, configure the settings below.
- Products Synchronization: Select YES to allow synchronization of products with Zoho.
- Sync Mode: Select how you want to synchronize Magento 2 products to Zoho.
- Immediately: Syncs products immediately on product creation.
- Cron Job: Syncs products on cron job run time and frequency.

Immediately after the synchronization, you can see the products in Zoho.
Orders Synchronization Settings
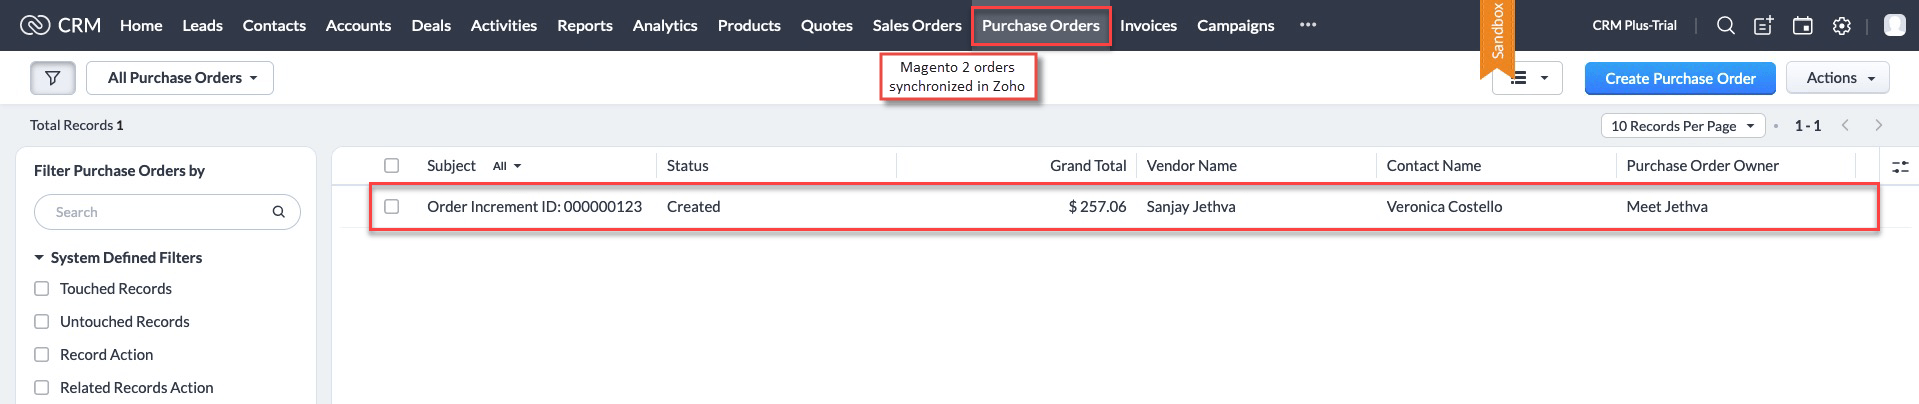
To synchronize the Magento 2 orders with the Zoho API, configure the settings below.
Orders Synchronization: Select YES to allow synchronization of orders with Zoho.
Sync Mode: Select how you want to synchronize Magento 2 orders to Zoho.
Immediately: Syncs orders immediately on placement.
Cron Job: Syncs orders on cron job run time and frequency.

Immediately after the synchronization, you can see the orders in Zoho.
Invoices Synchronization Settings
To synchronize the Magento 2 invoices with the Zoho API, configure the settings below.
Invoices Synchronization: Select YES to allow synchronization of invoices with Zoho.
Sync Mode: Select how you want to synchronize Magento 2 invoices to Zoho.
Immediately: Syncs invoices immediately on generation.
Cron Job: Syncs invoices on cron job run time and frequency.

Immediately after the synchronization, you can see the invoices in Zoho.

Developer Settings
Select YES to enable debug log.

Zoho Field Sync Settings
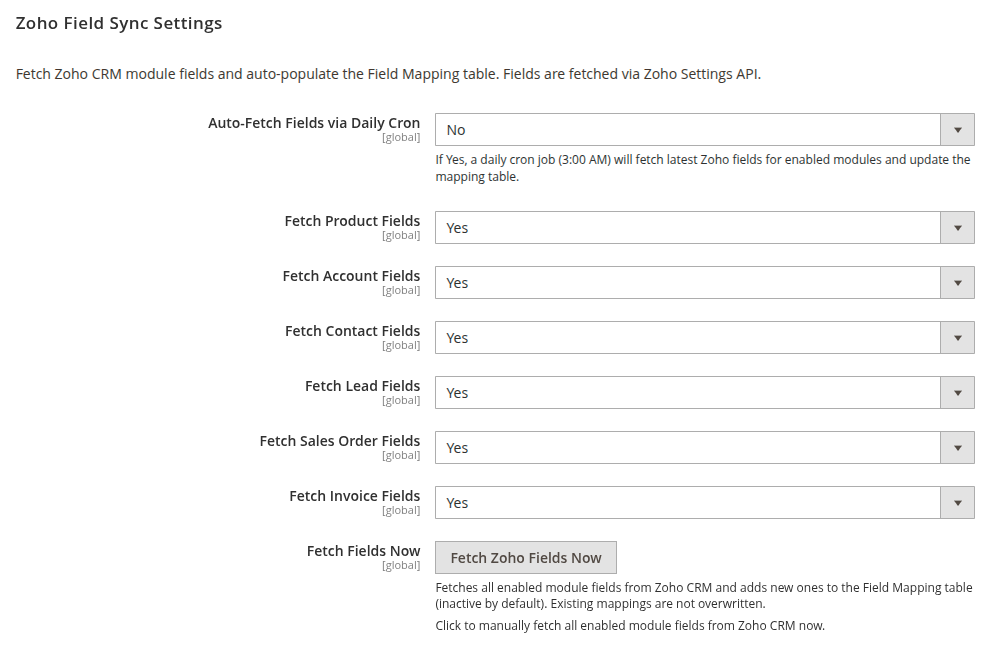
The extension can pull field definitions (standard and custom fields) directly from your Zoho CRM modules and use them to auto-populate the Field Mapping table. Configure this under Configuration > Meetanshi > Zoho CRM Integration in the Zoho Field Sync Settings section.
- Auto-Fetch Fields via Daily Cron: Select YES to let a daily cron job (runs at 3:00 AM) fetch the latest Zoho fields for the enabled modules and update the mapping table automatically.
- Fetch Product Fields: Select YES to include the Zoho Products module when fetching fields.
- Fetch Account Fields: Select YES to include the Zoho Accounts module.
- Fetch Contact Fields: Select YES to include the Zoho Contacts module.
- Fetch Lead Fields: Select YES to include the Zoho Leads module.
- Fetch Sales Order Fields: Select YES to include the Zoho Sales Orders module.
- Fetch Invoice Fields: Select YES to include the Zoho Invoices module.
- Fetch Fields Now: Click this button to immediately fetch the fields of all enabled modules from Zoho CRM. On success, the newly discovered fields are cached for the mapping dropdowns and any new fields are added to the Field Mapping grid (added as inactive until you map them).
 Note: Make sure Zoho CRM is connected with a valid token before fetching fields. The fields are retrieved via the Zoho Settings API, so a working API connection is required.
Field Mapping
The Field Mapping section lets you control exactly how Magento 2 data is mapped to your Zoho CRM fields for each entity. This is useful when you want to sync into custom Zoho fields, change which Magento attribute feeds a Zoho field, or transform values before they are sent.
Move to Zoho CRM Integration > Field Mapping, where you will find four sub-menus:
- Customer (Account/Contact/Lead): Manages the field mappings used when syncing customers to Zoho Accounts, Contacts and Leads.
- Product: Manages the field mappings used when syncing products to the Zoho Products module.
- Order: Manages the field mappings used when syncing orders to the Zoho Sales Orders module.
- Invoice: Manages the field mappings used when syncing invoices to the Zoho Invoices module.
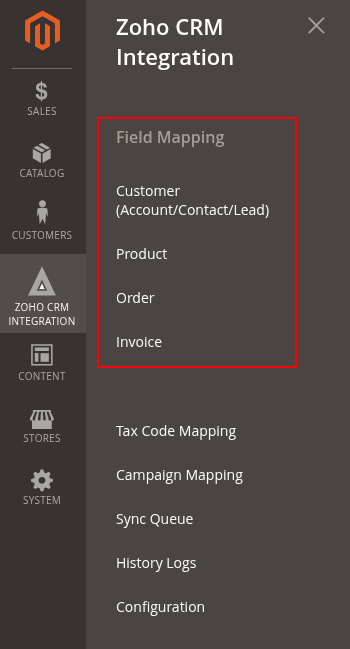 Each sub-menu opens a grid that lists the existing mappings for that entity. The grid shows the Entity Type, Zoho Field, Magento Source, Transform, Active, System and Sync on Update columns, and lets you filter, edit, delete or mass-delete mappings. (The Customer grid shows the Account, Contact and Lead mappings together.)
Adding or Editing a Field Mapping
Click Add New Mapping on the grid (or Edit on an existing row) to open the mapping form and configure the settings below.
- Entity Type: Select the entity this mapping applies to - Contact, Account, Lead, Sales Order, Product, or Invoice.
- Zoho Field (API Name): Select the destination Zoho CRM field from the dropdown. The list is populated from the fields fetched from Zoho (standard fields, then custom fields, with mandatory fields marked with an asterisk). Choose "Enter Custom API Name..." to type a Zoho field API name manually.
- Magento Source: Select the Magento data source that feeds the Zoho field. The dropdown lists the relevant standard fields and your store's custom attributes for the selected entity (for example
customer.firstname,product.price,order.increment_id,billing_address.city). Choose "Enter Custom Value..." to type a custom source in dot notation. - Transform: Optionally select a transformation applied to the value before it is sent to Zoho. Available transforms include: None (as-is), Digits Only, Trim & Collapse Spaces, Truncate to 30/50/100/250 characters, Country Code to Name, Uppercase, Lowercase, Strip HTML Tags, Clean Text, Convert to URL, Convert to Float, Convert to Integer, Convert to Boolean, and Absolute Float Value.
- Sync on Order Update: (Shown for the Order entity only.) Select YES to also send this field to Zoho when an existing order is updated, such as on a status change or shipment.
- Active: Select YES to include this mapping when syncing; select NO to keep the mapping defined but disabled.
Click Save Mapping to store the mapping, or Back to return to the grid.
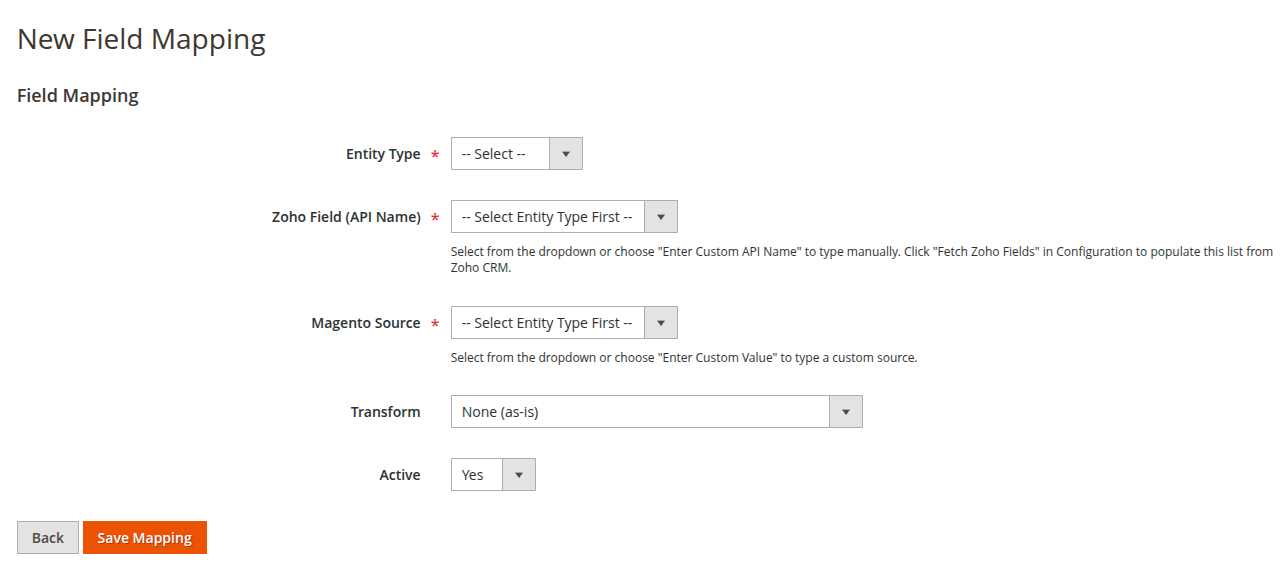 Note: System default mappings can be disabled (set Active to NO) but cannot be deleted. Fields added automatically by "Fetch Fields" start as inactive with an empty Magento Source, so map the Magento Source and set Active to YES to start syncing them.
Tax Mapping
Important Note on Synchronization Order:
Once the initial configuration and access token setup are complete, you must configure and synchronize your tax codes under Zoho CRM Integration > Tax Mapping before syncing products, orders, or invoices. Completing this step beforehand ensures that tax classes match correctly and prevents any synchronization errors during transaction processing.
Move to Zoho CRM Integration > Tax Mapping to map Magento 2 tax classes with Zoho. First of all, click " Add All Tax Code " button to add all the Magento 2 tax codes to the list in the grid and then, click " Synchronize " to sync each tax code with Zoho API.
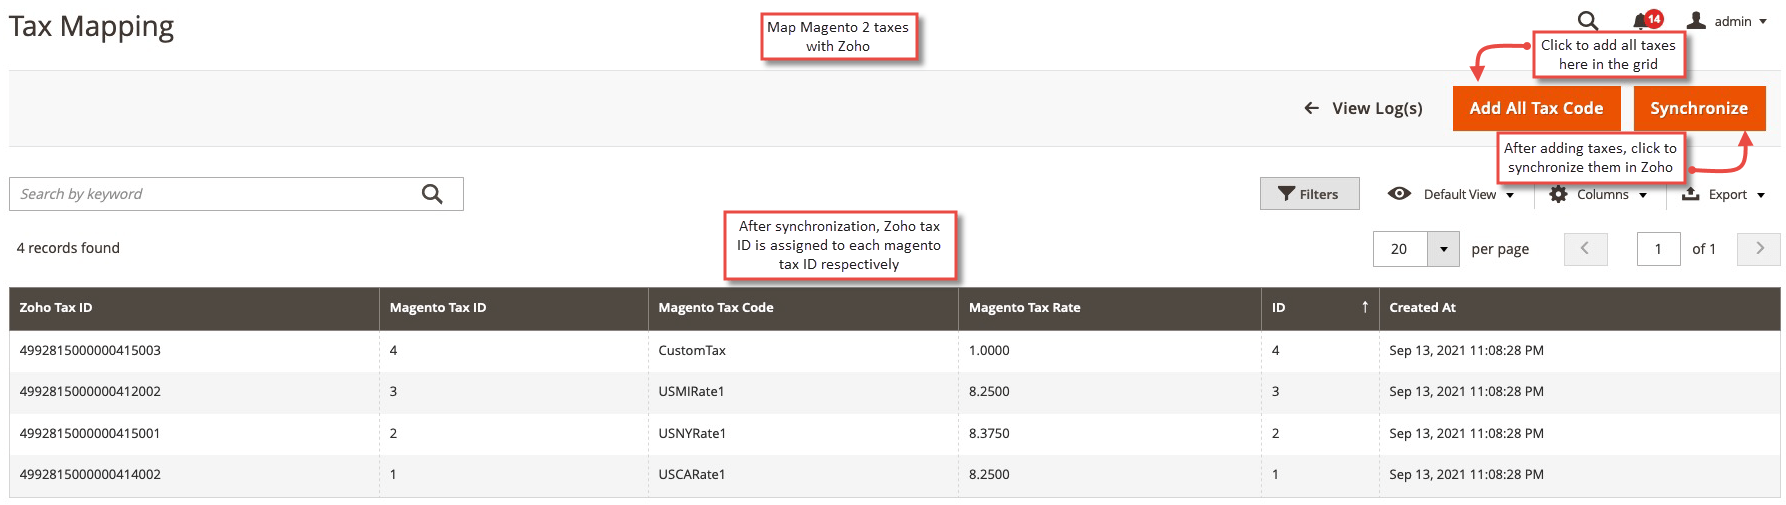
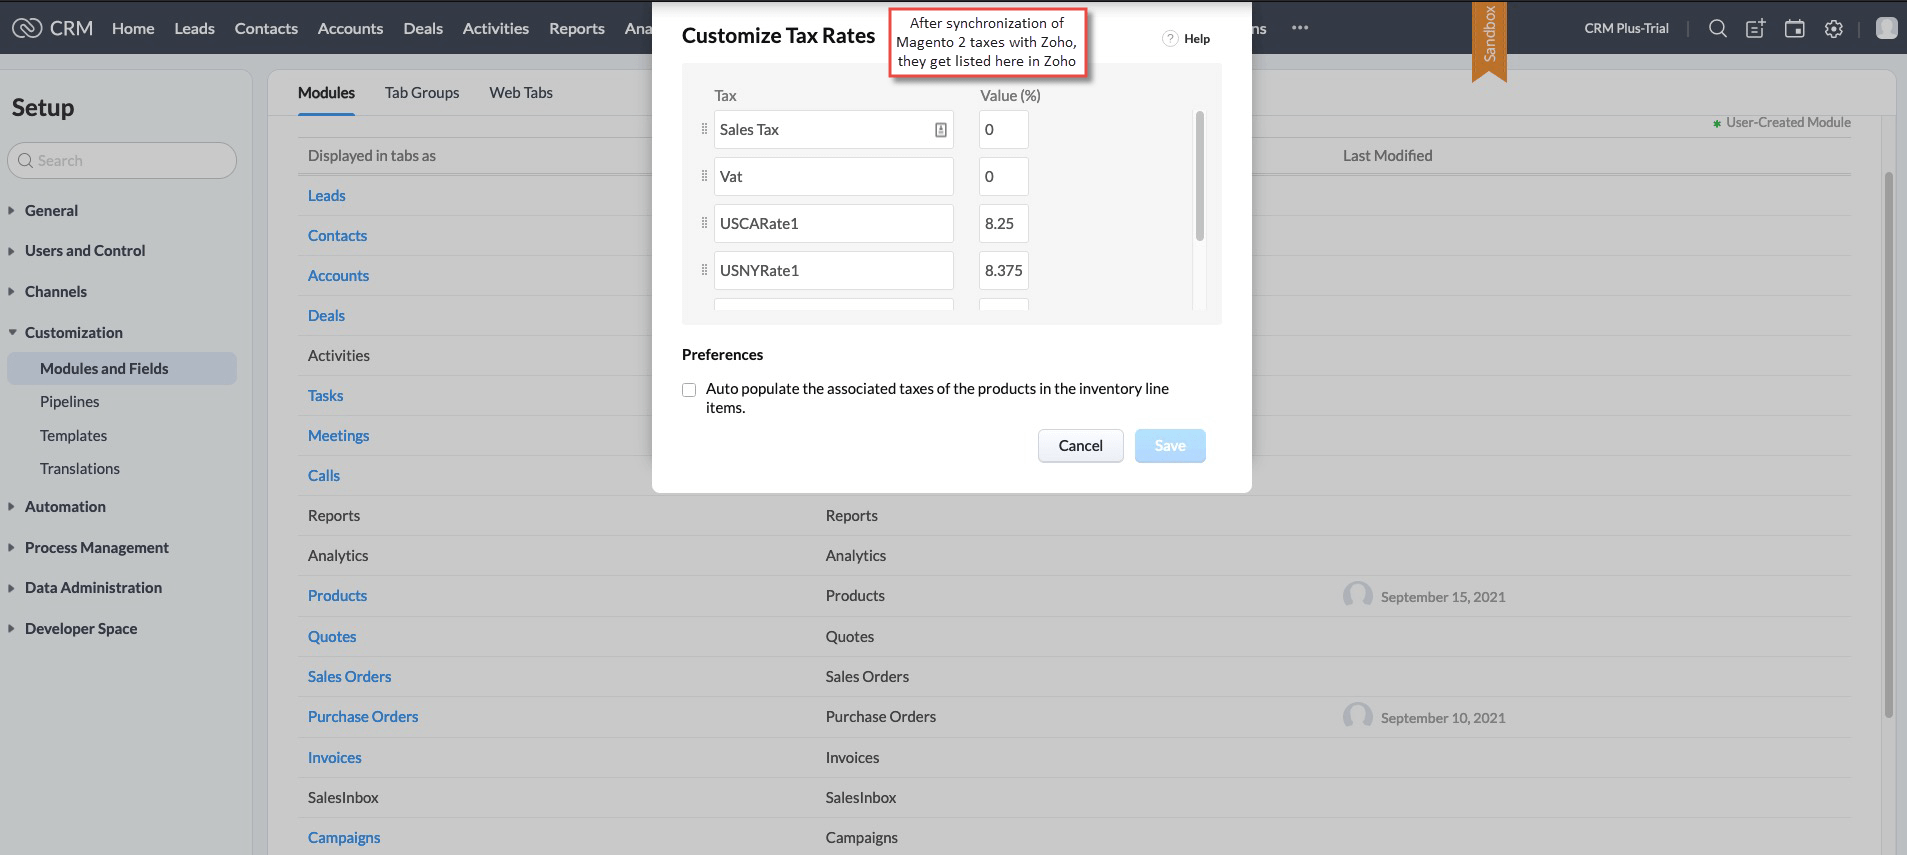
- To see the mapped tax codes in Zoho, click on Settings > Customization > Modules and Fields.
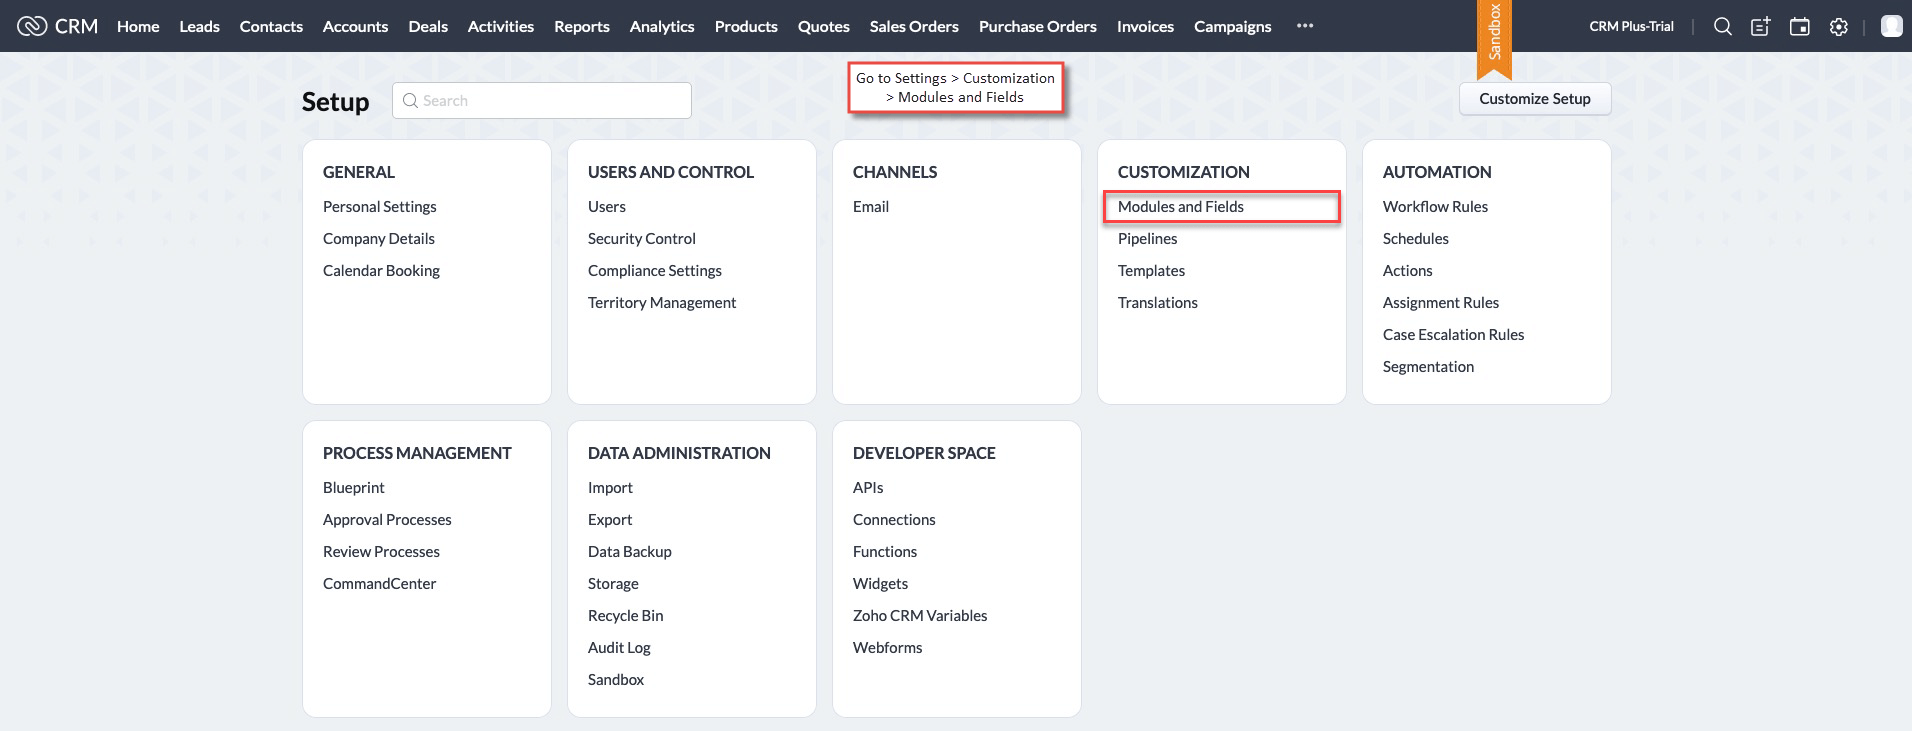
- Click on Products > Customize Tax Rates to open the tax code popup.
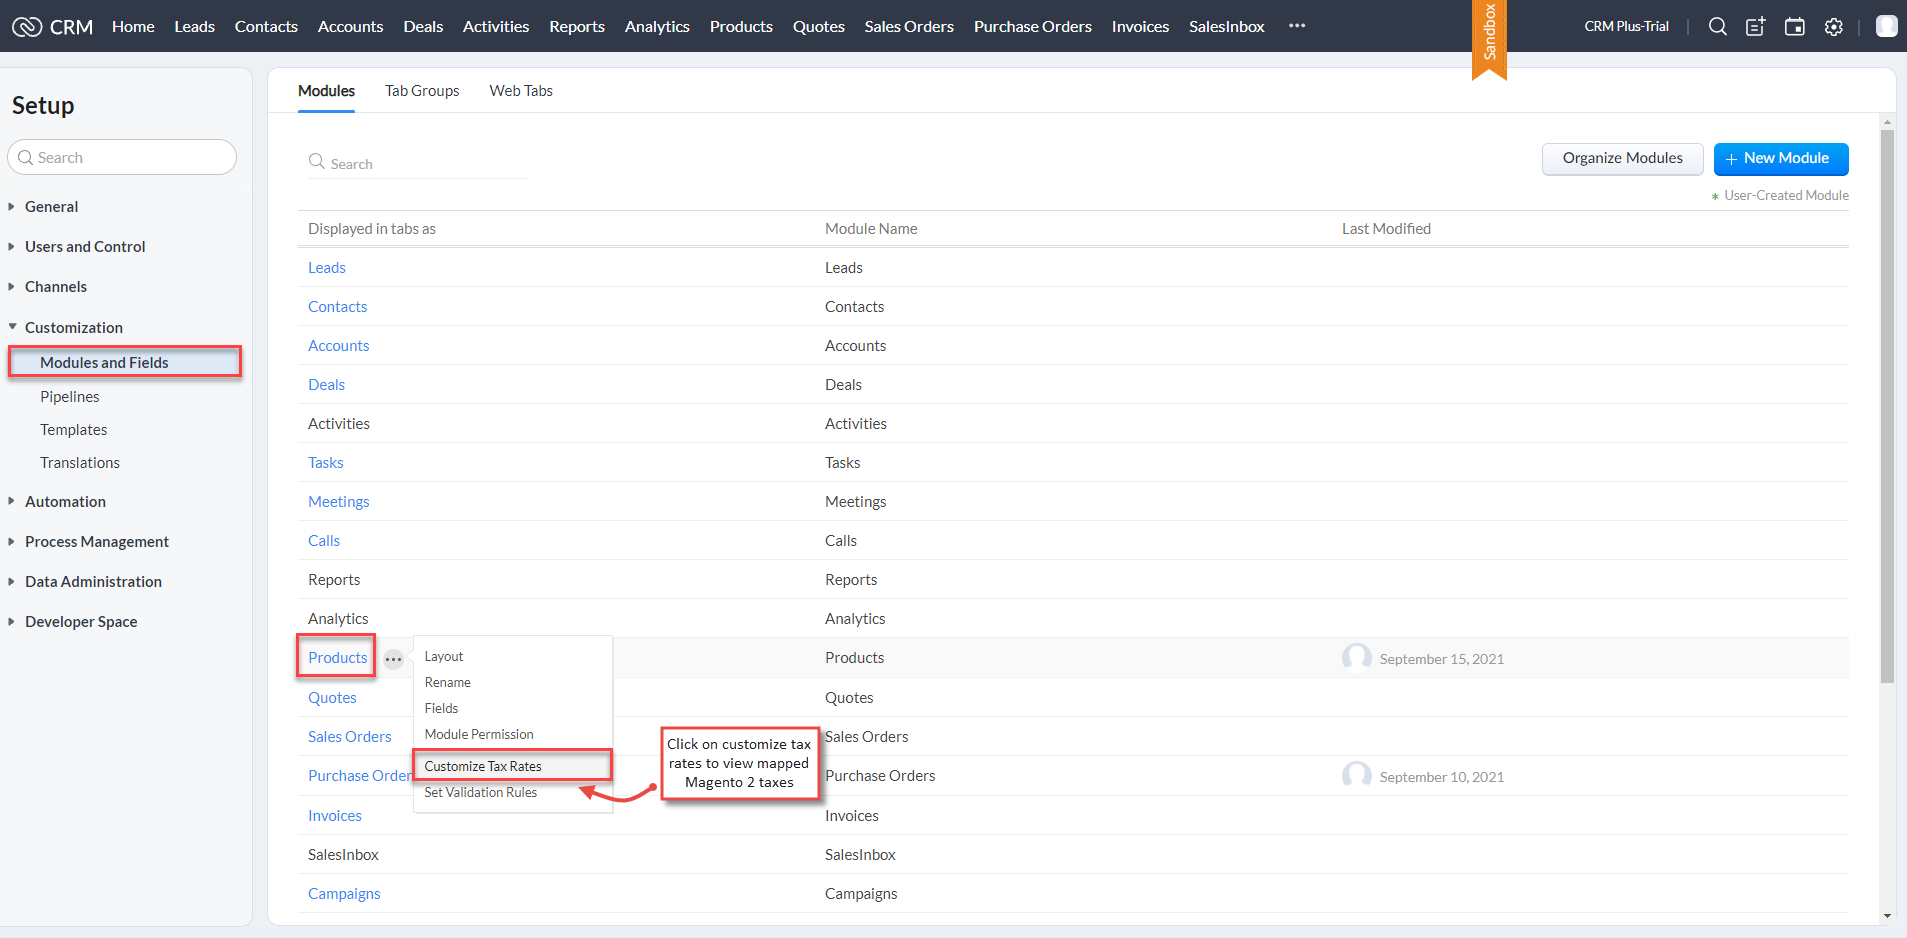
- You can see the synchronized tax codes in popup.
Campaign Mapping
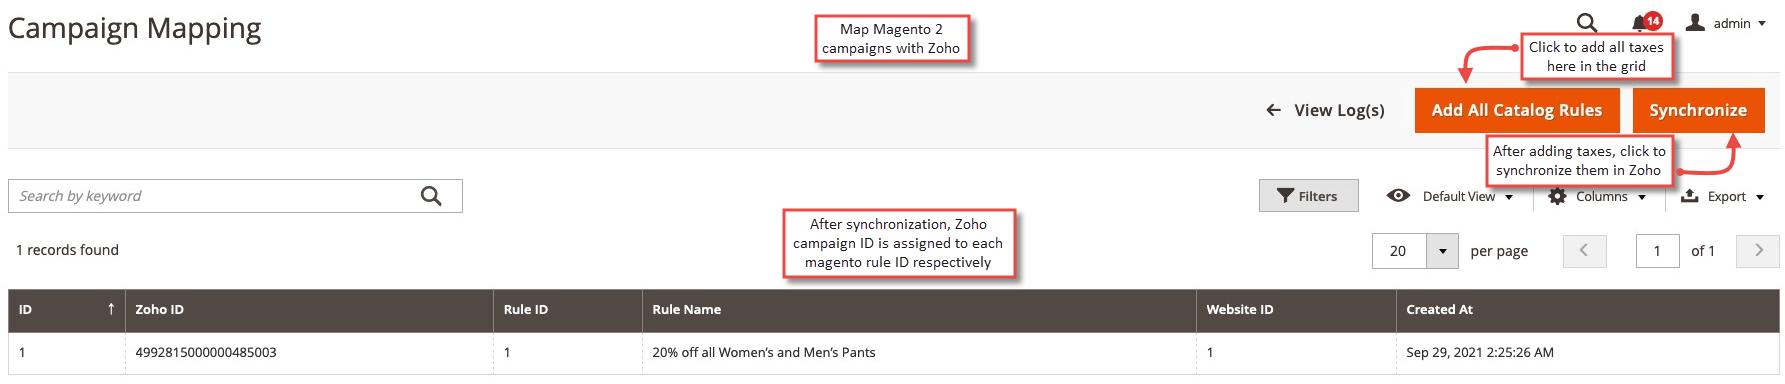
Move to Zoho CRM Integration > Campaign Mapping to map Magento 2 catalog rules with Zoho. First of all, click " Add All Catalog Rules " button to add all the Magento 2 catalog rules to the list in the grid and then, click " Synchronize " to sync each tax rule with Zoho API.
Sync Queue
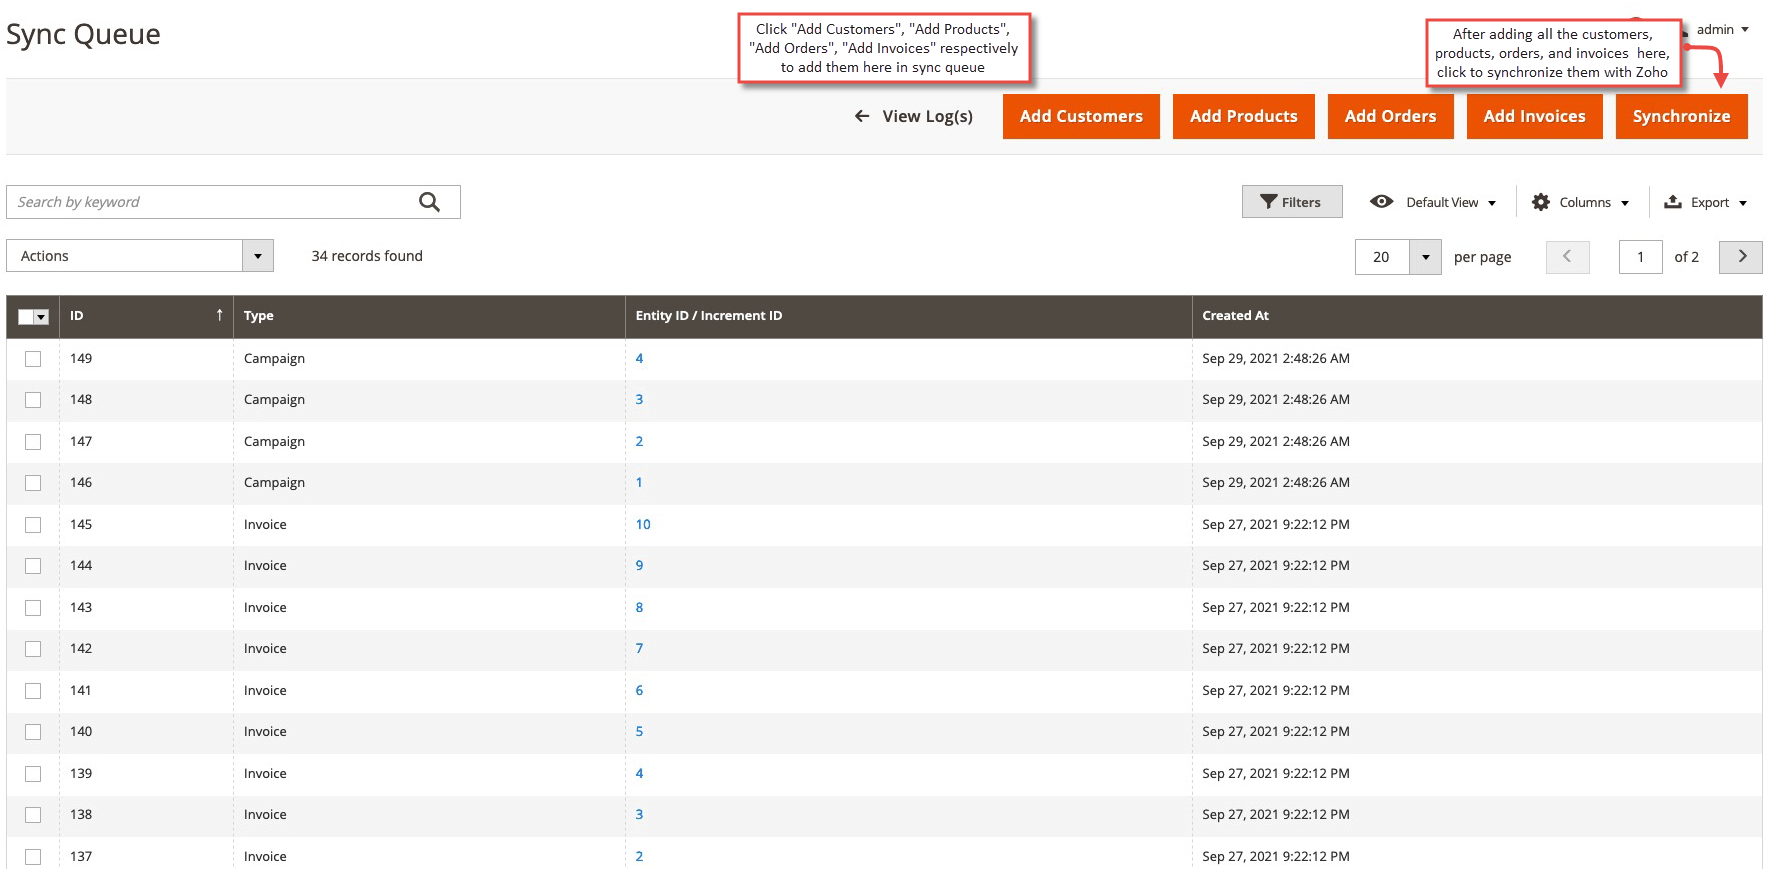
If your store is already having customers, products, orders, invoices and want all of them to sync with Zoho after the extension installation, move to Zoho CRM Integration > Sync Queue .
Click "Add Customers ", " Add Products ", " Add Orders ", "Add Invoices ", one by one in the same order as mentioned to add all here in the sync queue. Click on " Synchronization " button to sync them gradually with Zoho.
History Logs
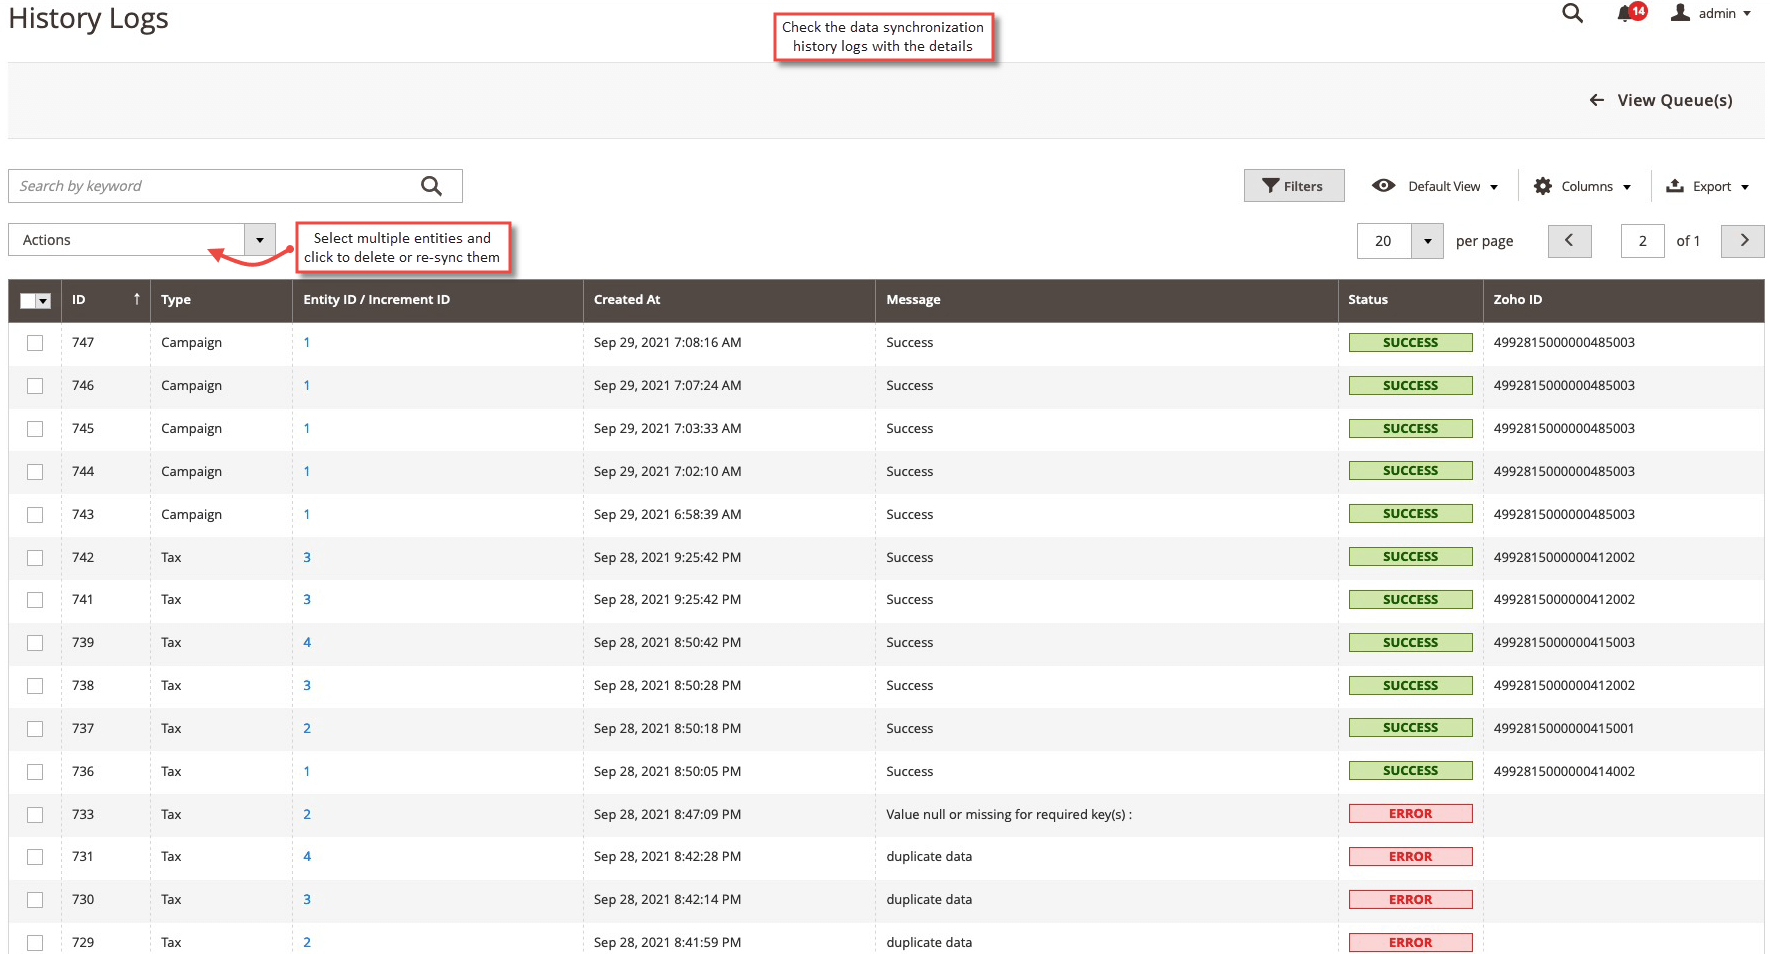
After synchronization is done, the status of each entity is shown with the details on the separate grid in backend at Zoho CRM Integration > History Logs . If the data is synchronized right, the status will be success else if there's problem during data sync, it will show error status.
Customers, Orders, Products, Invoices Grid after Synchronization
After synchronization of customers, orders, products and invoices in Zoho, if you check the backend grid of individual, you can see Zoho ID for each entity.
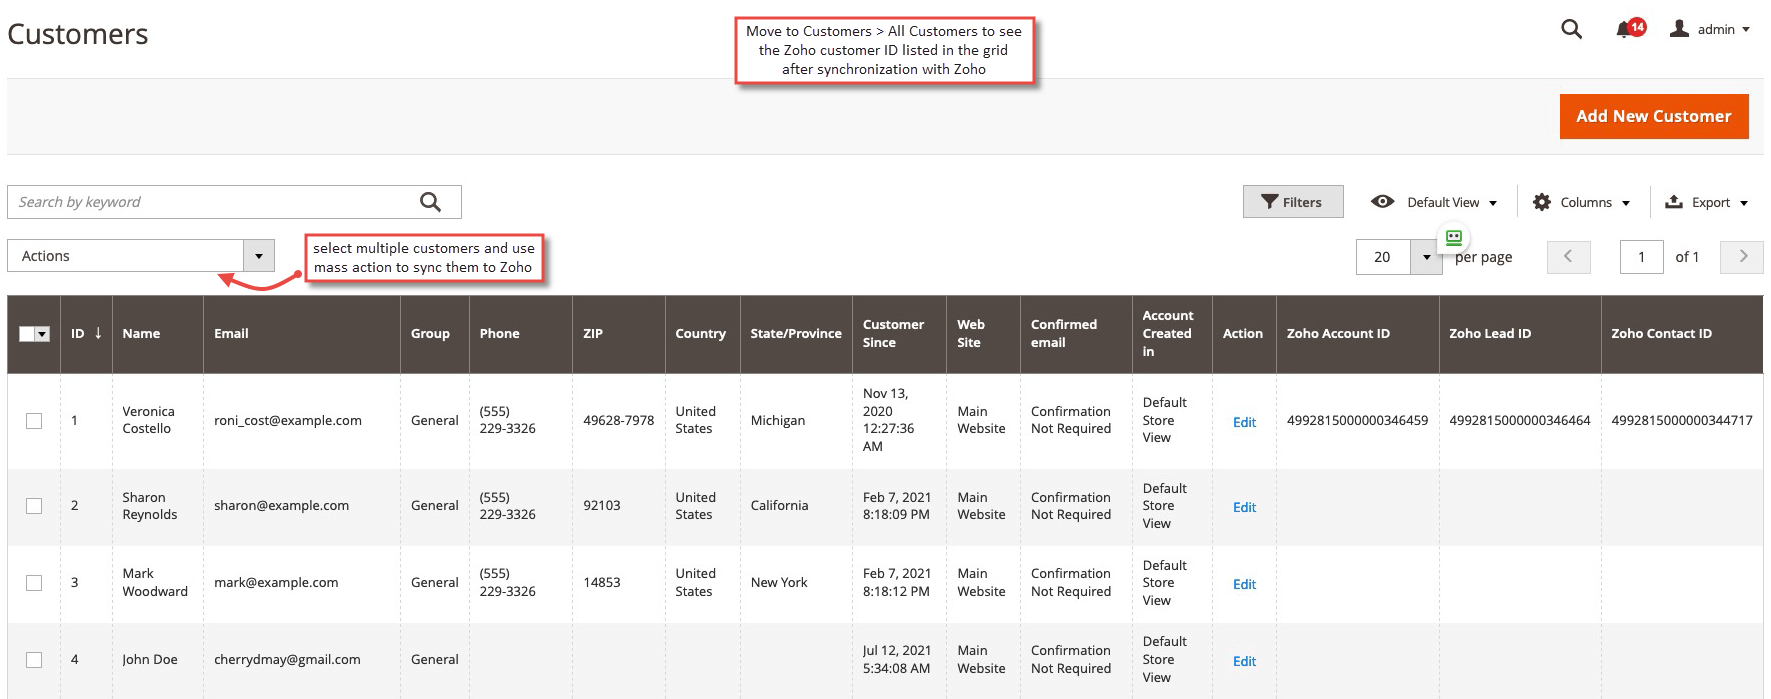
- Customers Grid with Zoho Account ID, Lead ID, Contact ID
After the successful synchronization of customers to Zoho, move to Customers > All Customers to see Zoho account ID, lead ID and contact ID. The admin can select multiple customers and use " Sync to Zoho " mass action to sync them manually.
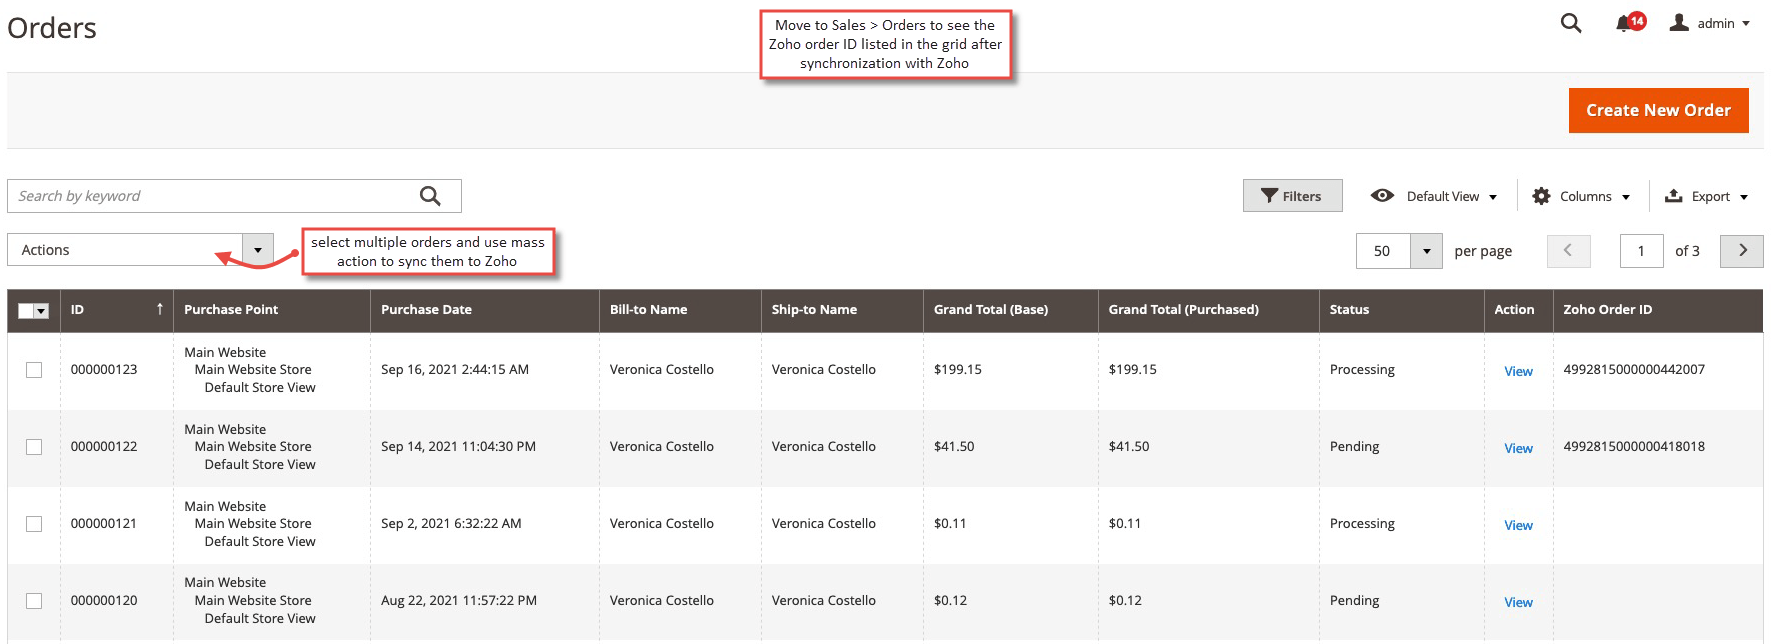
- Orders Grid with Zoho Order ID
After the successful synchronization of orders to Zoho, move to Sales > Orders to see Zoho order ID. The admin can select multiple orders and use " Sync to Zoho " mass action to sync them manually.
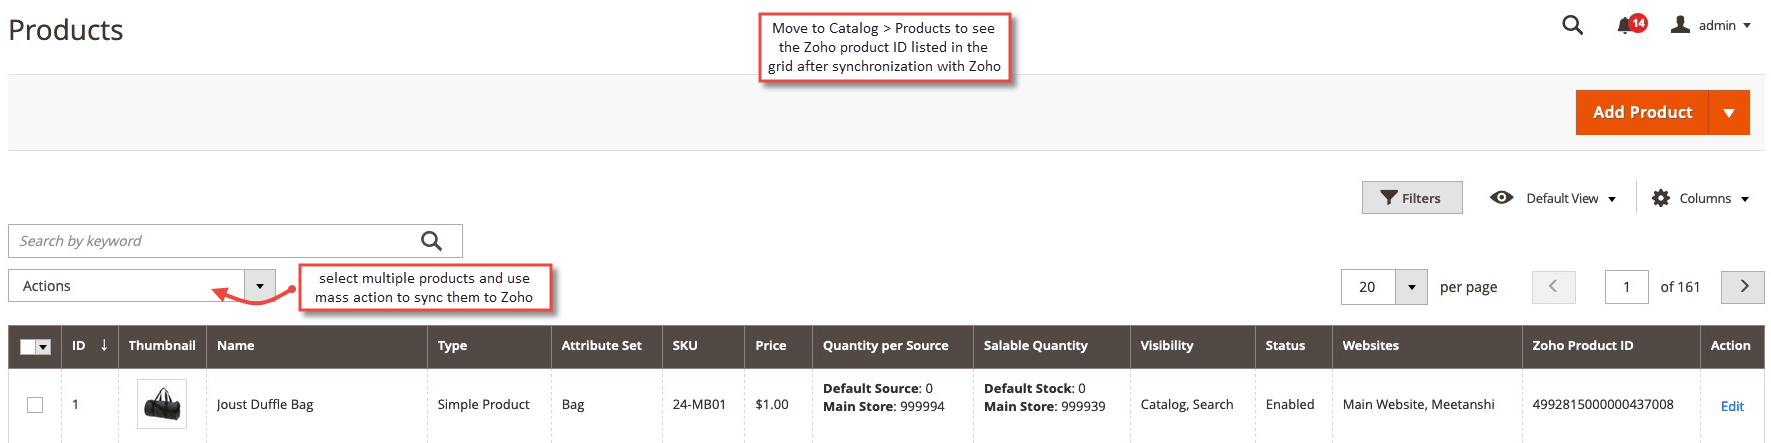
- Products Grid with Zoho Product ID
After the successful synchronization of products to Zoho, move to Catalog > Products to see Zoho product ID. The admin can select multiple products and use " Sync to Zoho " mass action to sync them manually.
- Invoices Grid with Zoho Invoice ID
After the successful synchronization of invoices to Zoho, move to Sales > Invoices to see Zoho invoice ID. The admin can select multiple invoices and use " Sync to Zoho " mass action to sync them manually.
