Magento 2 One Step Checkout - User Guide
Meetanshi One Step Checkout replaces Magento's default two-step checkout with a single, fully customizable page. This guide walks you through the complete setup in order: install the extension, configure it, customize the layout and fields, set up delivery slots, and track checkout performance.
Step 1: Extension Installation
Installation instructions
For Magento Marketplace Customers
- Find the Composer name and version of the extension in the extension's composer.json file.
- Log in to your SSH and run:
composer require meetanshi/magento-2-one-step-checkout --ignore-platform-reqs
- Enter your authentication keys. Your public key is your username and your private key is your password.
- Wait for Composer to finish updating your project dependencies and make sure there are no errors.
- To verify that the extension installed properly, run:
php bin/magento module:status Meetanshi_OneStepCheckoutUltimate --ignore-platform-reqs
- By default, the extension is probably disabled.
- Enable the extension and clear static view files:
php bin/magento module:enable Meetanshi_OneStepCheckoutUltimate --clear-static-content
php bin/magento setup:upgrade
- For Magento version 2.0.x to 2.1.x:
php bin/magento setup:static-content:deploy
- For Magento version 2.2.x and above:
php bin/magento setup:static-content:deploy --f
php bin/magento cache:flush
For Meetanshi Customers
- Extract the zip folder and upload the extension to the root of your Magento 2 directory via FTP.
- Log in to your SSH and run the commands below step by step:
php bin/magento setup:upgrade
- For Magento version 2.0.x to 2.1.x:
php bin/magento setup:static-content:deploy
- For Magento version 2.2.x and above:
php bin/magento setup:static-content:deploy --f
php bin/magento cache:flush
Step 2: Enable the Extension and Verify
- In the Magento Admin Panel, go to Stores > Configuration > Meetanshi > One Step Checkout.
- Set Enable One Step Checkout to Yes and save the configuration.
- Flush the cache from System > Cache Management.
- Open your storefront, add a product to the cart and proceed to checkout. You should now see the one page checkout at yourstore.com/onestepcheckout.
If the default checkout still appears, flush the cache again and confirm the module is enabled with php bin/magento module:status.
The extension now works with sensible defaults. The next step fine-tunes it to your store.
Step 3: Configure the Checkout
All settings live under Stores > Configuration > Meetanshi > One Step Checkout. The sections below follow the order in which most stores configure them: behavior first, then content, then design, then performance and security.
3.1 General Configuration
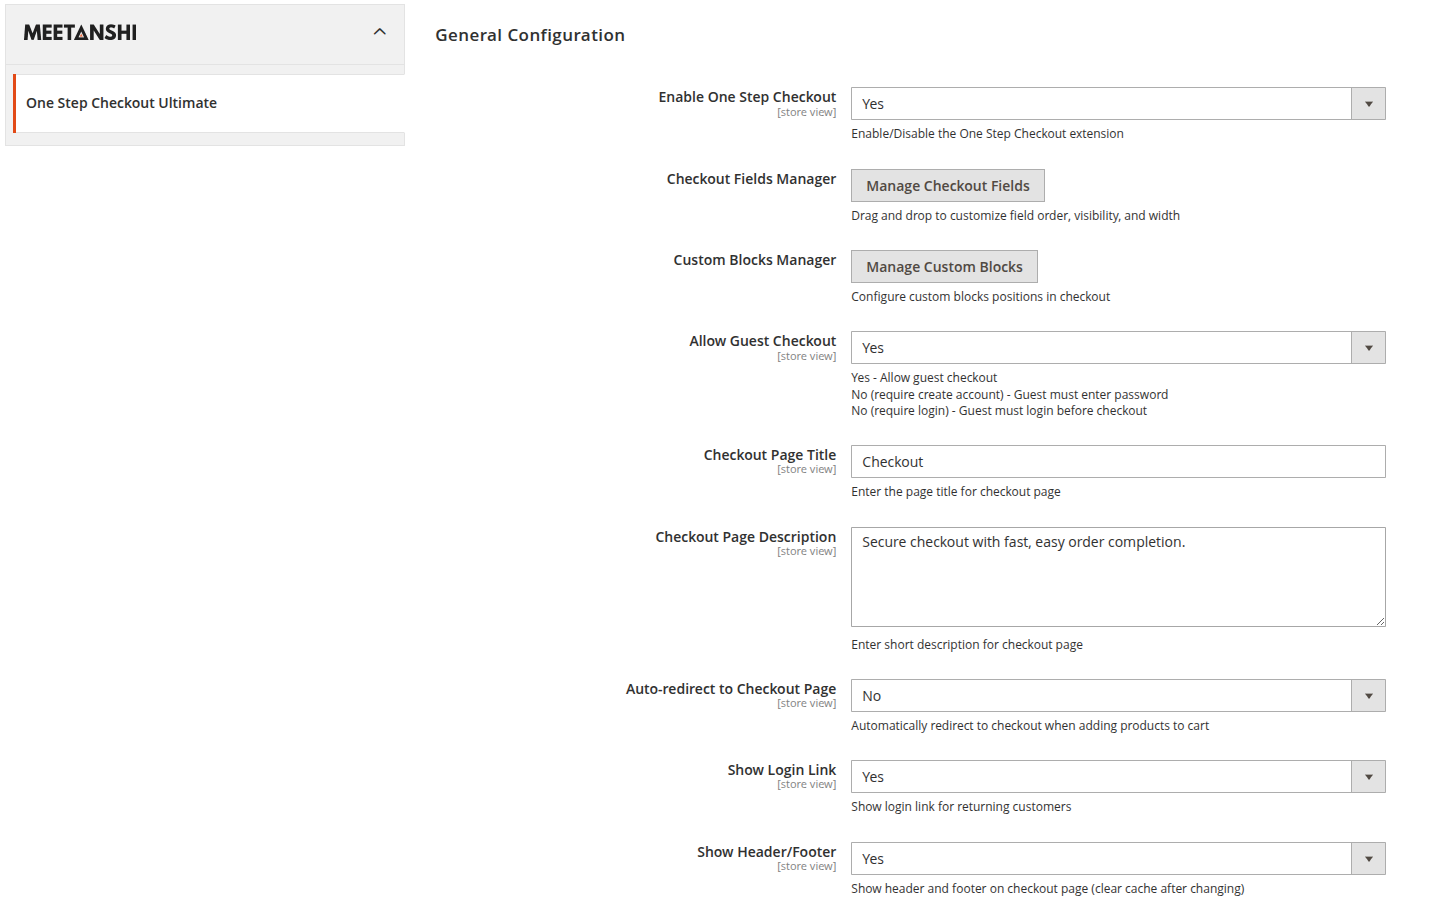
Enable One Step Checkout: Enable or disable the extension. When enabled, customers complete their entire checkout on a single page.
Checkout Fields Manager: Customize the checkout fields by changing their order, visibility and width using a drag-and-drop interface. Covered in detail in Step 4.
Custom Blocks Manager: Add and manage custom content blocks on the checkout page and choose where they should be displayed. Covered in detail in Step 4.
Allow Guest Checkout: Control whether customers can place orders without creating an account.
- Yes: Customers can complete checkout as guests.
- No (Require Create Account): Customers must create a new account before placing an order.
- No (Require Login): Existing customers must log in before they can proceed to checkout.
Checkout Page Title: Set the main title displayed at the top of the checkout page.
Checkout Page Description: Add a short description below the checkout title to give customers additional information or instructions.
Auto-redirect to Checkout Page: Automatically send customers to the checkout page as soon as they add a product to their cart, skipping the cart page.
Show Login Link: Display a login link at the top of the checkout page so returning customers can sign in quickly.
Show Header/Footer: Choose whether to display your store's header and footer on the checkout page. Hiding them provides a cleaner, distraction-free checkout. Clear the Magento cache after changing this setting.
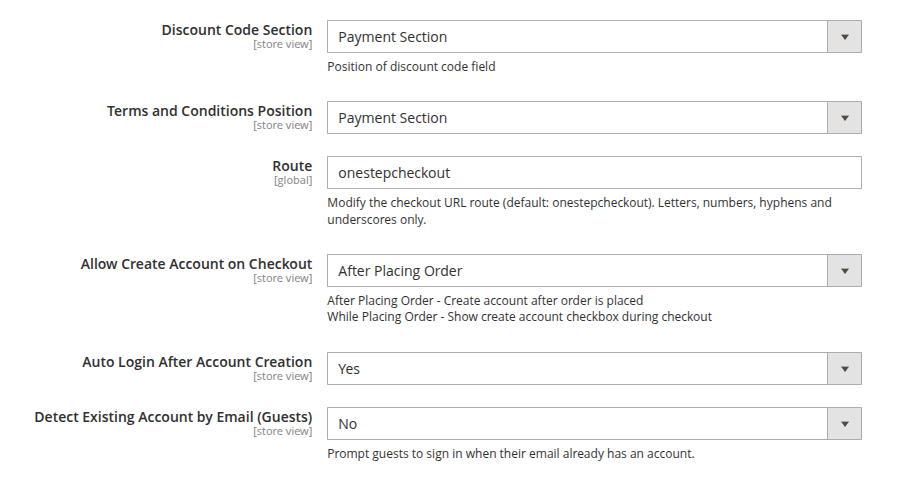
Discount Code Section: Choose where the discount or coupon code field appears on the checkout page, such as in the Payment section.
Terms and Conditions Position: Select where the Terms and Conditions checkbox is displayed during checkout.
Route: Customize the checkout page URL. The default route is onestepcheckout. Only letters, numbers, hyphens (-) and underscores (_) are allowed.
Allow Create Account on Checkout: Choose when customers can create an account during checkout.
- After Placing Order: Customers are prompted to create an account after successfully placing the order.
- While Placing Order: A "Create an Account" option is displayed during checkout.
Auto Login After Account Creation: Automatically log customers into their new account immediately after it is created during checkout.
Detect Existing Account by Email (Guests): When enabled, guest customers who enter an email address already linked to an existing account are prompted to log in instead of placing the order as a guest.
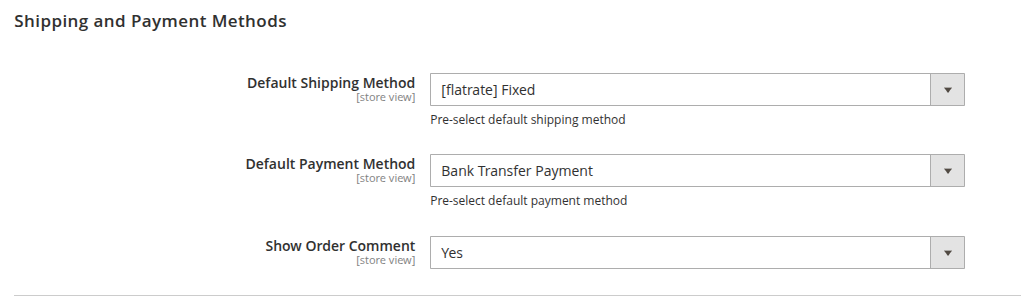
3.2 Shipping and Payment Methods
Default Shipping Method: Select the shipping method that is automatically selected when customers reach the checkout page. This speeds up checkout.
Default Payment Method: Choose the payment method selected by default during checkout. Customers can still change it.
Show Order Comment: Allow customers to leave special instructions or comments related to their order before placing it.
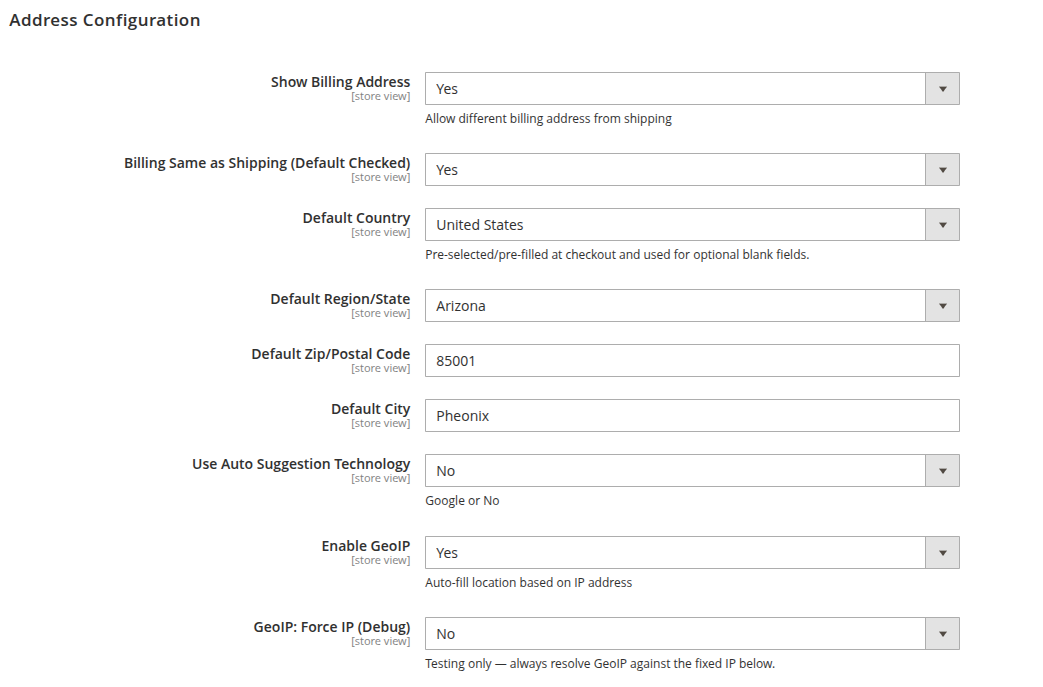
3.3 Address Configuration
Show Billing Address: Allow customers to enter a billing address different from their shipping address.
Billing Same as Shipping (Default Checked): Keep the "Billing address is the same as shipping address" option selected by default. Customers can uncheck it to enter a different billing address.
Default Country: Pre-select a country on the checkout page. This country is used when no location is detected.
Default Region/State: Automatically fill the selected state or region when the checkout page loads.
Default Zip/Postal Code: Pre-fill the ZIP or postal code field with a default value.
Default City: Pre-fill the city field with a default value.
Use Auto Suggestion Technology: Enable Google Places address autocomplete to help customers fill in their address quickly. Set to No to disable suggestions.
Enable GeoIP: Automatically detect the customer's location from their IP address and pre-fill country, state or city where possible.
GeoIP: Force IP (Debug): For testing only. Always uses a fixed IP address instead of the customer's actual IP to verify GeoIP functionality.
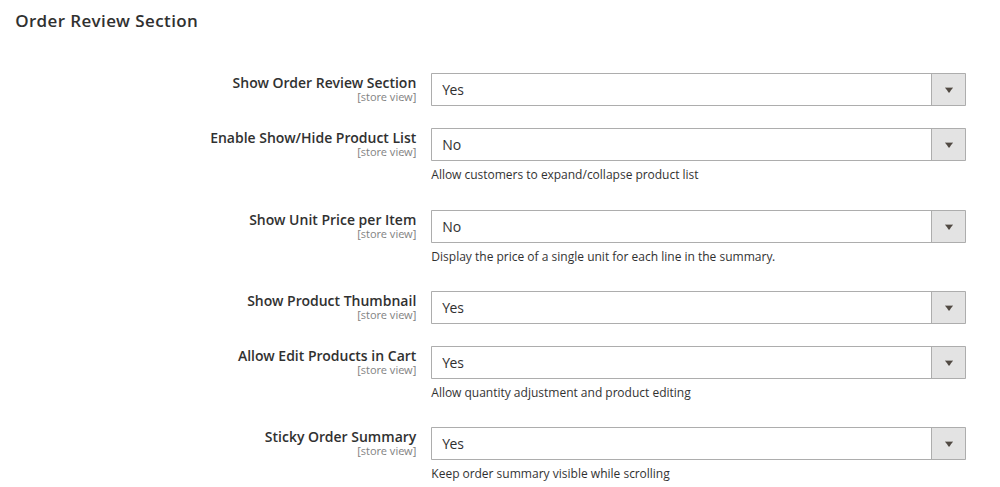
3.4 Order Review Section
Show Order Review Section: Display an order summary during checkout so customers can review their items before placing the order.
Enable Show/Hide Product List: Allow customers to expand or collapse the product list in the order summary.
Show Unit Price per Item: Display the price of each individual product in the order summary.
Show Product Thumbnail: Display product images next to each item for easier identification.
Allow Edit Products in Cart: Let customers update quantities or remove items directly from the checkout page without returning to the cart.
Sticky Order Summary: Keep the order summary visible while customers scroll through the checkout page.
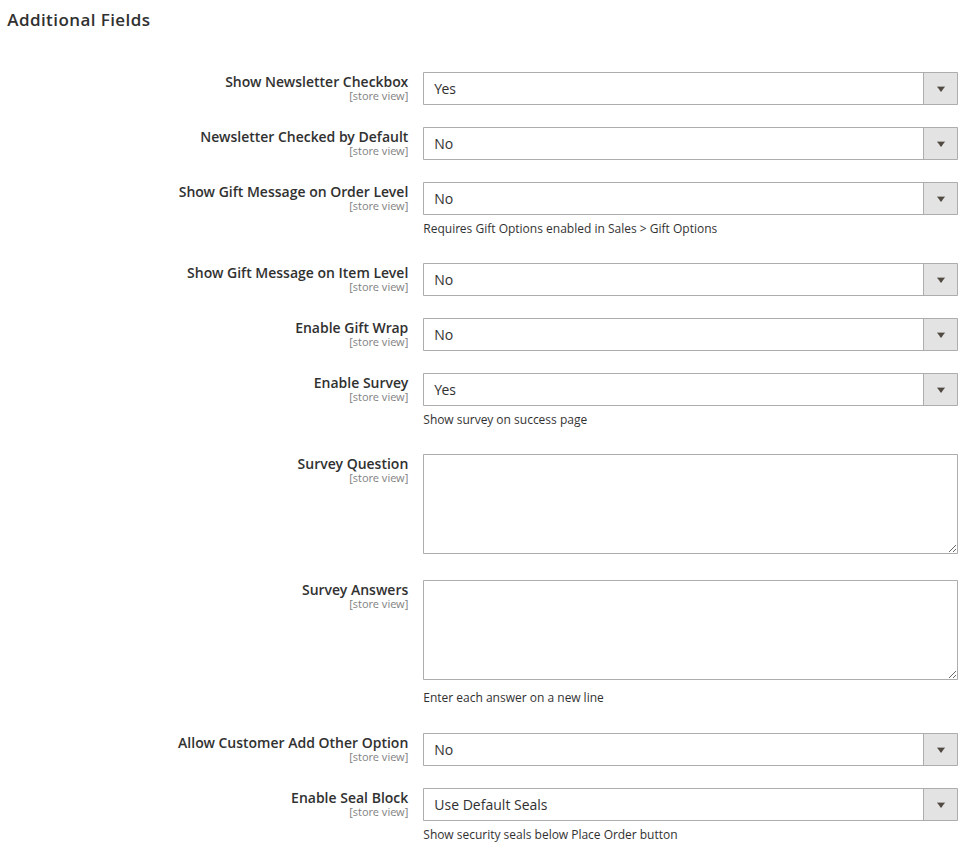
3.5 Additional Fields
Show Newsletter Checkbox: Display a newsletter subscription checkbox during checkout.
Newsletter Checked by Default: Choose whether the newsletter checkbox is already selected when the page loads.
Show Gift Message on Order Level: Allow customers to add a single gift message for the entire order. Requires Gift Options to be enabled in Sales > Gift Options.
Show Gift Message on Item Level: Allow customers to add separate gift messages for individual products.
Enable Gift Wrap: Give customers the option to request gift wrapping during checkout.
Enable Survey: Display a short survey on the order success page after the customer places an order. Survey responses appear in the Analytics Dashboard (Step 6).
Survey Question: Enter the question you want to ask customers in the post-purchase survey.
Survey Answers: Add the answer options for the survey, one answer per line.
Allow Customer Add Other Option: Allow customers to enter their own answer if none of the predefined options apply.
Enable Seal Block: Display trust badges or security seals below the Place Order button to build customer confidence.
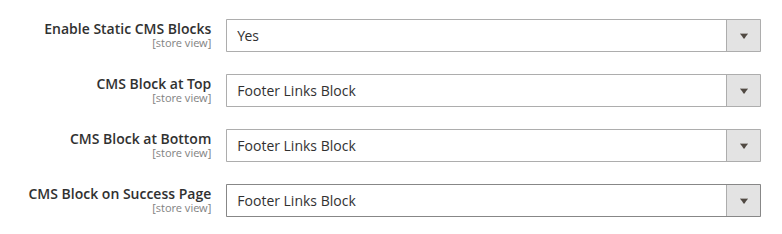
Enable Static CMS Blocks: Enable custom CMS content blocks on the checkout page.
CMS Block at Top: Select the CMS block to display at the top of the checkout page.
CMS Block at Bottom: Select the CMS block to display at the bottom of the checkout page.
CMS Block on Success Page: Select the CMS block to display on the order success page.
3.6 Delivery Date Configuration
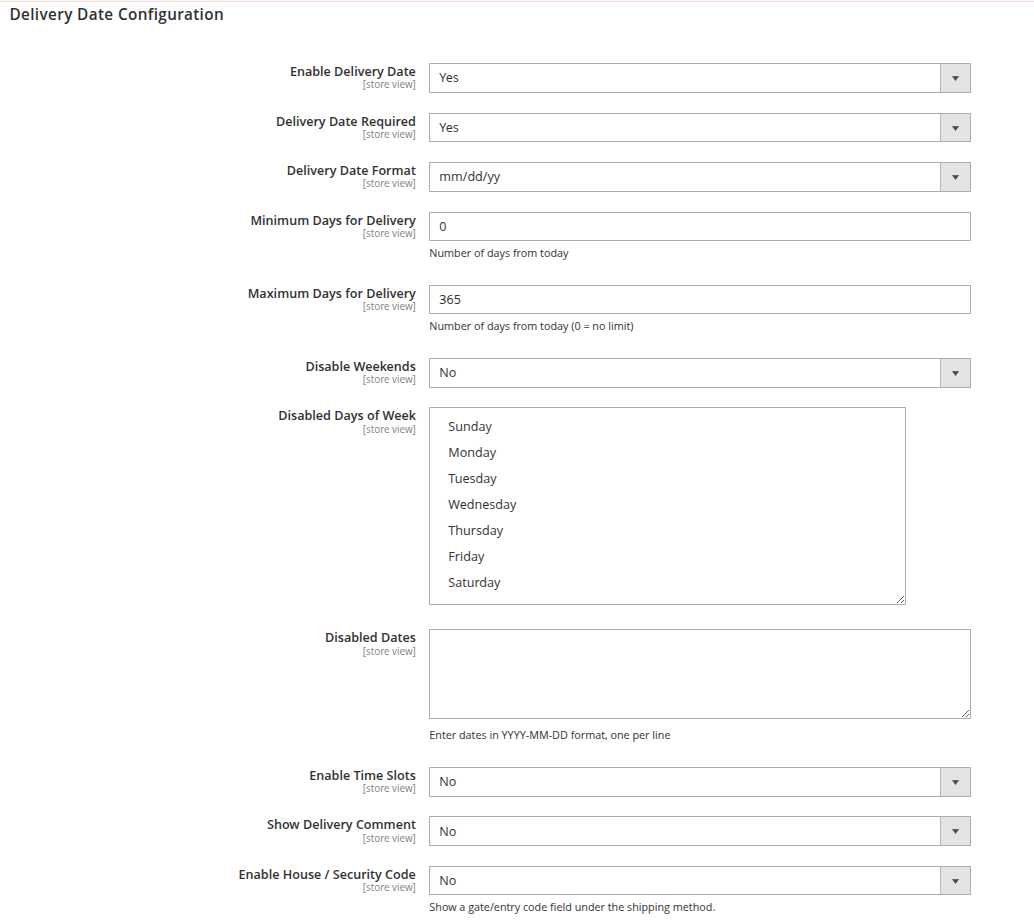
Enable Delivery Date: Allow customers to choose their preferred delivery date during checkout.
Delivery Date Required: Make selecting a delivery date mandatory before the customer can place the order.
Delivery Date Format: Choose the format used to display and select the delivery date, for example MM/DD/YY.
Minimum Days for Delivery: Set the minimum number of days from today before a delivery date can be selected. For example, 0 allows same-day delivery if available.
Maximum Days for Delivery: Set the maximum number of days into the future that customers can choose. Enter 0 for no limit.
Disable Weekends: Prevent customers from selecting Saturdays and Sundays.
Disabled Days of Week: Choose specific weekdays that should not be available for delivery.
Disabled Dates: Enter specific calendar dates (one per line in YYYY-MM-DD format) that should not be available, such as holidays or store closures.
Enable Time Slots: Allow customers to choose a preferred delivery time slot along with the delivery date.
Manage Slots Per Date (with Capacity): Enable this option to manage delivery time slots for specific dates with a booking limit. Slots are created from Sales > One Step Checkout > Delivery Slots (see Step 5), where you assign a date, define the available time slots and set the maximum number of orders per slot. Once a slot reaches its capacity, it is automatically hidden during checkout.
Show Delivery Comment: Allow customers to leave special delivery instructions or notes for the shipping team.
Enable House / Security Code: Display an additional field for a gate code, apartment access code or other security information required for delivery.
3.7 Design Configuration
Checkout Page Layout: Choose the layout for your checkout page, such as single-column, multi-column or multistep wizard, based on the shopping experience you want to provide. If you pick a multistep wizard layout, also review section 3.8.
Design Style: Select a predefined checkout design theme, such as Default, Flat, Material, Classic or Modern, to match your store's look and feel.
Block Title Prefix: Add step numbers or icons before section headings to make the checkout flow easier to follow.
Page Title Color: Choose the color of the main checkout page title.
Description Color: Set the color of the description text below the checkout title.
Heading Text Color: Choose the color used for section headings throughout the checkout page.
Place Order Button Color: Customize the background color of the Place Order button to match your branding.
Place Order Button Text: Change the text displayed on the Place Order button.
Place Order Button Position: Select where the Place Order button appears on the checkout page.
Radio Button Style: Customize the appearance of radio buttons used for shipping and payment options.
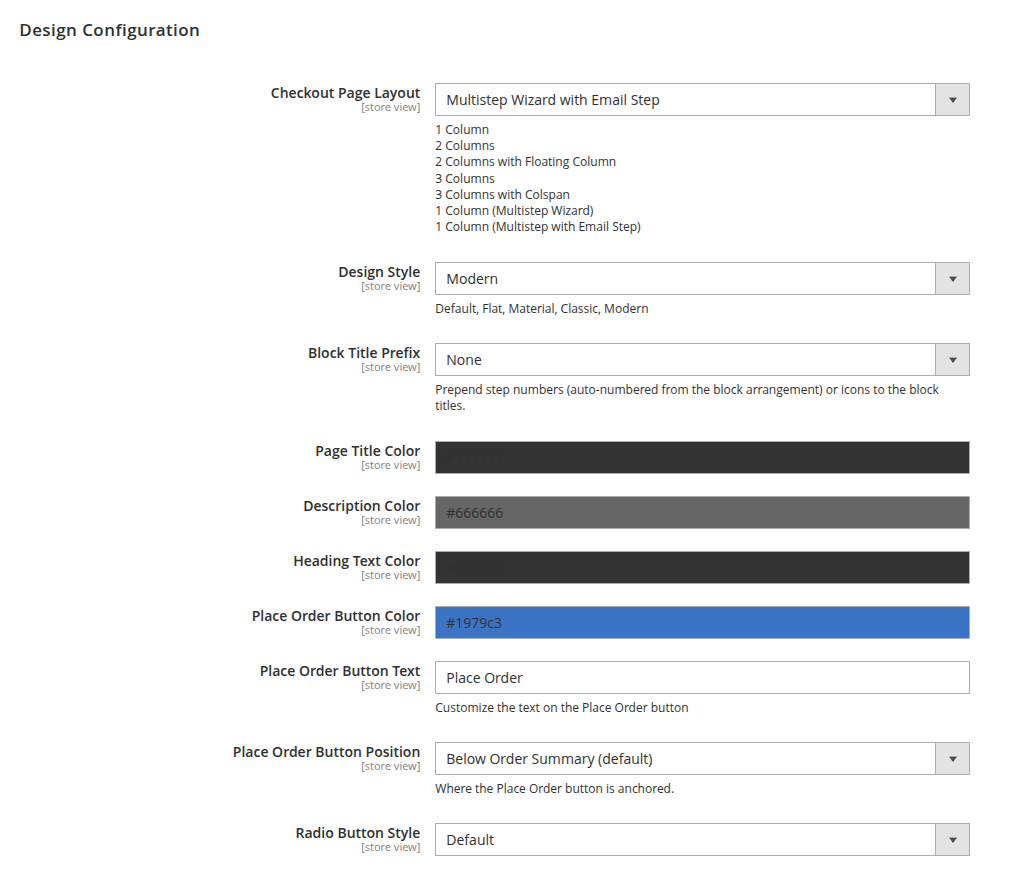
Checkbox Style: Customize the appearance of checkboxes displayed during checkout.
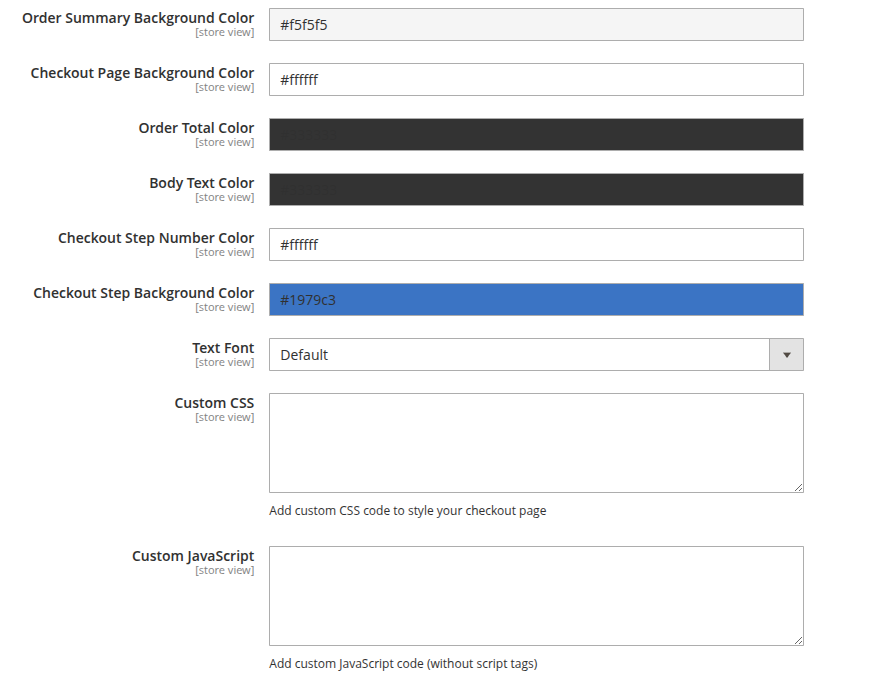
Order Summary Background Color: Set the background color of the order summary section.
Checkout Page Background Color: Choose the overall background color of the checkout page.
Order Total Color: Set the color of the final order total.
Body Text Color: Choose the default text color used throughout the checkout page.
Checkout Step Number Color: Set the text color of the step numbers.
Checkout Step Background Color: Set the background color of the step numbers.
Text Font: Choose the font family used for all text on the checkout page.
Custom CSS: Add your own CSS code to further customize the appearance.
Custom JavaScript: Add custom JavaScript (without
<script>tags) to extend the checkout functionality.
3.8 Multistep Wizard Configuration
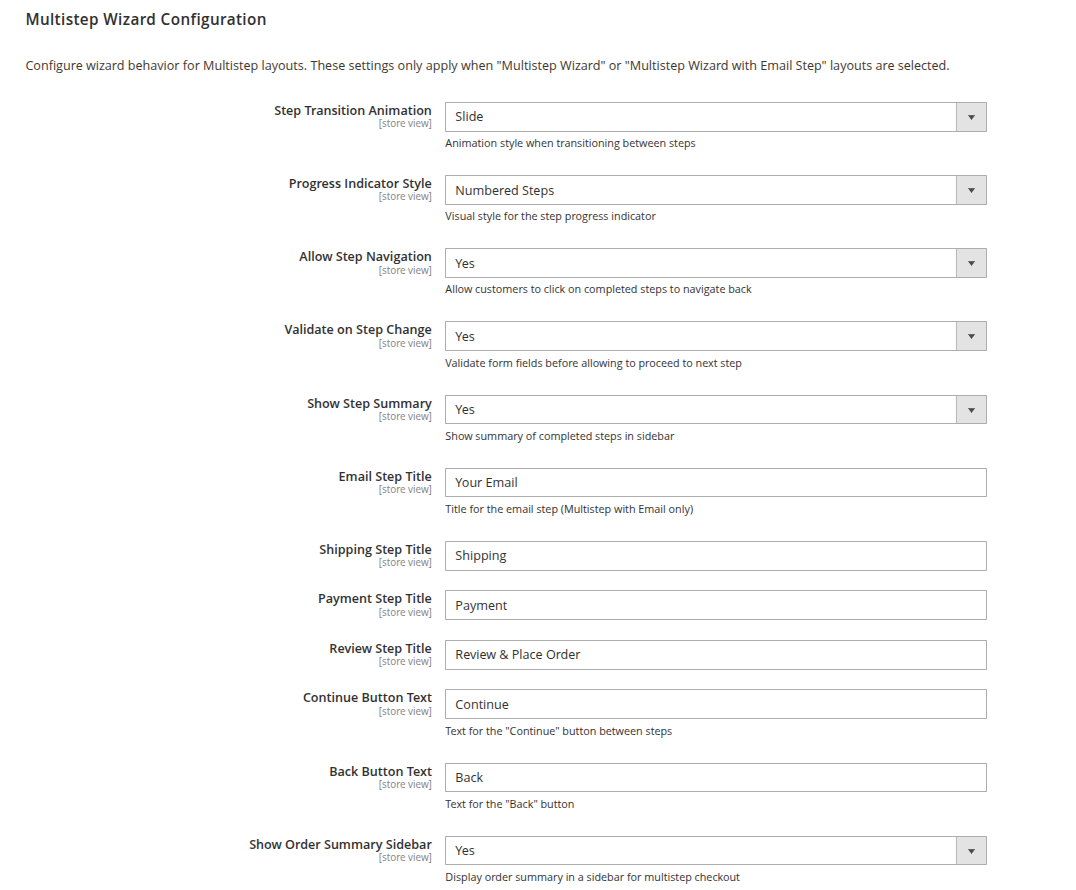
Note: These settings apply only when Multistep Wizard or Multistep Wizard with Email Step is selected as the Checkout Page Layout in section 3.7.
Step Transition Animation: Choose the animation effect used when customers move between checkout steps.
Progress Indicator Style: Select how checkout progress is displayed, such as numbered steps.
Allow Step Navigation: Allow customers to return to previously completed steps by clicking on them.
Validate on Step Change: Check required fields before allowing customers to move to the next step.
Show Step Summary: Display a summary of completed steps in the sidebar for quick review.
Email Step Title: Set the title for the email step in the Multistep Wizard with Email Step layout.
Shipping Step Title: Customize the title of the shipping information step.
Payment Step Title: Customize the title of the payment information step.
Review Step Title: Set the title for the final order review and confirmation step.
Continue Button Text: Customize the text on the Continue button between steps.
Back Button Text: Customize the text on the Back button.
Show Order Summary Sidebar: Display the order summary in a sidebar throughout the multistep checkout.
3.9 Design Tokens (CSS Variables)
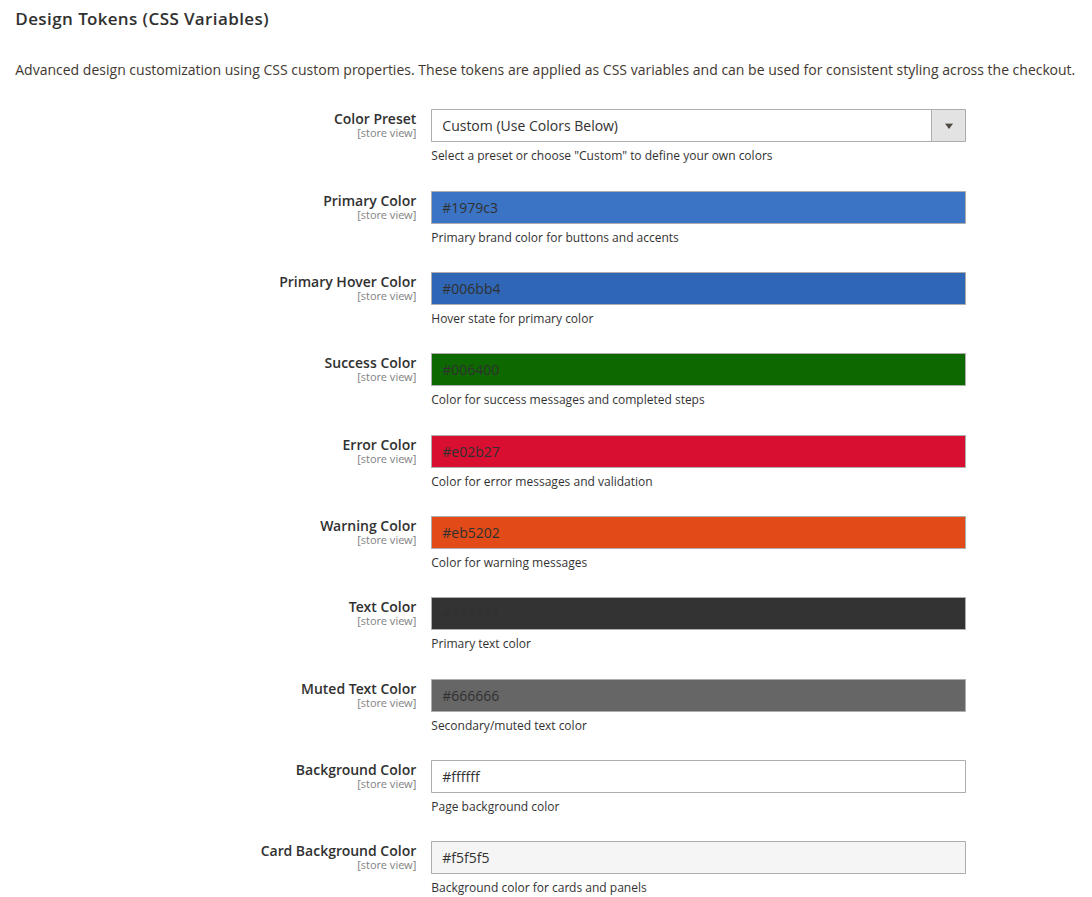
Design Tokens control the overall look and feel of the checkout through CSS variables, keeping colors, spacing and styling consistent across the entire checkout.
Color Preset: Choose a predefined color scheme or select Custom to configure your own brand colors.
Primary Color: Set the main brand color used for buttons, links, highlights and other key elements.
Primary Hover Color: Choose the color displayed when customers hover over primary buttons and interactive elements.
Success Color: Set the color used for success messages, completed steps and positive status indicators.
Error Color: Choose the color used for validation errors and error messages.
Warning Color: Set the color used for warning messages and important notices.
Text Color: Define the default color for main text.
Muted Text Color: Set the color for secondary text, descriptions and helper messages.
Background Color: Choose the overall background color of the checkout page.
Card Background Color: Set the background color for sections, cards and panels.
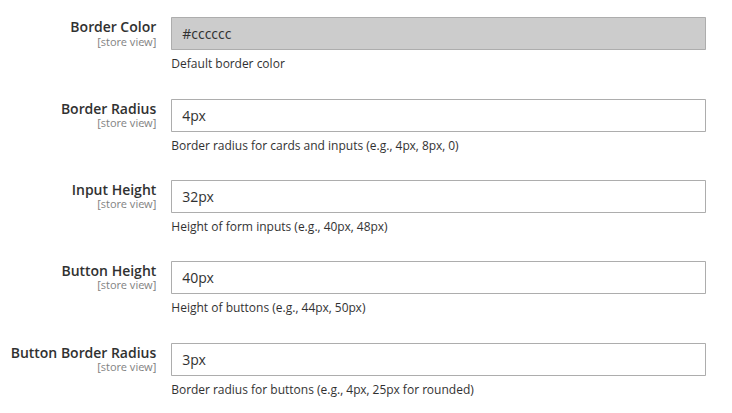
Border Color: Define the default color for borders around inputs, cards and other elements.
Border Radius: Control how rounded the corners of inputs, cards and other elements appear. Higher values create a softer look.
Input Height: Set the default height of all form fields.
Button Height: Specify the default height of buttons.
Button Border Radius: Control how rounded button corners appear. Larger values create more rounded buttons.
3.10 Tooltips Configuration
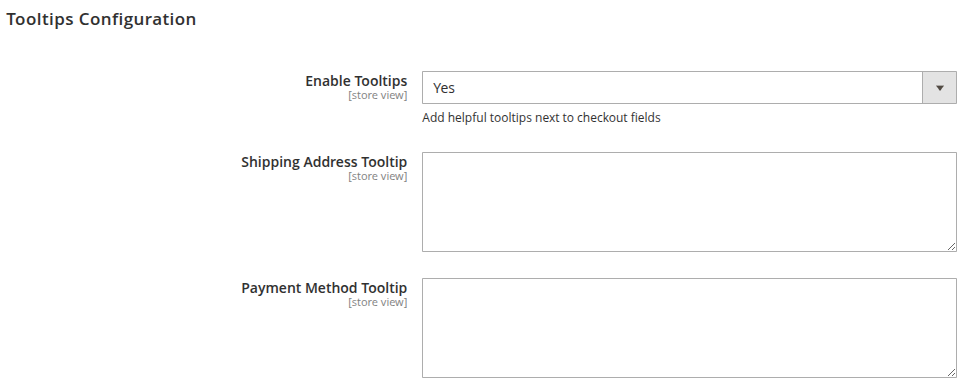
Enable Tooltips: Display helpful tooltips next to checkout fields to guide customers through checkout.
Shipping Address Tooltip: Enter the tooltip text for the Shipping Address section.
Payment Method Tooltip: Enter the tooltip text for the Payment Method section.
3.11 Loading Speed Optimization
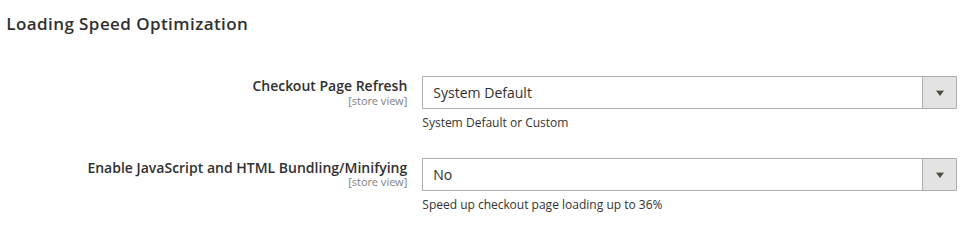
Checkout Page Refresh: Choose how the checkout page updates when changes are made. Select System Default for Magento's default behavior or Custom for the optimized refresh method provided by the extension.
Enable JavaScript and HTML Bundling/Minifying: Bundle and minify JavaScript and HTML files to reduce the number and size of files the browser loads, making the checkout page load faster.
3.12 Checkout Analytics
These settings enable the data collection behind the Analytics Dashboard covered in Step 6.
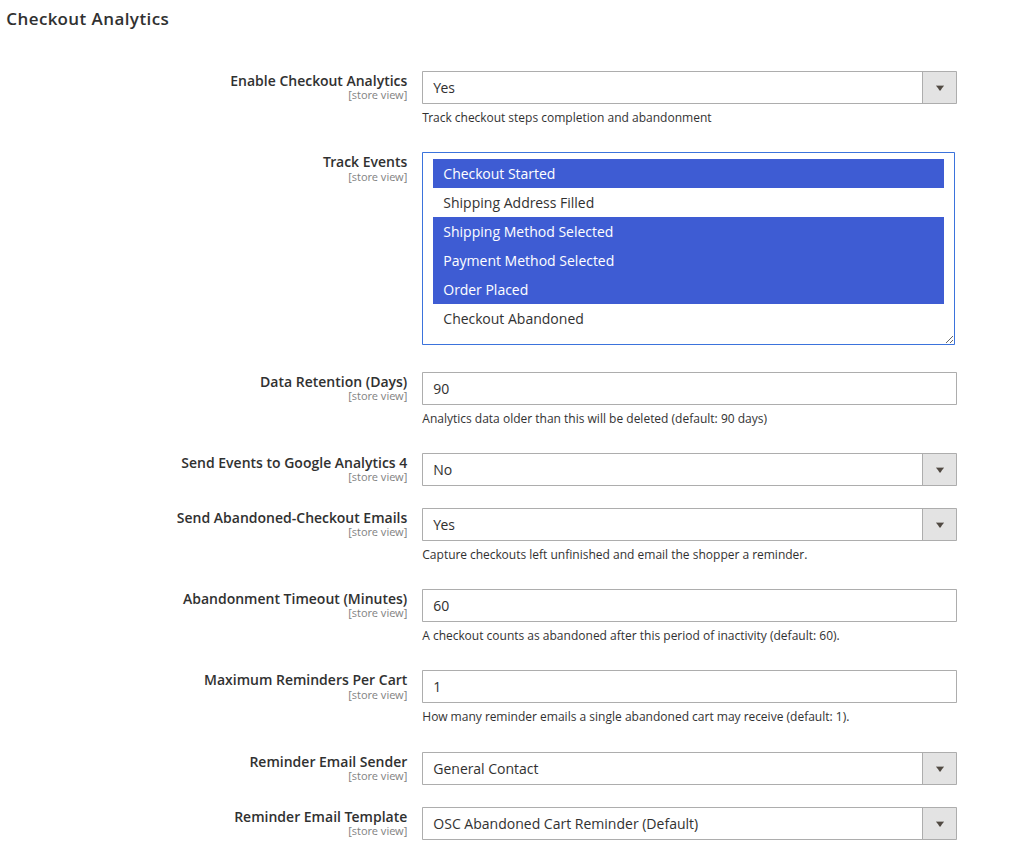
Enable Checkout Analytics: Track customer progress through checkout, identify where customers abandon their carts and gather checkout insights.
Track Events: Select the events to track, such as Checkout Started, Shipping Address Filled, Shipping Method Selected, Payment Method Selected, Order Placed and Checkout Abandoned.
Data Retention (Days): Specify how long analytics data is stored before automatic deletion. Default: 90 days.
Send Events to Google Analytics 4: Send tracked events to GA4 for advanced reporting.
Send Abandoned-Checkout Emails: Automatically send reminder emails to customers who leave checkout without completing their purchase.
Abandonment Timeout (Minutes): Set the inactivity period after which a checkout session counts as abandoned. Default: 60 minutes.
Maximum Reminders Per Cart: Define the maximum number of reminder emails per abandoned cart.
Reminder Email Sender: Select the email identity shown as the sender of reminder emails.
Reminder Email Template: Choose the email template for abandoned checkout reminders.
3.13 Advanced Settings
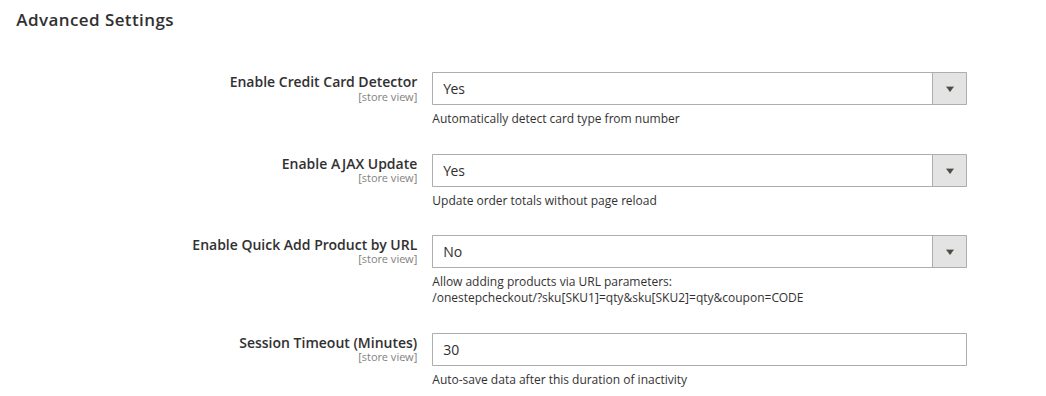
Enable Credit Card Detector: Automatically detect and display the customer's credit card type from the card number entered.
Enable AJAX Update: Update shipping methods, payment methods and order totals instantly without reloading the page.
Enable Quick Add Product by URL: Allow products to be added to the cart through URL parameters. Useful for promotions or custom landing pages.
Session Timeout (Minutes): Specify how long customer checkout data is kept during inactivity before the session expires.
3.14 Security
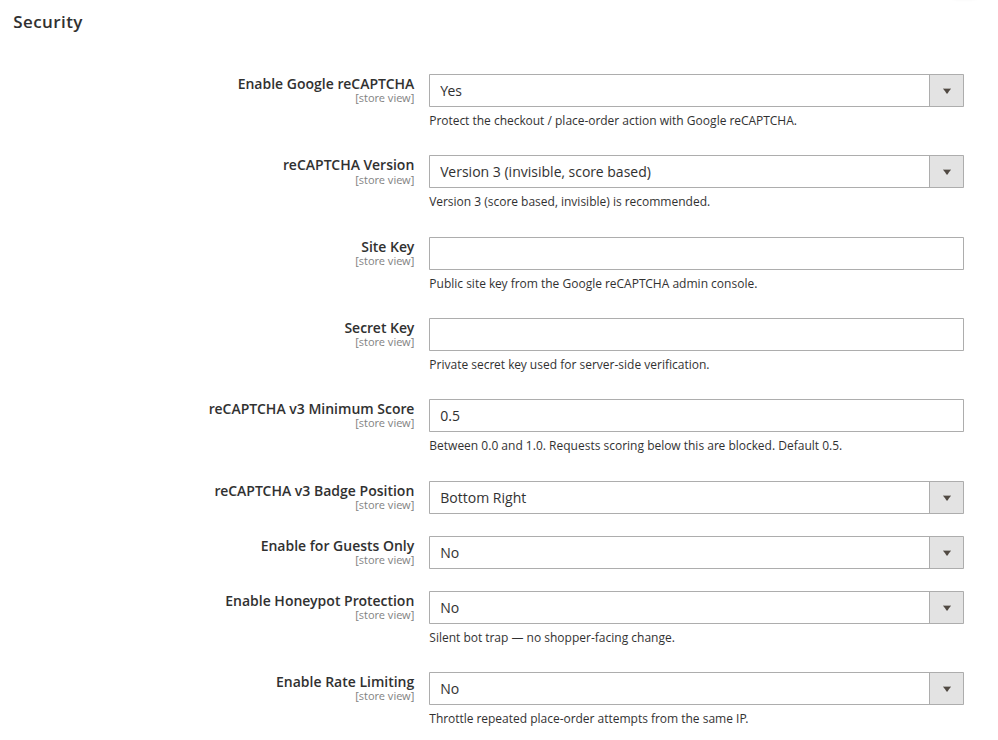
Enable Google reCAPTCHA: Protect the Place Order action from spam, bots and fraudulent submissions.
reCAPTCHA Version: Choose the reCAPTCHA version. Version 3 is recommended as it works silently without customer challenges.
Site Key: Enter the public Site Key from your Google reCAPTCHA account.
Secret Key: Enter the private Secret Key from your Google reCAPTCHA account. It verifies requests securely on the server.
reCAPTCHA v3 Minimum Score: Set the minimum score (between 0.0 and 1.0) for a request to be considered legitimate. Requests below this score are blocked. Recommended: 0.5.
reCAPTCHA v3 Badge Position: Choose where the reCAPTCHA badge appears, such as Bottom Right, Bottom Left or Inline.
Enable for Guests Only: Apply reCAPTCHA only to guest customers while logged-in customers place orders without verification.
Enable Honeypot Protection: Enable an invisible security field that detects and blocks bots without affecting genuine customers.
Enable Rate Limiting: Limit repeated Place Order attempts from the same IP address within a short period.
Step 4: Customize the Checkout Layout and Fields
The extension gives you three admin tools to shape the checkout itself: the block builder controls the page structure, the fields manager controls which fields appear in each section, and custom fields let you collect extra information. All three are found under Sales > One Step Checkout.
4.1 Manage Checkout Blocks
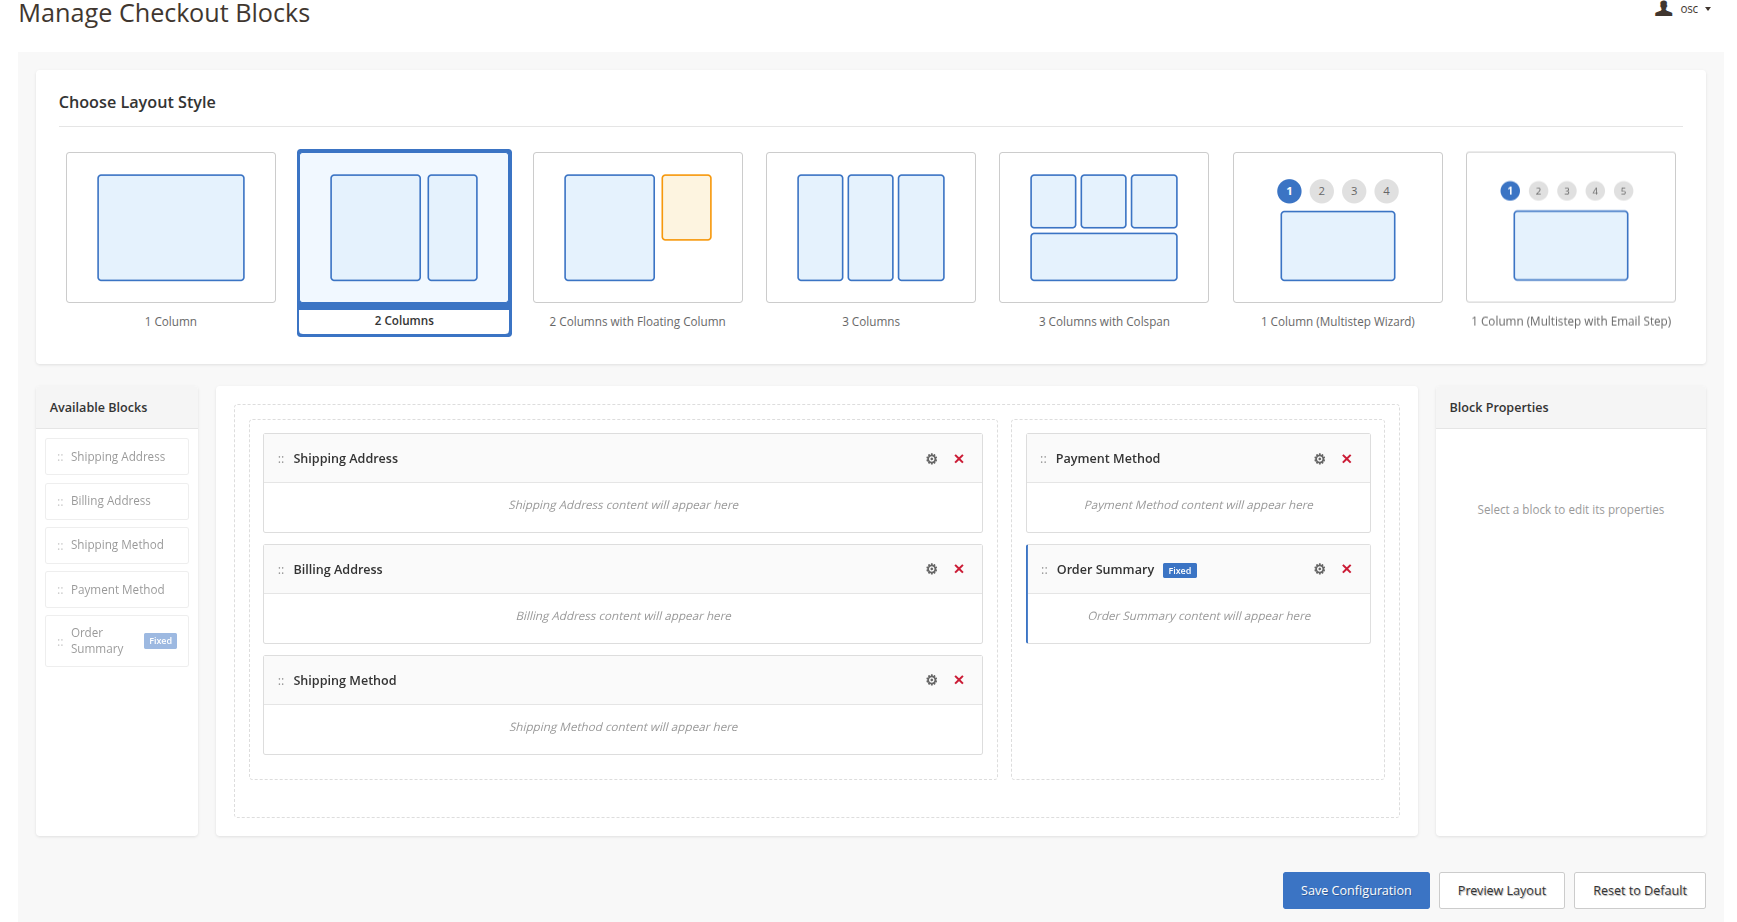
The Manage Checkout Blocks interface is a visual drag-and-drop builder for the layout and structure of your checkout page.
4.2 Manage Checkout Fields
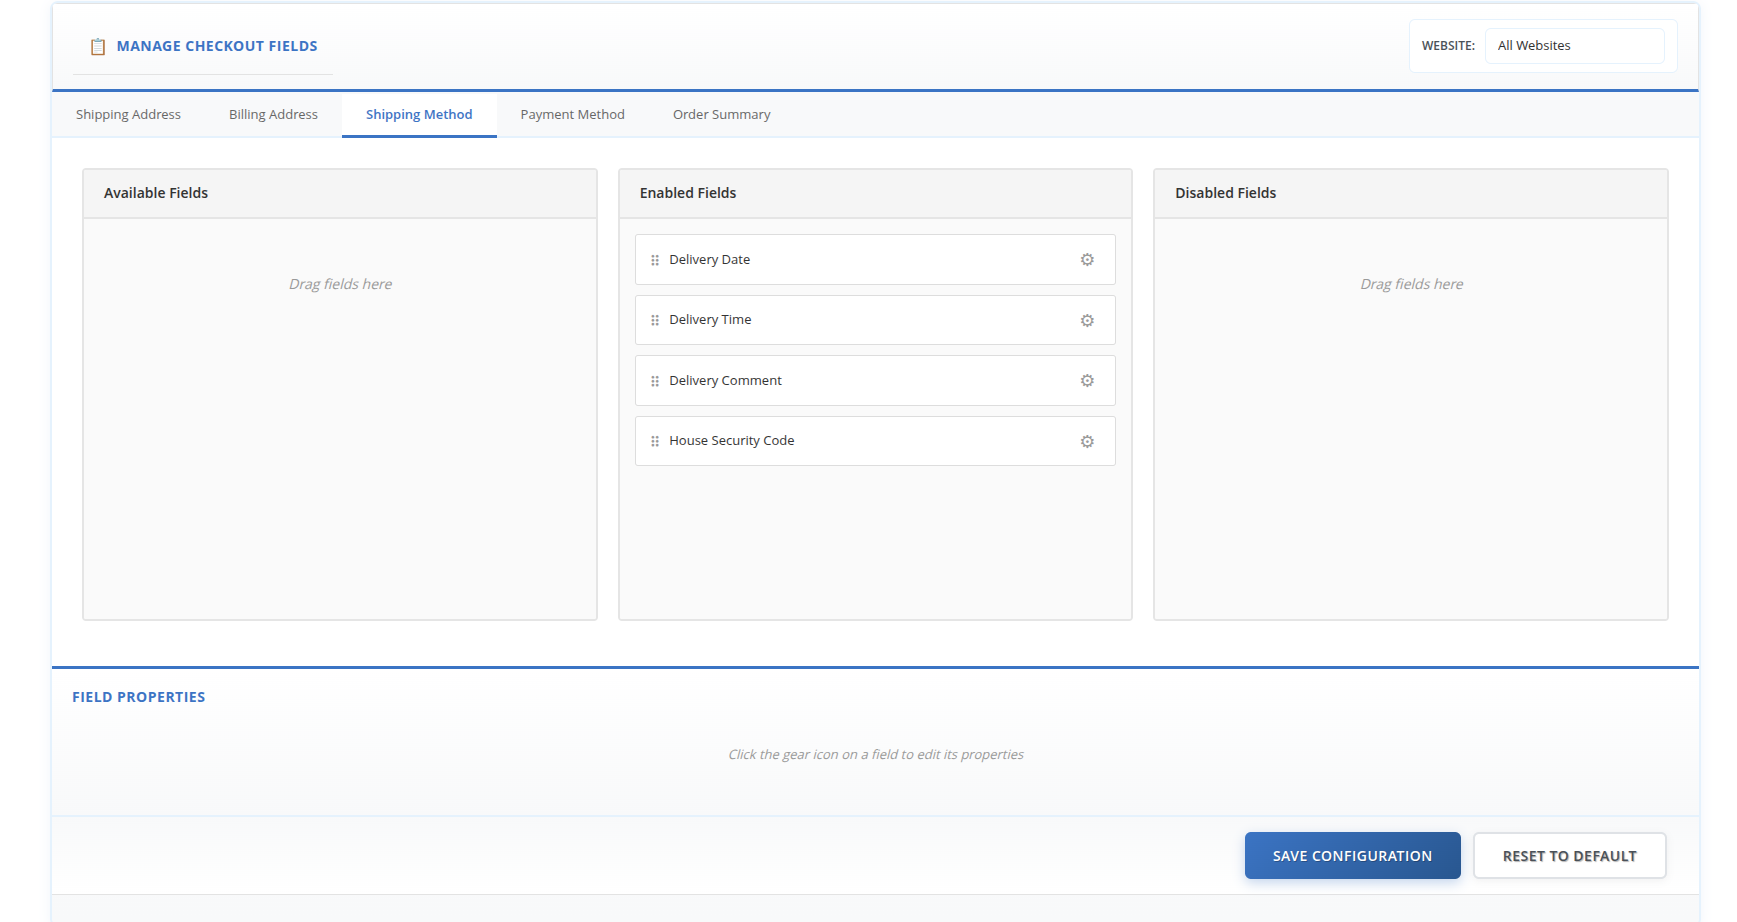
The Manage Checkout Fields interface controls which fields appear within each section of the checkout and how they behave.
4.3 Custom Checkout Fields
Custom Checkout Fields let you create new input fields to collect additional information from customers during checkout.
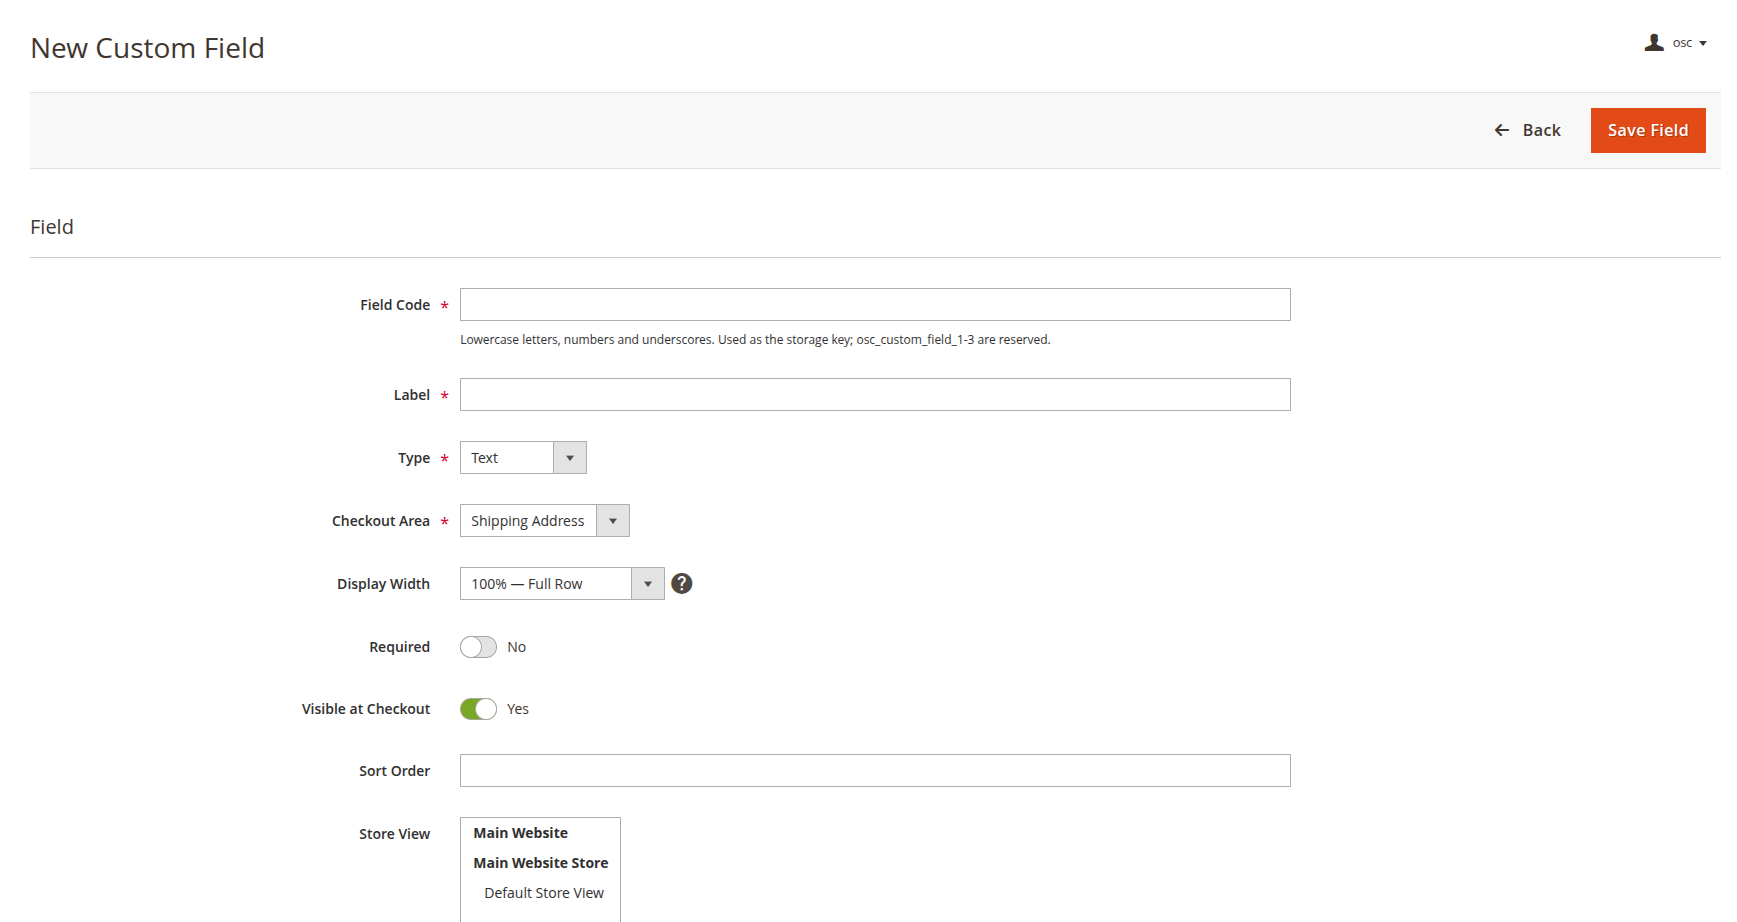
To create or edit a custom field, configure the following properties:
- Field Code: A unique internal identifier, for example
delivery_instructions. Use only lowercase letters, numbers and underscores. This acts as the database storage key. Note:osc_custom_field_1-3are reserved. - Label: The frontend title displayed to the customer.
- Type: The input type (Text, Textarea, Dropdown, Checkbox and more).
- Checkout Area: The checkout step where the field appears (Shipping Address, Billing Address, Shipping Method).
- Display Width: How much horizontal space the field occupies (100% for a full row, 50% for side-by-side fields).
- Required: Set to Yes if the customer must fill the field to proceed.
- Visible at Checkout: Set to Yes to make the field active on the frontend. Set to No to hide it temporarily without deleting it.
- Sort Order: A numeric value that determines display sequence relative to other fields in the same area. Lower numbers appear first.
- Store View: Select specific store views for the field. Leave empty to apply it to all store views.
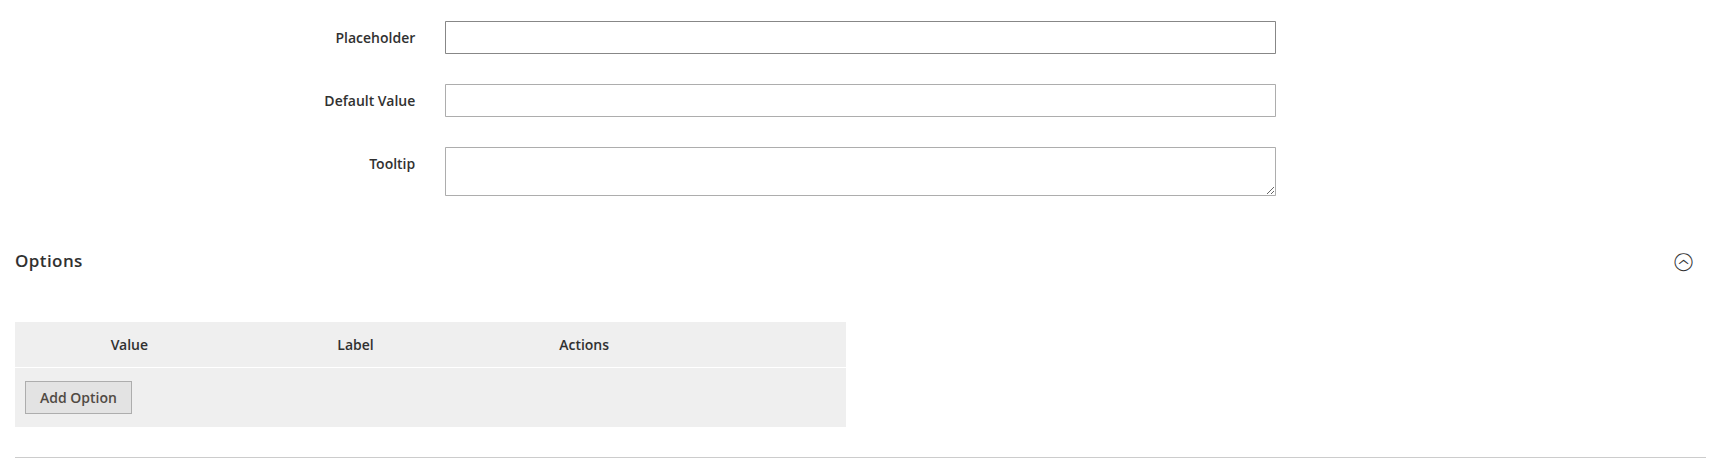
- Placeholder: Hint text shown inside the input before the customer types.
- Default Value: A pre-filled default value.
- Tooltip: Helpful instructions shown when the customer hovers over the tooltip icon next to the field.
- Options: For Dropdown, Radio or Multiple Select types, use Add Option to define the selectable values and their frontend labels.
After configuring the field, click Save Field at the top right.
Step 5: Set Up Delivery Slots (Optional)
The Delivery Slots page at Sales > One Step Checkout > Delivery Slots lets you generate and manage delivery time windows with booking capacity.
Before you start: slots are visible to customers only when Manage Slots Per Date is enabled in the Delivery Date configuration (section 3.6). A warning appears at the top of this page if it is not turned on.
5.1 Generate Slots
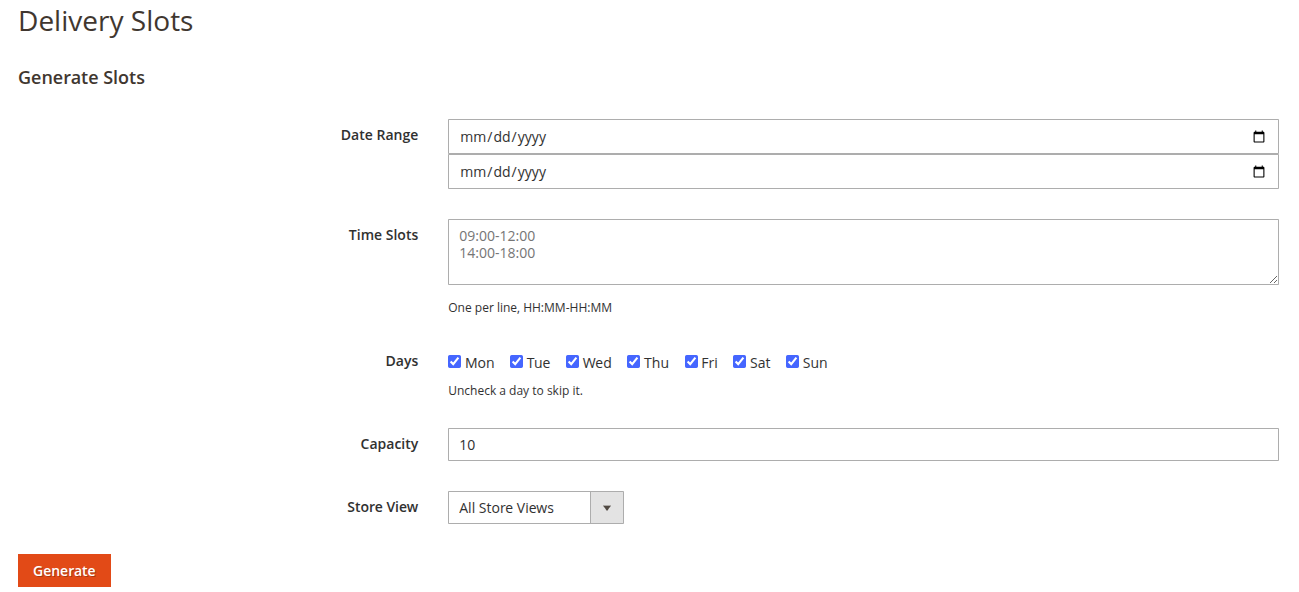
Use this section to bulk-create recurring delivery time windows for a period.
- Date Range: Select the starting and ending dates for slot generation.
- Time Slots: Enter the time windows offered each day, one per line, in 24-hour
HH:MM-HH:MMformat. Example:09:00-12:00for a morning slot and14:00-18:00for an afternoon slot. - Days: Select the weekdays these slots apply to. Uncheck days you do not deliver, such as Saturday and Sunday.
- Capacity: Enter the maximum number of orders accepted for each generated slot. Once a slot reaches capacity, it becomes unavailable to customers.
- Store View: Select the store view these slots apply to.
- Generate: Click Generate to create the slots. They immediately appear in the Existing Slots table below.
5.2 Existing Slots
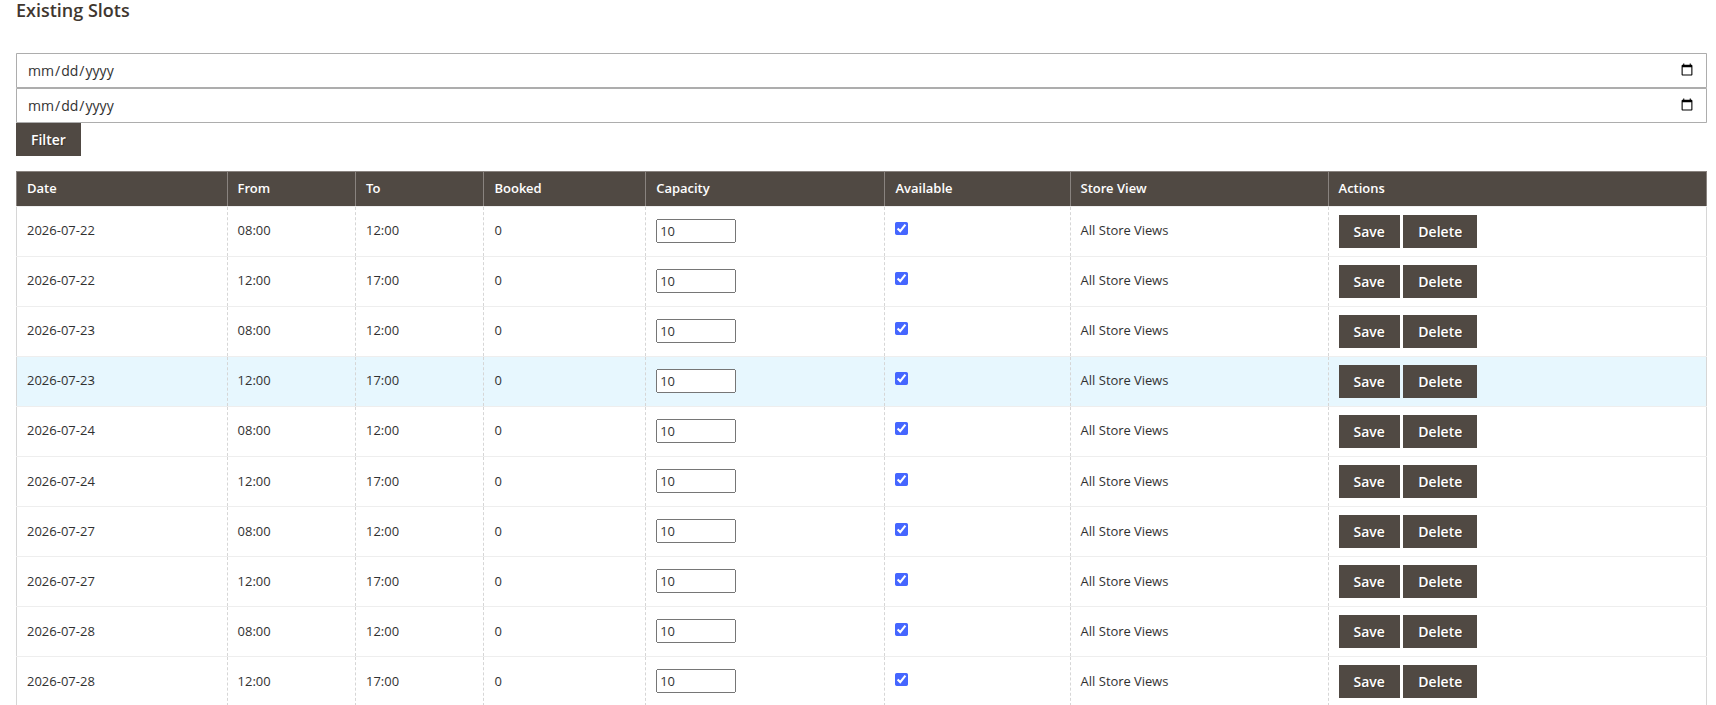
This table lists all currently active delivery slots.
- Filter: Use the date range inputs at the top of the table and click Filter to find slots within a timeframe.
- Manage Capacity: Edit the Capacity value directly in the table to raise or lower the order limit for a specific date and time.
- Availability: Uncheck Available to manually close a slot without deleting it.
- Actions: After changing capacity or availability, click Save in the Actions column. Click Delete to permanently remove a slot.
Step 6: Track Performance with the Analytics Dashboard
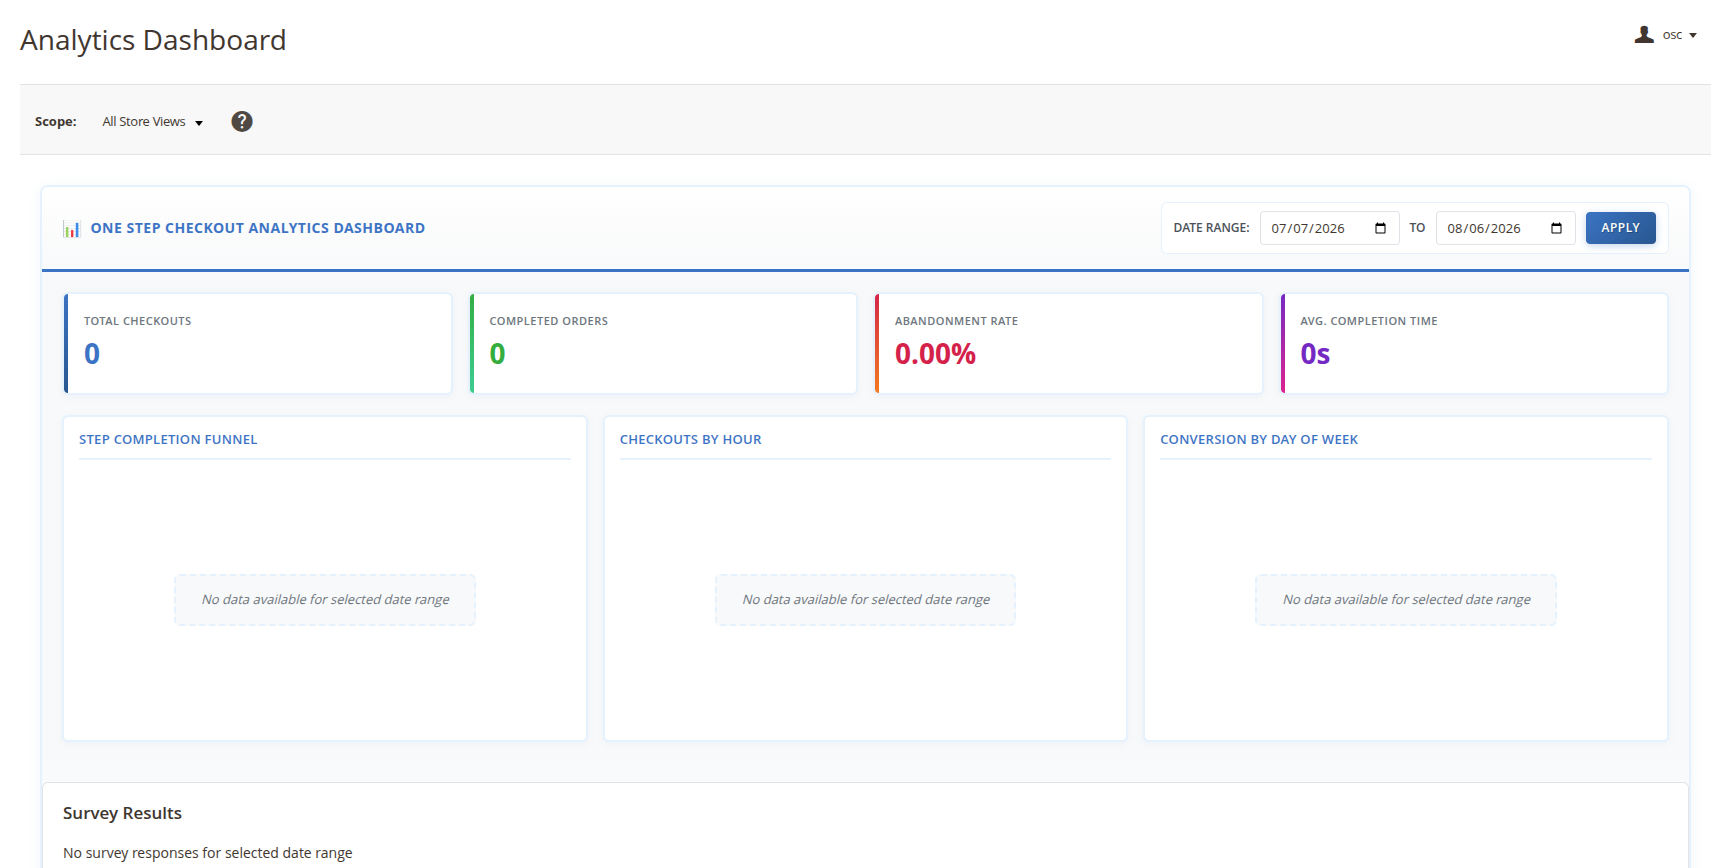
Once Enable Checkout Analytics is on (section 3.12), the Analytics Dashboard shows how customers move through your checkout, where they drop off and how to optimize the experience.
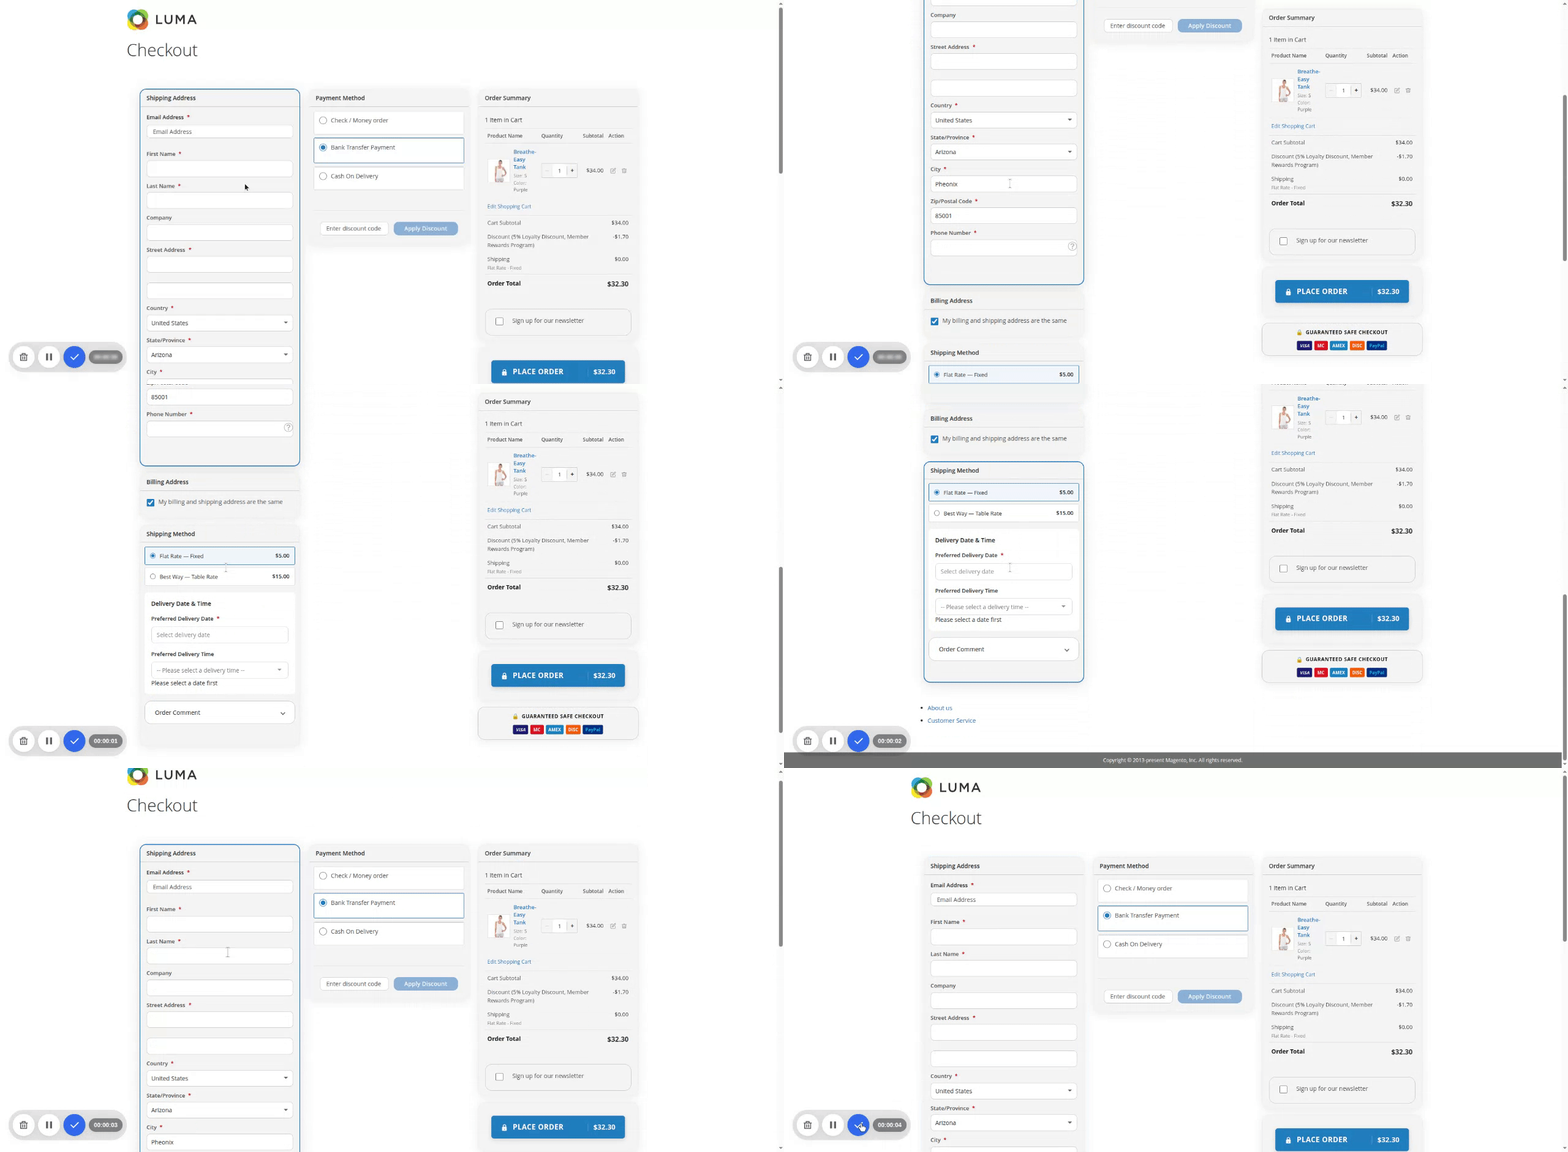
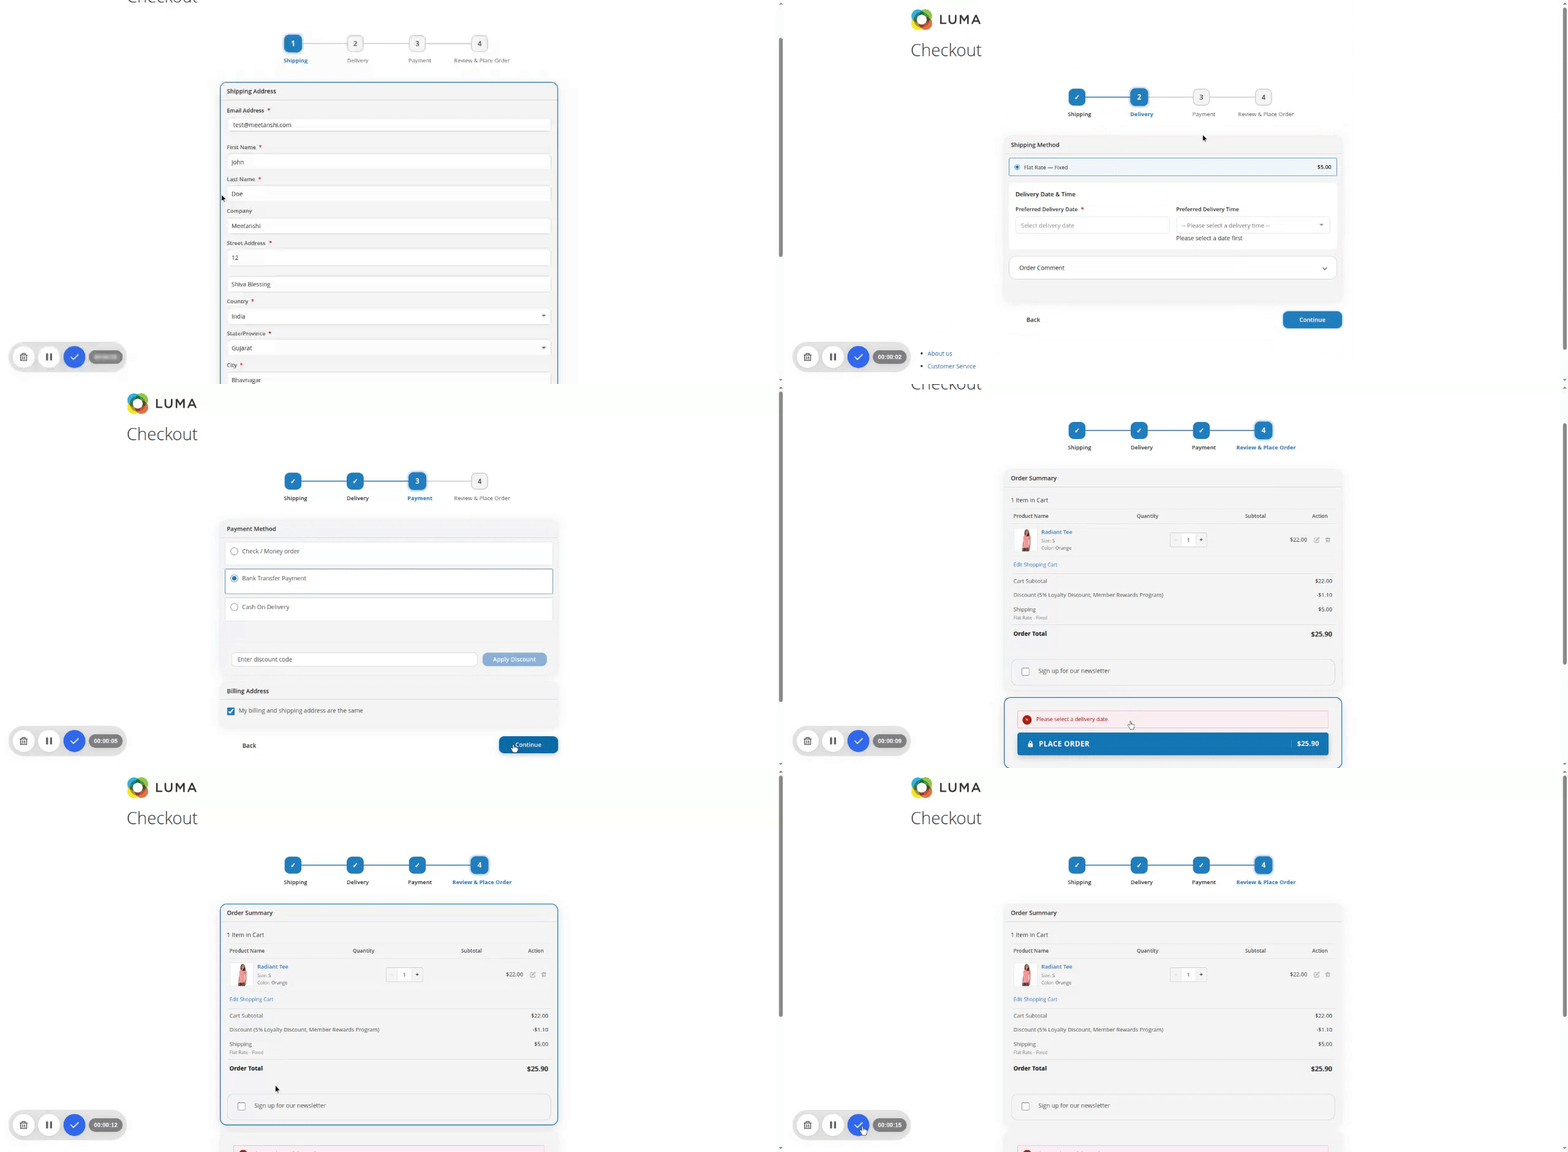
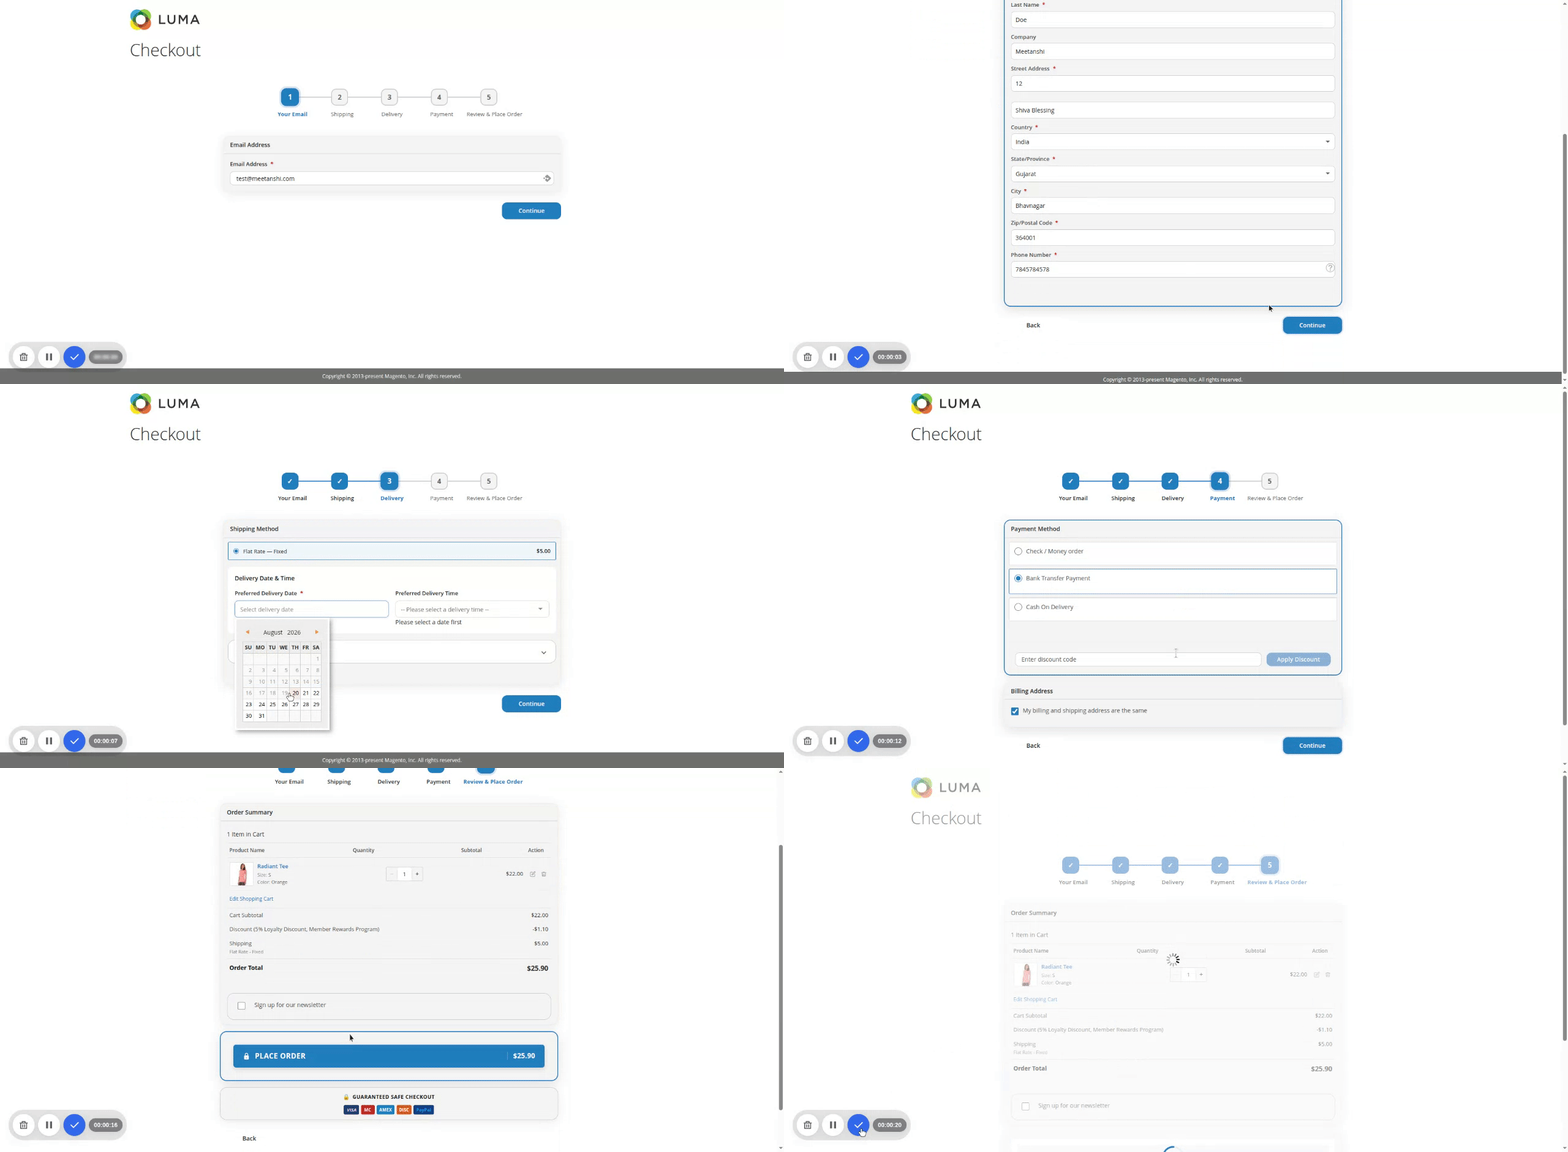
One step checkout in Frontend
We checked various layouts of checkout blocks in step 4.1. Here's how they will display in the frontend:
1 Column
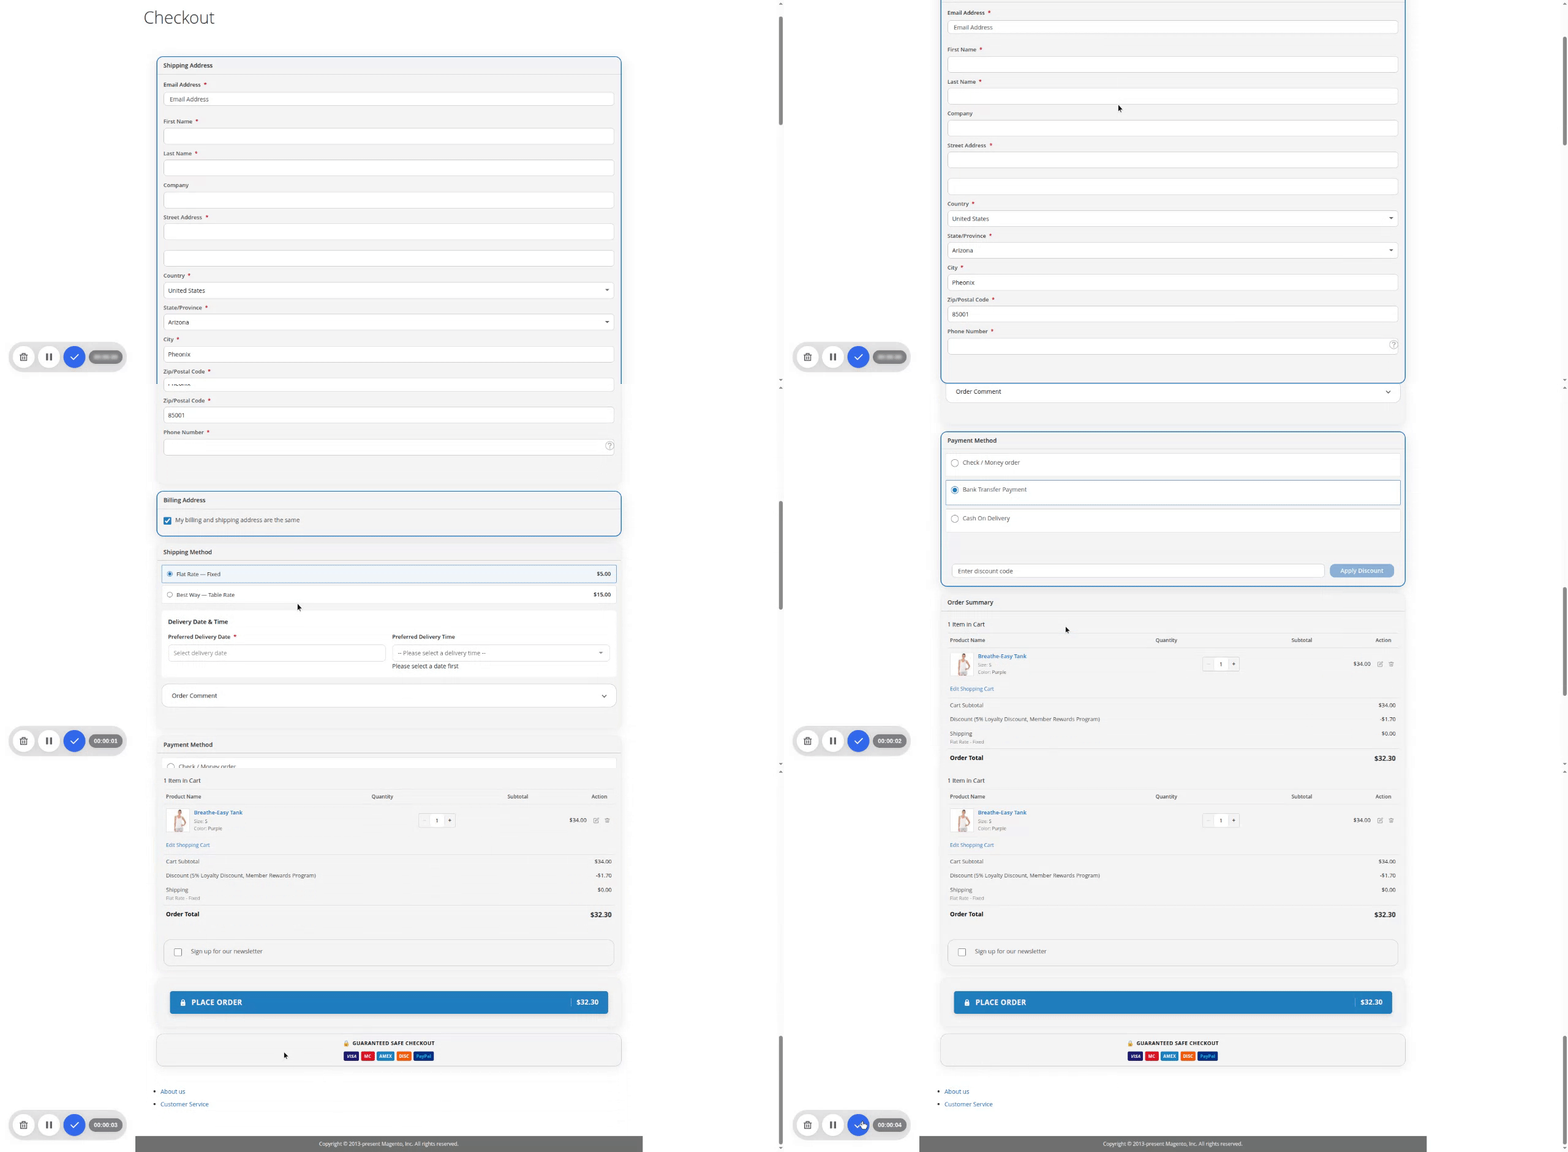
2 Column
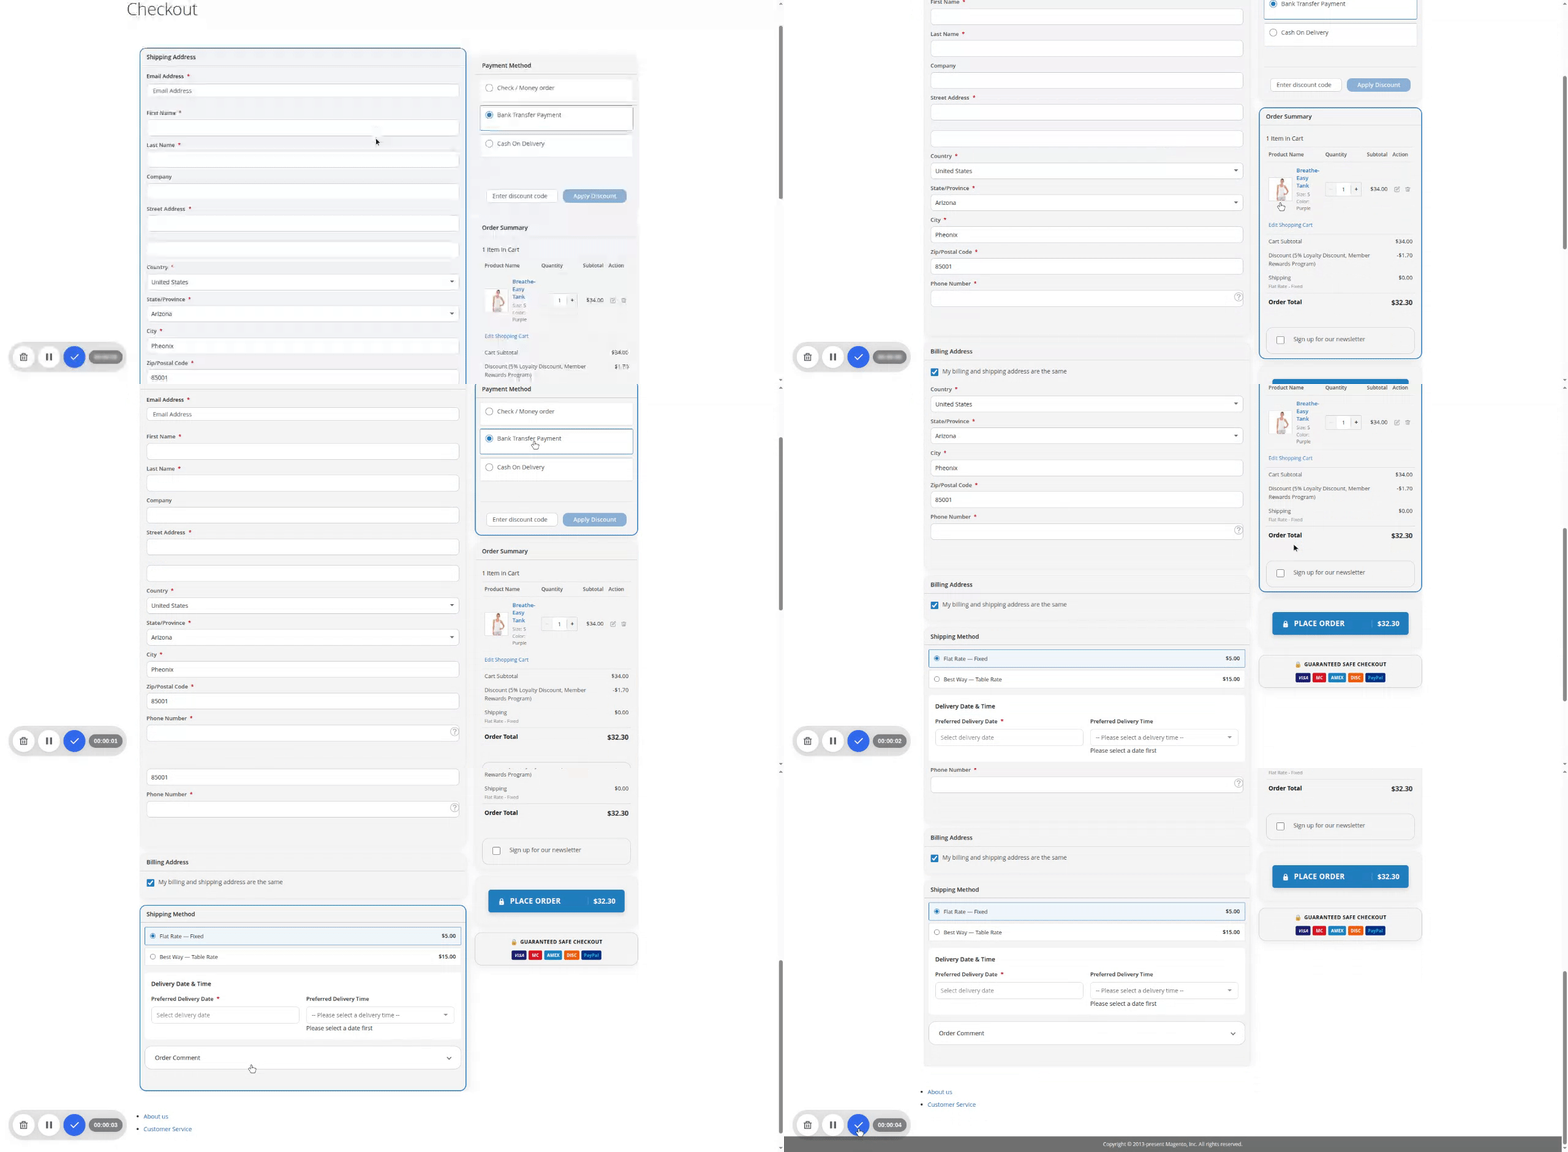
2 Columns with Floating Column
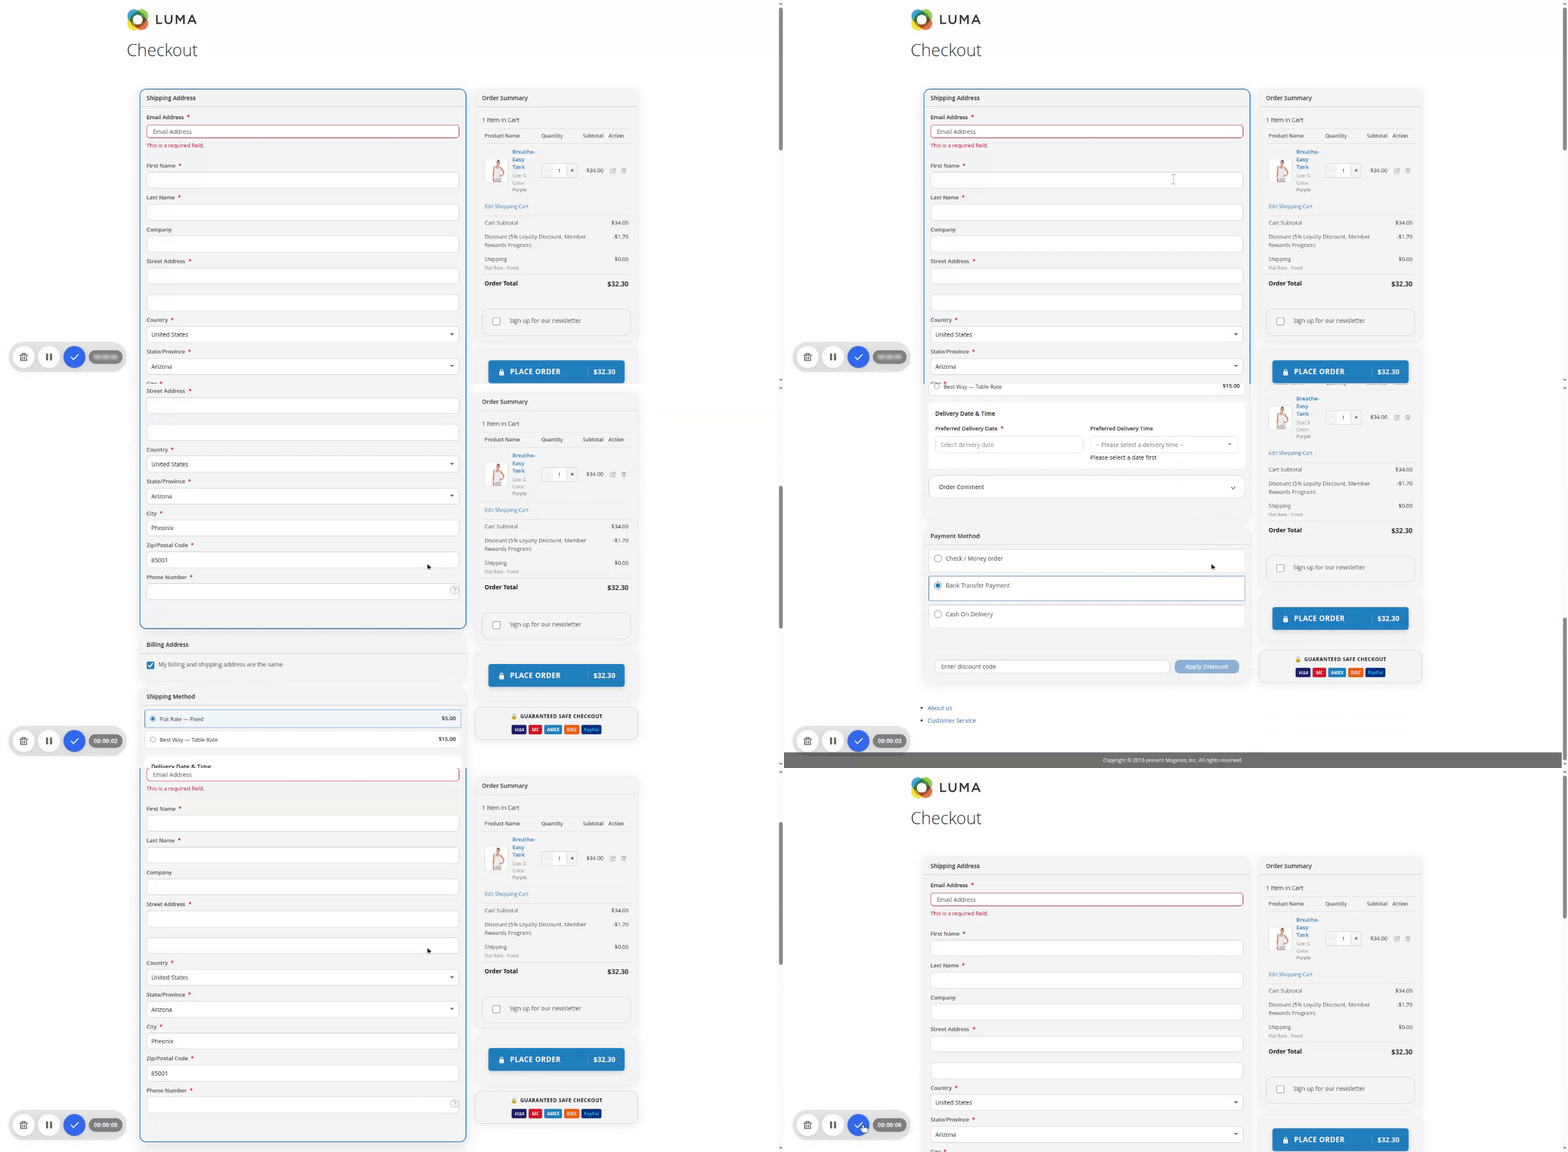
3 Columns
1 Column (Multistep Wizard)
1 Column (Multistep with Email Step)
Setup Checklist
Use this quick list to confirm your setup is complete:
- Extension installed and enabled, checkout loads at the configured route
- Guest checkout and account creation behavior set as intended
- Default shipping and payment methods selected
- Address defaults, autocomplete and GeoIP configured
- Delivery date and time slots configured and slots generated (if used)
- Layout, design style and brand colors applied
- Checkout fields arranged and any custom fields created
- Security options (reCAPTCHA, honeypot, rate limiting) enabled
- Analytics enabled and a test order placed to verify tracking
- Cache flushed and a full test order completed as both guest and logged-in customer