Tap Payments for Magento 2 - User Guide
Extension Installation
Prerequisites
- Magento 2.3.x – 2.4.x installed and functioning.
- Active Tap Payments Merchant Account (Public Key & Secret Key).
Magento Marketplace Customers Method
- Access your server CLI via SSH and navigate to your Magento root directory.
- Run the Composer command to fetch the extension:
composer require meetanshi/magento-2-tap-payments - Enable the extension module:
php bin/magento module:enable Meetanshi_Tap - Run the upgrade command:
php bin/magento setup:upgrade - Deploy static content based on your Magento version:
- For Magento 2.0.x – 2.1.x:
php bin/magento setup:static-content:deploy - For Magento 2.2.x & above:
php bin/magento setup:static-content:deploy -f
- For Magento 2.0.x – 2.1.x:
- Flush the Magento cache:
php bin/magento cache:flush
Direct ZIP / Meetanshi Customers Method
- Download the extension ZIP file from your Meetanshi account area.
- Extract the archive contents and upload them to your server under
<Magento_Root>/app/code/Meetanshi/Tap/. - Connect to your Magento server via SSH and execute the following commands:
php bin/magento setup:upgrade- For Magento 2.0.x – 2.1.x:
php bin/magento setup:static-content:deploy - For Magento 2.2.x & above:
php bin/magento setup:static-content:deploy -f
php bin/magento cache:flush - For Magento 2.0.x – 2.1.x:
Tap Payments for Magento 2 enables secure online payments for Middle East (MENA) businesses via KNET, Benefit, Mada, Debit/Credit Cards, and Apple Pay powered by Tap Payments Gateway.
How to Obtain Tap Payments API Credentials
Follow these steps to obtain your Public Key and Secret Key from Tap Payments:
- Log in to your Tap Payments Dashboard.
- Switch to Test Mode for testing credentials or Live Mode for production credentials using the mode toggle.
- In the left navigation menu, click Developer or API Credentials.
- Locate your Public Key (starts with
pk_test_...orpk_live_...) and Secret Key (starts withsk_test_...orsk_live_...). - Copy both keys.
- Enter the copied values into the Test Public Key / Live Public Key and Test Secret Key / Live Secret Key fields under Magento Admin configuration.
Payment Gateway Configuration
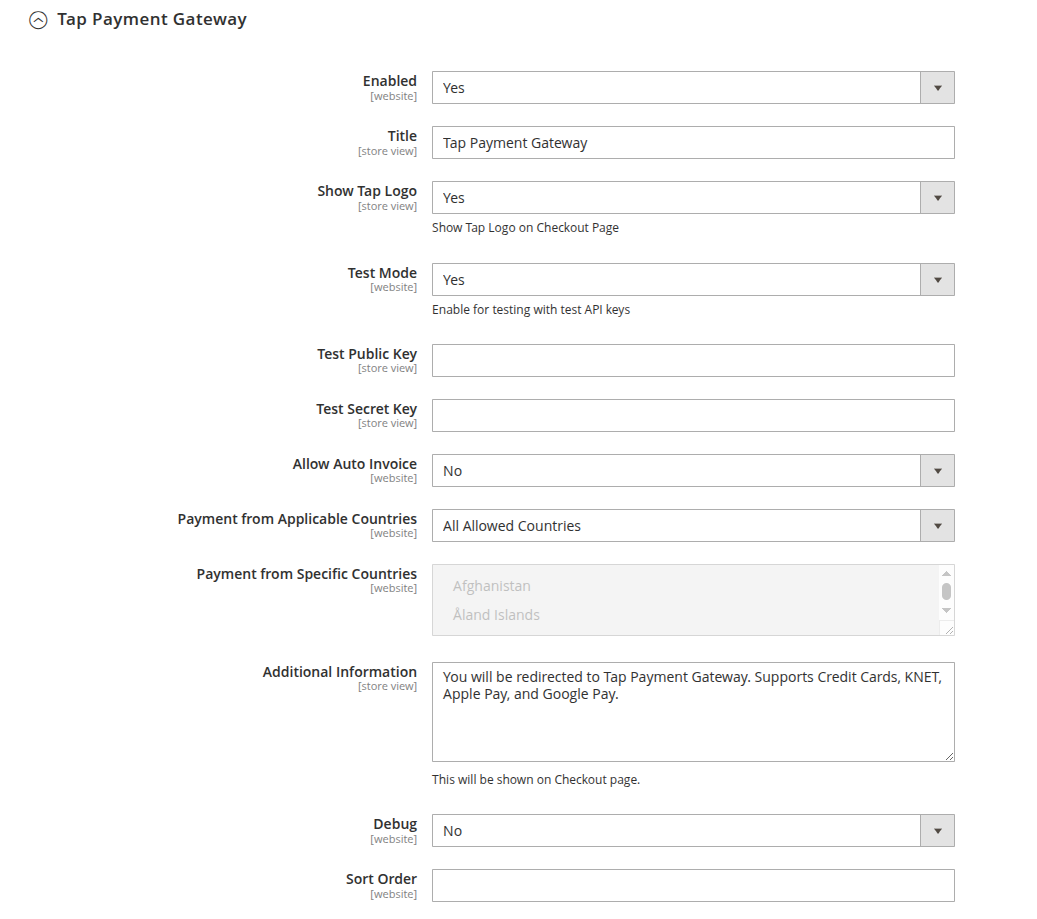
Navigate to Stores > Configuration > Sales > Payment Methods > Tap Payment Gateway to configure payment credentials.
- Enabled: Select Yes to enable Tap Payment Gateway on store checkout.
- Title: Enter payment method title displayed to customers (Default:
Tap Payment Gateway). - Show Tap Logo: Select Yes to show Tap Payments brand logo on checkout.
- Test Mode: Select Yes for testing with test API keys, or No for live production mode.
- Test Public Key: Enter your Test Public API Key from Tap Dashboard.
- Test Secret Key: Enter your Test Secret API Key (
sk_test_...). - Live Public Key: Enter your Live Production Public API Key.
- Live Secret Key: Enter your Live Production Secret API Key (
sk_live_...). - Allow Auto Invoice: Select Yes to generate invoices automatically upon successful payment.
- Payment from Applicable Countries: Select All Allowed Countries or Specific Countries.
- Payment from Specific Countries: Select allowed countries when specific country restriction is enabled.
- Additional Information: Enter custom payment instructions shown on checkout.
- Debug: Select Yes to enable debug logging.
- Sort Order: Enter a numeric value for display ordering on checkout.
Checkout Flow & Customer Experience
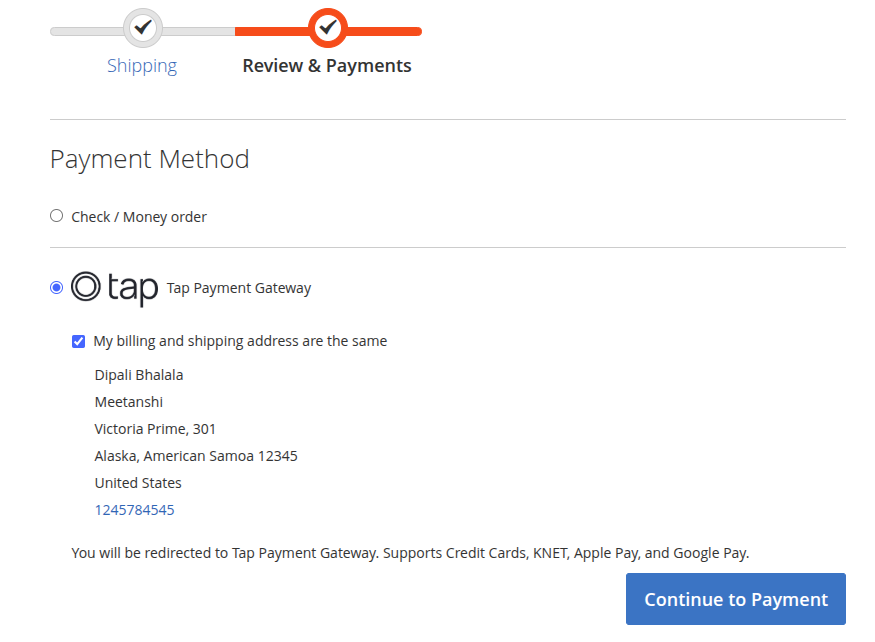
- Customer chooses Tap Payment Gateway on Magento checkout page and clicks Place Order.
- The customer is redirected to Tap hosted payment page to pay via KNET, Benefit, Mada, or Cards.
- Upon payment approval, Tap redirects customer back to Magento order confirmation page.