ACP Integration for Magento 2 - User Guide
Extension Installation
For Magento Marketplace Customers
- Find the Composer name and version of the extension in the extension’s
composer.jsonfile. - Log in to your server via SSH and run:
composer require meetanshi/magento-2-acp-integration --ignore-platform-reqs
Enter your authentication keys:
Wait for Composer to finish updating the project dependencies and ensure there are no errors.
Verify that the extension is installed properly:
php bin/magento module:status Meetanshi_OpenAiAcp --ignore-platform-reqs
By default, the extension may be disabled. Enable it using:
php bin/magento module:enable Meetanshi_OpenAiAcp --clear-static-content
- Run the setup upgrade:
php bin/magento setup:upgrade
Deploy static content:
- Magento 2.2.x & above
php bin/magento setup:static-content:deploy -fFlush the cache:
php bin/magento cache:flush
For Meetanshi Customers
- Extract the ZIP file and upload the extension to the root of your Magento 2 directory via FTP.
- Log in to your server via SSH and run the following commands step by step:
php bin/magento setup:upgrade
Deploy static content:
- Magento 2.0.x – 2.1.x
php bin/magento setup:static-content:deploy - Magento 2.2.x & above
php bin/magento setup:static-content:deploy -f
- Magento 2.0.x – 2.1.x
Flush the cache:
php bin/magento cache:flush
Configuration
Sign in to Magento Admin to configure Magento 2 ACP Integration and open Stores > Configuration > Meetanshi > OpenAI ACP. Choose the intended scope and configure the fields below.
General Settings
- Enable Extension: Select YES to turn on the extension or NO to leave it off.
- OpenAI API Key: Enter the assigned OpenAI developer credential and keep the value secret.
- Target Country: Choose the market country.
- Enable Checkout via ChatGPT: Select YES to mark products eligible for direct purchase inside ChatGPT; NO disables that setting.
- Return Policy URL: Enter the store-view return-policy page URL required by ACP.
Once the above fields are configured, save the settings and click the Connect to OpenAI & Initialize Feed button.
- Enable Debug Logging: Select YES to write connection, request, and response details to
var/log/openai_acp.log.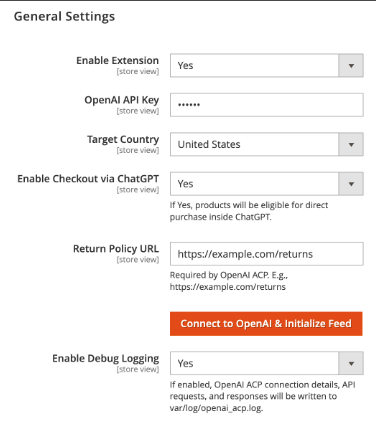
- Update Frequency: Select a schedule your store can support: every day at 2 AM, every 12 hours, or every hour.

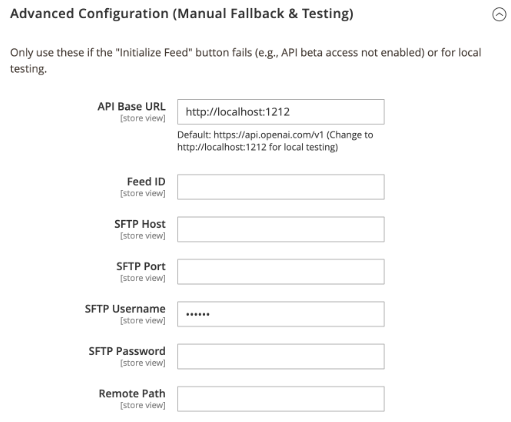
Advanced Configuration (Manual Fallback & Testing)
Use this section for setting up a local testing environment.
- API Base URL: The endpoint used to communicate with the OpenAI API. Leave this as the default (https://api.openai.com/v1) for production. To route API calls locally for testing, replace it with your local server address (e.g., http://localhost:1212).
- Feed ID: The unique identifier for your product catalog feed. You only need to enter this manually if the automated initialization fails to retrieve it.
- SFTP Host & SFTP Port: The server address and port number required to securely transfer your feed data if manual routing is necessary.
- SFTP Username & Password: The authentication credentials required to connect to your designated SFTP server.
- Remote Path: The specific destination directory on the SFTP server where the generated feed file should be saved.
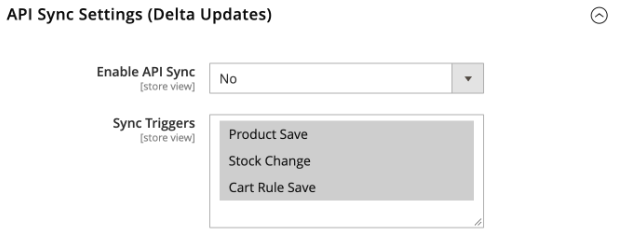
API Sync Settings (Delta Updates)
- Enable API Sync: YES enables the delta-sync setting; NO leaves it disabled.
- Sync Triggers: Select Product Save, Stock Change, or Cart Rule Save as needed. Test delta delivery before relying on it.
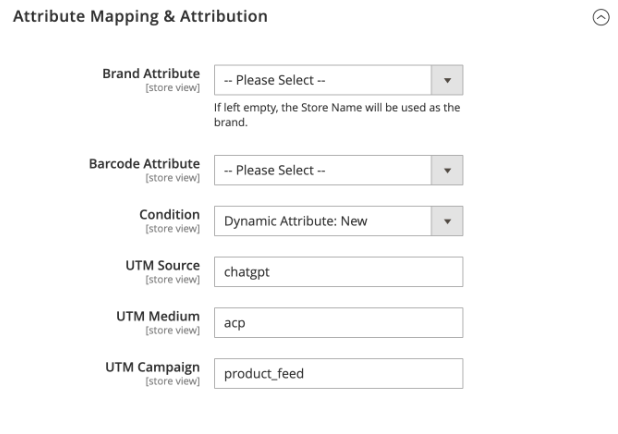
Attribute Mapping & Attribution
- Brand Attribute: Select a Magento product attribute for brand. When blank, the helper says the store name is used.
- Barcode Attribute: Select the relevant product attribute for barcode.
- Condition: Choose a value/attribute for condition.
- UTM Source, UTM Medium, UTM Campaign: Enter tracking values for outgoing links that match your analytics conventions.
OpenAI Feed Rules
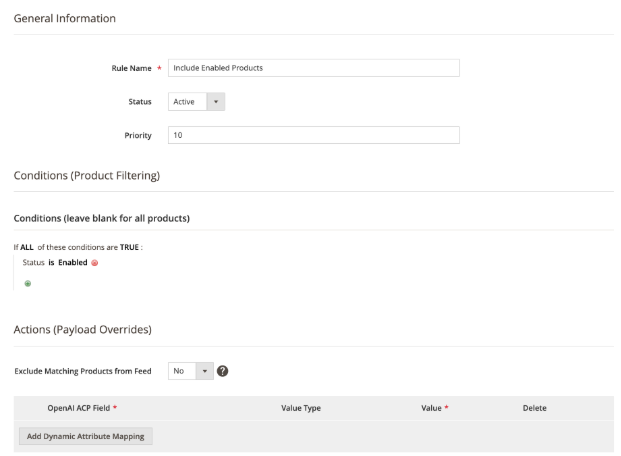
Open Marketing > OpenAI ACP > OpenAI Feed Rules. Use the grid to manage rules and select Add New Rule to prepare one.
General Info
- Rule Name: Required name to identify the rule.
- Status: Set the rule to Active or Inactive. Check the installed version if the selector is absent.
- Priority: Set the rule ordering value. Test overlapping rules to confirm precedence.
Conditions
- Set conditions for this rule to include or exclude certain products from the store.
Actions (Payload Overrides)
- Exclude Matching Products from Feed: YES excludes products matching the conditions, according to the field help; NO leaves them in the feed. Test the output.
- Add Dynamic Attribute Mapping: Add a row, select the target OpenAI ACP field, choose a value type, and enter the static value or product attribute code. Check the controls in your installed build.