Magento 2 Visual Merchandiser Extension User Guide
Meetanshi Visual Merchandiser replaces Magento's manual "drag products into a category" workflow with rule-driven Dynamic Categories, a drag-and-drop merchandising workspace, an automatic Sale category, Shop by Brand pages, and advanced merchandising sorts. This guide walks you through the complete setup in order: install the extension, enable it, configure each feature, build your first dynamic category, set up brands and the sale category, and keep everything refreshed.
Step 1: Extension Installation
Installation instructions
For Magento Marketplace Customers
- Find the Composer name and version of the extension in the extension's composer.json file.
- Log in to your SSH and run:
composer require meetanshi/magento-2-visualmerchandiser-and-dynamic-categories --ignore-platform-reqs
- Enter your authentication keys. Your public key is your username and your private key is your password.
- Wait for Composer to finish updating your project dependencies and make sure there are no errors.
- To verify that the extension installed properly, run:
php bin/magento module:status Meetanshi_VisualMercha --ignore-platform-reqs
- By default, the extension is probably disabled.
- Enable the extension and clear static view files:
php bin/magento module:enable Meetanshi_VisualMercha --clear-static-content
php bin/magento setup:upgrade
For Magento version 2.2.x and above:
php bin/magento setup:static-content:deploy --f
php bin/magento cache:flush
For Meetanshi Customers
Extract the zip folder and upload the extension to the root of your Magento 2 directory via FTP. Log in to your SSH and run the commands below step by step:
php bin/magento setup:upgrade
For Magento version 2.2.x and above:
php bin/magento setup:static-content:deploy --f
php bin/magento cache:flush
Step 2: Enable the Extension and Verify
In the Magento Admin Panel, go to Stores > Configuration > Meetanshi > Visual Merchandiser > General.
Set Enable Module to Yes and save the configuration.
Open any category under Catalog > Categories and scroll to the Visual Merchandiser section. You should now see the drag-and-drop merchandising workspace at the bottom of the category edit page instead of Magento's default "Products in Category" grid.
Step 3: Configuration
All settings live under Stores > Configuration > Meetanshi > Visual Merchandiser.
The sections below follow the order they appear in the admin, from the master switch through to sorting.
3.1 General
Enable Module: The master on/off switch. When disabled, the category product assignment interface reverts to the native Magento grid and all storefront features (brand pages, sale category and advanced sorts) are turned off.
Enable Debug Log: Write detailed troubleshooting information to var/log/meetanshi_visualmercha.log for support purposes.

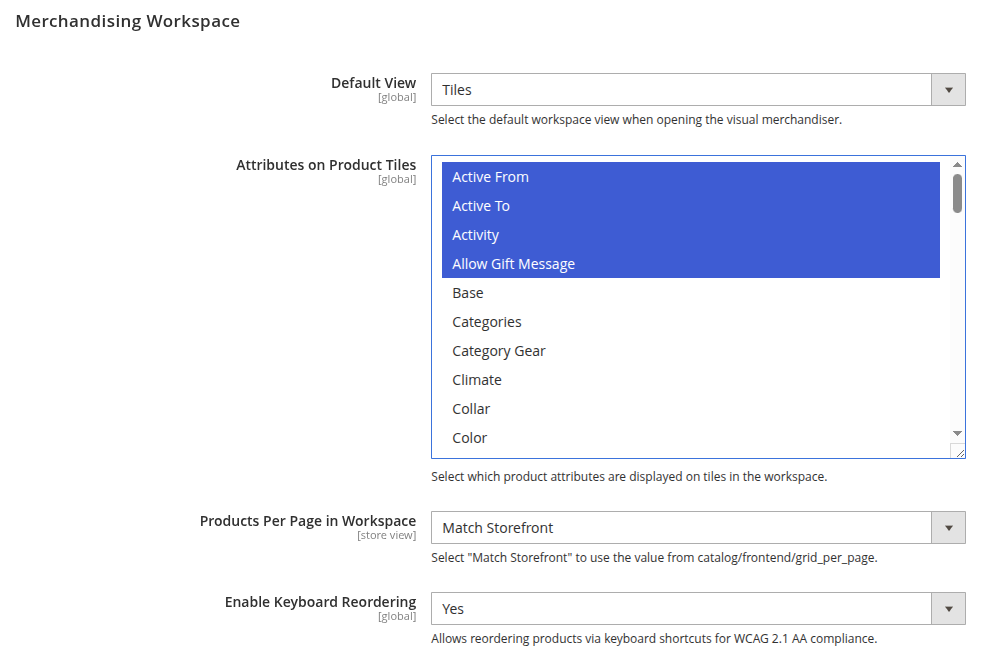
3.2 Merchandising Workspace
Default View: Choose whether the workspace opens in Tiles or List view.
Attributes on Product Tiles: Select extra product attributes (for example Material or Pattern) to display directly on each tile in the workspace.
Products Per Page in Workspace: Set how many products the workspace shows per page by default, or choose "Match Storefront" to follow your storefront grid setting (catalog/frontend/grid_per_page).
Enable Keyboard Reordering: Turn on keyboard shortcuts for reordering products (WCAG 2.1 AA support). Set to No if you do not need it.
3.3 Dynamic Categories
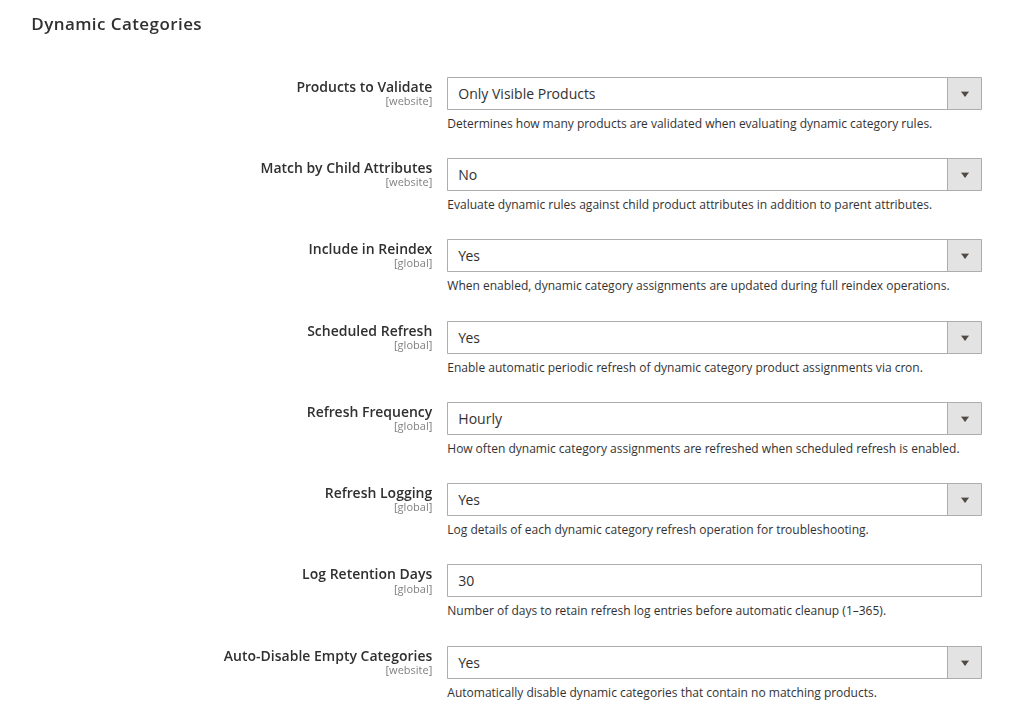
Products to Validate: Choose whether rules are checked against every product or only enabled ones.
Match by Child Attributes: Evaluate dynamic rules against a variant's own attributes (such as a specific color or size) in addition to the parent product's attributes.
Add Parent Automatically: When a child variant matches, also include its parent configurable product so customers land on the clickable parent. Requires Match by Child Attributes to be enabled.
Include in Reindex: The master switch for whether dynamic categories update at all, across every trigger (save, cron, queue and full reindex).
Scheduled Refresh: Enable automatic periodic refresh of dynamic category assignments via cron.
Refresh Frequency: Set how often the scheduled refresh runs (for example every 15 minutes, hourly or daily). Available when Scheduled Refresh is enabled.
Refresh Logging: Log the details of each dynamic category refresh for troubleshooting. These appear in the Refresh Logs grid (Step 8).
Log Retention Days: Number of days to keep refresh log entries before automatic cleanup (1–365). Available when Refresh Logging is enabled.
Auto-Disable Empty Categories: Automatically disable a dynamic category that currently matches no products.
3.4 Sale Category Preset
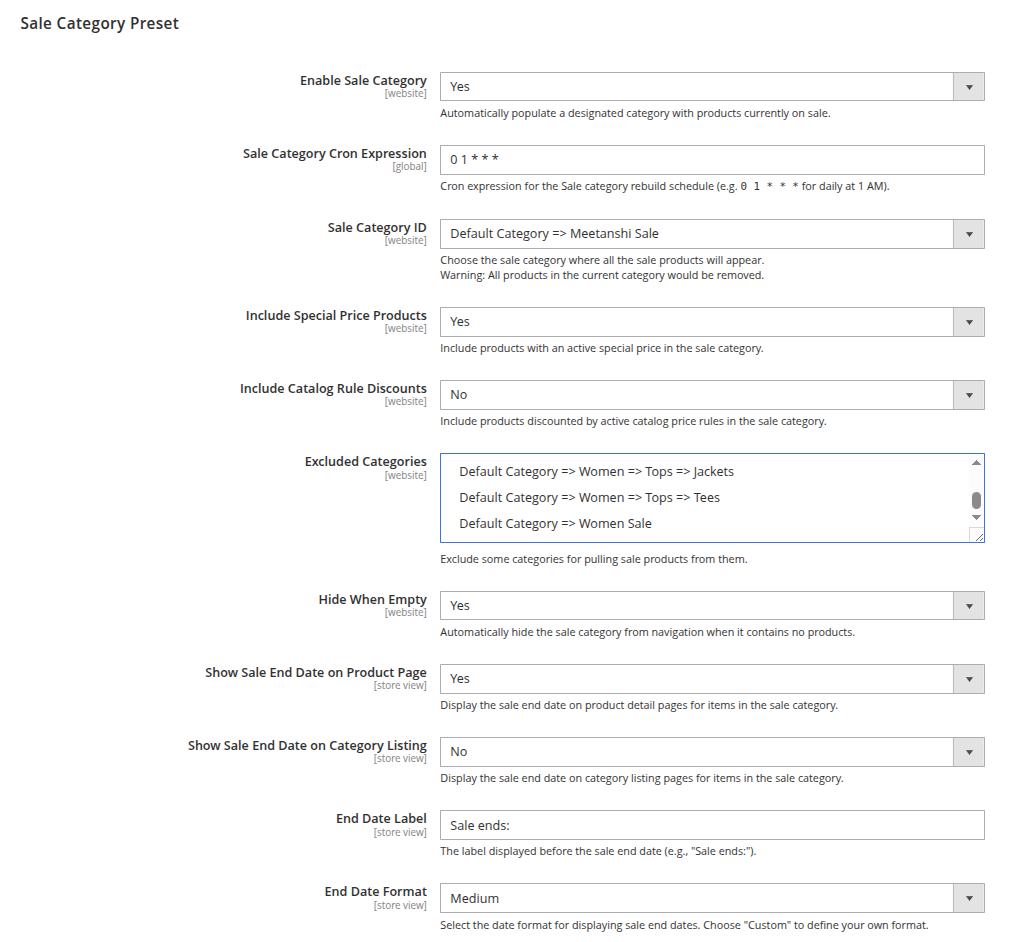
Enable Sale Category: Automatically populate a designated category with products that are currently on sale.
Sale Category Cron Expression: The cron expression for the sale category rebuild schedule, for example
0 1 * * *for daily at 1 AM.Sale Category ID: Choose the category that will hold the sale products. Warning: all products currently in that category will be replaced.
Include Special Price Products: Include products that have an active special price.
Include Catalog Rule Discounts: Include products discounted by an active catalog price rule.
Excluded Categories: Keep products that belong to the listed categories out of the sale category, even if they are otherwise on sale.
Hide When Empty: Automatically hide the sale category from navigation when it contains no products.
Show Sale End Date on Product Page: Display the sale end date on product detail pages.
Show Sale End Date on Category Listing: Display the sale end date on category listing pages.
End Date Label: The text shown before the sale end date, for example "Sale ends:".
End Date Format: Select the display format for the sale end date, or choose Custom to define your own.
Custom Date Format: Enter a custom PHP date format string (for example "d M Y" for "25 Dec 2025"). Available when End Date Format is set to Custom.
3.5 Shop by Brand
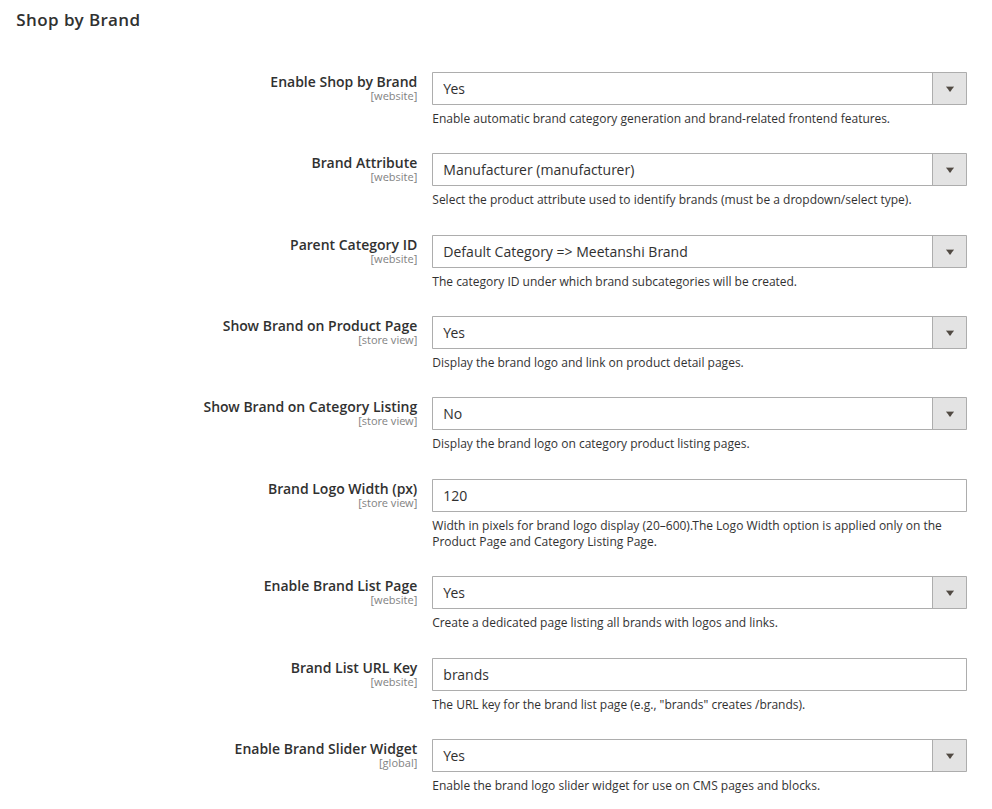
Enable Shop by Brand: Enable automatic brand category generation and brand-related frontend features.
Brand Attribute: Select the product attribute used to identify brands. It must be a dropdown/select type such as Manufacturer.
Parent Category ID: The category under which brand subcategories are created.
Show Brand on Product Page: Display the brand logo and link on product detail pages.
Show Brand on Category Listing: Display the brand logo on category product listing pages. This toggle is independent of the product page toggle.
Brand Logo Width (px): Set the width in pixels for brand logo display (20–600).
Enable Brand List Page: Create a dedicated page listing all brands with logos and links.
Brand List URL Key: The URL key for the brand list page, for example "brands" creates /brands.
Enable Brand Slider Widget: Enable the brand logo slider widget for use on CMS pages and blocks via Content > Widgets.
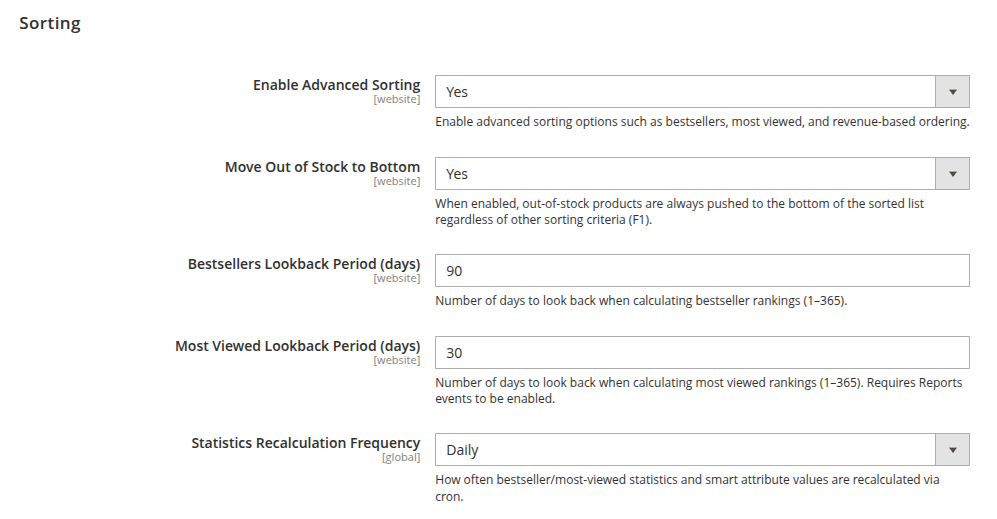
3.6 Sorting
Enable Advanced Sorting: Unlock advanced sort options such as Best Sellers, Most Viewed, Top Rated, Biggest Saving, Reviews Count and Now in Wishlists in the workspace and on category pages.
Move Out of Stock to Bottom: When enabled, out-of-stock products are always pushed to the bottom of the sorted list regardless of the other sort criteria.
Bestsellers Lookback Period (days): How far back sales history counts toward bestseller rankings (1–365).
Most Viewed Lookback Period (days): How far back view history counts toward most-viewed rankings (1–365). Requires Reports events to be enabled.
- Statistics Recalculation Frequency: How often bestseller, most-viewed, wishlist and rating statistics are recalculated via cron.
Step 4: Create Your First Dynamic Category
- Go to Catalog > Categories and open an existing category or click Add Subcategory / Add Root Category.
- Scroll to the Visual Merchandiser section.
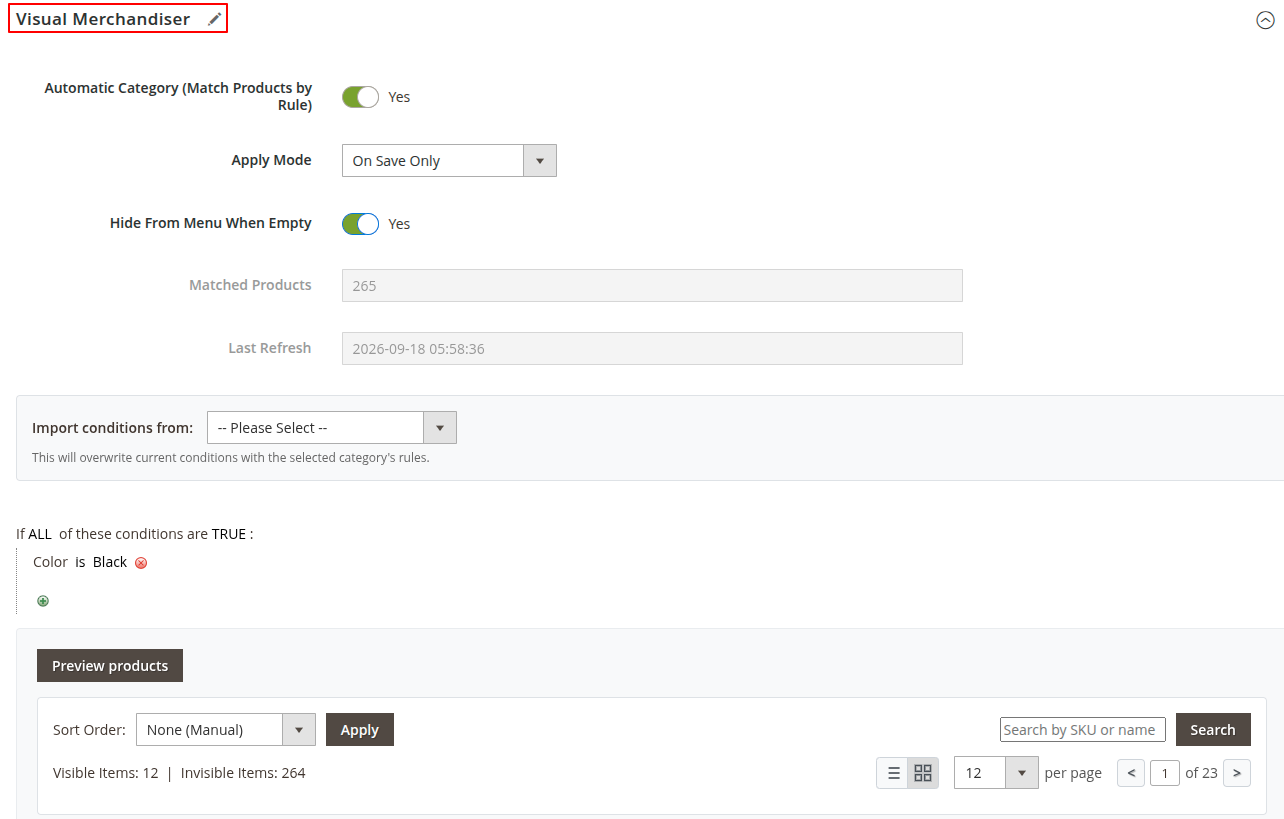
- Set Automatic Category (Match Products by Rule) to Yes. Additional fields appear once it is on:
Apply Mode: When the category re-checks its rule and refreshes itself (see Step 4.1).
Hide From Menu When Empty: Remove the category from navigation while its rule matches zero products, and bring it back when it matches something again.
Matched Products: A read-only count of how many products the rule currently finds.
Last Refresh: When the product list was last recalculated.
Import conditions from: Copy the rule from another existing dynamic category instead of building one from scratch.
- Under "If ALL of these conditions are TRUE," click + to add a condition, then choose an attribute, an operator and a value.
- Click Preview products to see exactly which products match, right in the workspace, before saving.
- Click Save Category.
Leaving Automatic Category off gives you the same workspace for manually arranging a hand-picked product list.
4.1 Apply Mode Options
On Save & Cron: Updates immediately when you save the category and again on the regular schedule. A good default.
On Save Only: Updates only when you save the category.
Asynchronously (Queue): Updates in the background shortly after any relevant product is saved, without slowing down that save. Best for very large catalogs.
Cron Only: Updates only on the regular schedule, never instantly.
Manual Only: Never updates itself. You must preview and save, or run the command-line refresh.
Step 5: Use the Merchandising Workspace
The drag-and-drop workspace at the bottom of every category edit page works the same for automatic and manual categories.
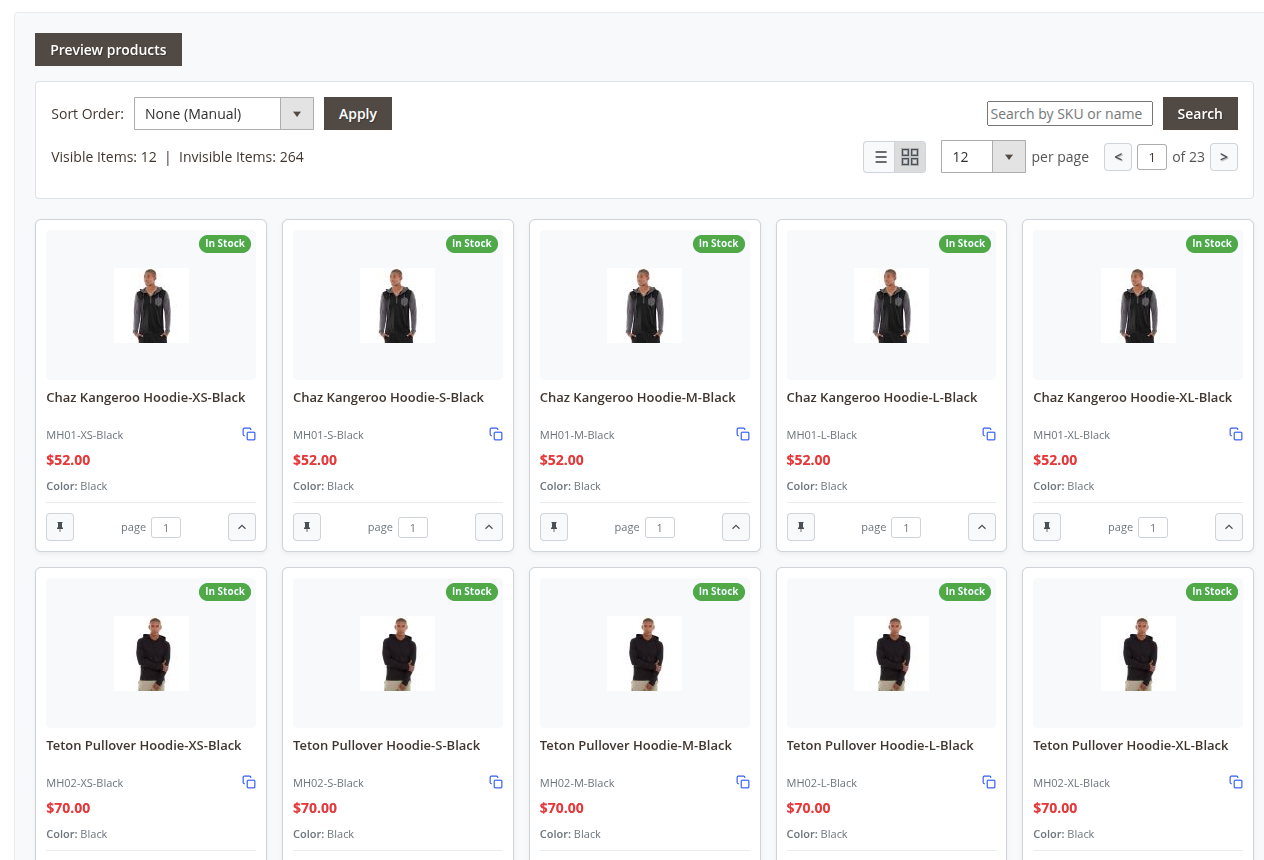
Preview products: (Automatic categories) re-run the rule and refresh what is shown.
Sort Order: Pick a sort and click Apply. Advanced sorts appear when Advanced Sorting is enabled (Step 3.6).
Search by SKU or name: Filter the matched or assigned products without leaving the page.
List / Tile view toggle: Switch between a compact table and a visual grid of product cards.
Per page & pagination: Control how many products show at once.
Drag and drop: Reorder products by dragging a tile or row, or type a position number directly.
Pin: Lock a product to its current position so automatic sorting and rule changes never move it. Everything else re-sorts around pinned items.
Keyboard reordering: Focus a tile and press Space to pick it up, arrow keys to move, Space to drop, or Escape to cancel. Can be disabled in configuration.
Invisible Items Analyzer: A panel that explains why a matched product will not appear on the storefront (disabled, not visible individually, or out of stock).
Step 6: Generate Categories by Pattern (Optional)
Create a whole set of dynamic categories at once instead of one at a time.
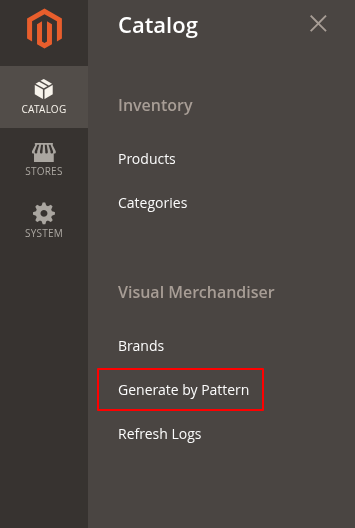
- Go to Catalog > Visual Merchandiser > Generate by Pattern, then click Add New.
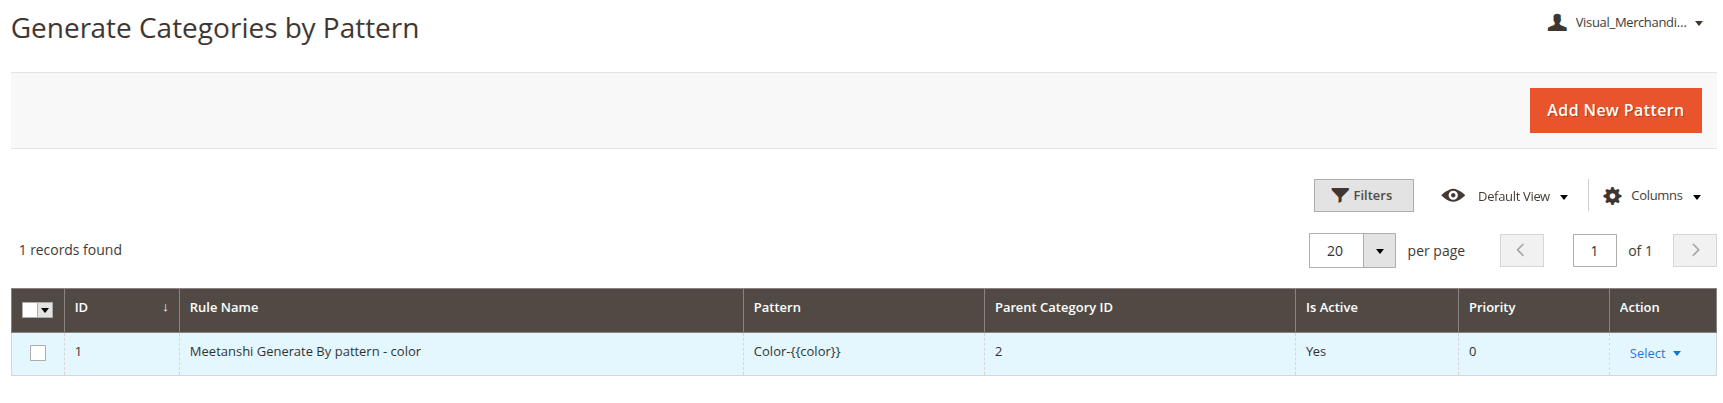
- Fill in:
- Rule Name: For your own reference.
- Parent Category: Where the generated categories are created.
- Pattern: For example
Color-{{color}}generates one category per color option, each matching products with that color. Use/to nest subcategories, for example{{brand}}/{{color}}.
- Click Preview Categories to review the exact list before committing.
- Click Generate Categories.
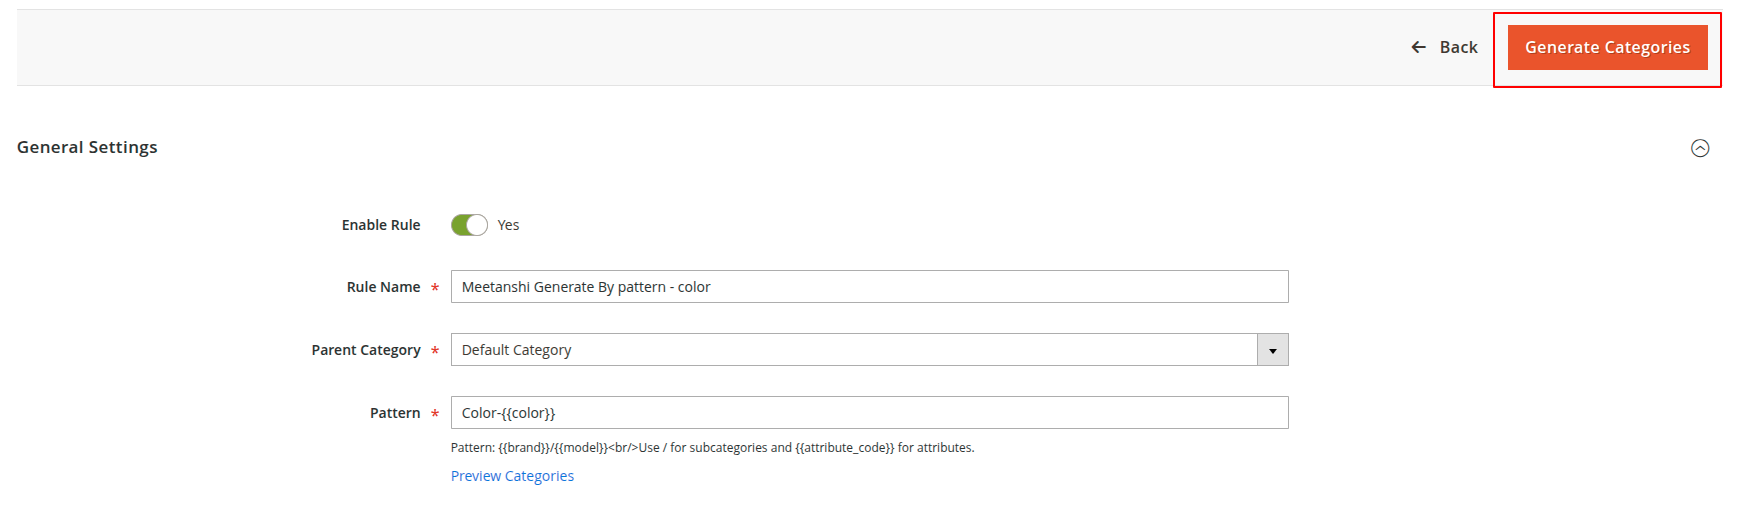 Every generated category is created as a fully working dynamic category with matched products populated immediately.
Step 7: Set Up Sale Category and Brands
7.1 Sale Category
After configuring Sale Category Preset (Step 3.4), the chosen category stays in sync with whatever is currently discounted. It updates instantly when you save a product with a special price and on the schedule set by the Sale Category Cron Expression. Turning Enable Sale Category off empties the category and hides it from the menu right away.
7.2 Brands
After enabling Shop by Brand (Step 3.5):
- Go to Catalog > Visual Merchandiser > Brands and click Add Brand.
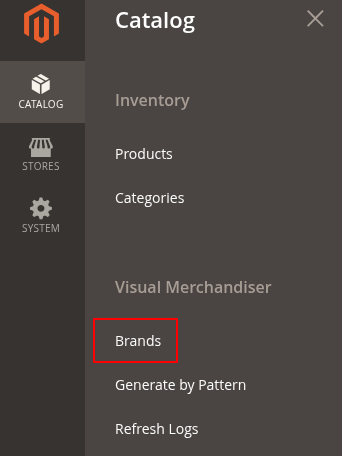
- Pick one of the brand attribute's options to link the brand record to actual products.
- Fill in the brand Name, upload a Logo, and optionally add a description, meta title/description and status.
Brand pages are created as real categories under the configured parent. When Enable Brand List Page is on, an alphabetical directory appears at the configured URL key with a scrollable brand slider at the top. When Enable Brand Slider Widget is on, drop a "Brand Slider" widget into any CMS page or block via Content > Widgets.
Step 8: Keep Categories Refreshed and Track Activity
8.1 Command-line Refresh
Manual Only categories, and any category you want to force-update, can be refreshed from SSH:
php bin/magento meetanshi:visualmercha:refresh
Rebuild the sale category on demand:
php bin/magento meetanshi:visualmercha:sale:rebuild
Rebuild merchandising statistics used by advanced sorts:
php bin/magento meetanshi:visualmercha:stats:rebuild
List all dynamic categories with their current product counts:
php bin/magento meetanshi:visualmercha:list
8.2 Refresh Logs
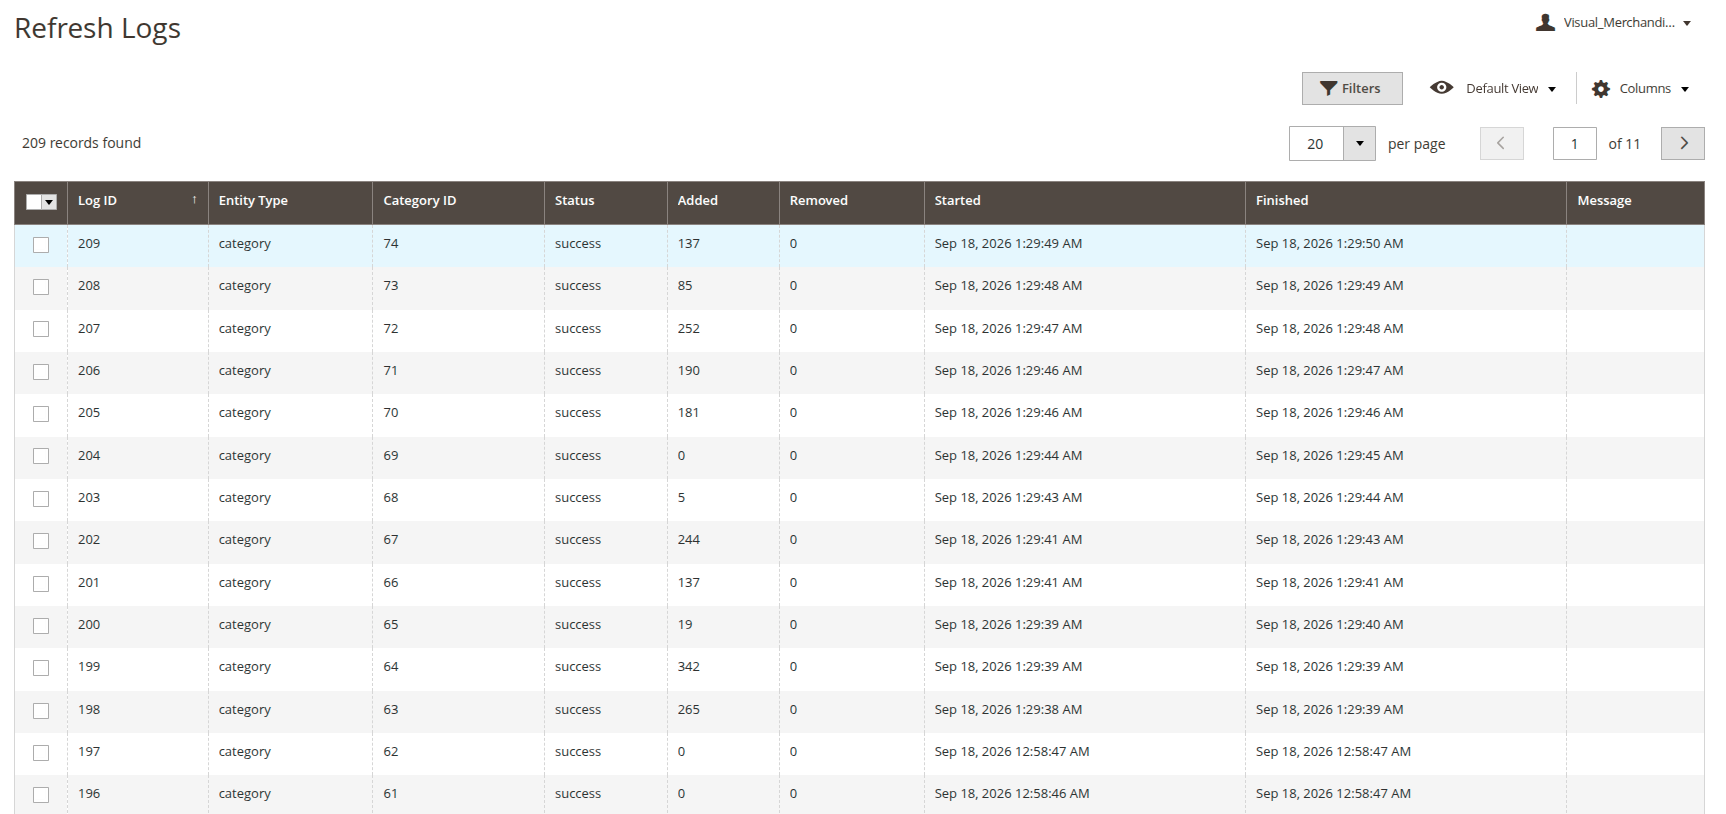
Catalog > Visual Merchandiser > Refresh Logs shows a history of every dynamic category recalculation: when it started and finished, how many products were added or removed, and whether it succeeded or failed.
Rows fill in only when Refresh Logging is enabled and are cleaned up automatically after Log Retention Days. This is the first place to check when a category is not updating.
Setup Checklist
Use this quick list to confirm your setup is complete:
- Extension installed and enabled, workspace appears on the category edit page
- Match by Child Attributes and Add Parent Automatically set as intended
- Include in Reindex and Scheduled Refresh configured, refresh frequency set
- First dynamic category created with saved conditions and previewed
- Sale category enabled and pointed at a dedicated category
- Shop by Brand enabled, brand attribute selected, brand records created with logos
- Advanced sorting enabled and statistics frequency set (if used)
- Refresh logging enabled and a test refresh confirmed in the Refresh Logs grid
- Cache flushed and a category verified on the storefront