Klarna Payment for Magento 2 - User Guide
Extension Installation
Extract the zip folder and upload our extension to the root of your Magento 2 directory via FTP.
Login to your SSH and run the commands below step by step:
php bin/magento setup:upgrade
- For Magento version 2.0.x to 2.1.x -
php bin/magento setup:static-content:deploy
- For Magento version 2.2.x & above -
php bin/magento setup:static-content:deploy -f
php bin/magento cache:flush
- That's it.
Configuration
For configuring Klarna Payment for Magento 2 extension, log in to Magento 2, move to Stores > Configuration > Sales > Payment Methods > Klarna Payment where you can find various settings to enable the extension.
API Configuration
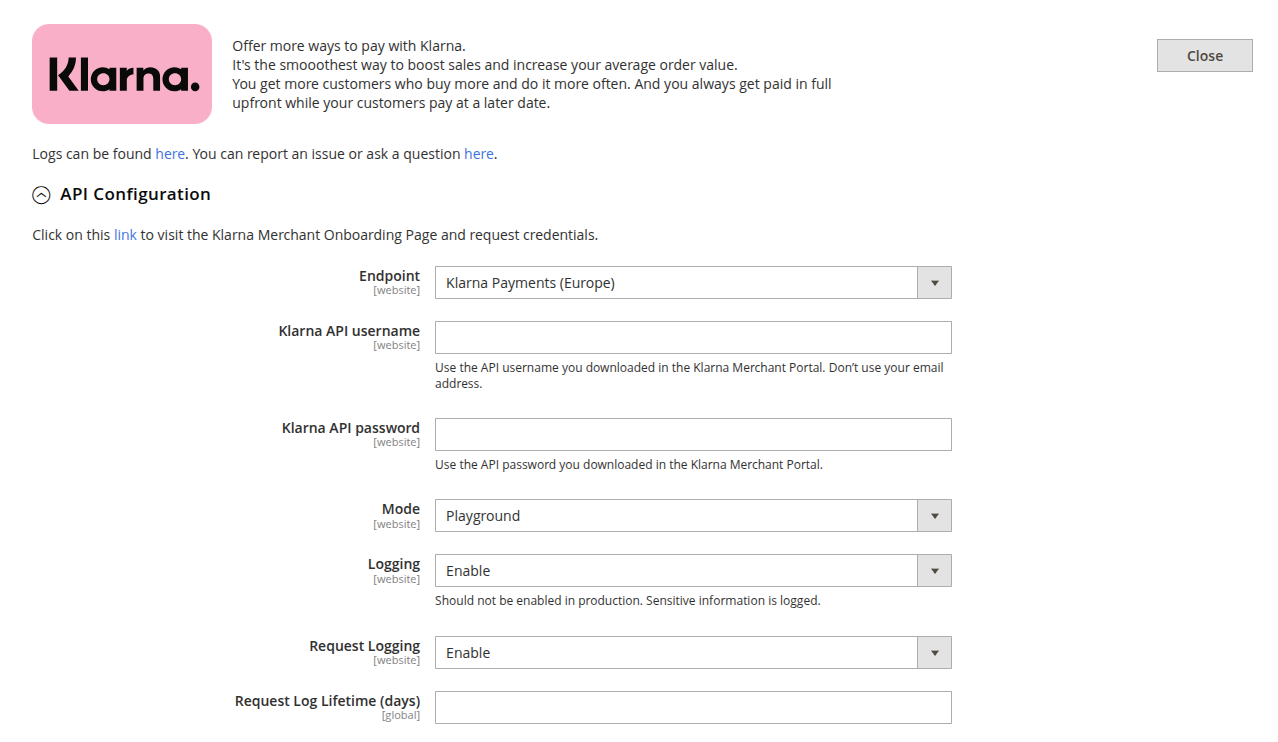
Click on the provided link to visit the Klarna Merchant Onboarding Page and request credentials.
Endpoint: Select the Klarna payments endpoint for your region. Options:
- Klarna Payments (Europe) - use for European merchant accounts
- Klarna Payments (North America) - use for North American merchant accounts
- Klarna Payments (Oceania) - use for Oceania-region merchant accounts
Klarna API Username: Enter the API username you downloaded from the Klarna Merchant Portal. Do not use your email address.
Klarna API Password: Enter the API password you downloaded from the Klarna Merchant Portal.
Mode: Select the operating mode for the Klarna payment integration. Options:
- Playground - use for testing and development. No real transactions are processed.
- Production - use for live stores with real customer transactions.
Logging: Set to Enable to log Klarna API interactions for debugging purposes. Should not be enabled in production as sensitive information is logged.
Request Logging: Set to Enable to log full API request and response data. Useful for troubleshooting integration issues.
Request Log Lifetime (days): Enter the number of days to retain request logs before they are automatically purged.
Klarna Payments
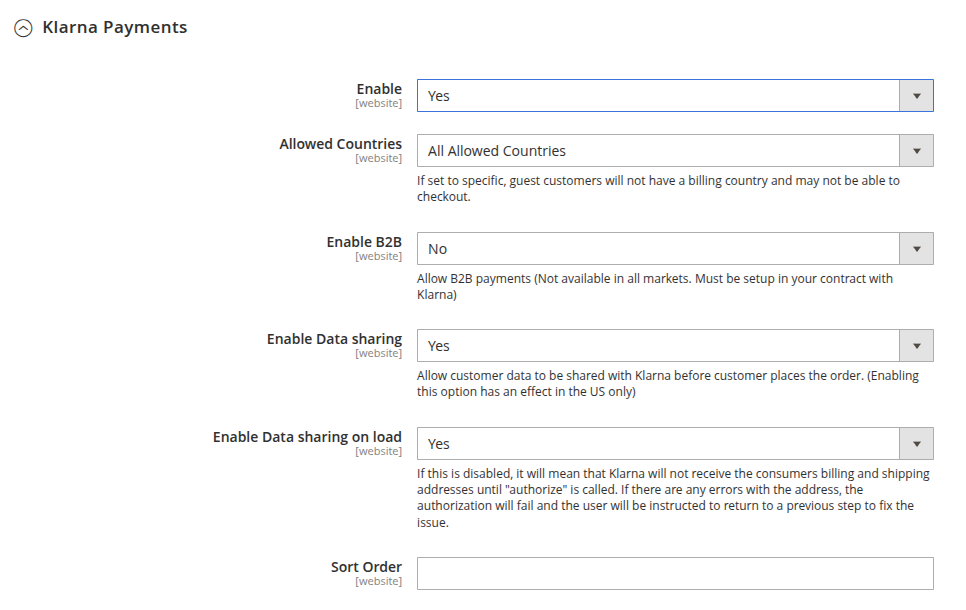
Enable: Set to Yes to enable the Klarna Payments method on the storefront checkout.
Allowed Countries: Select which countries are eligible for Klarna Payments. Options:
- All Allowed Countries - Klarna is available for all countries configured in your store
- Specific Countries - restrict Klarna to only the countries you select
Note: If set to specific, guest customers will not have a billing country and may not be able to checkout.
Enable B2B: Set to Yes to allow B2B payments through Klarna. Note: B2B payments are not available in all markets and must be set up in your contract with Klarna.
Enable Data Sharing: Set to Yes to allow customer data to be shared with Klarna before the customer places the order. Enabling this option has an effect in the US only.
Enable Data Sharing on Load: Set to Yes to share consumer billing and shipping addresses with Klarna when the checkout page loads. If disabled, Klarna will not receive the consumer's billing and shipping addresses until "authorize" is called. If there are any errors with the address, the authorization will fail and the user will be instructed to return to a previous step to fix the issue.
Sort Order: Enter a numeric value to control the display position of Klarna Payments relative to other payment methods during checkout. Lower numbers appear first.
Design
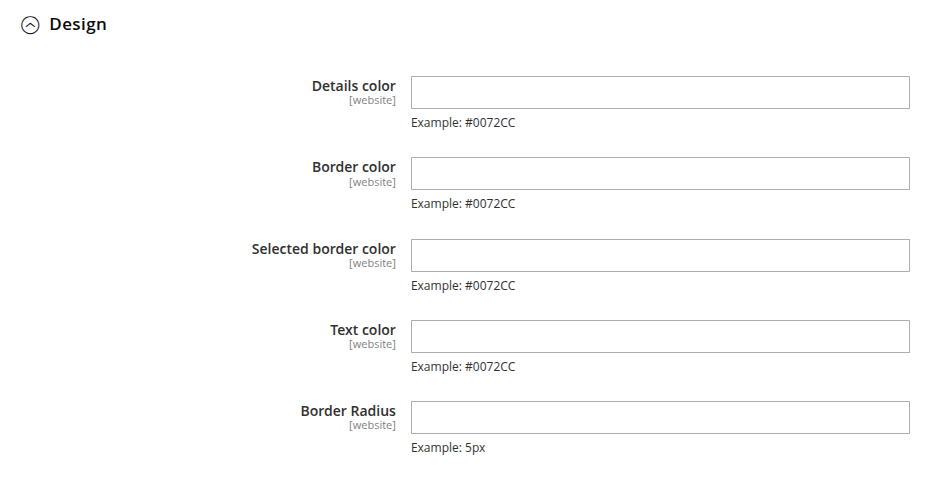
Customize the visual appearance of the Klarna payment widget on the storefront.
Details Color: Enter a hex color code for the details text within the Klarna widget.
Border Color: Enter a hex color code for the border of the Klarna payment widget.
Selected Border Color: Enter a hex color code for the border when the Klarna payment option is selected.
Text Color: Enter a hex color code for the main text within the Klarna widget.
Border Radius: Enter the border radius value to control the roundness of the Klarna widget corners (e.g., 5px).
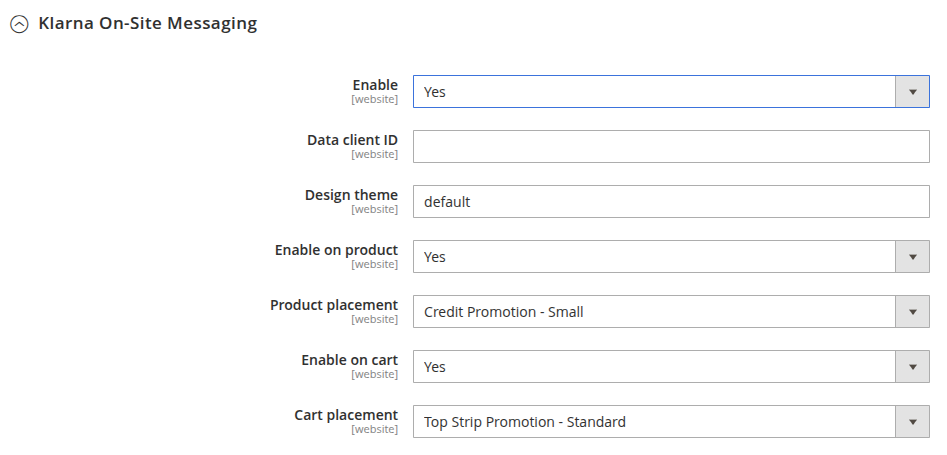
Klarna On-Site Messaging
Configure Klarna's promotional on-site messaging to display financing and payment options on product and cart pages.
Enable: Set to Yes to enable Klarna On-Site Messaging across your storefront.
Data Client ID: Enter your Klarna Data Client ID for on-site messaging. This ID is obtained from your Klarna Merchant Portal.
Design Theme: Enter the design theme name for Klarna on-site messaging placements (e.g., "default"). This controls the overall visual style of the messaging widgets.
Enable on Product: Set to Yes to display Klarna On-Site Messaging on product detail pages, showing customers available payment options for that product.
Product Placement: Select the placement style for on-site messaging on product pages. Options:
Enable on Cart: Set to Yes to display Klarna On-Site Messaging on the shopping cart page, showing customers available payment plans for their cart total.
Cart Placement: Select the placement style for on-site messaging on the cart page. Options:
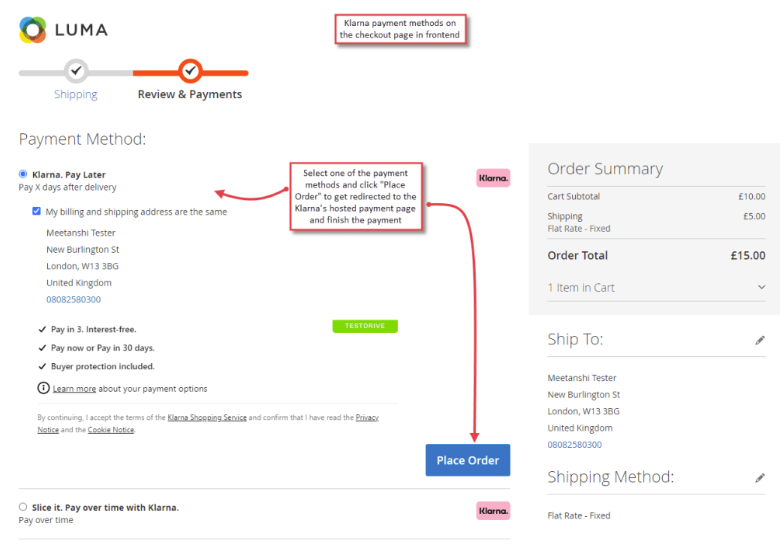
Frontend - Klarna Payment at Checkout
Once the extension is configured, Klarna payment methods are displayed on the checkout page in the frontend under the Review & Payments step.
Checkout Page
- On the checkout page, under the Payment Method section, customers can see available Klarna payment options such as:
- Klarna. Pay Later - Pay X days after delivery
- Slice it. Pay over time with Klarna - Pay over time with instalments
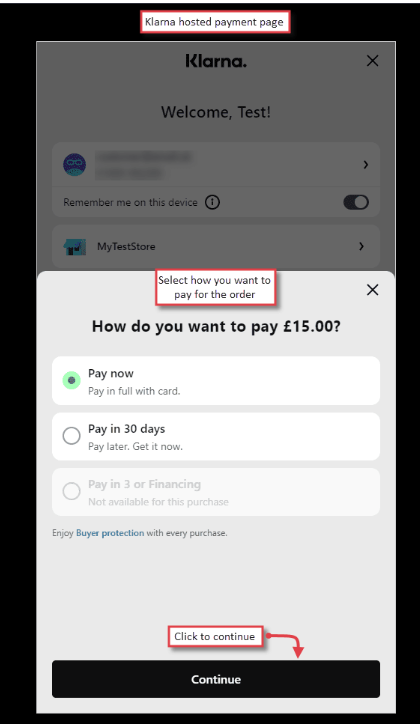
Klarna Hosted Payment Page
After clicking "Place Order", the customer is redirected to the Klarna hosted payment page.
Klarna displays the store name (e.g., "MyTestStore") and the order total.
Select the preferred payment option and click "Continue" to proceed.
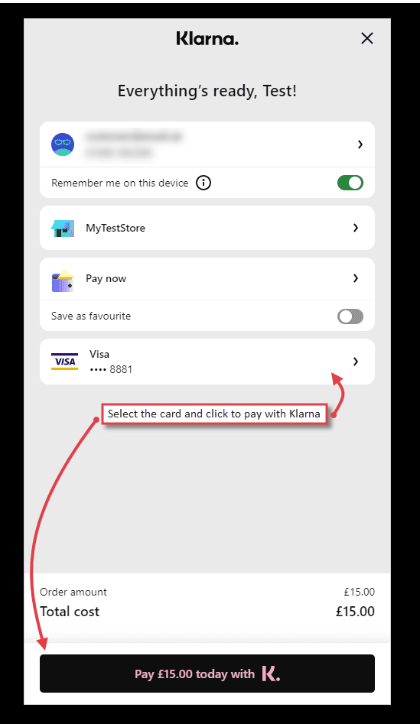
Payment Success & Redirect
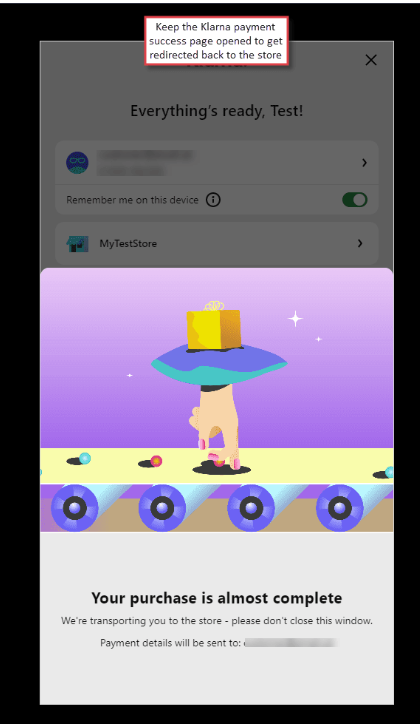
- After successful payment, Klarna displays a confirmation screen with the message "Your purchase is almost complete".
Frontend - Customer My Account
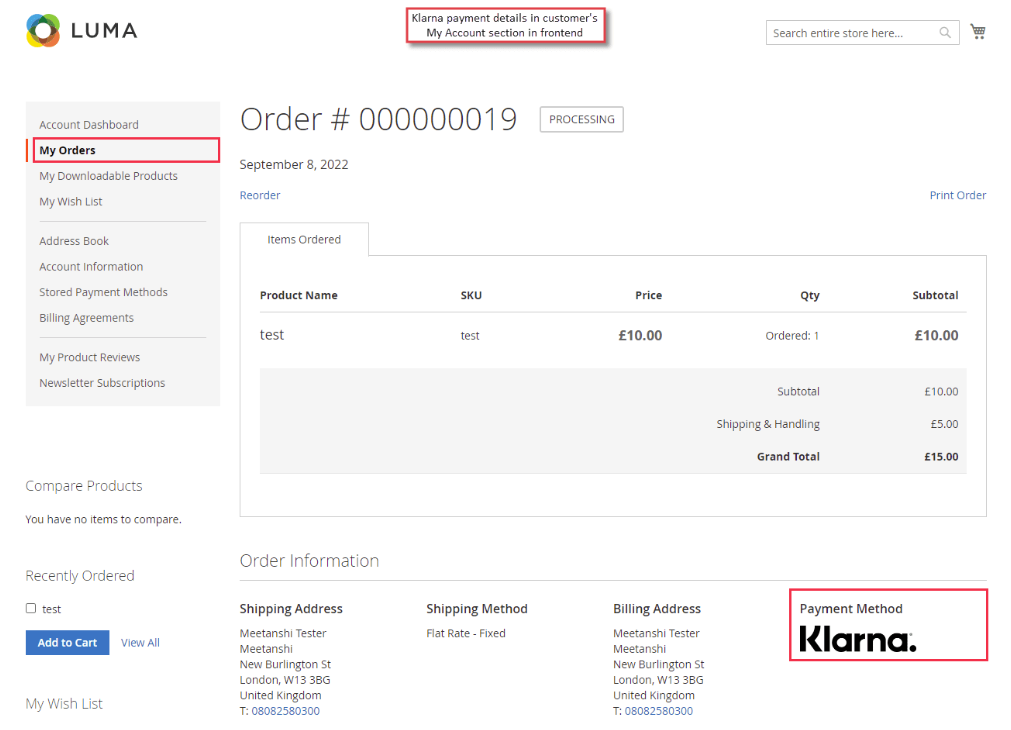
Order View in My Account
- After the order is placed, customers can view their order details by navigating to My Account > My Orders and clicking on the order.
Order View in Sales > Orders
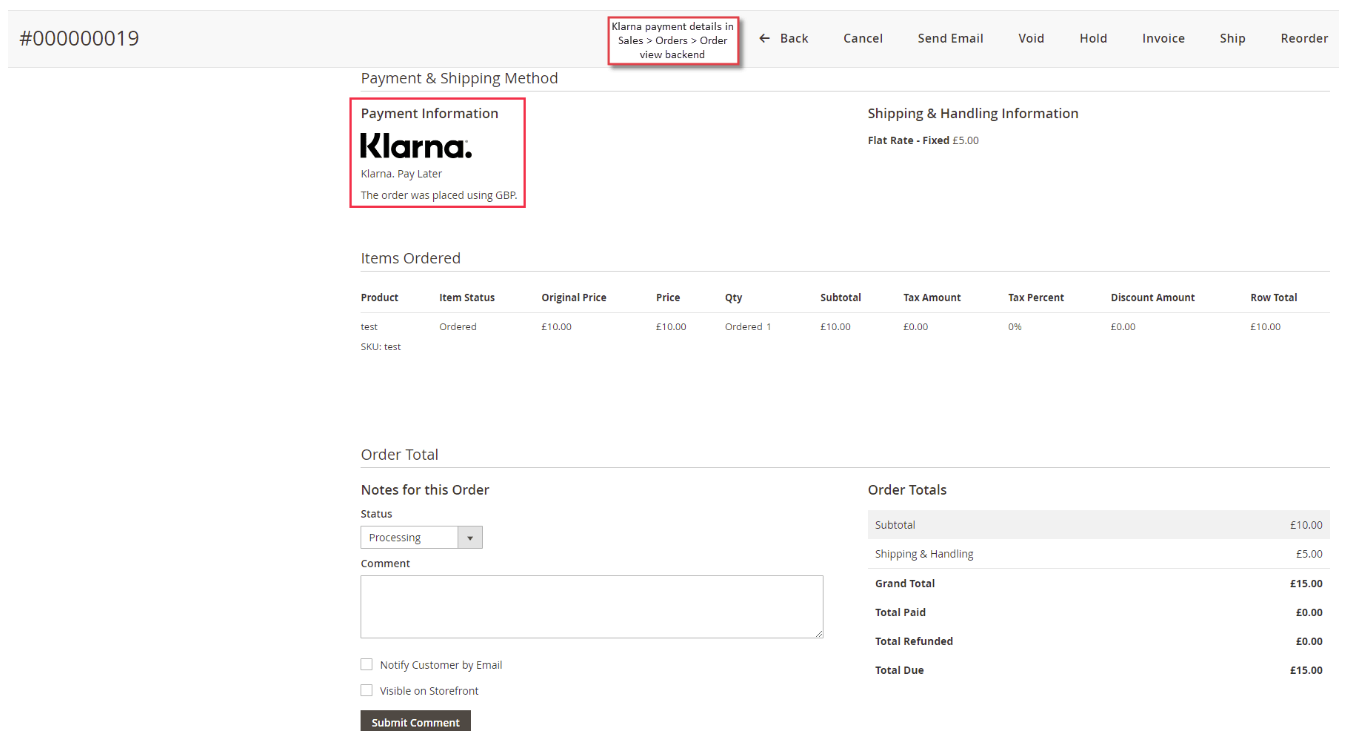
- In the admin panel, navigate to Sales > Orders and open the order to view Klarna payment details.