Salesforce CRM Integration for Magento 2 - User Guide
Extension Installation
Follow the instructions below to install the extension via composer.
- Find the Composer name and version of the extension in the extension's
composer.jsonfile. -
Login to your SSH and run the following commands:
composer require meetanshi/magento-2-salesforce-crm-integration --ignore-platform-reqs composer require omniphx/forrest --ignore-platform-reqs - Enter your authentication keys. Your public key is your username; your private key is your password.
- Wait for Composer to finish updating your project dependencies and ensure there are no errors.
-
Verify that the extension is installed properly by running the command:
php bin/magento module:status Meetanshi_Salesforce -
Enable the extension and run the necessary Magento commands:
php bin/magento module:enable Meetanshi_Salesforce --clear-static-content
php bin/magento setup:upgrade
php bin/magento setup:static-content:deploy -f
php bin/magento cache:flush
Extract the zip folder and upload our extension to the root of your Magento 2 directory via FTP.
Login to your SSH and run the below commands step by step:
composer require omniphx/forrest --ignore-platform-reqs
php bin/magento setup:upgrade
For Magento version 2.0.x to 2.1.x -
php bin/magento setup:static-content:deploy
For Magento version 2.2.x & above -
php bin/magento setup:static-content:deploy -f
php bin/magento cache:flush
Note: Make sure to configure the cron job to make the extension work smoothly.
Welcome to the Magento 2 Salesforce CRM Integration extension! This guide will walk you through every step of connecting your Magento store with your Salesforce account. This integration allows you to automatically synchronize your crucial e-commerce data — including customers, products, and orders — directly to Salesforce, creating a unified view of your business operations.
Get Your Salesforce API Credentials
Before configuring the Salesforce CRM Integration for Magento 2 extension in Magento, you must create a Connected App within your Salesforce account to get the necessary API credentials.
Steps to Create a Connected App in Salesforce:
- Log in to your Salesforce account.
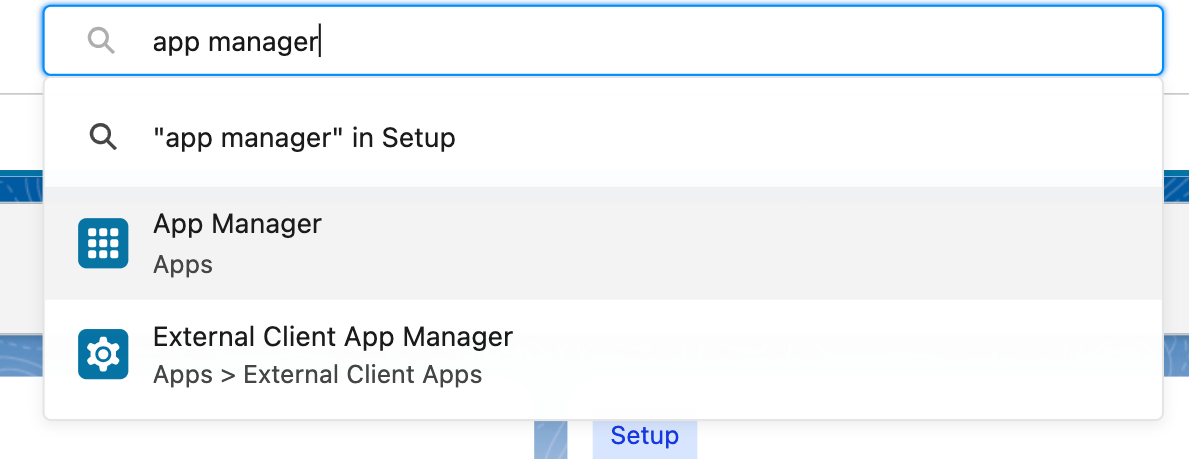
- Navigate to Setup in the top-right corner. Search for App Manager and click on it.
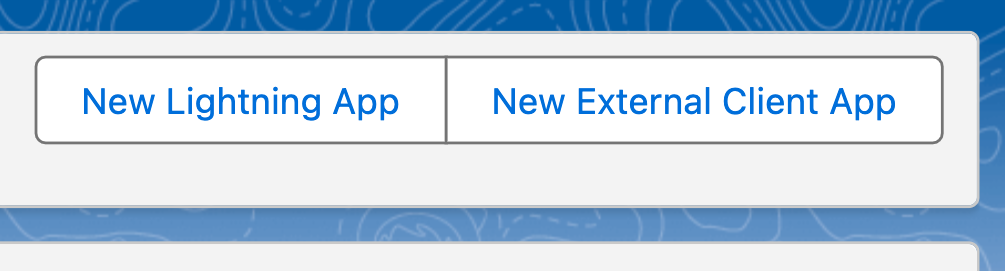
- Click the "New External Client App" button in the top-right corner.
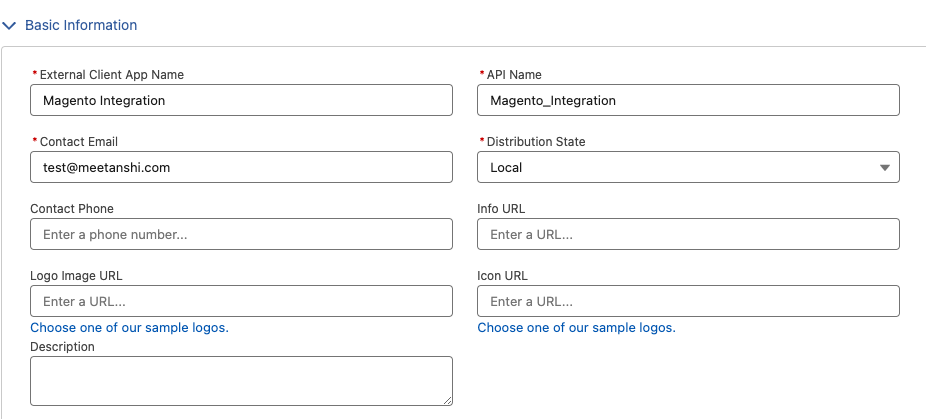
- Fill in the Basic Information:
- Connected App Name: Magento 2 Integration (or a name of your choice).
- API Name: This will auto-populate.
- Contact Email: Enter your email address.
- Under the API (Enable OAuth Settings) section:
- Check the box for "Enable OAuth Settings".

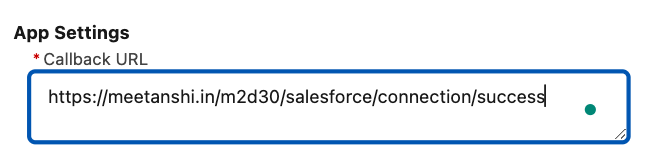
- Now, go to your Magento Admin panel, navigate to Salesforce CRM Integration > Stores > Configuration. Find the Redirect URIs field and copy the URL provided there.

- Return to Salesforce and paste this URL into the Callback URL field.
- From the Available OAuth Scopes, select the following and add them to the Selected OAuth Scopes:
- Manage user data via APIs (api)
- Perform requests on your behalf at any time (refresh_token, offline_access)

- Click Save. You may need to wait a few minutes for the changes to apply.
- Once saved, you will be taken to the App's detail page. Under the API (Enable OAuth Settings) section, you will now see your Consumer Key and Secret.
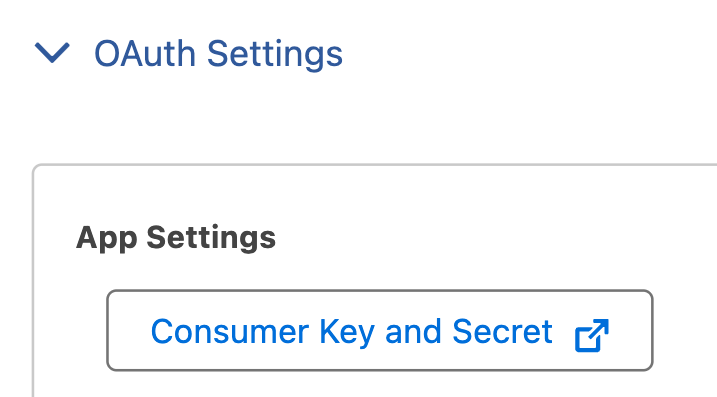
- Copy both the Consumer Key and Consumer Secret—you will need them in the next step.

Configure the Extension in Magento 2
With your Salesforce credentials in hand, it's time to set up the connection in your Magento admin panel.
Navigate to Salesforce CRM Integration > Stores > Configuration.
Connection Settings
This is the first and most important section to configure.
- Salesforce CRM Integration: Set to "Enable" to activate the extension.
- Connection Status: This read-only field shows if your store is successfully connected. It will show "NOT CONNECTED" initially.
- Sandbox Mode:
- Yes: Use this for connecting to a Salesforce Sandbox account for testing purposes.
- No: Use this for your live, production Salesforce account.
- Sandbox Consumer Key: Paste the Consumer Key you copied from your Salesforce Connected App.
- Sandbox Consumer Secret: Paste the Consumer Secret you copied from your Salesforce Connected App.
- Sandbox/ Initial Token: Leave this blank for now.
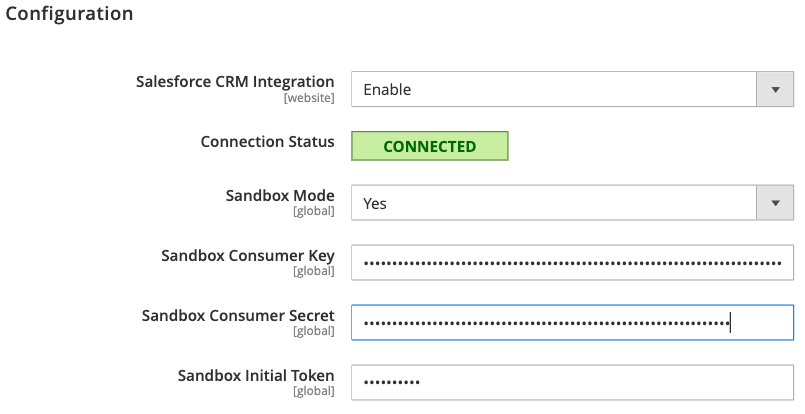
Click "Save Config". After saving, a new "Connect to Salesforce" button will appear. Click it to authorize the connection. You will be redirected to Salesforce to log in and approve the access. Once done, you will be redirected back to Magento, and the Connection Status should update to "Connected".
Synchronization Settings
These settings control what data gets synced and how often.
Website Wise Synchronization
- Allow Synchronization from: Choose the Magento Website/Store View you wish to sync data from.

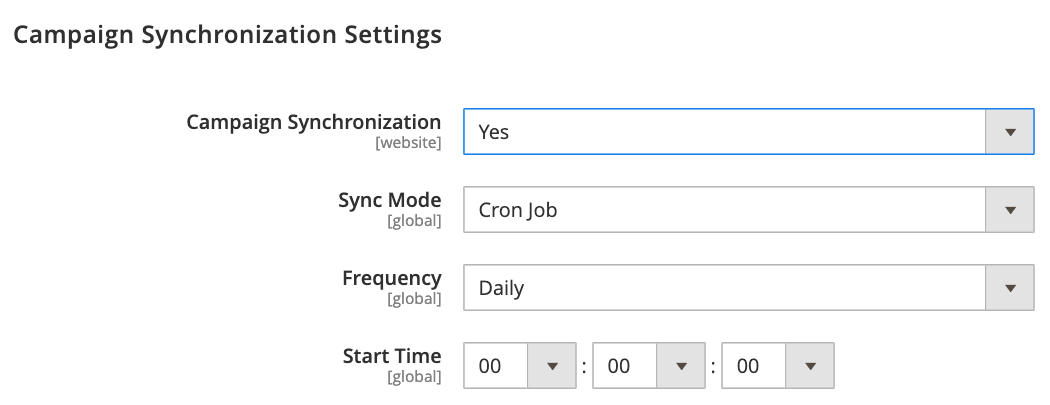
Campaign Synchronization Settings
For each data type (Account, Contact, Product, Order, Opportunity, Campaign), you have the following options:
- Enable Synchronization: Set Campaign Synchronization to Yes. This activates the synchronization feature for campaigns.
- Set Sync Mode: Select Cron Job from the Sync Mode dropdown to schedule automated synchronization.
- Set Frequency: Choose the sync frequency from the Frequency dropdown. The example shows Daily.
- Set Start Time: Specify the Start Time for the daily synchronization to begin. The example shows a start time of 00:00:00 (12:00:00 AM).
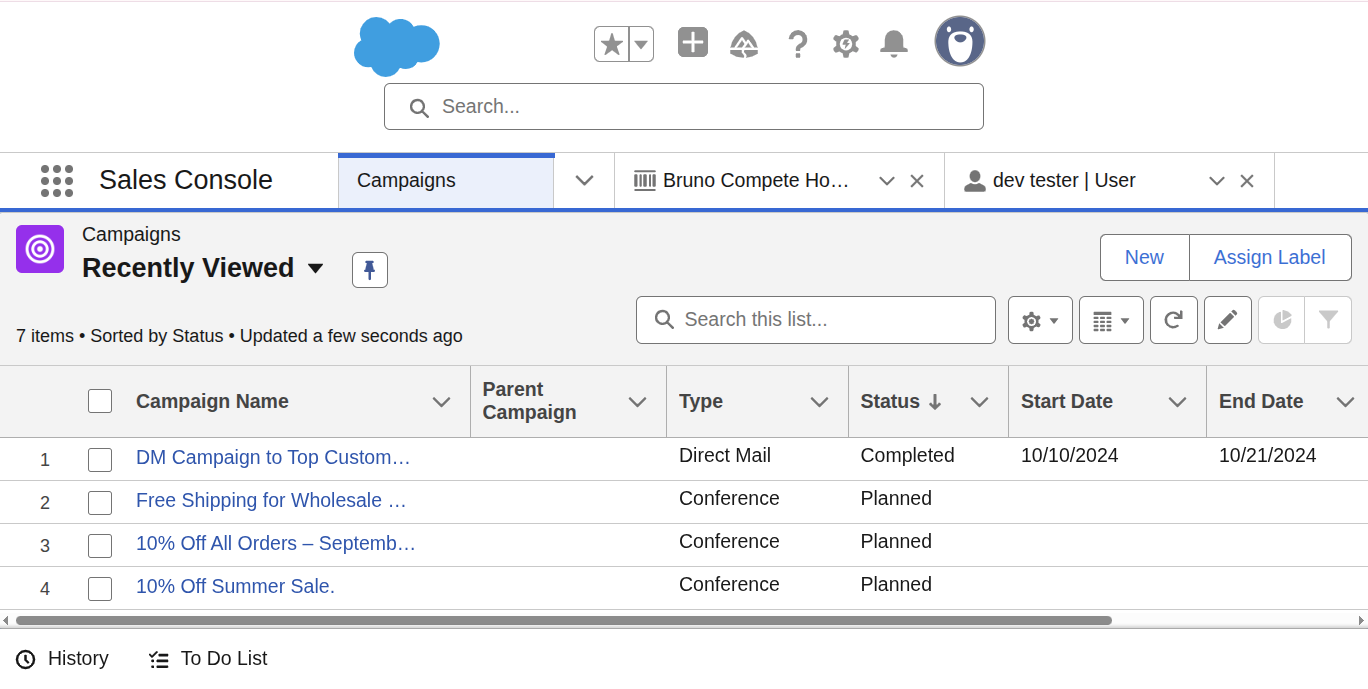
Here's what the synced campaigns look like in Salesforce:
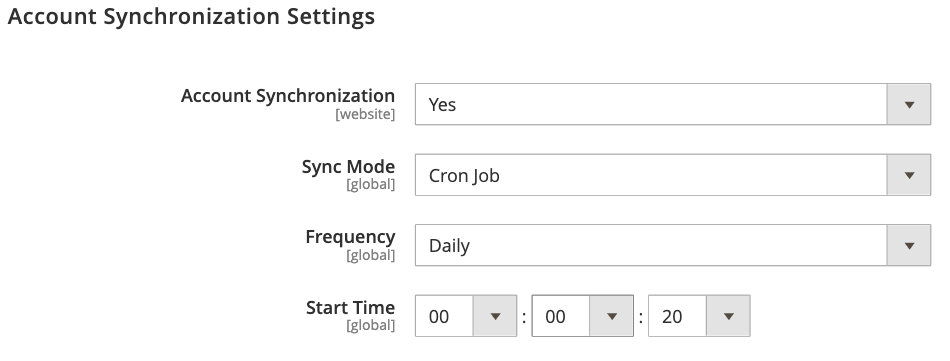
Account & Contact Synchronization
To synchronize customer accounts and contacts, follow these steps.
- Enable Synchronization: Set Account Synchronization and Contact Synchronization to Yes. This turns on the sync feature for these data types.
- Set Sync Mode: Change Sync Mode to Cron Job. This automates the synchronization process to run at scheduled intervals.
- Set Frequency: Choose a frequency from the Frequency dropdown menu. The example shows Daily, meaning the sync will run once every day.
- Set Start Time: Specify the Start Time for the daily sync to begin. The example shows a start time of 00:00:20 (12:00:20 AM), so the sync will run shortly after midnight each day.
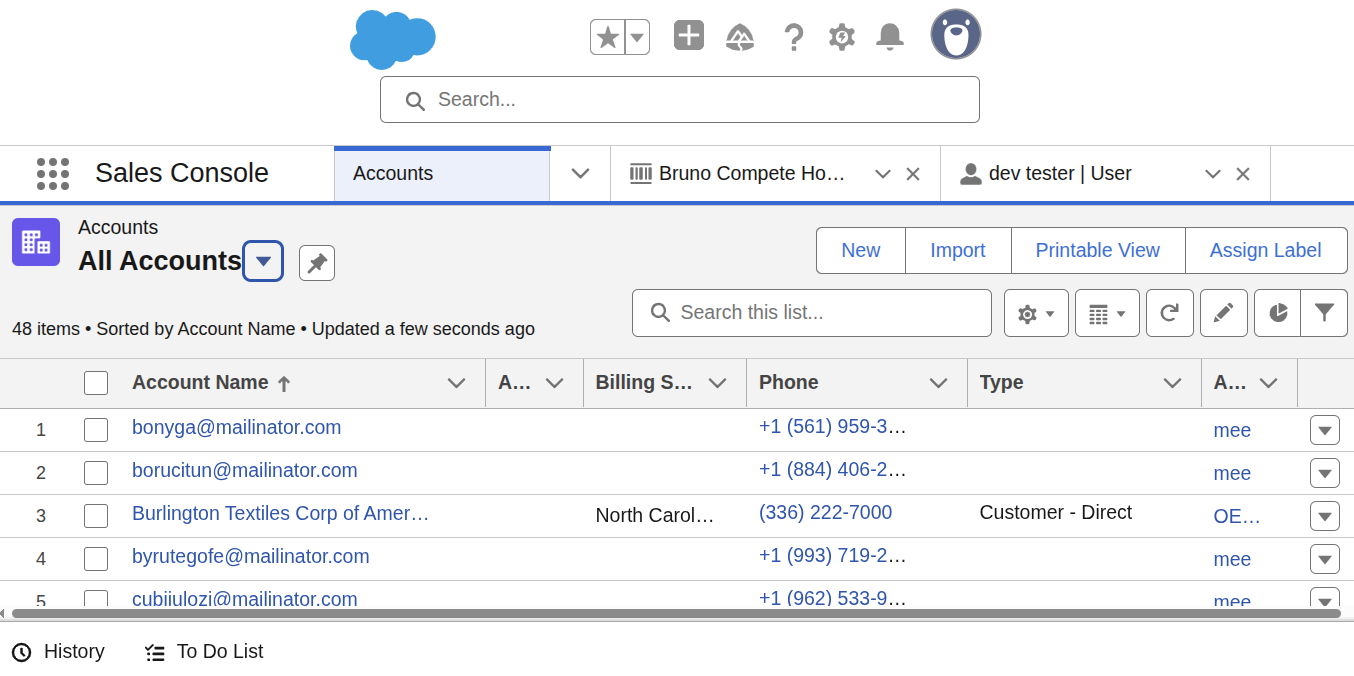
Here's what the synced accounts look like in Salesforce:
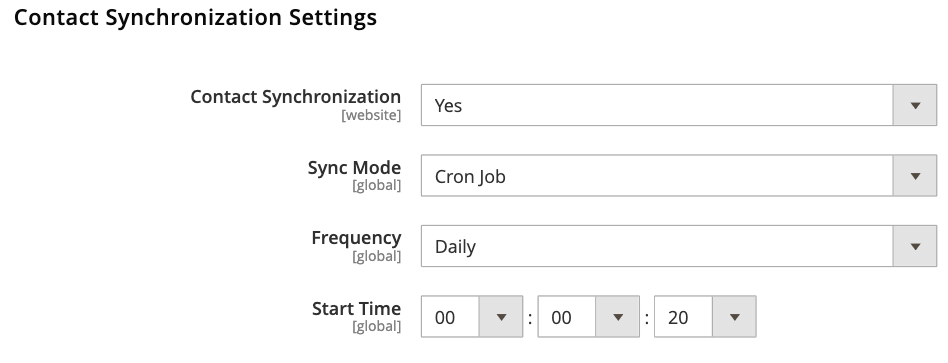
Contact Synchronization
To synchronize customer contacts, follow these steps.
- Enable Synchronization: Set Contact Synchronization to Yes. This turns on the synchronization feature for contact data.
- Set Sync Mode: Change Sync Mode to Cron Job. This automates the synchronization process to run at a scheduled time.
- Set Frequency: Choose a frequency from the Frequency dropdown menu. The example shows Daily, meaning the sync will run once every day.
- Set Start Time: Specify the Start Time for the daily sync to begin. The example shows a start time of 00:00:20 (12:00:20 AM), so the sync will run shortly after midnight each day.
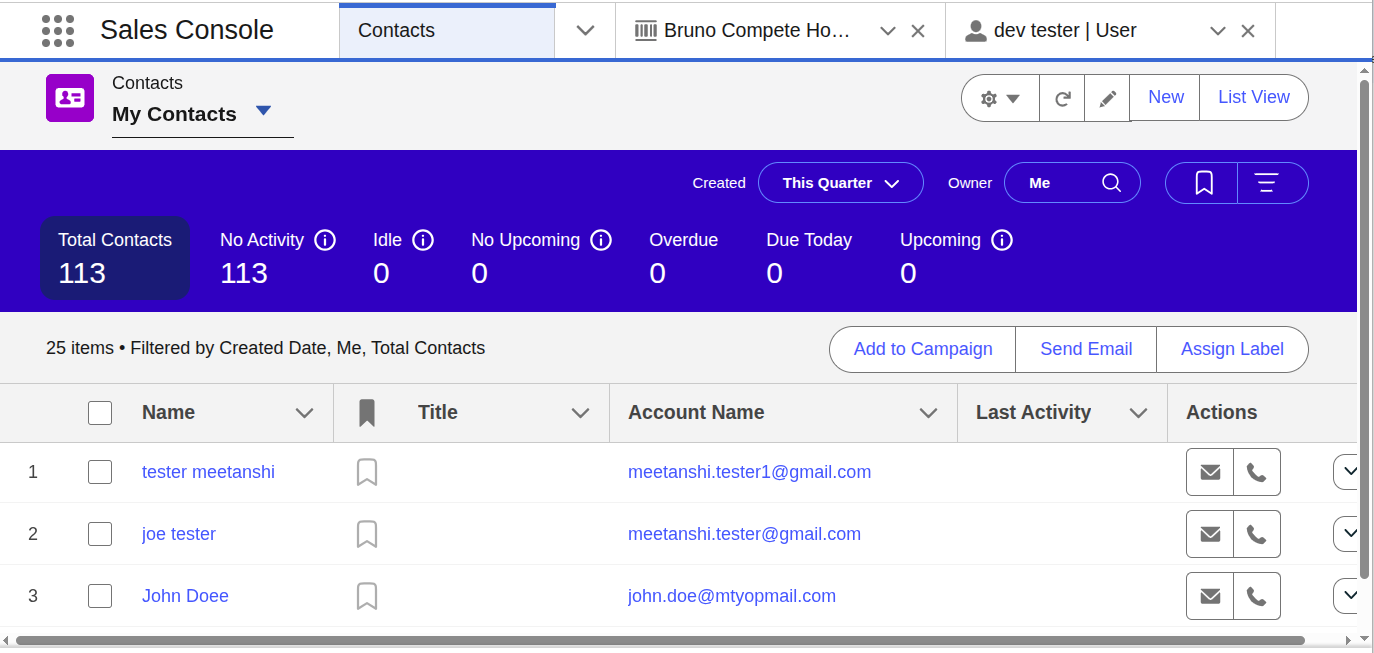
Here's what the synced contacts look like in Salesforce:
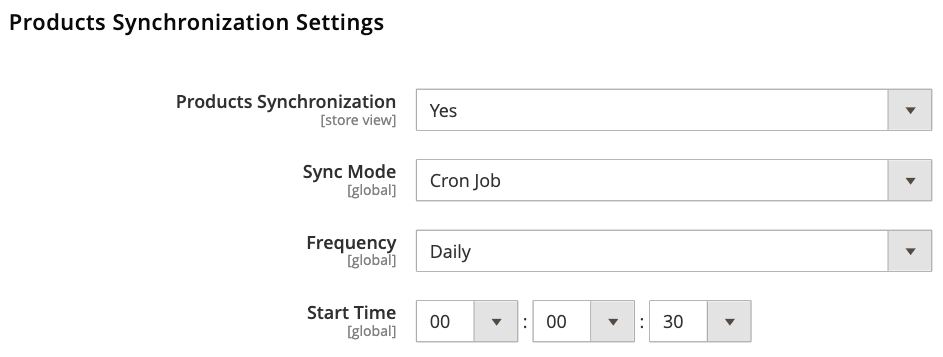
Product Synchronization
To synchronize your product catalog, follow these steps.
- Enable Synchronization: Set Products Synchronization to Yes.
- Set Sync Mode: Choose Cron Job from the Sync Mode dropdown.
- Set Frequency: Select a Frequency for the sync to run. The example shows Daily.
- Set Start Time: Configure the Start Time for the daily sync. The example shows a start time of 00:00:30 (12:00:30 AM).
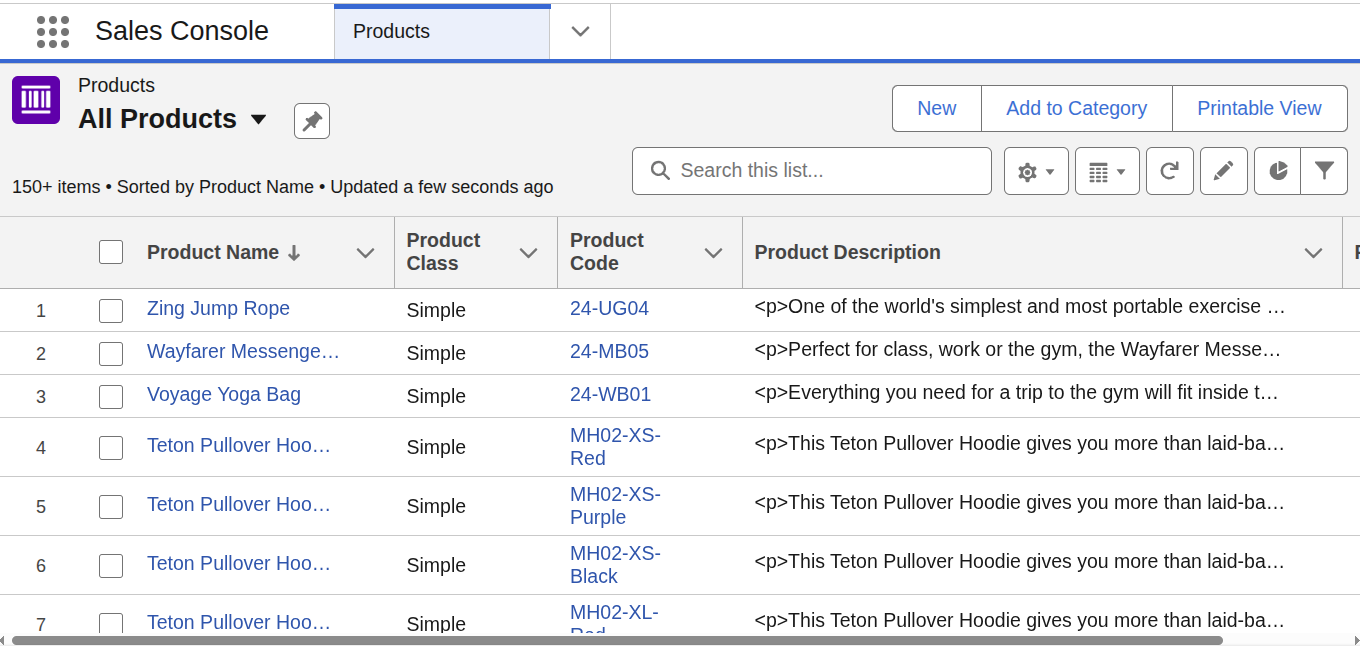
Here's what the synced products look like in Salesforce:
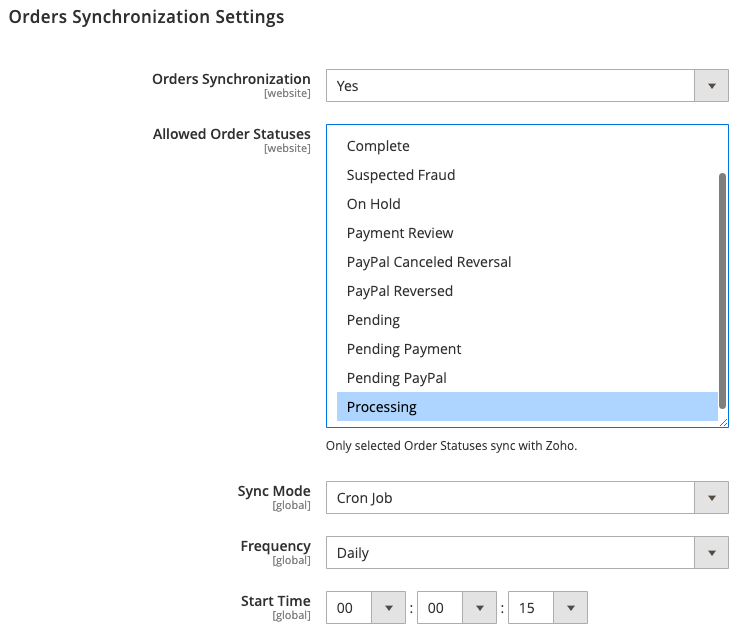
Order Synchronization
To synchronize customer orders, follow these steps.
- Enable Synchronization: Set Orders Synchronization to Yes.
- Choose Order Statuses: In the Allowed Order Statuses box, select the specific statuses you want to synchronize with Zoho. Only orders with these statuses will be synced.
- Set Sync Mode: Choose Cron Job from the Sync Mode dropdown.
- Set Frequency: Select a Frequency for the sync to run, such as Daily.
- Set Start Time: Specify the Start Time for the daily sync. The example shows a start time of 00:00:15 (12:00:15 AM).
Here's what the synced orders look like in Salesforce:

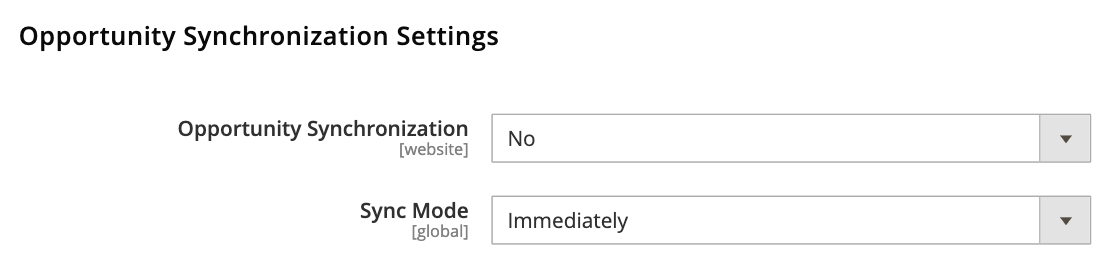
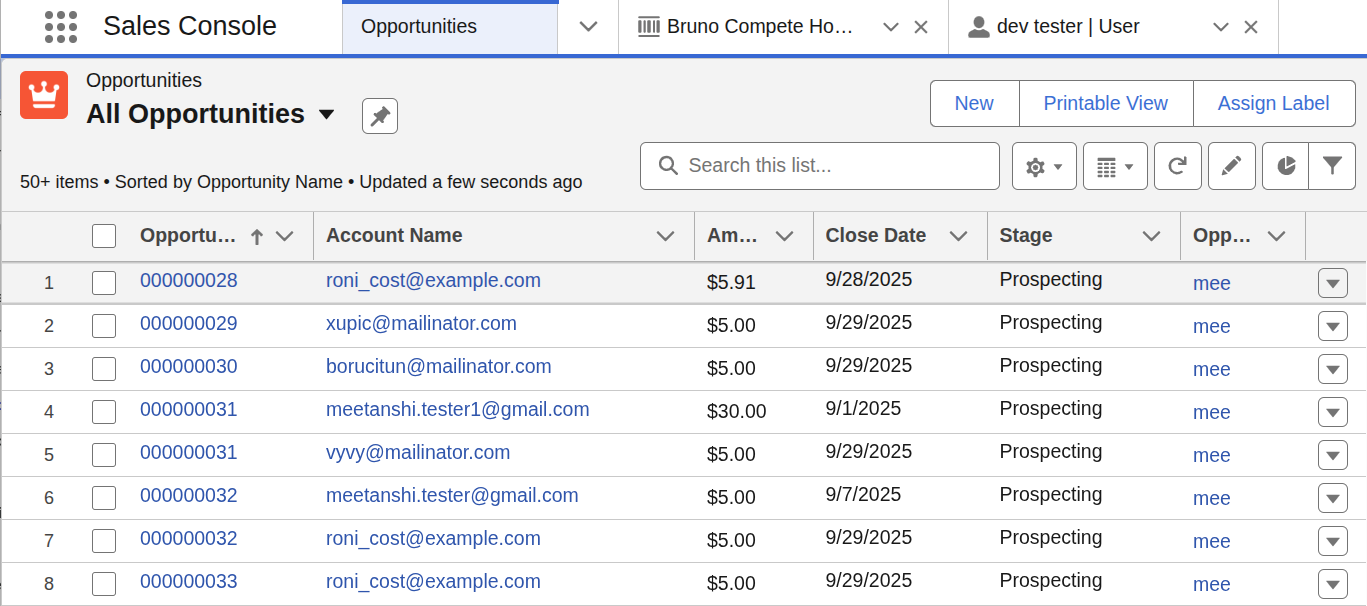
Opportunity Synchronization
To manage opportunity synchronization, follow these steps.
- Disable Synchronization: Set Opportunity Synchronization to No if you don't want to sync opportunities.
- Set Sync Mode: The Sync Mode is shown as Immediately in the image, but since synchronization is disabled, this setting is not currently active. If synchronization were enabled, this setting would determine if changes are synced in real-time or via a cron job.
Here's what the synced opportunities look like in Salesforce:
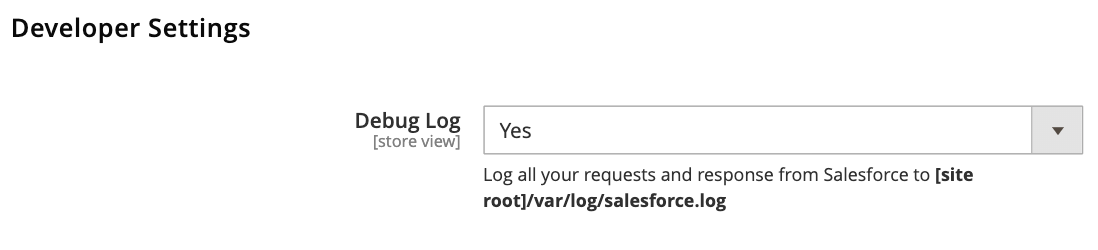
Developer Settings
- Debug Log: Set to "Yes" to enable detailed logging. This is very helpful for troubleshooting any issues. The log file can be found at the path shown in the description (var/log/salesforce.log).
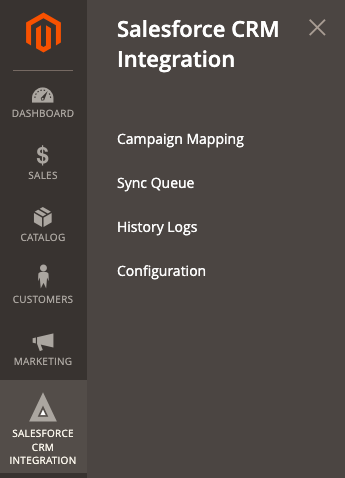
Map Magento Data to Salesforce
Mapping ensures that data from Magento is correctly categorized in Salesforce.
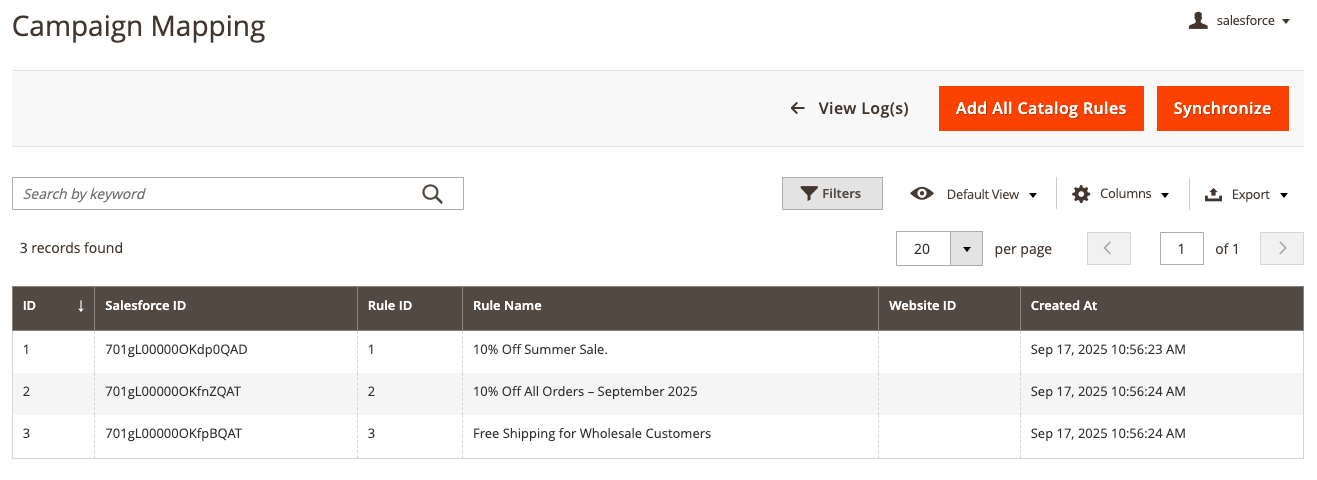
Campaign Mapping
This section links Magento's Catalog Price Rules to Salesforce Campaigns.
Navigate to Salesforce CRM Integration > Campaign Mapping.
Click Add All Catalog Rules to populate the grid with all active catalog rules from your Magento store. Click "Synchronize" to sync these as Campaigns in Salesforce.
Manage Data Synchronization
Once configured, you can manage the sync process and monitor its status.
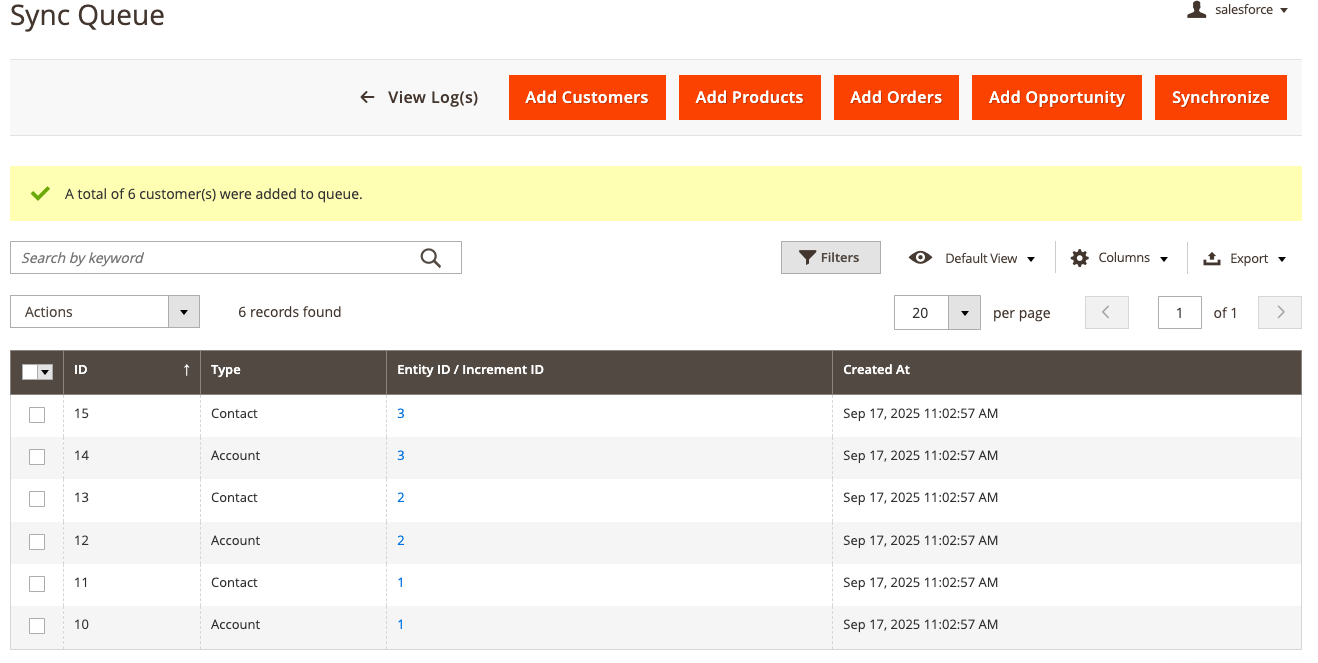
Syncing Historical Data (Sync Queue)
If you have existing customers, products, and orders in your store from before you installed the extension, you can use the Sync Queue to send them all to Salesforce.
- Navigate to Salesforce CRM Integration > Sync Queue.
- To ensure data integrity, add data to the queue in the following order:
- Click "Add Customers"
- Click "Add Products"
- Click "Add Orders"
- Click "Add Opportunity"
- After adding all the desired data, click the master "Synchronize" button to start the process. The extension will gradually sync the queued items in the background.
Monitoring the Sync (History Logs)
The History Logs provide a complete record of all synchronization attempts.
- Navigate to Salesforce CRM Integration > History Logs.
- Here you will see a list of every item that has been synced.
- Status: Will show "Success" if the data was synced correctly, or "Error" if there was a problem.
- Message: Provides more detail, especially for errors. This is the first place to check if you suspect data isn't syncing.
