Magento 2 Order Attributes
Extension Installation
For Magento Marketplace Customers
- Find the Composer name and version of the extension in the extension's composer.json file.
- Login to your SSH and run:
composer require meetanshi/magento-2-order-attributes
Enter your authentication keys . Your public key is your username; your private key is your password.
Wait for Composer to finish updating your project dependencies and make sure there aren't any errors.
To verify that the extension installed properly, run the command:
php bin/magento module:status Meetanshi_OrderAttributes
By default, the extension is probably disabled.
Enable the extension and clear static view files:
php bin/magento module:enable Meetanshi_OrderAttributes--clear-static-content
php bin/magento setup:upgrade
- For Magento version 2.0.x to 2.1.x -
php bin/magento setup:static-content:deploy
- For Magento version 2.2.x & above -
php bin/magento setup:static-content:deploy --f
php bin/magento cache:flush
For Meetanshi Customers
- Extract the zip folder and upload our extension to the root of your Magento 2 directory via FTP.
- Login to your SSH and run below commands step by step:
php bin/magento setup:upgrade
- For Magento version 2.0.x to 2.1.x - php bin/magento setup:static-content:deploy
- For Magento version 2.2.x & above - php bin/magento setup:static-content:deploy --f
php bin/magento cache:flush
Configuration Settings
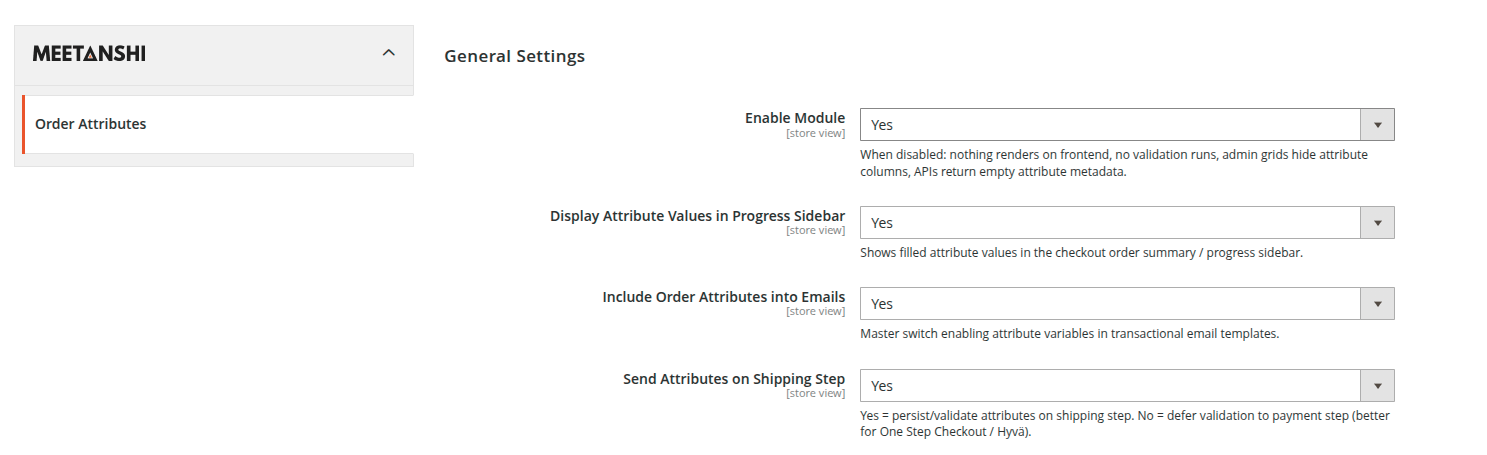
To configure the general settings for the Magento 2 Order Attributes extension, navigate to Stores > Configuration > Meetanshi > Order Attributes in the admin panel.
General Settings
Enable Module: Enable or disable the Magento 2 Order Attributes extension. If disabled, all custom order attributes will stop working.
Display Attribute Values in Progress Sidebar: Show the values entered for custom order attributes in the checkout order summary, allowing customers to review their selections before placing the order.
Include Order Attributes into Emails: Include custom order attribute values in order-related emails, such as order confirmation, invoice, shipment, and credit memo emails.
Send Attributes on Shipping Step: Choose when custom order attributes should be saved and validated during checkout.
- Yes: Attributes are saved and validated during the Shipping step.
- No: Validation is delayed until the Payment step, which is recommended for better compatibility with One Step Checkout and Hyvä Checkout.
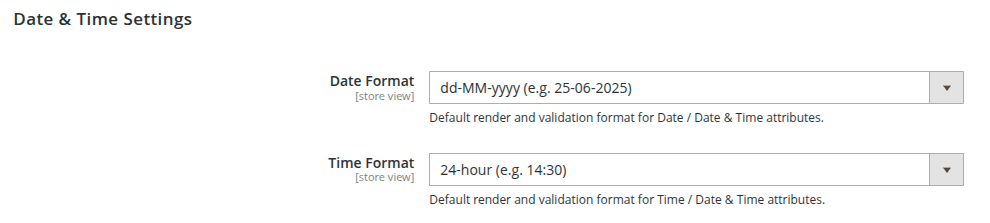
Date & Time Settings
- Date Format: Choose how dates are displayed for Date and Date & Time attributes. Example: dd-MM-yyyy → 25-06-2025
- Time Format: Choose how time is displayed for Time and Date & Time attributes. Example: 24-hour format → 14:30
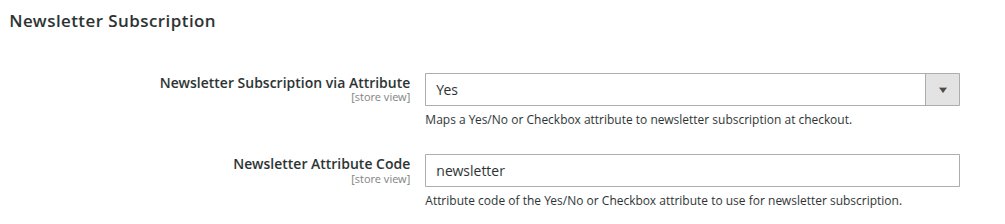
Newsletter Subscription
- Newsletter Subscription via Attribute: Allows customers to subscribe to your newsletter by selecting a custom Yes/No or Checkbox order attribute during checkout.
- Newsletter Attribute Code: Enter the attribute code of the Yes/No or Checkbox field that should be used for newsletter subscription. For example, if your newsletter attribute code is newsletter, enter newsletter here.
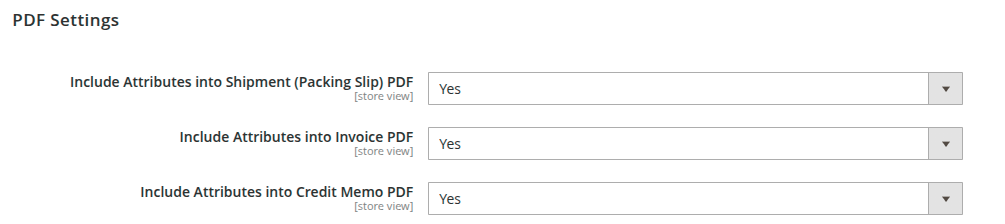
PDF Settings
- Include Attributes into Shipment (Packing Slip) PDF: Adds the custom order attribute values to the shipment (packing slip) PDF generated for the order.
- Include Attributes into Invoice PDF: Includes the custom order attribute values in the invoice PDF, making them available when invoices are printed or downloaded.
- Include Attributes into Credit Memo PDF: Displays the custom order attribute values in the credit memo PDF generated for refunded orders. This ensures the same order information is available across all related documents.
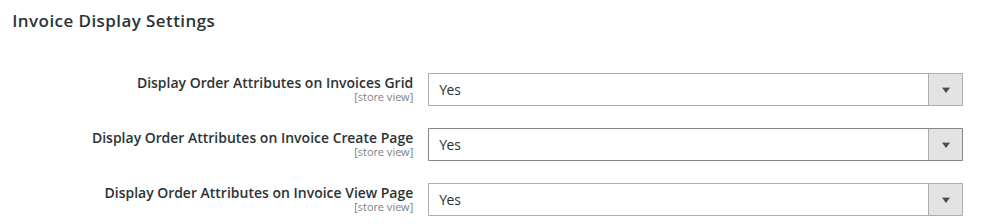
Invoice Display Settings
- Display Order Attributes on Invoices Grid: Add a column to the Invoices grid to easily view custom attribute data.
- Display Order Attributes on Invoice Create Page: Show the custom order attributes while generating a new invoice in the admin panel.
- Display Order Attributes on Invoice View Page: Display the captured custom fields when viewing an existing invoice in the backend.
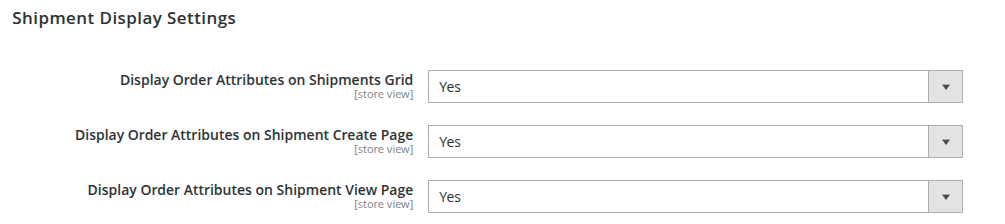
Shipment Display Settings
- Display Order Attributes on Shipments Grid: Include custom attribute data as a sortable column in the Shipments grid.
- Display Order Attributes on Shipment Create Page: Make custom order attributes visible to admins while creating a new shipment.
- Display Order Attributes on Shipment View Page: Show the custom checkout fields on the details page of an existing shipment.
Credit Memo Display Settings
- Display Order Attributes on Credit Memo Create Page: Allow admins to view custom attributes while processing a credit memo.
- Display Order Attributes on Credit Memo View Page: Display the custom data on the details page of a completed credit memo.

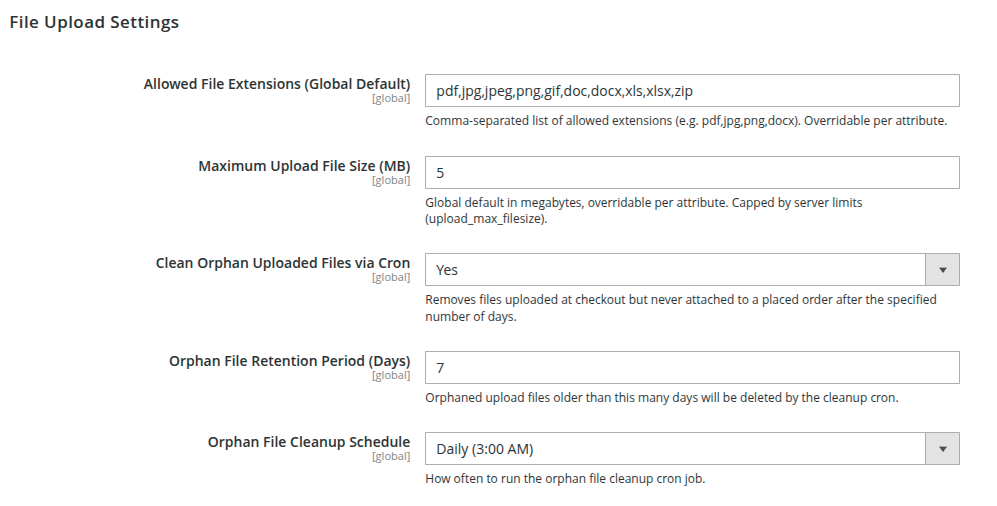
File Upload Settings
Allowed File Extensions (Global Default): Specify the file types customers are allowed to upload (such as PDF, JPG, PNG, and DOCX). You can override this list for individual order attributes if required.
Maximum Upload File Size (MB): Set the maximum file size customers can upload. This value can be customized for individual attributes but cannot exceed your server's upload limit.
Clean Orphan Uploaded Files via Cron: Automatically deletes files uploaded during checkout that were never associated with a completed order, helping free up server storage.
Orphan File Retention Period (Days): Define how many days unused uploaded files should be kept before they are automatically removed.
Orphan File Cleanup Schedule: Choose how often Magento should run the cleanup process to remove orphaned uploaded files (for example, daily at 3:00 AM).
Order Attributes Management
To manage your custom checkout fields, go to Sales > Order Attributes. Here you will find three main options:
- Manage Attribute: Create and configure individual custom fields for the checkout.
- Manage Relation: Set up dependencies where one attribute's visibility depends on another's value.
- Manage Checkout Steps: Create custom steps in the checkout flow to house your attributes.
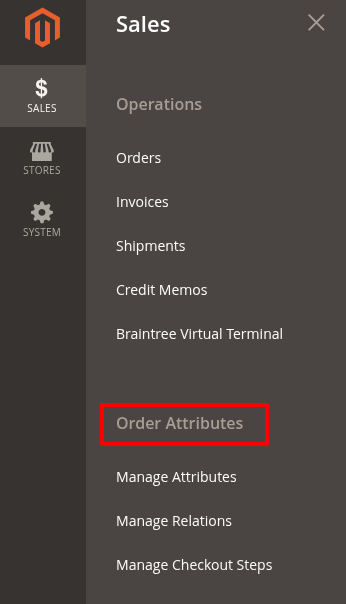
Manage Attribute
Navigate to Sales > Order Attributes > Manage Attribute and click on the Add New Attribute button to create a new checkout field.
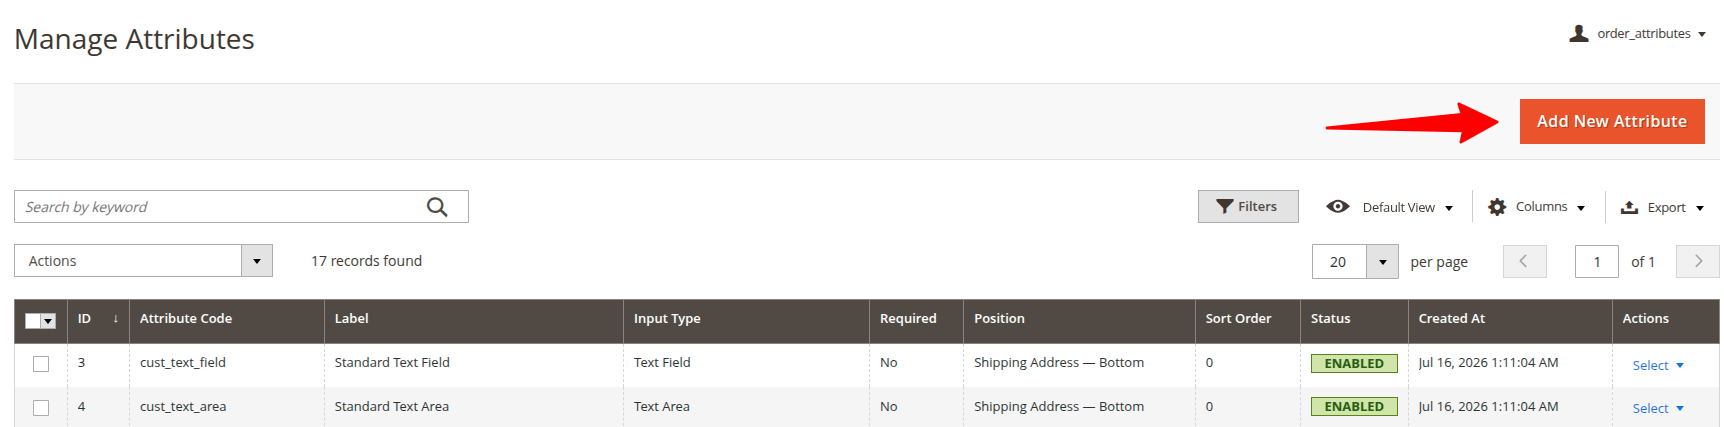
Configure the following options:
- Default Label: Enter the primary name for the attribute (e.g., "Delivery Instructions").
- Input Type: Select the type of data to collect (e.g., Text Field, Dropdown, Date, File).
- Default Value: Specify a pre-filled value for the field, if applicable.
- Required: Choose whether the customer must fill out this field to complete checkout.
- Input Validation: Apply specific validation rules (like alphanumeric only, email format) to ensure clean data.
- Minimum Text Length: Set the minimum number of characters allowed for text inputs.
- Maximum Text Length: Set the maximum number of characters allowed for text inputs.
- Minimum Value: Define the minimum acceptable value; applies to Date, Date & Time, and Time input types.
- Maximum Value: Define the maximum acceptable value; applies to Date, Date & Time, and Time input types.
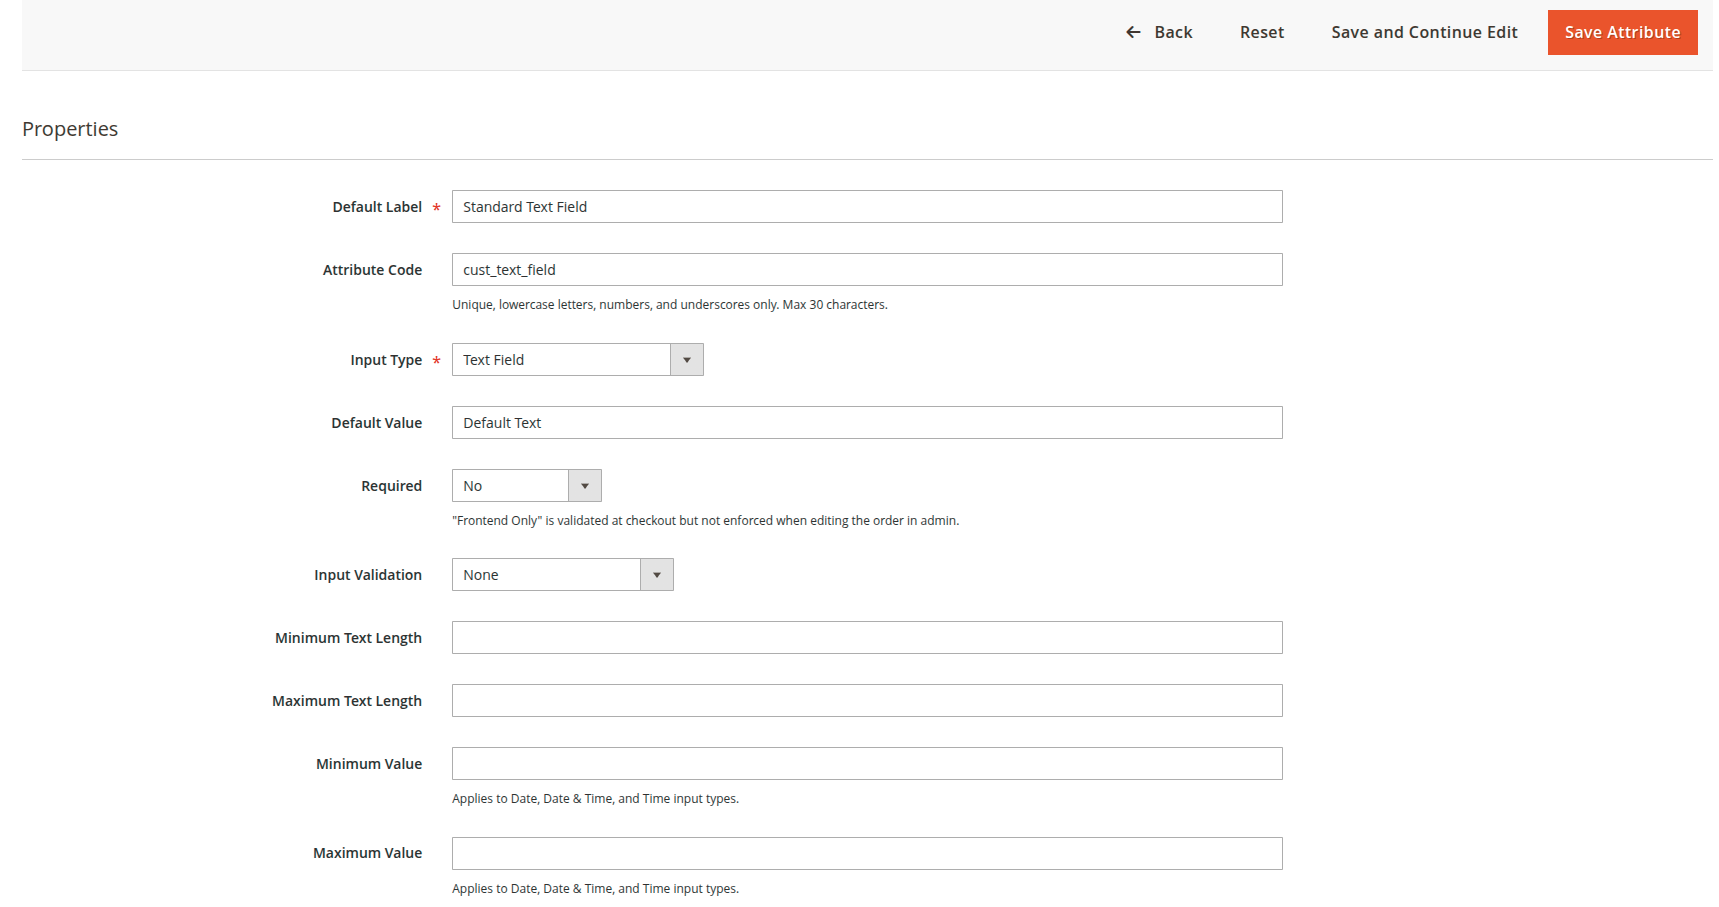
- Input/Output Filter: Apply filters like stripping HTML tags; applies to Text Field and Text Area input types.
- Allowed File Extensions: Specify permitted file types as comma-separated values (e.g., jpg,png,pdf). Applies to File and Image types.
- Maximum File Size (MB): Limit the maximum size for uploaded files to prevent excessive server usage.
- Visible on Frontend: Choose "Yes" to display this attribute to customers on the storefront.
- Visible on Backend: Choose "Yes" to allow admin users to view and edit this attribute.
- Save Value for Future Checkout: Choose "Yes" to auto-fill the field for returning customers based on their past orders.
- Show on Admin Order Grids: Choose "Yes" to include this attribute as a column in the Sales > Orders grid.
- Show in Customer Account: Choose "Yes" to display the captured data on the customer's order history page.
- Include in HTML Print-out: Choose "Yes" to show the attribute on HTML printable versions of the order.
- Include in PDF Documents: Choose "Yes" to embed the attribute data into generated PDFs.
- Include in Transactional Emails: Choose "Yes" to add this attribute to order confirmation and status emails.
- Status: Enable or disable the attribute from active use.
- CMS Static Block: Select a static block (e.g., Footer Links Block) to display; applies only to the Static Block (Display Only) input type.
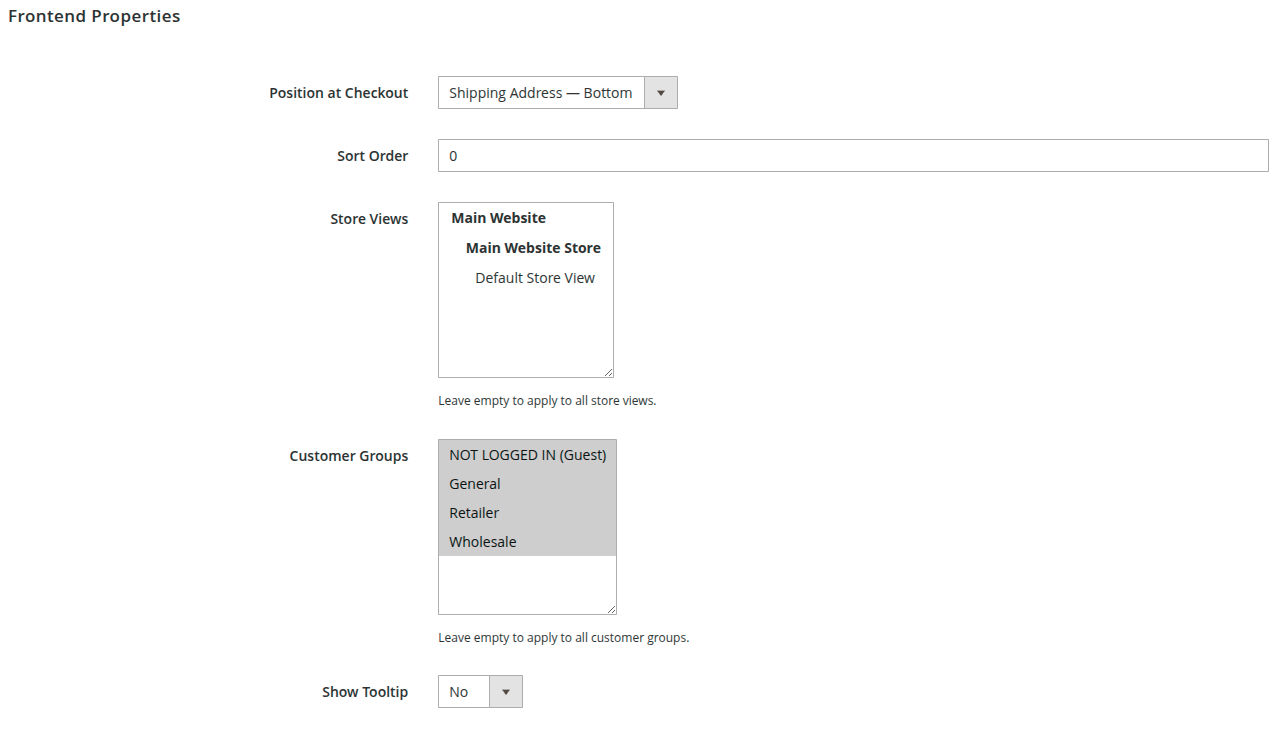
Frontend Properties
- Position at Checkout: Select exactly where the field should appear during the checkout flow (or select "None" to hide it).
- Sort Order: Determine the display priority of the field relative to others in the same position.
- Store Views: Select specific store views (e.g., Main Website Store, Default Store View) or leave empty to apply to all store views.
- Customer Groups: Target the attribute to specific shopper groups (e.g., NOT LOGGED IN, General, Retailer, Wholesale) or leave empty for all customer groups.
- Show Tooltip: Choose "Yes" to display an informational tooltip icon next to the field label.
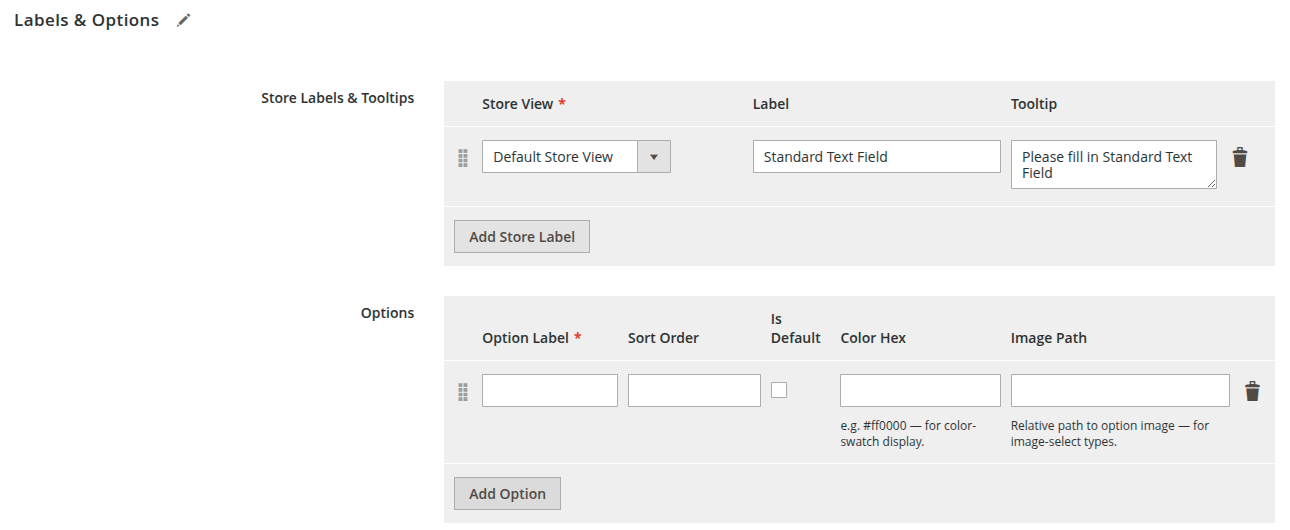
Labels & Options
- Store Labels & Tooltips: Add specific translated labels and tooltip descriptions for each configured store view using the "Add Store Label" button.
- Options: Define the available selectable choices for dropdown, multi-select, and radio button input types.
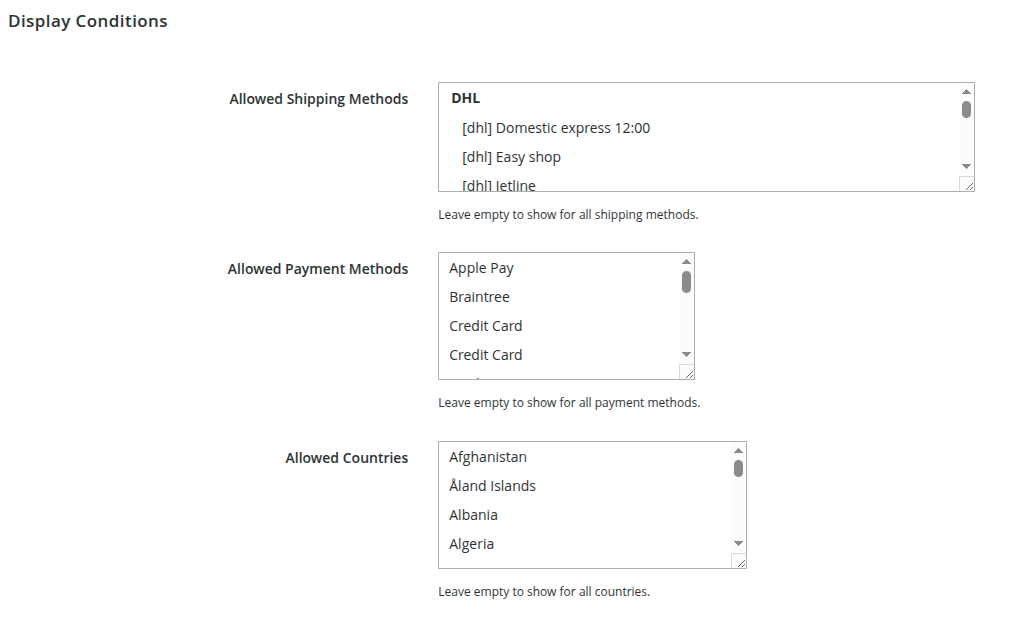
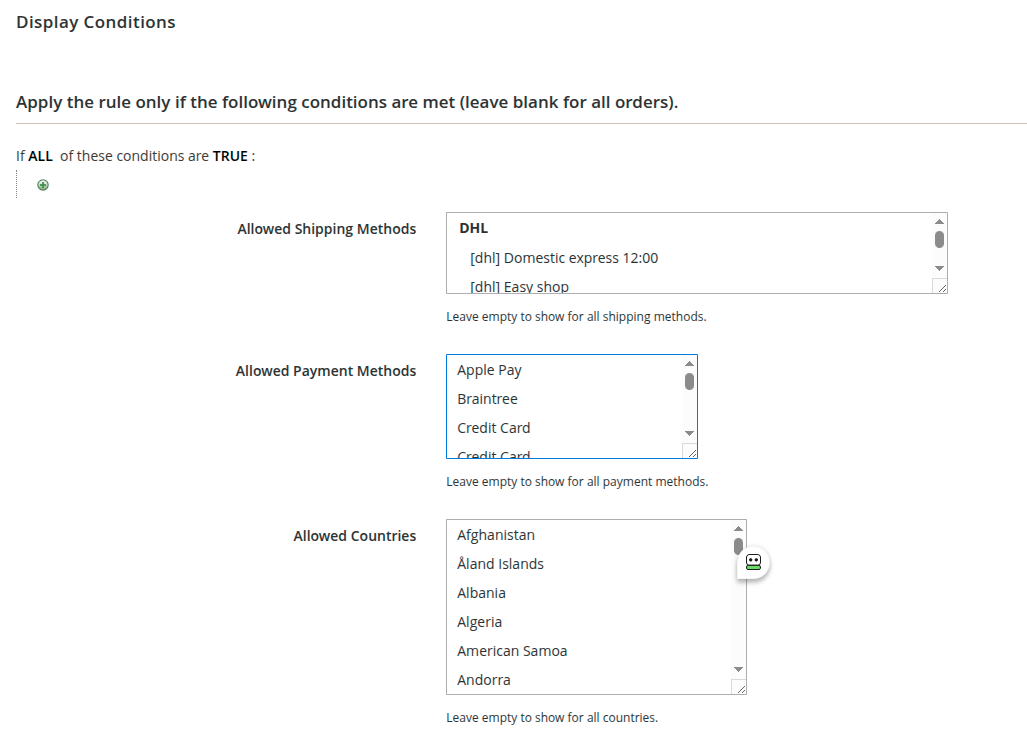
Display Conditions
- Display Conditions: Define specific cart rules, shipping methods, payment methods, or country selections that must be met for the attribute to be visible.
- Depend Attributes Control the visibility of this attribute based on complex contextual requirements or parent/child dependencies during checkout.

Manage Relation
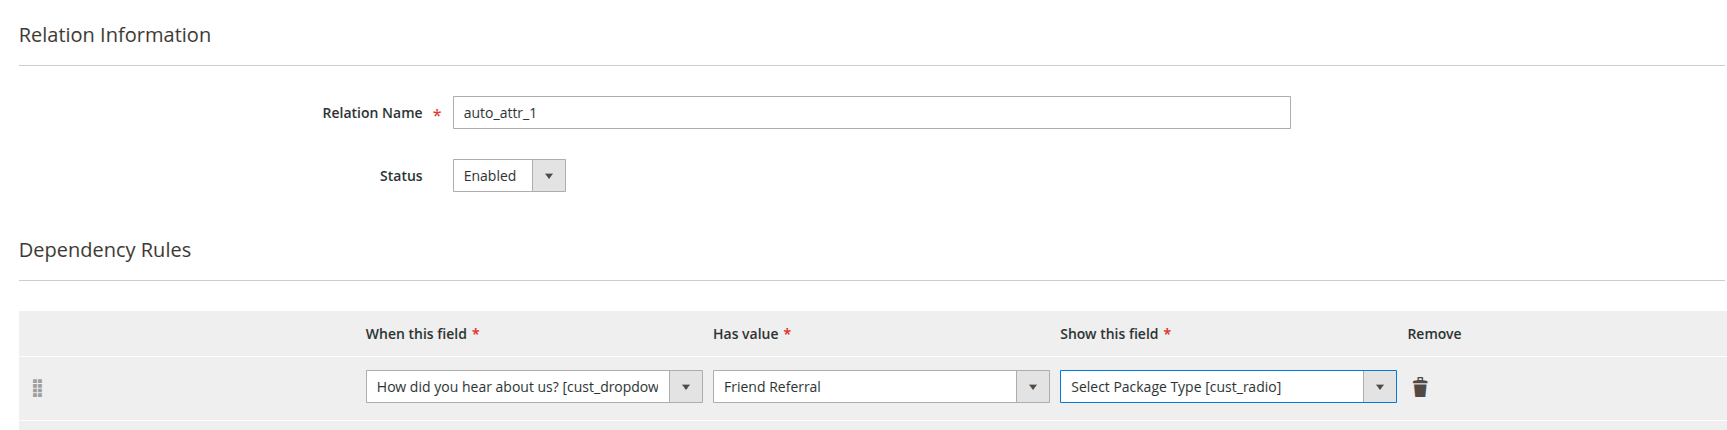
Navigate to Sales > Order Attributes > Manage Relation and click on the Add New Relation button to set up attribute dependencies.
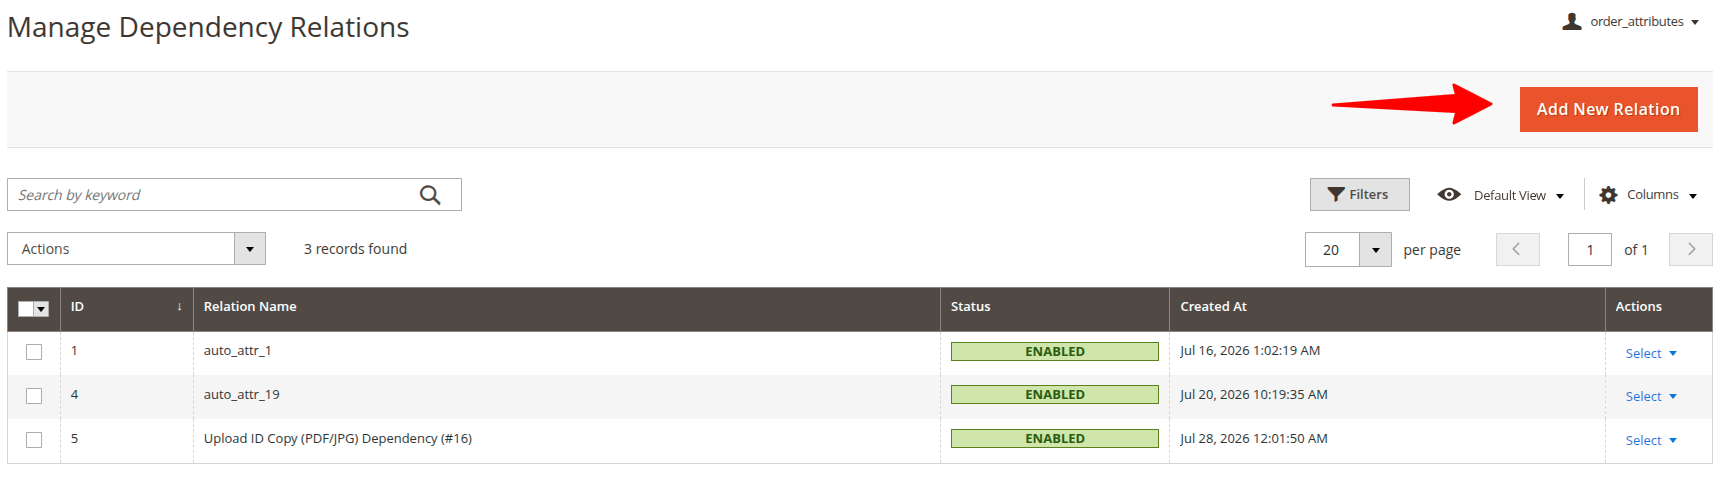
Relation Information
- Relation Name: Enter a descriptive name for this dependency rule.
- Status: Enable or disable this relation.
Dependency Rules
Click the Add Rule button to create a specific condition.
- When this field: Select the parent attribute that triggers the condition.
- Has value: Specify the value the parent attribute must have to trigger the rule.
- Show this field: Select the child attribute that will be displayed when the condition is met.
- Remove: Click to delete the specific dependency rule.
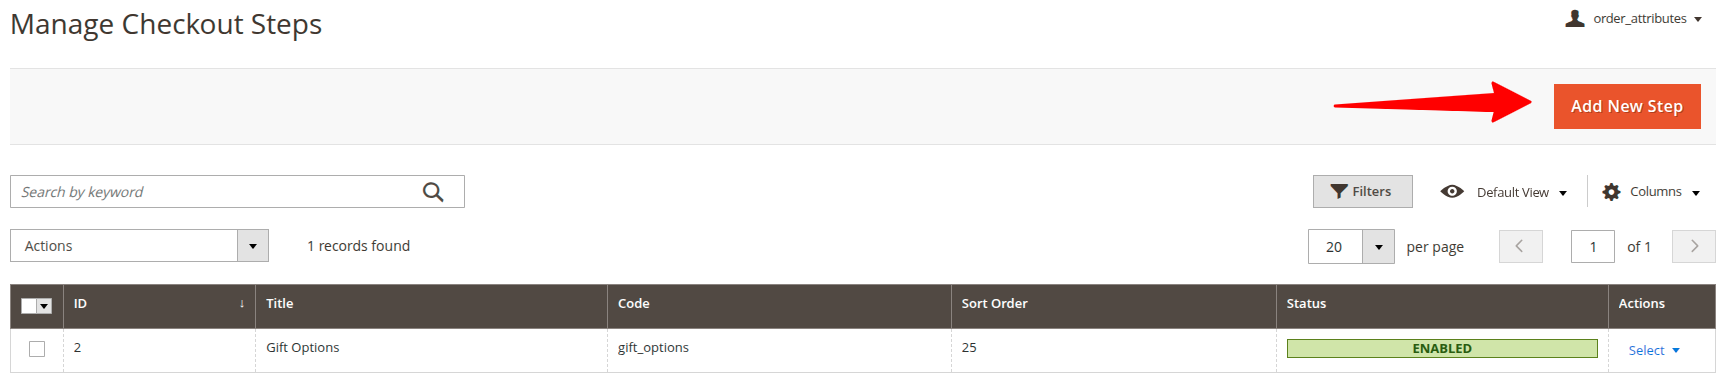
Manage Checkout Steps
Navigate to Sales > Order Attributes > Manage Checkout Steps and click the Add New Step button to create custom steps within your checkout flow.
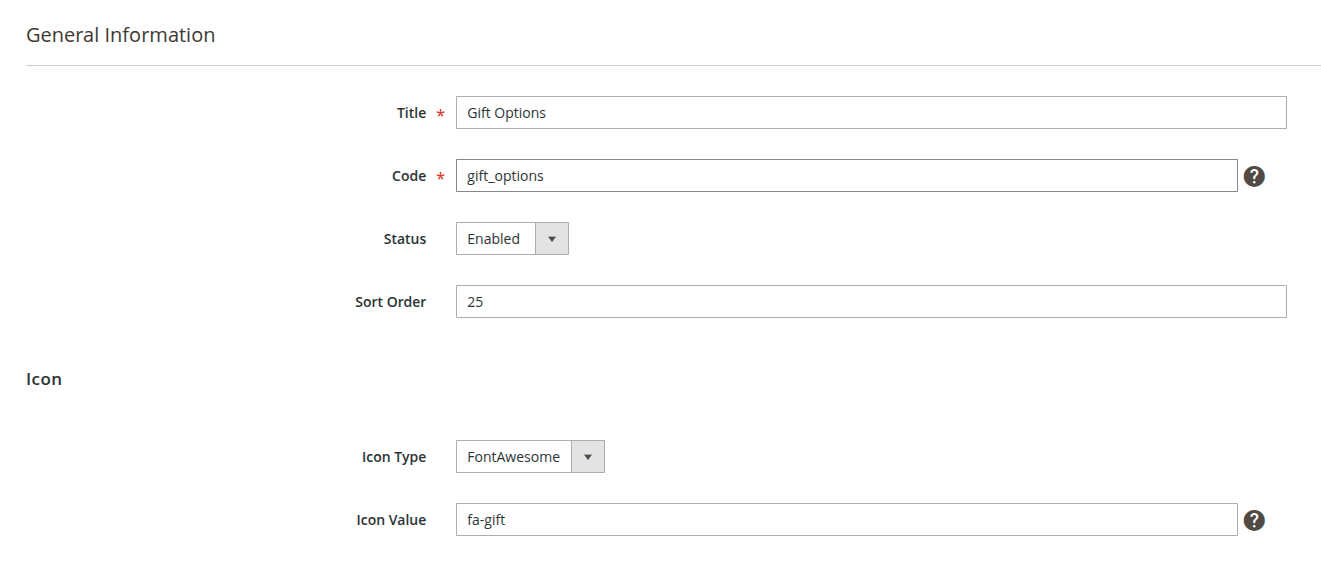
General Information
- Title: Enter the display name for the new checkout step.
- Code: Provide a unique identifier code for internal system use.
- Status: Enable or disable this checkout step.
- Sort Order: Determine the position of this step relative to default and other custom checkout steps.
Icon
- Icon Type: Choose the type of icon to display for this step (e.g., None, Font Icon, Image).
- Icon Value: Specify the icon code or upload the icon image based on the chosen type.
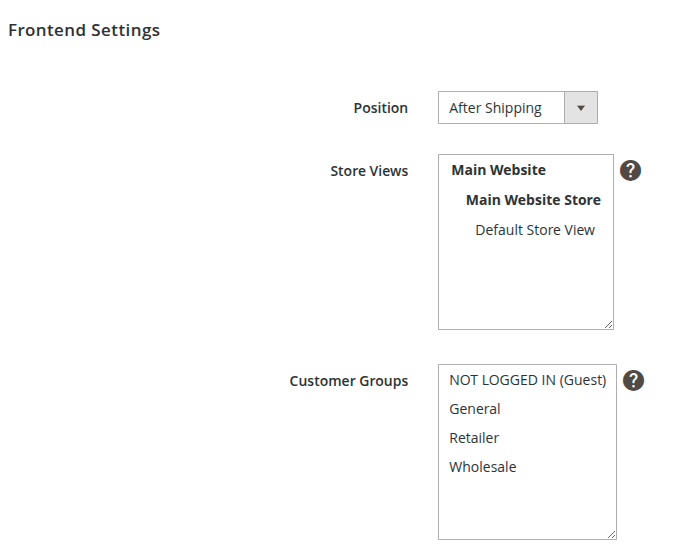
Frontend Settings
- Store Views: Select specific store views (e.g., Main Website Store, Default Store View) where this custom step should appear, or leave empty to apply to all store views.
- Customer Groups: Target the custom step to specific shopper groups (e.g., NOT LOGGED IN, General, Retailer, Wholesale) or leave empty to apply to all groups.
Display Conditions
- Allowed Shipping Methods: Select specific shipping methods (e.g., DHL, FedEx, Flat Rate, Free Shipping, UPS, USPS) that must be chosen for this step to appear. Leave empty to show for all shipping methods.
- Allowed Payment Methods: Select specific payment methods (e.g., Credit Card, PayPal, Check) that must be chosen for this step to appear. Leave empty to show for all payment methods.
- Allowed Countries: Select specific shipping countries that must be chosen for this step to appear. Leave empty to show for all countries.