MIT SMS Notification Pro - User Guide
Welcome to the MIT SMS Notification Pro user guide. This Shopify app helps store owners send automated SMS notifications to customers for order updates, shipping alerts, and other important events. In this guide, you’ll learn how to configure the app, manage SMS settings, and make the most of its features for better customer communication
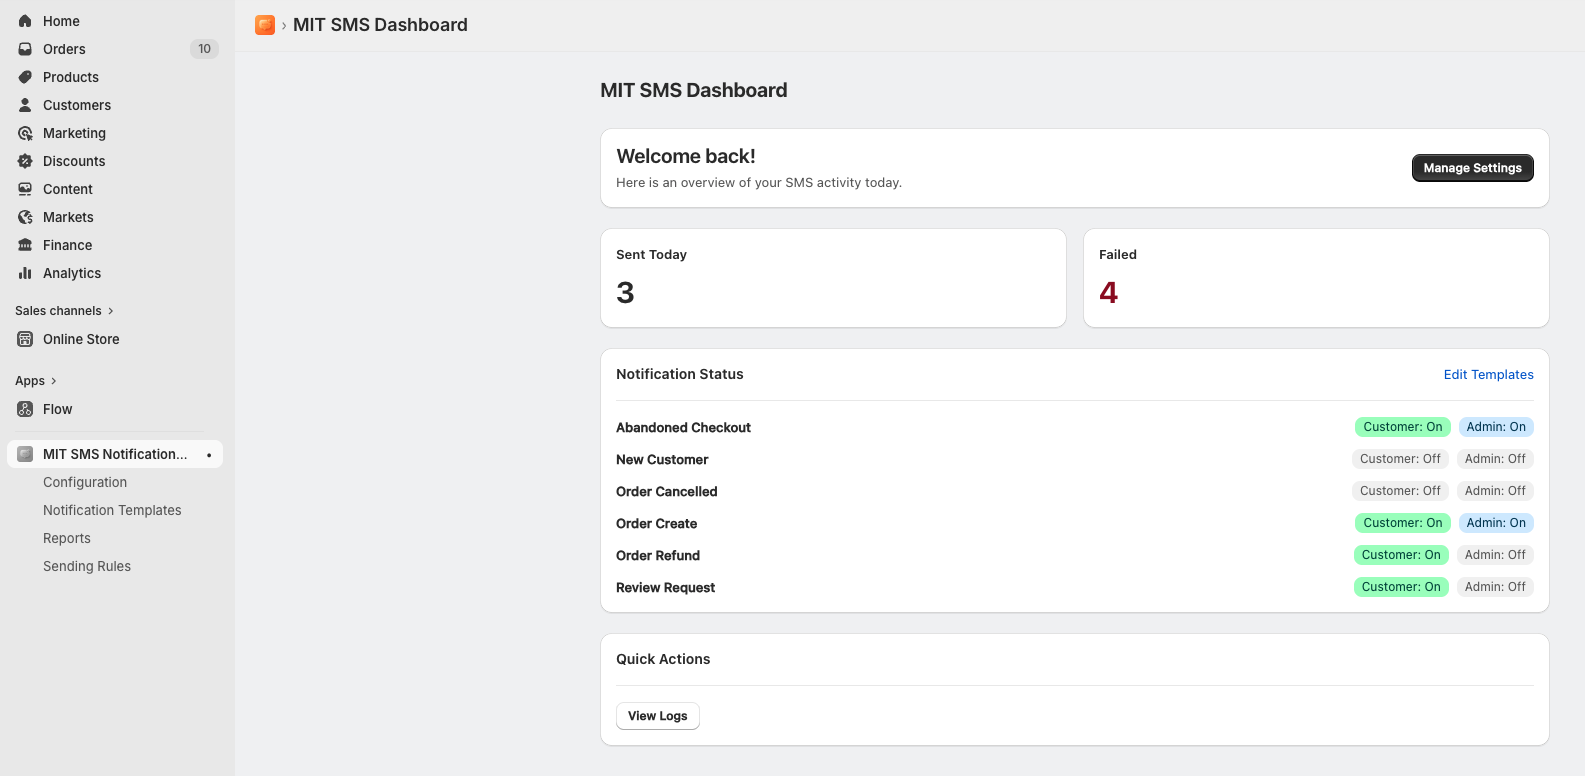
Dashboard Overview
When you first open the app, the MIT SMS Dashboard provides a bird's-eye view of your text message activity and core notification statuses.
- Sent Today & Failed Counters: Quickly monitor your daily message performance with live tallies of successful and failed delivery attempts.
- Notification Status: View a breakdown of transactional triggers, such as Abandoned Checkout, New Customer, and Order Create, and see instantly whether notifications are active (On or Off) for both Customers and Admins.
- Quick Actions: Use shortcuts like the View Logs button to instantly access deep analytical reports.
 Configuration & Gateway Setup
Before sending messages, you must link your preferred SMS gateway service to authenticate and route your texts.
Configuration & Gateway Setup
Before sending messages, you must link your preferred SMS gateway service to authenticate and route your texts.
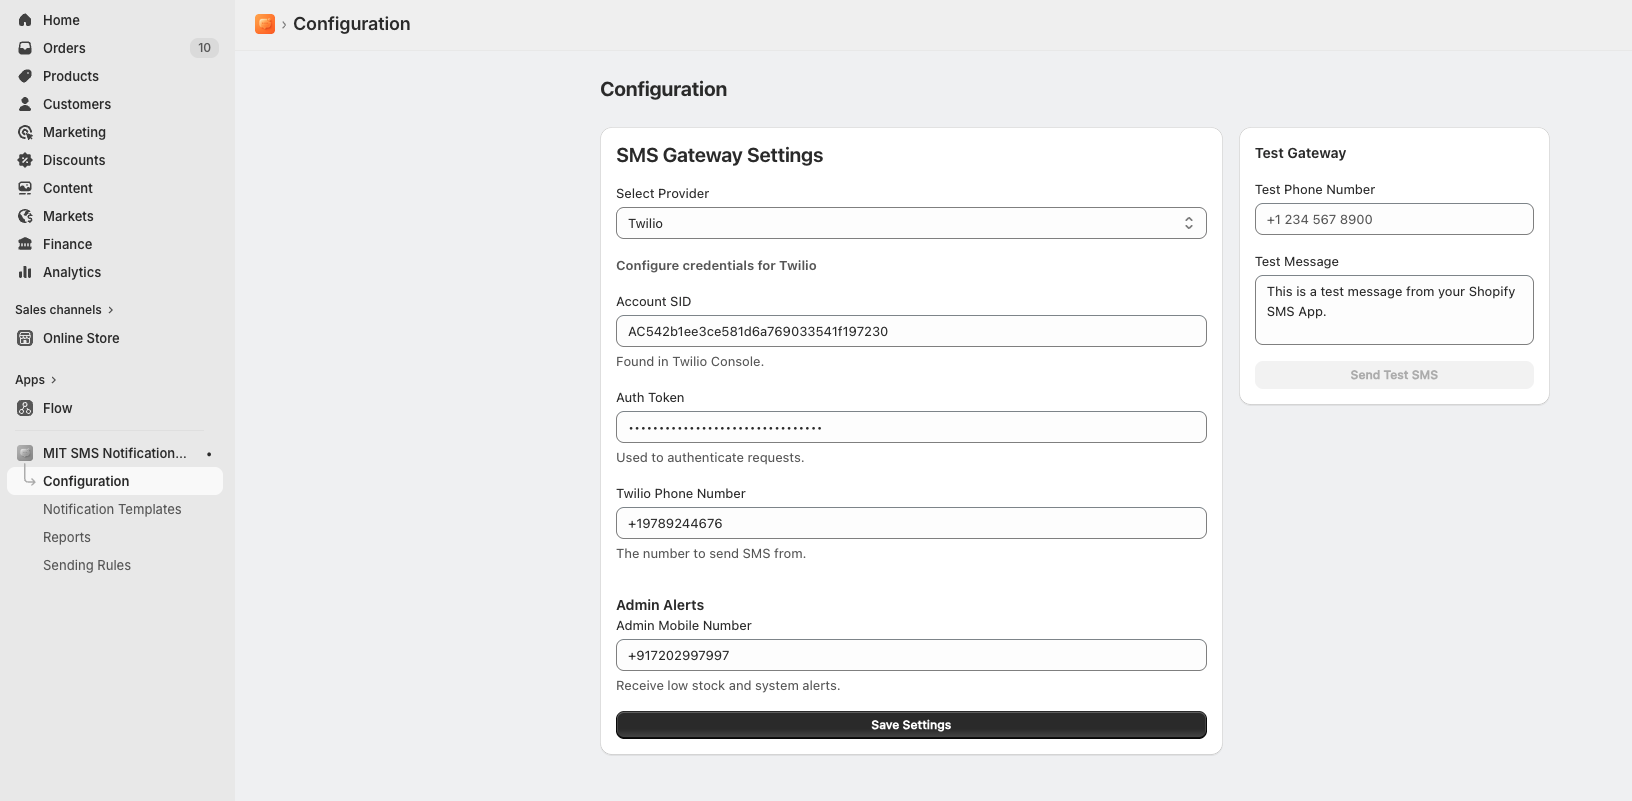
1. Gateway Settings
Navigate to Configuration to choose your gateway infrastructure. Click the Select Provider dropdown to choose your service provider:
- Twilio
- MSG91
- Vonage (Nexmo)

2. Enter Credentials
Fill in your provider account details:
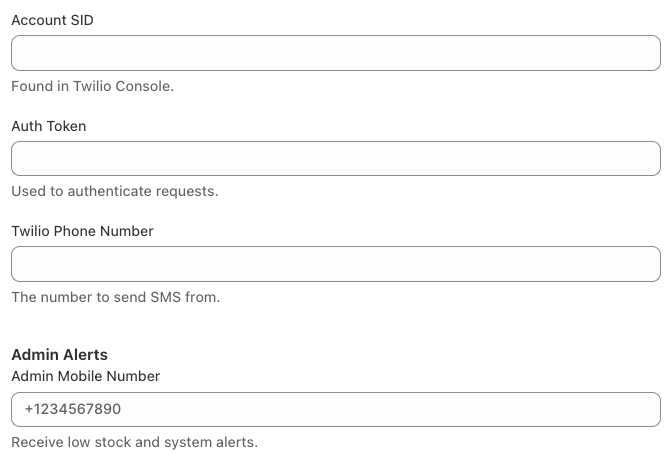
- Account SID / Auth Details: Enter the unique identifiers provided in your gateway service console.
- Sender Info: Input your dedicated Twilio Phone Number or sender ID.
- Admin Alerts: Provide an Admin Mobile Number to receive system alerts, such as low stock notices.
Click Save Settings.
3. Test Gateway
Before going live, use the Test Gateway card on the right. Enter a test phone number, draft a quick message, and click Send Test SMS to verify your setup works seamlessly.
Managing Notification Templates
Customize and control all automated SMS alerts from the Notification Templates section. Here, you can enable or disable notifications for both customers and admins based on different store events. A preview of how SMS will look is available on the right side.
Supported notification events include:
New Customer- Send SMS when a new account is created.
Order Create – Sends SMS when a customer places a new order.
Abandoned Checkout – Automatically sends reminders for abandoned carts after a set duration.
Order Cancelled – Notifies customers when an order is cancelled.
Order Refund – Sends refund confirmation SMS updates.
Order Fulfilled – Alerts customers once an order has been shipped.
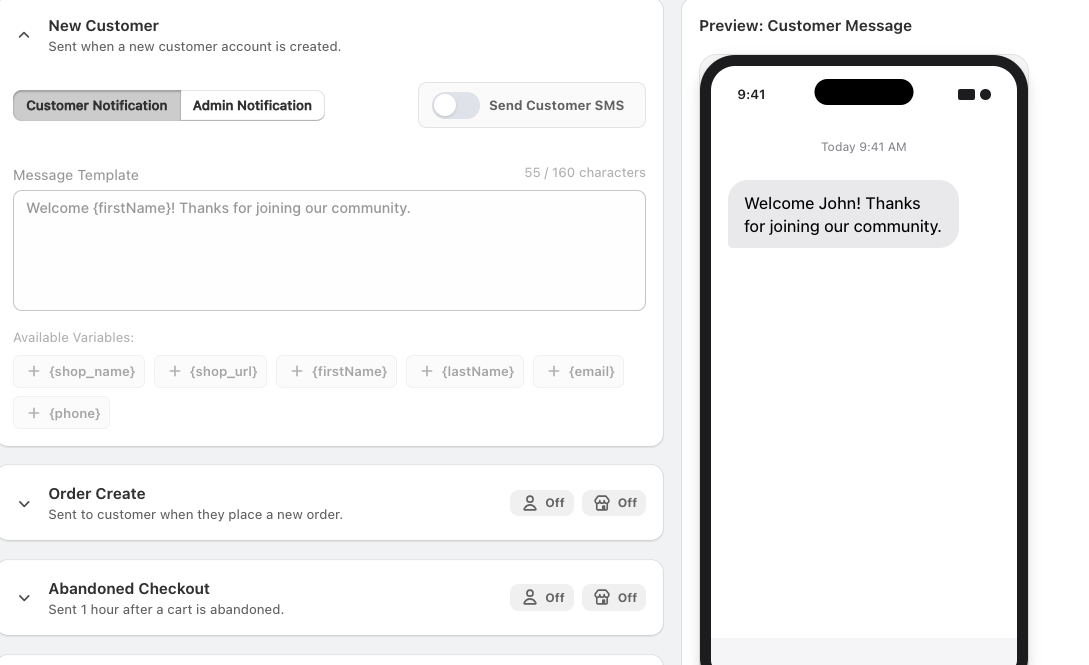 For each notification type, you can:
Enable or Disable Notifications: Independently toggle SMS alerts for Customers and Admins.
Customize Message Templates: Edit SMS content for different events to match your store’s branding and communication style.
Use Dynamic Variables: Add placeholders like {firstName}, {order_id}, {tracking_number}, and {phone} to personalize messages automatically.
Preview & Test Messages: Review message formatting and send test SMS notifications before enabling them live.
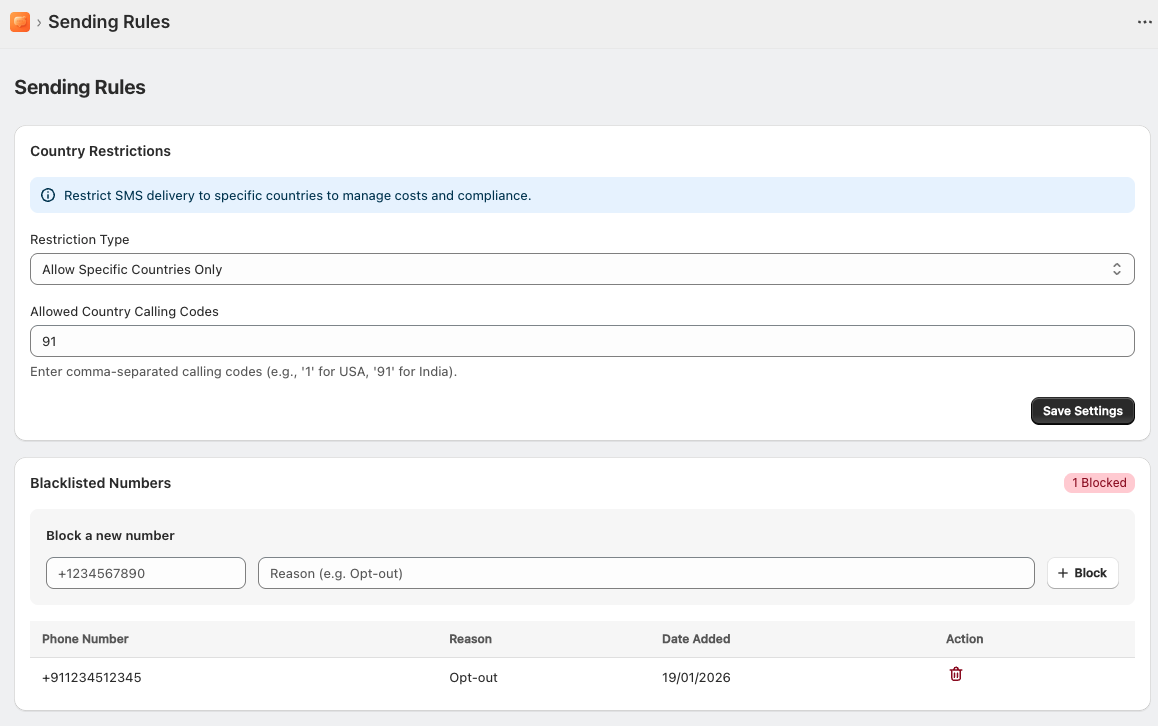
Country Restrictions & Blacklisted Numbers
Maintain strict regulatory compliance and optimize your operational messaging spend by managing your global delivery footprints. Navigate to Sending Rules to manage lists.
Country Restrictions
- Restriction Type: Set options like Allow Specific Countries Only.
- Allowed Country Calling Codes: Input comma-separated international calling codes (e.g., 91 for India) to restrict deliveries solely to your active operational markets.
Blacklisted Numbers
- Block Individual Numbers: Prevent unwanted text routing or handle manual opt-out requests by entering the number, adding a reference note (e.g., Opt-out), and clicking + Block.
- Audit Registry: Track blocked entries transparently via the database grid, showing the Phone Number, Reason, and Date Added, with the choice to delete them via the red trash icon.
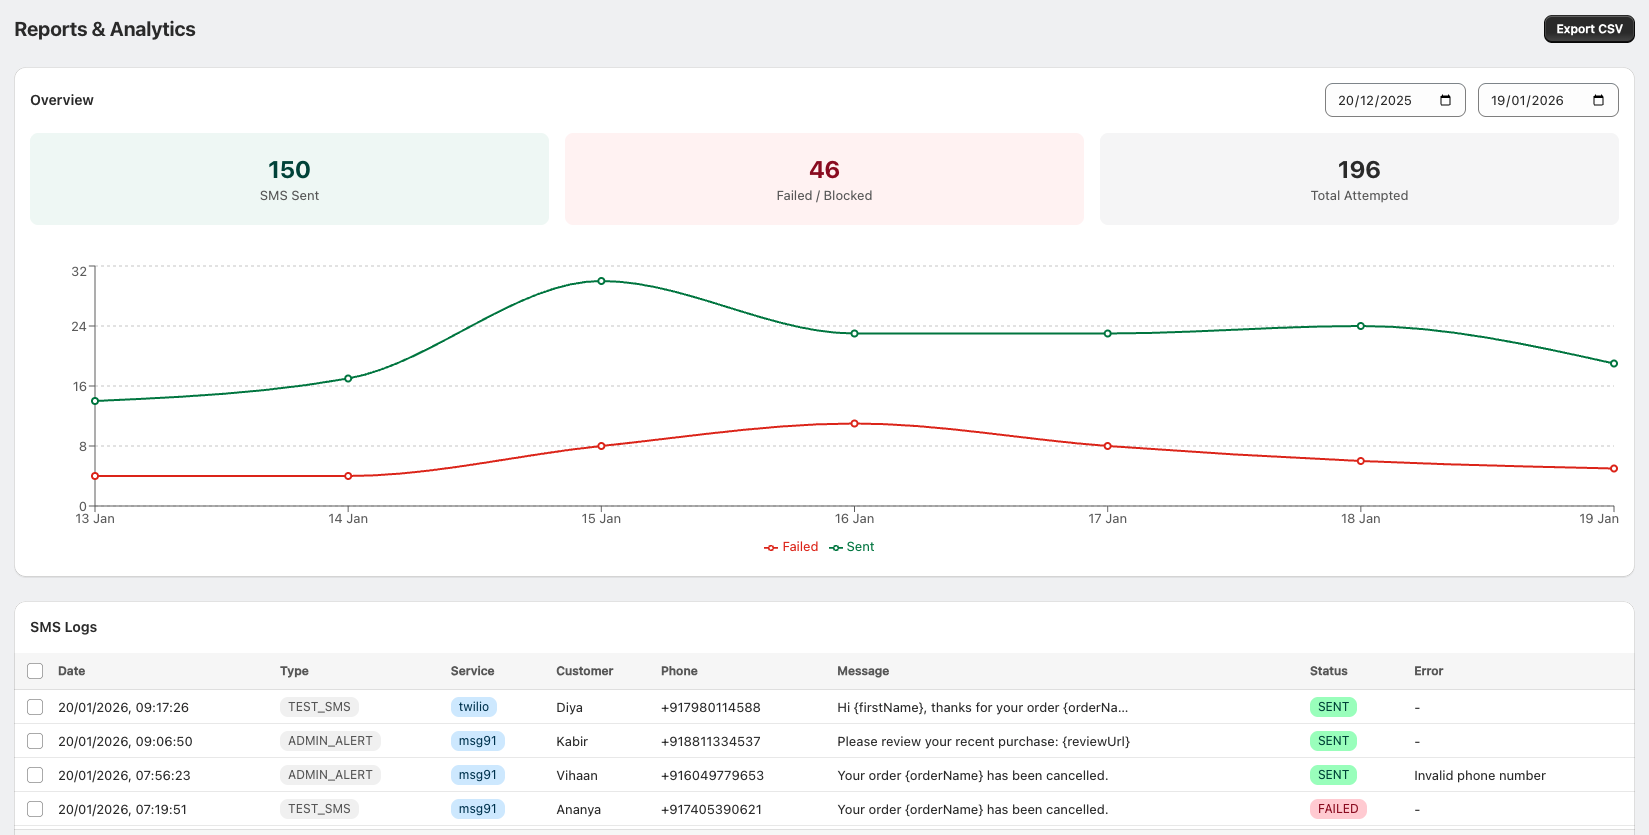
Reports & Analytics Logs
Track exact historical message outputs and audit technical failures cleanly through the central Reports & Analytics center.
- Overview Metrics: Evaluate a high-level summary showing SMS Sent, Failed / Blocked, and Total Attempted balances inside a set calendar window.
- Analytical Graph: Trace day-to-day delivery trend-lines comparing active success loops (Green) against delivery drops (Red).
- SMS Logs Table: Audit a granular message ledger detailing:
- Date & Type: Exact timestamps and classifications (TEST_SMS, ADMIN_ALERT).
- Service & Customer: Which provider engine handled the text (twilio, msg91) and who received it.
- Message Copy: A preview of the text sent, showing parsed or raw variables.
- Status & Error Messages: Live delivery confirmations (SENT, FAILED) complete with automated carrier error code details (such as Invalid phone number).
- Data Portability: Click Export CSV in the top right to download database spreadsheets for offline reporting.
How to Retrieve Gateway API Details
To connect your chosen SMS gateway, follow the platform-specific steps below to find your API credentials.
Twilio
Log in to your Twilio Console.
On the Console Dashboard, look at the Account Info pane.
Copy the Account SID and Auth Token (click Show to reveal it). Paste these into the app's Auth Details.
Use your active Twilio phone number (found under Phone Numbers > Manage > Active Numbers) as your Sender Info.
Vonage (Nexmo)
Log in to your Vonage API Dashboard.
Your API Key and API Secret will be displayed right at the top of the dashboard.
Copy and paste both strings into the corresponding fields in the app configuration.
Your Sender Info will be your approved Vonage virtual number or alphanumeric Sender ID.
MSG91 (Authentication & Template ID) Important Note for MSG91 Users: Due to regulatory compliance (such as DLT in India), you cannot send raw text directly from the app. You must first create matching templates inside your MSG91 dashboard, obtain a Template ID, and map it within the app alongside your API text.
Step 1: Get your MSG91 Authkey
Log in to your MSG91 Dashboard.
Click on the Authkey section from the left sidebar navigation.
Click Create New (if you don't have an active one), name it, and copy the generated key string into the app's configuration.
Step 2: Create and Approve Templates in MSG91
- In your MSG91 dashboard, navigate to SMS > Templates.
- Click Create New Template.
- Draft your message text. Ensure that any dynamic placeholders match the exact structure allowed by your local regulations (use ##variable## syntax inside MSG91 to match the placeholders you intend to use in Shopify).
- Submit the template for review.
Step 3: Map the Template ID in the App
Once MSG91 approves your template, copy the unique Template ID (an alphanumeric string) associated with it.
In the MIT SMS Notification Pro app, navigate to Notification Templates.
Select the corresponding event (e.g., Order Create), make sure the text matches your approved template structure, and paste the copied Template ID into the designated MSG91 Template ID field for that alert.