Starting an online store in the USA has never been easier, thanks to Shopify.
In this guide, we’ll walk you through how to start a Shopify store in the USA, from setting up the store to customizing themes and launching it successfully.
Requirements to Start a Shopify Store in the USA
To use a Shopify Store in the USA, you must meet the following requirements.
- A proper business registration with EIN (Employer Identification Number) which is your tax ID.
- Specific licenses based on your location.
- A full checking account in the USA that is in USD and supports ACH transfers
- Customer statement name must be between 2 and 19 characters long and include your business name or URL
- Comply with relevant privacy laws like The CAN-SPAM Act/State-specific laws.
Apart from financial and contact requirements, a unique logo, high-quality product images, and compelling descriptions are necessary for brand recognition.
Unlike a single federal tax, it’s a complex state-based system where you must collect taxes based on your physical and economic nexus in various states. A local tax advisor is recommended due to evolving laws.
How to Open a Shopify Store in the USA for Free? – Steps
Follow these steps to set up and launch your store without making any investment. The free trial gives you a good opportunity to explore the platform without making any commitment.
Step 1: Create Your Shopify Store
Sign up at Shopify and start your Shopify free trial by providing the necessary details.
Step 2: Select & Customize a Theme
Now, give your store a visual aesthetic to match the American vibes.
Head over to Online Store > Theme in your dashboard. You’ll find a bunch of free and paid themes to choose from. You can create a custom theme using the new AI feature.
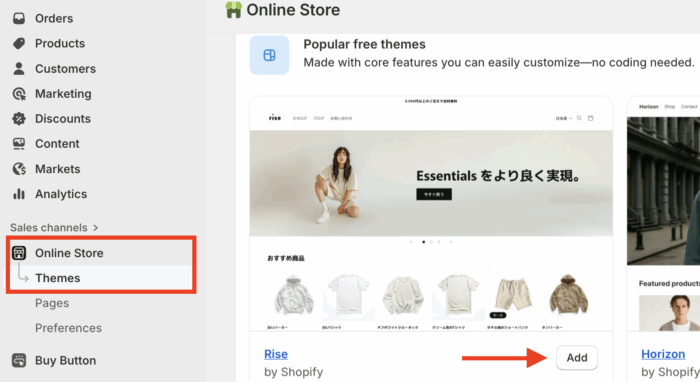
Shopify’s default Dawn theme (free) is popular and easy to customize with basic functionality.
Now, you will have access to the theme editor to edit the layout, sections (like the add Shopify logo list, featured collections, etc.), colors, and more of your entire store. Simply navigate to Online Store> Theme > Customize for this.
Step 3: Add Products & Collections
Navigate to the Products and click Add Product. You can add products individually or upload them in bulk using a CSV file.
Here, we’ll focus on the manual method.
The product page includes several key fields. Enter the following details carefully, as they will be directly displayed to your customers:
- Enter a clear and catchy title
- Write a detailed product description
- Add high-quality images
- Assign a product category
Then move forward to the Pricing section to set the cost of your product.
- Price: The actual amount customers will pay for the product
- Compare-at Price: Displays the original price and shows the current price as a discounted offer
- Select the Charge tax on this product checkbox if you’re including tax
Then, review the Inventory settings to keep accurate stock records. If your product is physical, configure the Shipping details as well.
If your product has multiple sizes, colors, or styles, add variants with specific pricing and inventory for each option.
The very important section Search engine listing preview, here add an appealing SEO title, and a meta description to improve visibility in search engines.
It’s important to understand the difference between the information you see on your product page and what appears on search engines, so here it is.
- Product Description vs. Meta Description: Your product description is for your customers, providing details and benefits. The meta description, however, is a concise snippet for search engines, designed to invite users to click on your link.
- Product Title vs. SEO Title: The product title is what customers see in your store, while the SEO title is what appears in search results. Your SEO title can be longer and should be crafted with keywords to help customers find you on Google.
Next, create collections (groups of products) to help customers browse by category or theme. Go to the Collections to begin creating either a manual or automated collection.
There are two methods for assigning products to collections:
- Manual: Products are assigned to collections individually
- Automated: Products are automatically assigned to collections based on predefined conditions
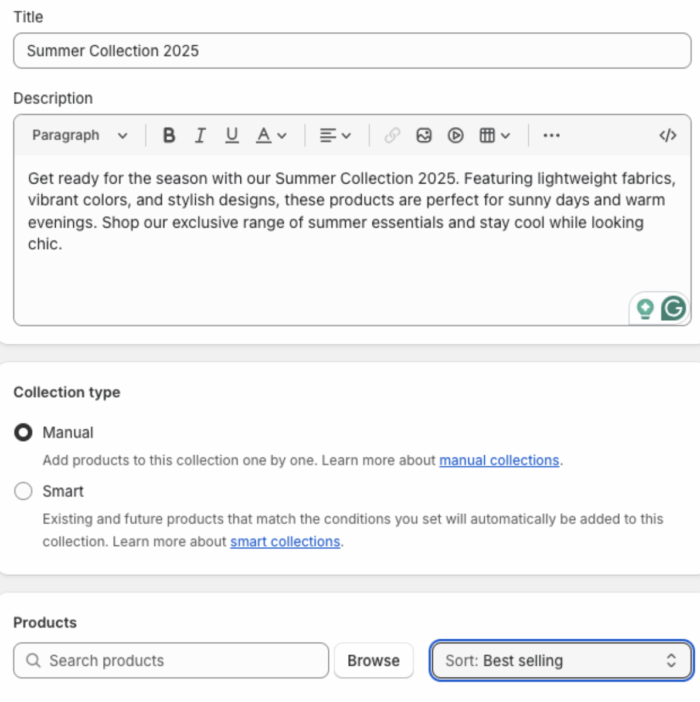
Creating a collection will let you keep your products assembled neatly and make them easily reachable.
Using the customize button mentioned in the theme editor, click Add section > Featured Section > Feature product/collection. You can add before and after, collection slider, video with text, and more sections.
Step 4: Integrate a Payment Method
Set up payments under Settings > Payments.
For US stores, activate Shopify Payments or use providers like PayPal. Enter the necessary bank and business details so you can receive payouts.
The payment section also contains two more options, which are
- Payment capture: Select how you want to capture payments
- Manual payment methods: Offer different ways for your customers to complete their payments

Additionally, you can hide payment method by location to ensure the right payment solution is visible to your shopper.
Step 5: Partner with Shipping Carriers
Configure shipping rates in Settings > Shipping and Delivery.
Choose shipping zones, set your rates, and partner with US carriers like USPS, UPS, or FedEx if offering real-time shipping rates.
Step 6: Configure Shipping & Taxes
Still in the settings > tax and duties, set up your tax collection for US states where you have sales tax obligations.
Shopify can automate much of this, ensuring compliance with state and local regulations.
If different tax rates apply to the products you sell, you will need to implement tax overrides.
Step 7: Connect a (.com/.in) Domain
Go to Settings > Domain to connect your custom domain. You can buy a new domain through Shopify or transfer/connect an existing one.
Step 8: Launch & Market Your Store
After you complete all the above steps, you are good to go.
Remove password protection from Online stores > Preferences in your store when ready to launch.
Start with basic marketing by setting up social accounts, running ads, and using Shopify’s built-in tools for SEO and email marketing.
Hire a Shopify Professional to Build a Growing Store
There’s no doubt Shopify provides the easiest process to set up an online store, but to succeed, you still need a robust SEO strategy to withstand the competition and expert technical management to prevent malfunctions.
Our Shopify development services offer a complete solution for businesses, covering everything to build a successful store, such as:
- End-to-end SEO optimized store
- Maintain a good page speed to gain good results
- Add customization if needed without hurting the store setup
- Give quality recommendations to run your store perfectly for long-term success
DIY may seem cheaper initially, but it often results in costly errors and wasted time, keeping you stuck troubleshooting instead of focusing on your business.
Frequently Asked Questions
Can I Open a Shopify Store In The USA from India?
Yes, you can open a Shopify store in the USA from India. Shopify allows merchants to set up stores based in different countries.
Do I Need a License to Sell on Shopify in the USA?
Shopify does not require a business license for selling on its platform; however, sellers must comply with all relevant federal, state, and local regulations.
How Much Does Shopify Cost in the USA?
Shopify offers various pricing plans in the USA to fit different business needs. The main plans include:
- Basic: $29/month
- Grow: $79/month
- Advanced: $299/month
- Shopify Plus: $2300/month
Run a Successful Business on Shopify Today
Building a thriving online store starts with the right platform, and Shopify gives you all the tools to make it happen.
But this is not a one-person task after all, and why settle for average when you can have the best?
We have a highly qualified, Shopify-certified developer to help you out with setting up a customizable Shopify store stress-free.
Let our Shopify experts create a custom theme to boost and elevate your customer experience.
Learn More