Here is a full guide on how to start a Shopify store in Canada from scratch, along with answers to some questions and concerns.
Is Shopify Available in Canada?
Yes, Shopify is available for Canadian merchants to use the platform and sell to their target audience locally & internationally.
Requirements to Set up a Shopify Store in Canada
Here are the essential prerequisites to build your Shopify store. I’ve organized the list by priority, so you can focus on what matters most.
Very Important:
- A proper plan to run your Shopify store with details planned out related to shipping, payment process, products, and product details.
- An official permit to legally operate your business in specific locations in Canada to help you stay secure; not having one can lead to fines and penalties.
Important:
- A very planned store domain that matches your branding and what you are selling; make sure it is unique and true to your offering.
- GST/HST registration if your business exceeds $30,000 CAD over any 12-month period.
Optional (but recommended for future growth):
- Sooner or later register your business, as it acts as a legal identity. You need to register the business name and type (sole proprietor or partnership). Based on this, you will receive a business number for tax purposes.
How to Start a Shopify Store in Canada? – Steps
Follow these exact steps to create your Shopify store in Canada.
- Create a Shopify Store
- Pick, Add & Customize a Theme
- Add Your Products & Collections
- Create Other Key Pages
- Integrate a Proper Payment Method
- Add Your Shipping Carriers
- Configure Shipping & Taxes
- Connect Your Domain
- Preview & Launch Your Store
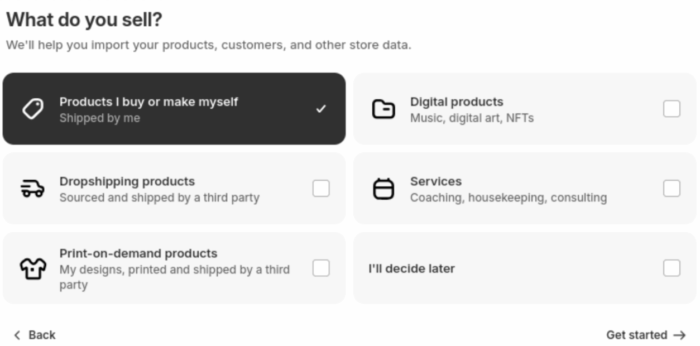
Step 1: Create a Shopify Store
Go to Shopify and click on the free trial option. Then, Shopify will ask you some questions to help them set up the store.
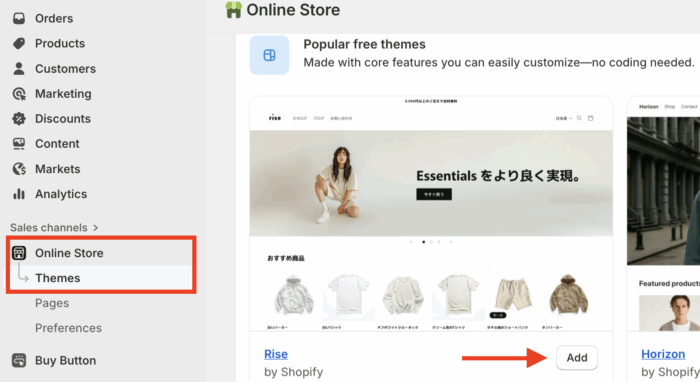
Step 2: Pick, Add & Customize a Theme
Dawn is the default theme set by Shopify. You can customize this theme or pick a new one that matches your store design vision.
Navigate to Sales channels > Online Store > Themes.
Explore the range of free Shopify themes and simply click on Add to install a new theme to your store.
After the theme is added, navigate to Online Store> Theme > Customize to edit the homepage layout, add sections, content, colors, and more.
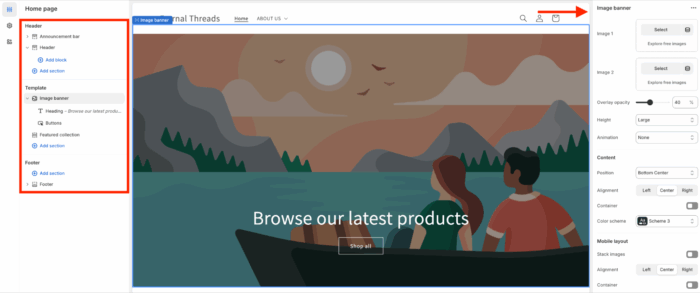
Shopify offers multiple settings to make changes as you like.
Step 3: Add Your Products & Collections
Add Product
There are two ways to add products depending upon the number of items you have:
- Manually add each product
- Use a CSV file to import products to Shopify (recommended for large stores)
To manually add each product, head to Products > Add Products.
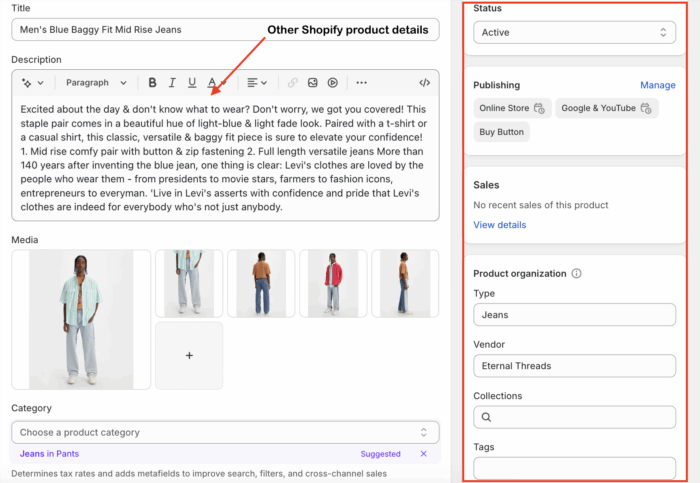
Then, start adding your product details. This information will directly display on your store’s product page. Fill them carefully.
Product details:
- Add a proper title, description, media, and category
- Set price, compare-at price, and manage the tax option
- Shipping information with the correct product weight
- Add product variants if any (color, size, and more)
- SEO details: Title, meta description, and URL edits
Right-Hand Side Panel:
- Set the product status to active
- Select the channels you want to publish your store on (online store, Facebook, etc)
- Select your Shopify market
- Set Product Organization:
- Product type – Category of your product
- Vendor – Select if you are the manufacturer or supplier of the product
- Collection – Add product to a correct collection
- Tags – Add tags for to improve product filtering
Click on Save, and follow the same process to add other products.
Add Collection
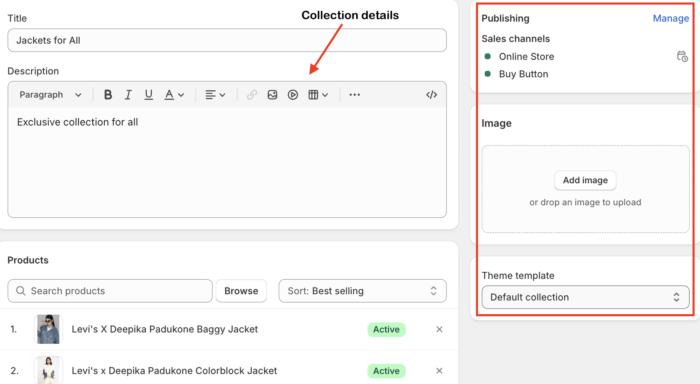
Navigate to Products > Collections from the Shopify admin to create your collection. You can either create a manual collection or automated.
Add collection details:
- Enter a collection title (e.g., Summer 2026)
- Write a collection description
- Select the collection type
- Add products to the collection
Right-Hand Side Panel:
- Select a Sales Channel
- Add a cover image for the collection
And click Save.
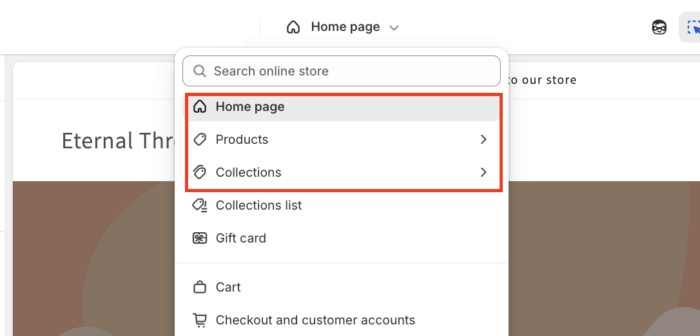
After you have created your product and collection, you must assign them to your homepage.
Using the customize button mentioned in the above step, from the left-hand side of the theme editor, click Add section > Featured Section > Feature product/collection.

Add your layout and the products/collections you want to display on your homepage.
From the top bar of the theme editor, select the product/collection page to make changes in the layout and format.
Step 4: Create Other Key Pages
About us page
- Head to Online Store > Pages > Add Page
- Enter the title (About us), and in the Content box, add your brand story
- Click Save.
Contact Us Page
- Go to Online Store > Pages > Add page button.
- Add page title (Contact Us). It is important to add a form on your Shopify contact us page to customers to quickly get in touch.
- Click Save.
Now, you need to add a navigation menu for the customers to easily access them. Head to Online Store > Navigation > Menu.
- Click Add menu item and enter the page, for example, About us.
- In the Link field, select the pages.
- Finally, add and save.
Step 5: Integrate a Proper Payment Method
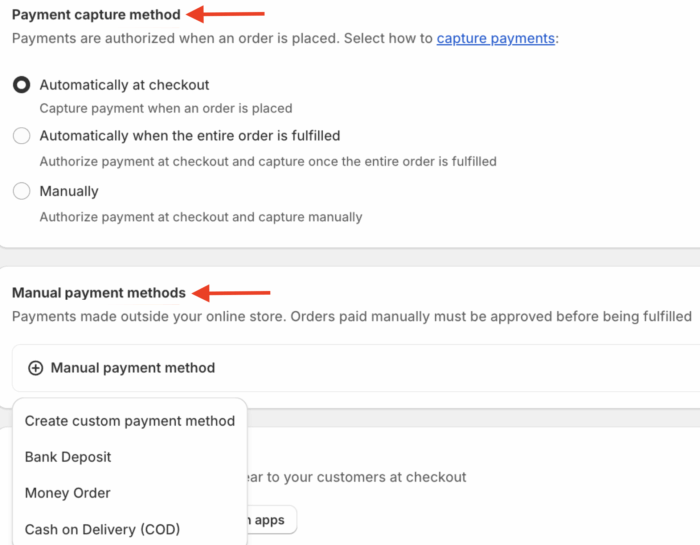
Head to Settings > Payments > Add payment method.
Use the search bar to pick the desired and popular payment options in Canada, and make sure to check their transaction fees, as they differ based on each provider. You can also customize and exclude payment methods to specific Shopify Market.
Here Shopify gives you two options that you must not miss.
- Payment capture – How you want to capture payments
- Manual payment methods – Select offline payment options
Step 6: Add Your Shipping Carriers
You can integrate with popular shipping providers in Canada like Purolator, FedEx, and Canada Post. Integrate the ones that you work with and set up proper custom rates with other delivery details.
Step 7: Configure Shipping & Taxes
Navigate to Taxes and Duties in Settings and from the search option look for Canada.
Then, select Canada and click on Collect sales tax.
Here, you have to:
- Select your region where you are registered to collect tax
- Enter your GST/HST or PST number. If you don’t have it yet, you can skip it.
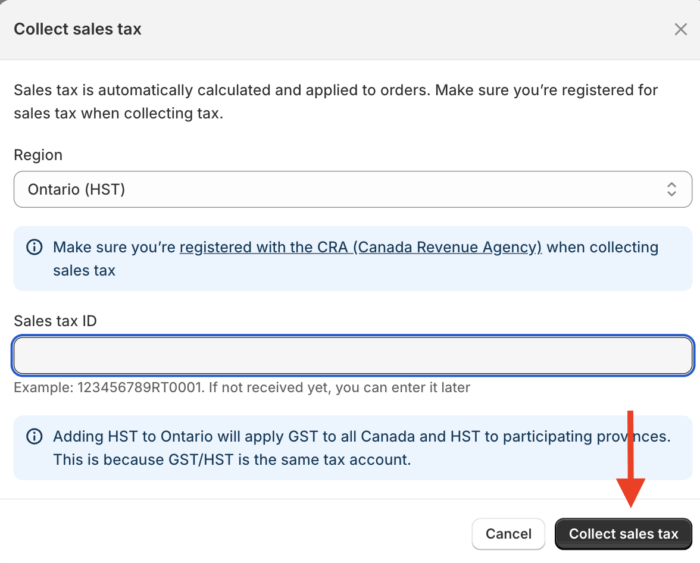
Then, follow the same process to add other regions.
In case you want to add a custom tax rate, then add tax overrides from the same Taxes and duties dashboard.
Step 8: Connect a (.com/.in) Domain
The default Shopify store domain will be your-store-name.myshopify.com. You can either use this domain or create a new one without the myshopify branding.
Step 9: Preview & Launch Your Store
Now, click on the eye icon next to the online store in the main admin panel and take a good look into your new store. Check out different settings and functionalities to see if everything is working as planned.

Then, head to the Preferences tab and remove the password protection to make your store live.
This completes the steps to set up your Shopify store in Canada. Now, you have to spread the word and do proper marketing and SEO to get sales.
Shopify does take care of your store’s SEO, but you need to add more focused strategies to truly rank well.
Skip the Hassle: Let a Shopify Agent Create an Action-Packed Store
Building a successful online store isn’t about simply setting up a website; it’s about creating a business that stands out from the competition and attracts the right customers. This is where we come in.
We build Shopify stores that focus on generating sales and thrive long-term.
Here is what we do differently:
✅ Manage technical issues that could affect your store’s performance.
✅ Implement strategies to improve your store’s page speed.
✅ Apply SEO best practices to ensure your store is search-ready.
✅ Include strategies to improve sales and conversions.
While you can learn and manage these tasks yourself, the process is complex and the risks are real. A single misstep can break your site’s functionality and end up costing you more than working with an expert from the start.
Frequently Asked Questions
How much does Shopify cost in Canada?
The pricing plans for Shopify Canada per month are $7, $38, $99, and $389.
Is Shop the same as Shopify in Canada?
No, Shop, usually referred to as Shop Pay, is a payment and checkout solution. Shopify is an e-commerce platform to build an online store.
Who uses Shopify in Canada?
EVRYJEWELS, Staples, Fragrance Buy, Urban Planet, and Unbound Merino are some brands using Shopify in Canada.
What can you sell on Shopify in Canada?
You can sell handmade goods, clothing, ebooks, digital files, memberships, and more.
This is a wrap to our guide on helping you build your Shopify store in Canada. Now, start building your Shopify store and watch your business come to life.
Let our Shopify experts create a custom theme to boost and elevate your customer experience.
Learn More