Incorrect tax configurations are one of the most common mistakes.
Overcharging customers leads to lost sales, disputes, and refund requests. Undercharging means your business absorbs the difference, creating unexpected losses and potential compliance risks with tax authorities.
Learn to set up tax rules in Magento 2 to run a professional, compliant online store.
Understand The Magento 2 Tax System
Magento 2 is built with a highly flexible, rules-based tax engine designed to handle the complexities of modern e-commerce.
Whether you sell domestically or internationally, it gives you the tools to configure taxes precisely to your business requirements:
- Dynamic tax rates by location – Apply different rates based on a customer’s Country, State, or ZIP code. Customers in California get California rates; customers in Oregon (no sales tax) get charged nothing.
- Product-type tax assignments – Clothing might be tax-exempt in some states while electronics are fully taxed. Magento lets you handle this at the product level.
- Customer group segmentation – Wholesale buyers, nonprofits, or tax-exempt businesses can be treated entirely differently from regular retail shoppers.
- Flexible tax display – Show prices including tax, excluding tax, or both.
How Does Magento 2 Calculates Tax
Before jumping into configuration, it’s important to understand the three-layer logic Magento uses to calculate tax.
Every tax calculation is based on the intersection of these elements:
| Element | What It Defines |
| Tax Rate | A percentage that applies to a specific geographic location (e.g., 8.25% for California). |
| Product Tax Class | The type of product being sold (e.g., Taxable Goods, Digital Products, Shipping). |
| Customer Tax Class | The type of customer making the purchase (e.g., Retail Customer, Wholesale, Tax Exempt). |
| Tax Rule | The combination of all three layers above—this is what actually triggers tax calculation. |
In short: Tax Rate + Product Tax Class + Customer Tax Class = Tax Rule.
Magento evaluates all the factors at checkout to determine the correct tax amount.
Think of Tax Rules as “if-then” logic: If a Retail Customer buys Taxable Goods and ships to California, then apply the California 8.25% rate.
Step-by-Step: Setting Up Tax Rules in Magento 2
Step 1: Configure Your General Tax Settings
The first thing you should do before creating any tax rates or rules is review and configure your store’s global tax settings. These define how Magento handles tax across every transaction.
Navigate to Stores > Configuration > Sales > Tax from your Magento 2 admin panel.
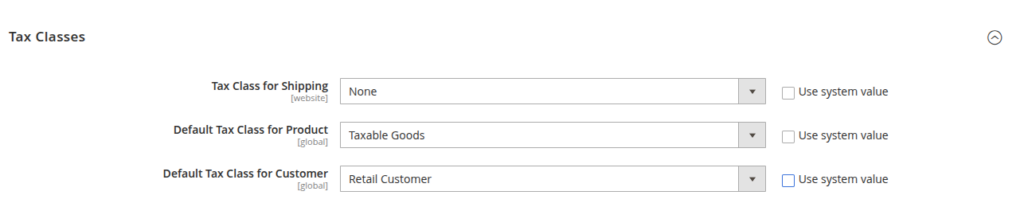
A. Tax Classes
Tax Classes tell Magento how to categorize your products and customers. Set the following defaults:
- Default Product Tax Class > Taxable Goods. This ensures most products are taxed unless you specifically assign them a different class.
- Default Customer Tax Class > Retail Customer. This is the standard tax group for regular shoppers.
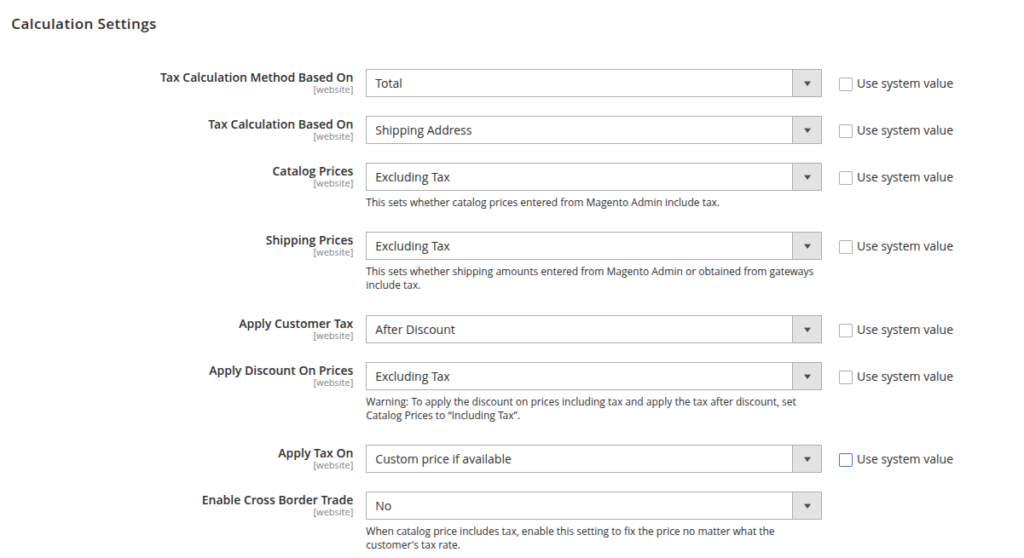
B. Calculation Settings
These settings determine how Magento computes the tax amount:
- Tax Calculation Method → Based on Total. This calculates tax on the entire order total rather than line by line, which avoids rounding discrepancies.
- Tax Calculation Based On → Shipping Address. Tax is applied based on where the order is being delivered — the standard requirement in most jurisdictions.
- Catalog Prices — Choose whether your listed product prices already include tax (common in Europe with VAT-inclusive pricing) or exclude tax (common in the US). This affects how Magento processes and displays prices throughout the store.
C. Price Display Settings
These settings control what customers see when browsing and checking out. Magento gives you three options:
- Display Prices Including Tax — Customers see one price with tax already baked in. Required by law in many European markets.
- Display Prices Excluding Tax — Customers see the base price; tax is added at checkout. Standard practice in the US.
- Display Both — Both values are shown simultaneously (e.g., $100.00 excl. tax / $108.25 incl. tax). Useful for stores serving both B2B and B2C customers who have different expectations.

Step 2: Create a Tax Rate
A Tax Rate defines the percentage of tax that applies to a specific geographic region. You’ll typically create one Tax Rate per jurisdiction where you have a tax obligation.
Navigate toStores > Tax Zones and Rates > Add New Tax Rate. Fill in the fields and Save Rates.
Pro tip: If you sell across many US states, consider importing tax rates in bulk using a CSV file rather than entering them one by one. Magento supports CSV import directly from the Tax Zones and Rates page.
Step 3: Create a Tax Rule
A Tax Rule is the glue that connects your Tax Rate, Product Tax Class, and Customer Tax Class into a single actionable rule. When all three elements match a transaction, Magento applies the corresponding rate at checkout.
Navigate to Stores > Tax Rules > Add New Tax Rules.
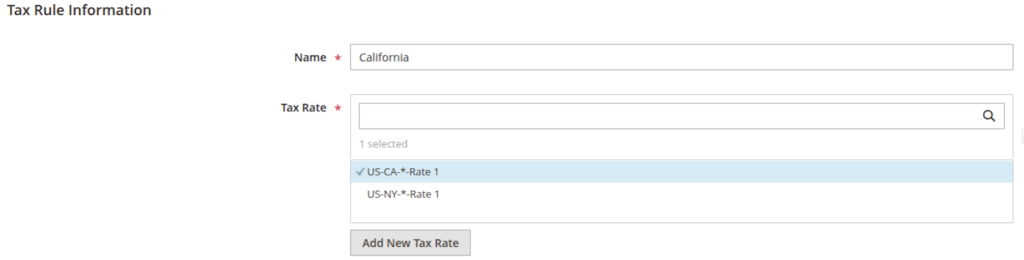
Click Save Rule. Magento will now automatically apply 8.25% California tax to any order where a Retail Customer purchases Taxable Goods and ships to a California address.
Step 4: Assign a Tax Class to Your Products
For tax to apply correctly, each product must have the appropriate Tax Class assigned.
If a product has no Tax Class (or is set to None), Magento will not apply any tax to it even if a perfectly matching rule exists.
Navigate to Catalog > Products > [Select a Product] > Edit
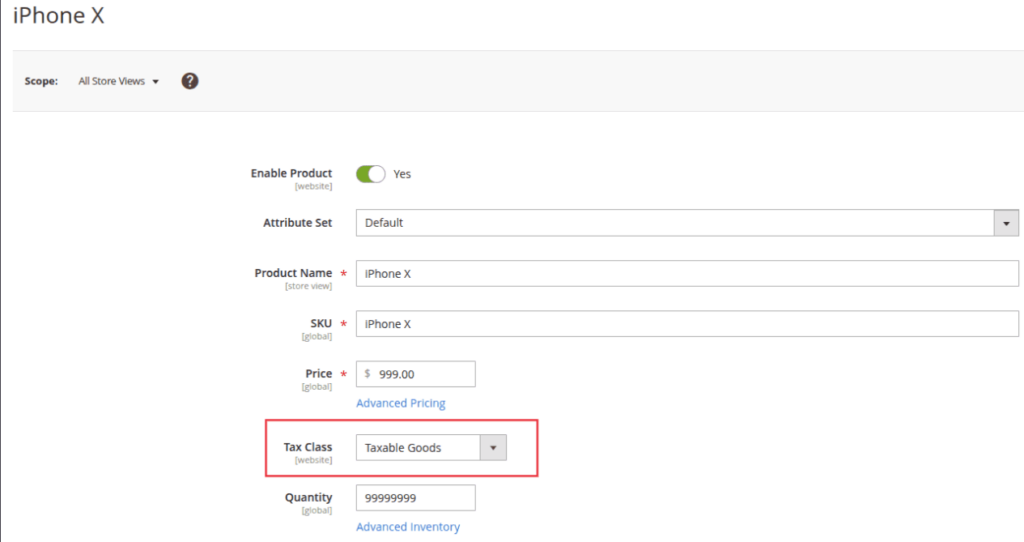
Within the product edit page, find the Pricing section and locate the Tax Class field. Set it to Taxable Goods. Click Save.
To update multiple products at once, use Magento’s mass action feature:
- Go to Catalog > Products
- Select multiple products using the checkboxes
- Open the Actions dropdown and select Update Attributes
- Set the Tax Class for all selected products simultaneously
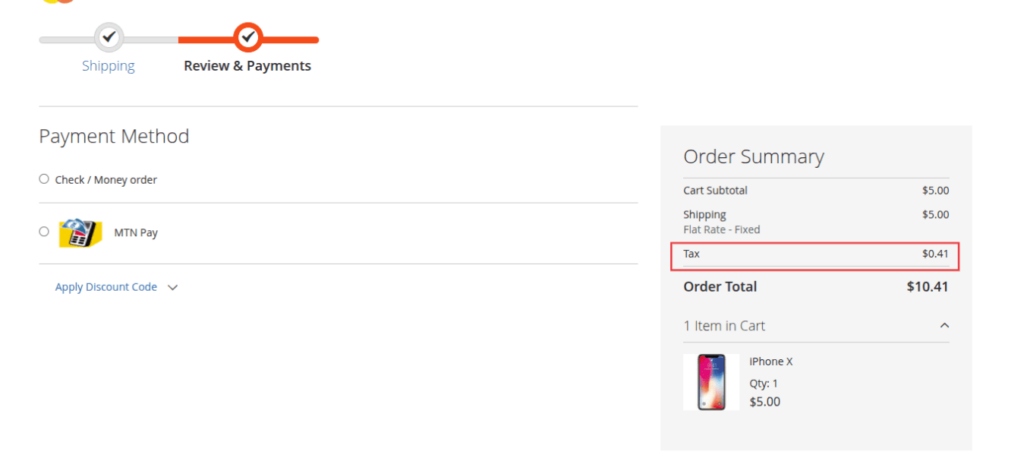
Step 5: Test Your Tax Configuration
Before going live, always test thoroughly. A configuration mistake is far easier to fix before launch than after customers have been charged incorrectly.
Also test these scenarios:
- Enter an Oregon shipping address — no tax should be applied (Oregon has no sales tax)
- Check out as a Wholesale or Tax Exempt customer — verify that customer-group-specific rules are functioning correctly
- Test a product assigned to a “Tax Exempt” product class — it should not be taxed regardless of address
Proper tax configuration in Magento 2 delivers four essential business benefits: legal compliance with tax authorities, accurate checkout totals that match customer expectations, customer trust through transparent and correct pricing, and smooth accounting with reliable tax data for your finance team.
Whether you operate in the US, EU, UK, Canada, India, or any other market, Magento 2’s flexible tax engine gives you the control you need to show tax and VAT Number in Registration Form in Magento 2 professionally.
