Do you want to skyrocket your sales with Magento 2 Google shopping ads?
Setting up this powerful advertising tool can get your products in front of the right customers when they are looking to buy a product like yours on Google.
In this guide, we will show you how to easily set up Magento 2 Google shopping ads.
Let’s dive in!
What Is Google Shopping Ads Magento 2?
Google shopping ads in Magento 2 is an integration that allows Magento store owners to display their products directly on Google search results and the Google shopping platform.
While this integration helps to increase your store’s reach, here are other benefits of using Google shopping ads in a Magento 2 store:
- Increase your product’s visibility on Google search and shopping.
- Get higher-quality traffic from users having strong purchase intent.
- Improve your website’s click-through rates due to engaging and relevant ads.
- Simplify managing and optimizing your product listings with a centralized platform.
How To Set Up Magento 2 Google Shopping Ads?
In this section, we will discuss how you can set up Magento 2 Google shopping ads using the Meetanshi Magento 2 Google Shopping Feed extension.
Step 1: Install & Configure the Extension
Installing the extension is the first step in setting up Google Shopping Ads for your Magento 2 store.
Extract the zip folder and upload our extension to the root of your Magento 2 directory via FTP.
After this, log in to your SSH and step by step run the below commands:
php bin/magento setup:upgradeFor Magento version 2.0.x to 2.1.x - php bin/magento setup:static-content:deployFor Magento version 2.2.x & above - php bin/magento setup:static-content:deploy –fphp bin/magento cache:flush
Now, configure the extension to make sure that your Magento 2 store is ready to generate and manage Google Shopping Feeds.
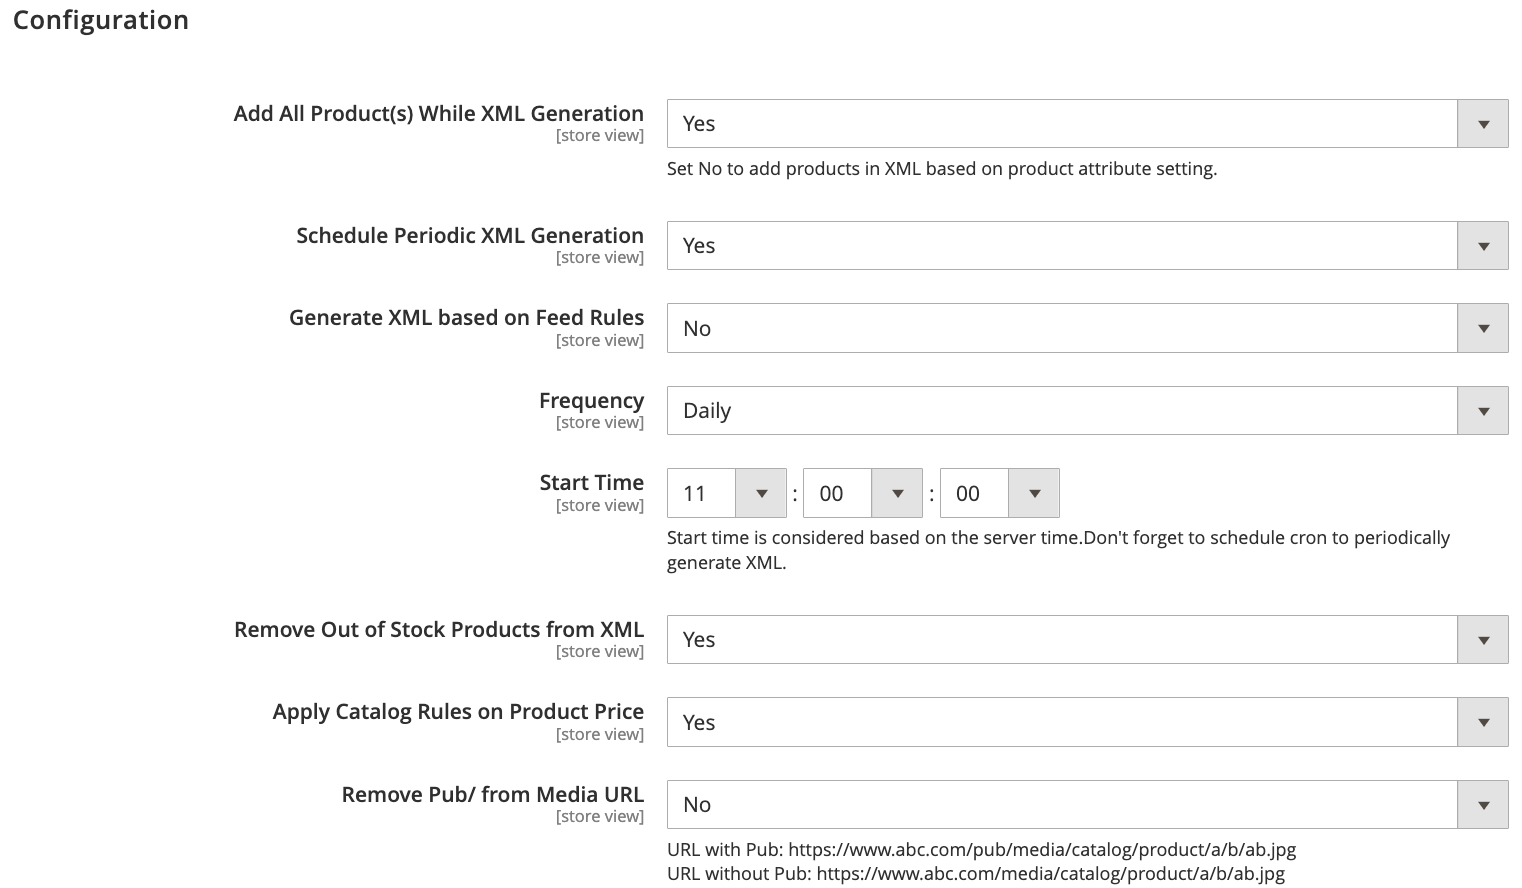
Navigate to Google Shopping Feed > Configuration, where you will see various configuration settings.
- Add all products while XML Generation: Include all products in the XML feed, ignoring individual product settings.
- Schedule Periodic XML Generation: Enable to schedule regular XML feed generation.
- Generate XML based on feed rules: Generate XML files according to defined feed rules.
- Frequency: Choose how often the XML feed is generated (monthly, weekly, daily, hourly).
- Start Time: Schedule the starting time for XML generation based on server time.
- Remove out-of-stock products from XML: Exclude out-of-stock products from the feed.
- Apply catalog rules on product price: Reflect catalog price rules in the feed.
- Remove Pub/from Media URL: Clean up URLs by removing the ‘Pub’ folder from media URLs.
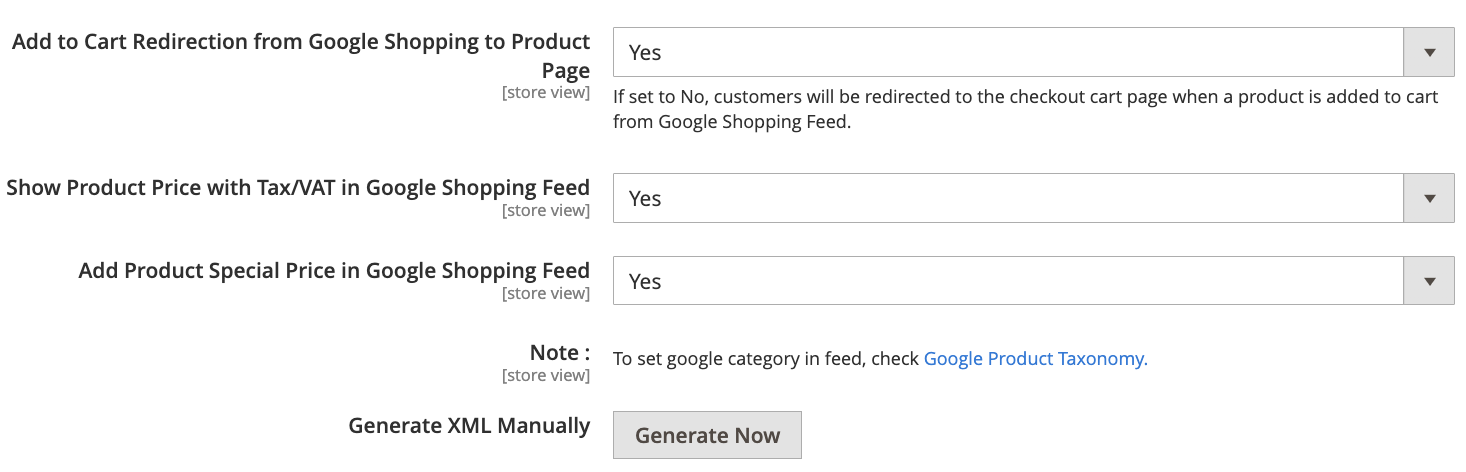
- Add-to-cart redirection from Google shopping to the product page: This redirects users to the product page rather than the cart.
- Show product prices with tax/VAT: Include tax/VAT in product prices.
- Add product special price: Display special prices in the feed.
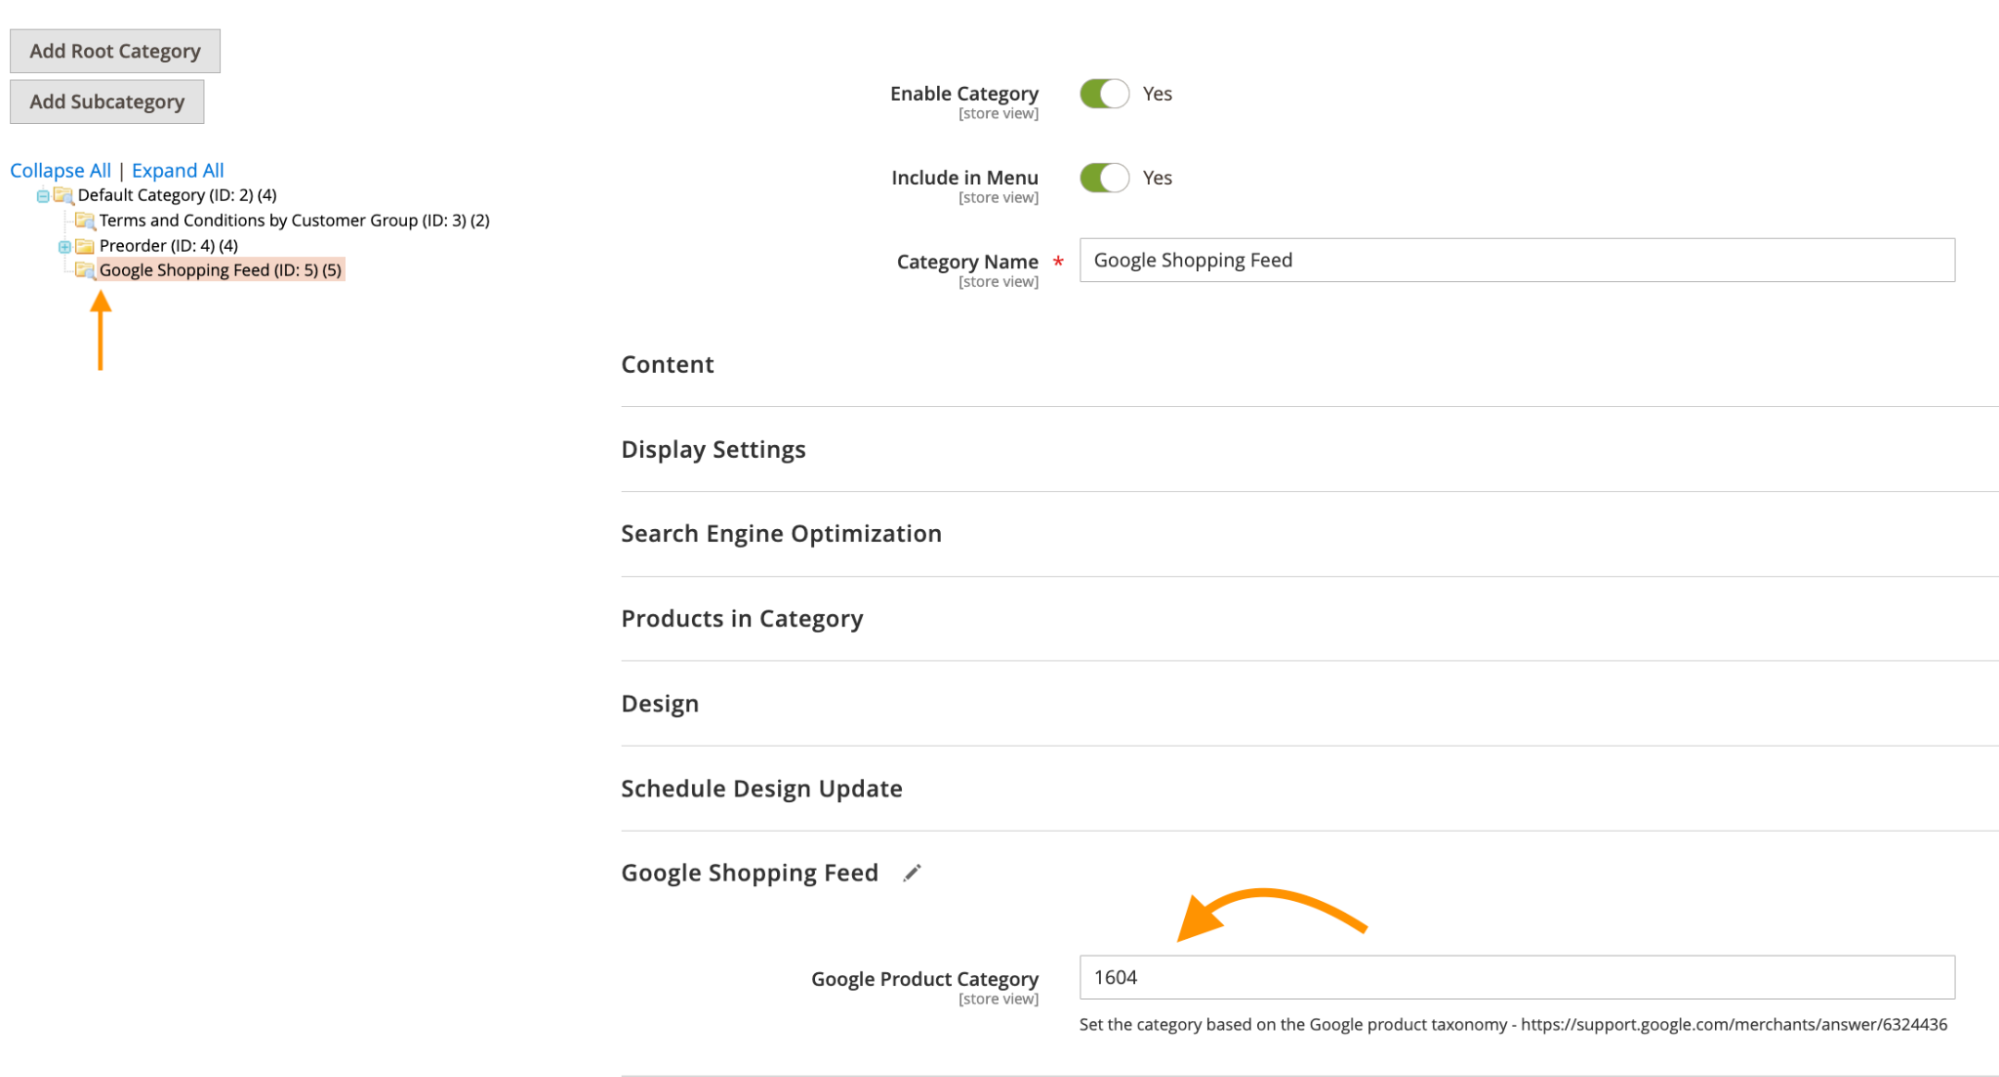
Step 2: Set Your Google Product Category
Setting the correct Google Product Category helps in accurately listing the products.
For Magento Categories
Go Catalog > Categories, select the category you want to edit. Then head to the Google Shopping Feed tab.
And scroll down to enter Google product category ID that best fits your Magento category.
For Magento Products
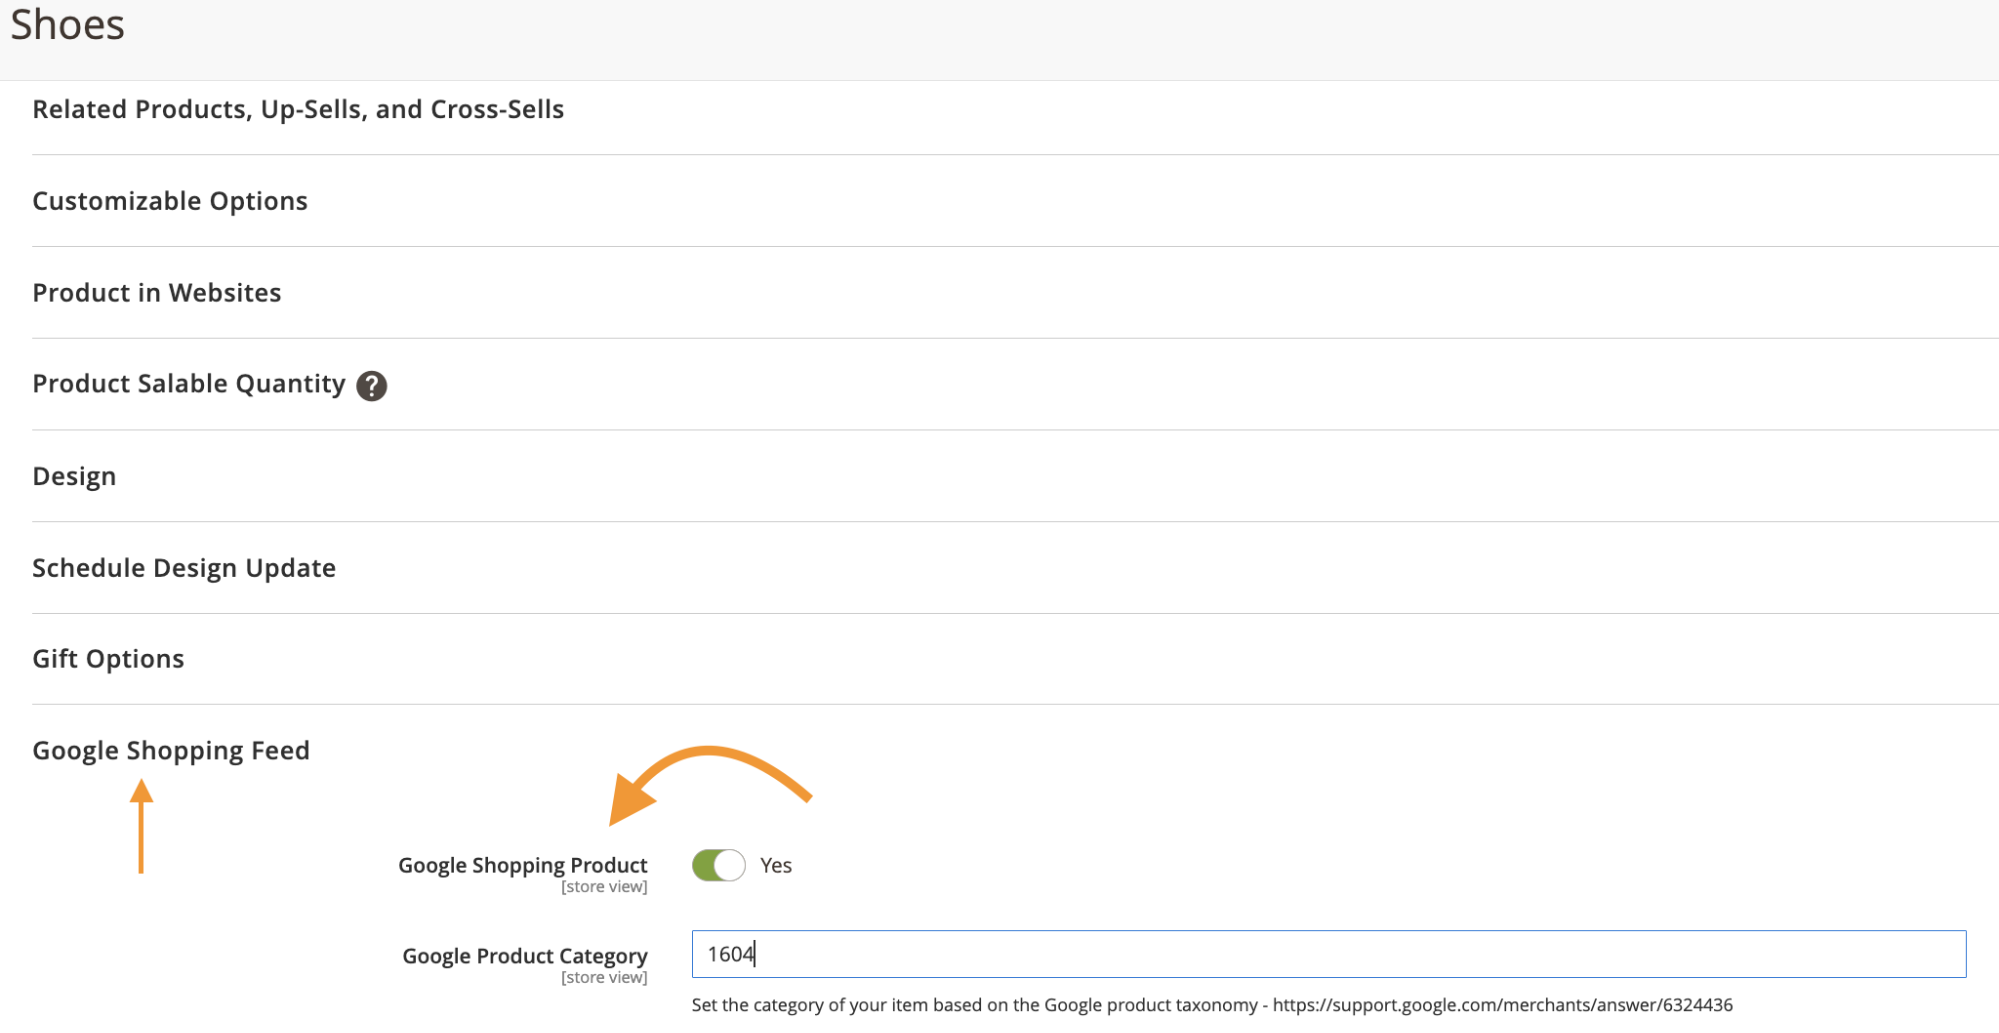
Head to Catalog > Products, select the product you want to edit.
And then go to the Google Shopping Feed tab,
- Enable the product for Google Shopping
- Enter the Google product category ID that matches your product.
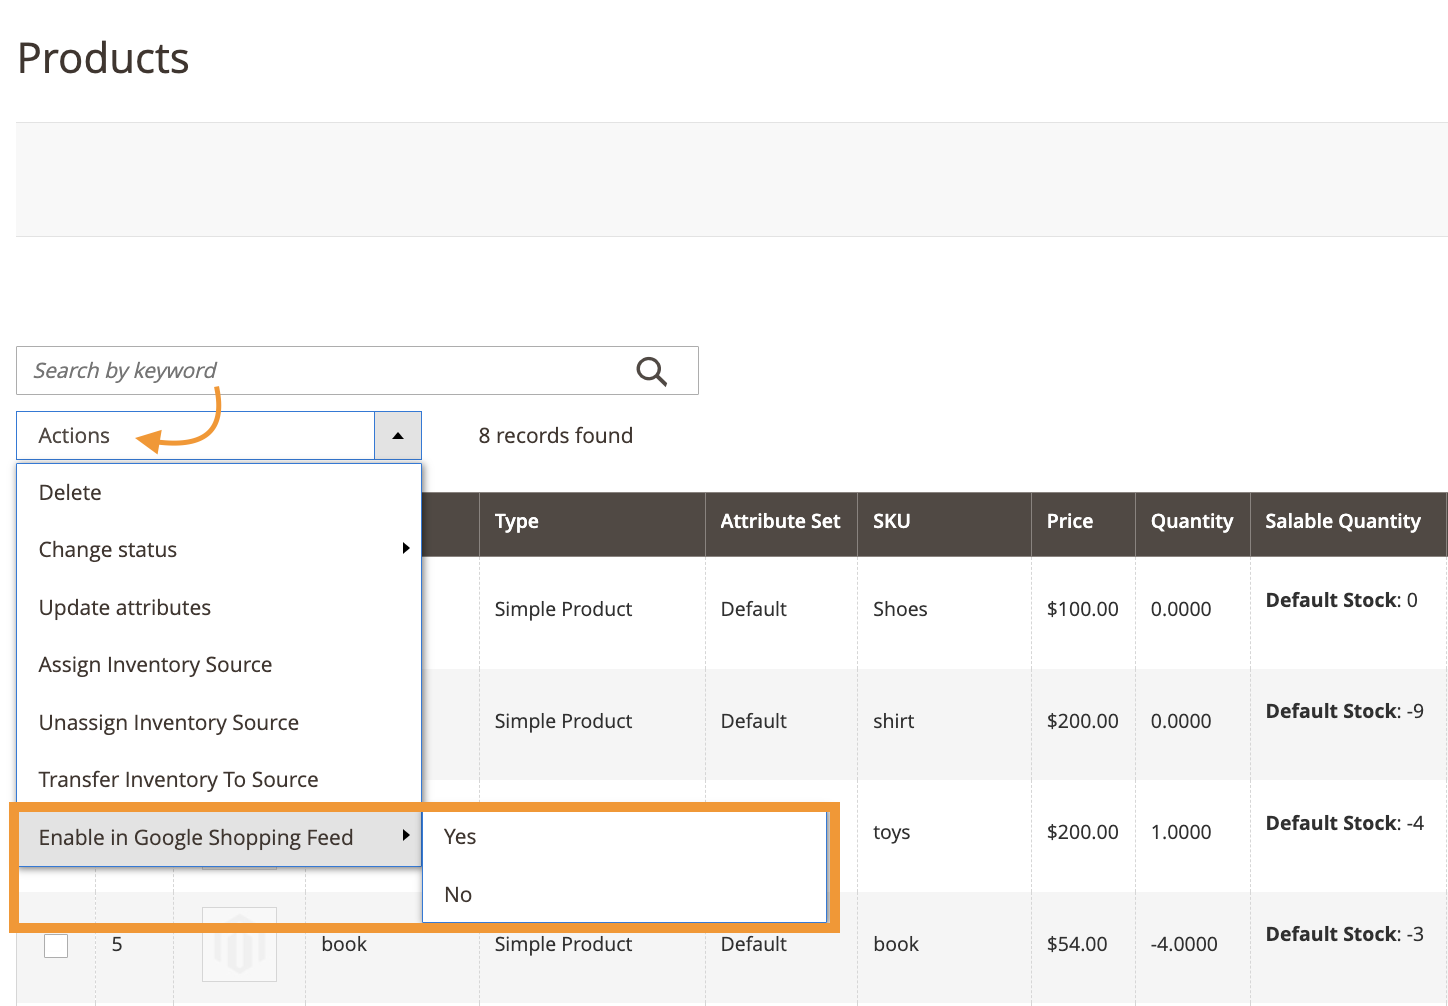
Step 3: Bulk Update Product Status
Navigate to Catalog> Products and select the products you want to update.
Then, use the mass action Enable in Google Shopping Feed from the Actions dropdown and set the desired status.
Step 4: Map Your Google Shopping Feed Attributes
Mapping attributes ensures that your product data is correctly transmitted to Google Shopping.
Default Attribute Mapping
This extension automatically maps default product attributes (like SKU, name, image, and description) to Google Shopping Feed Fields.
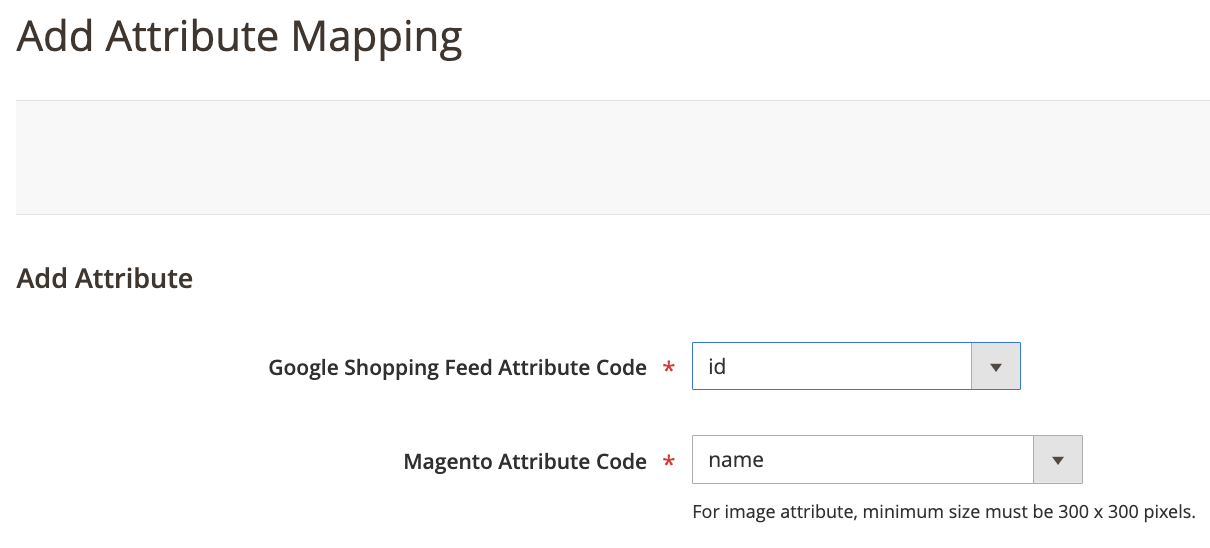
Add Custom Attribute Mapping
Navigate to Google Shopping Feed> Google Shopping Feed Attribute Mapping , click on Add New Mapping, and select the Google Shopping Feed attribute code and map it to a relevant Magento attribute.
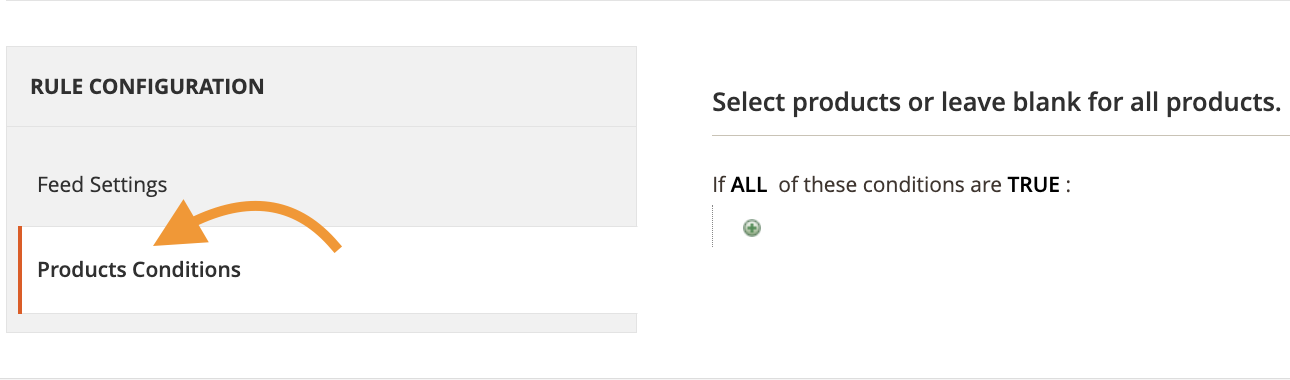
Step 5: Create Google Shopping Feed Rules
Creating rules helps customize the XML feed to your specific needs.
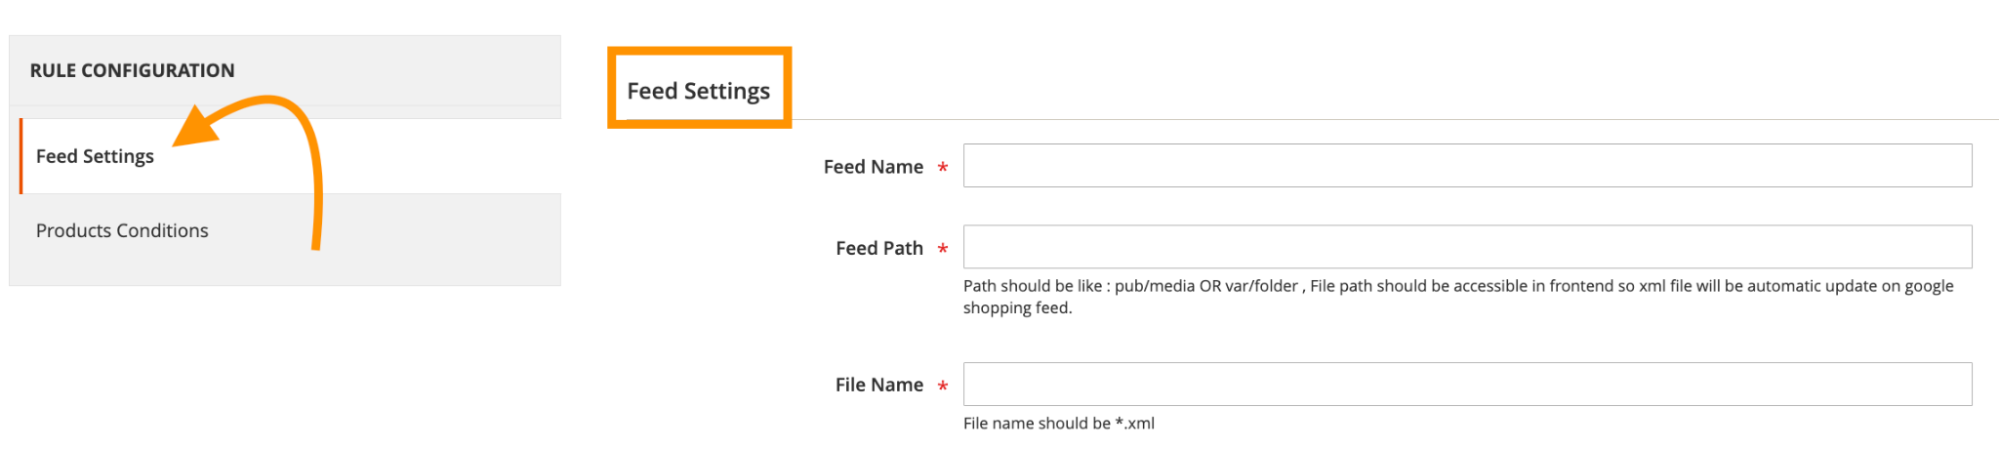
Navigate to Google Shopping Feed> Google Shopping Feed Rules and first add the Add New Google Shopping Feed Rule – Feed Settings
- Enter the feed name
- Feed path
- XML file name.
Now, set the conditions for which products should be included in the XML feed (e.g, exclude products from certain categories, only include in-stock items).
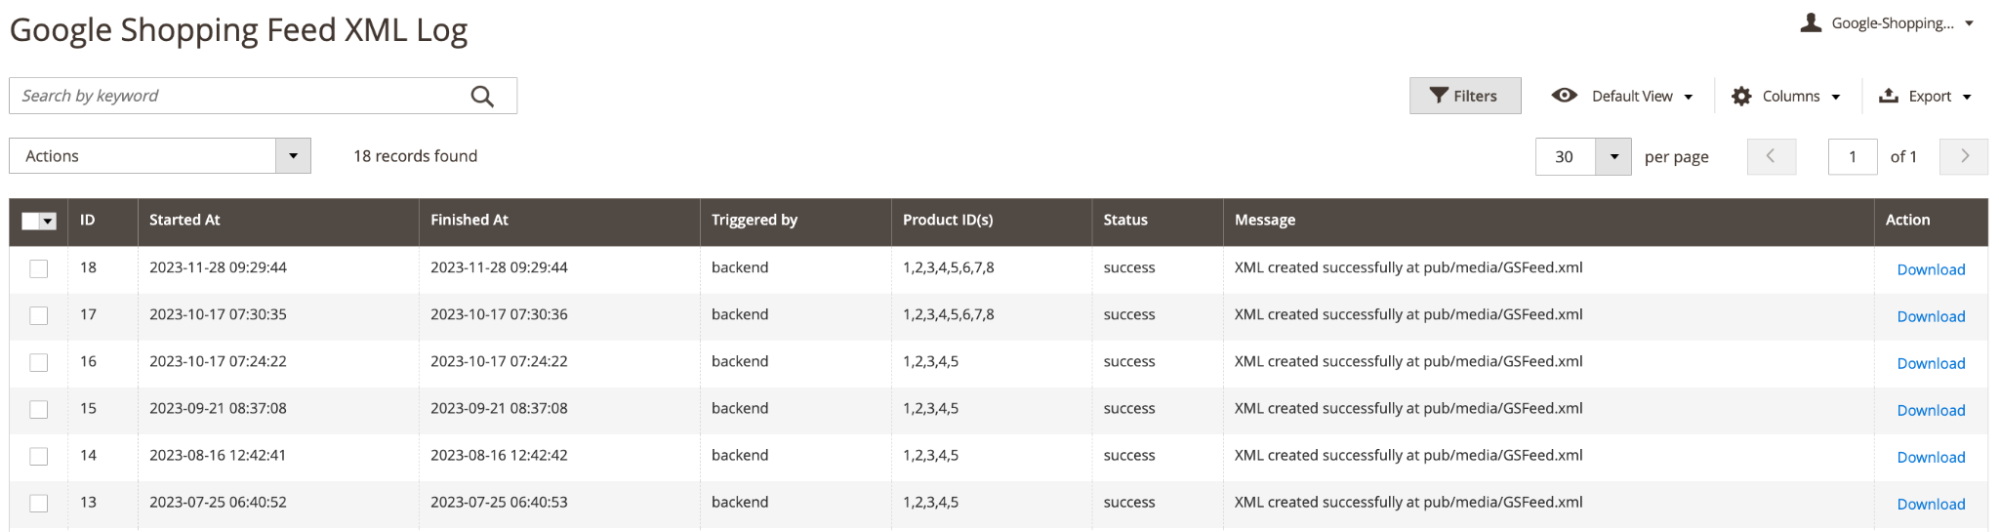
Step 6: Check Google Shopping Feed XML Log
Monitoring the XML generation log helps in troubleshooting and ensuring accuracy.
Navigate to Google Shopping Feed> Google Shopping Feed XML Log to view logs for both manual and scheduled XML file generations. The logs will include start and finish times, status, and other details.
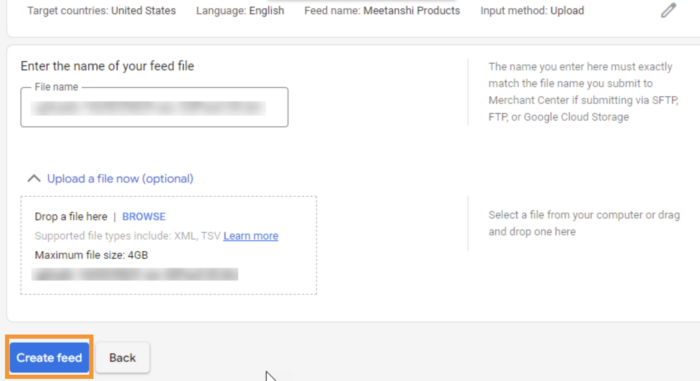
Step 7: Upload The Feed File To The Google Merchant Center
Now, it’s time to upload the feed file to Google Merchant Center so that your products appear on Google Shopping.
Log in to Google Merchant Center. Access your account. Then navigate to Products> Feeds and click on the + button to upload a new feed file. It will ask you to fill in the basic information so do the needful here.
At the end, finish this by clicking on Create Feed.
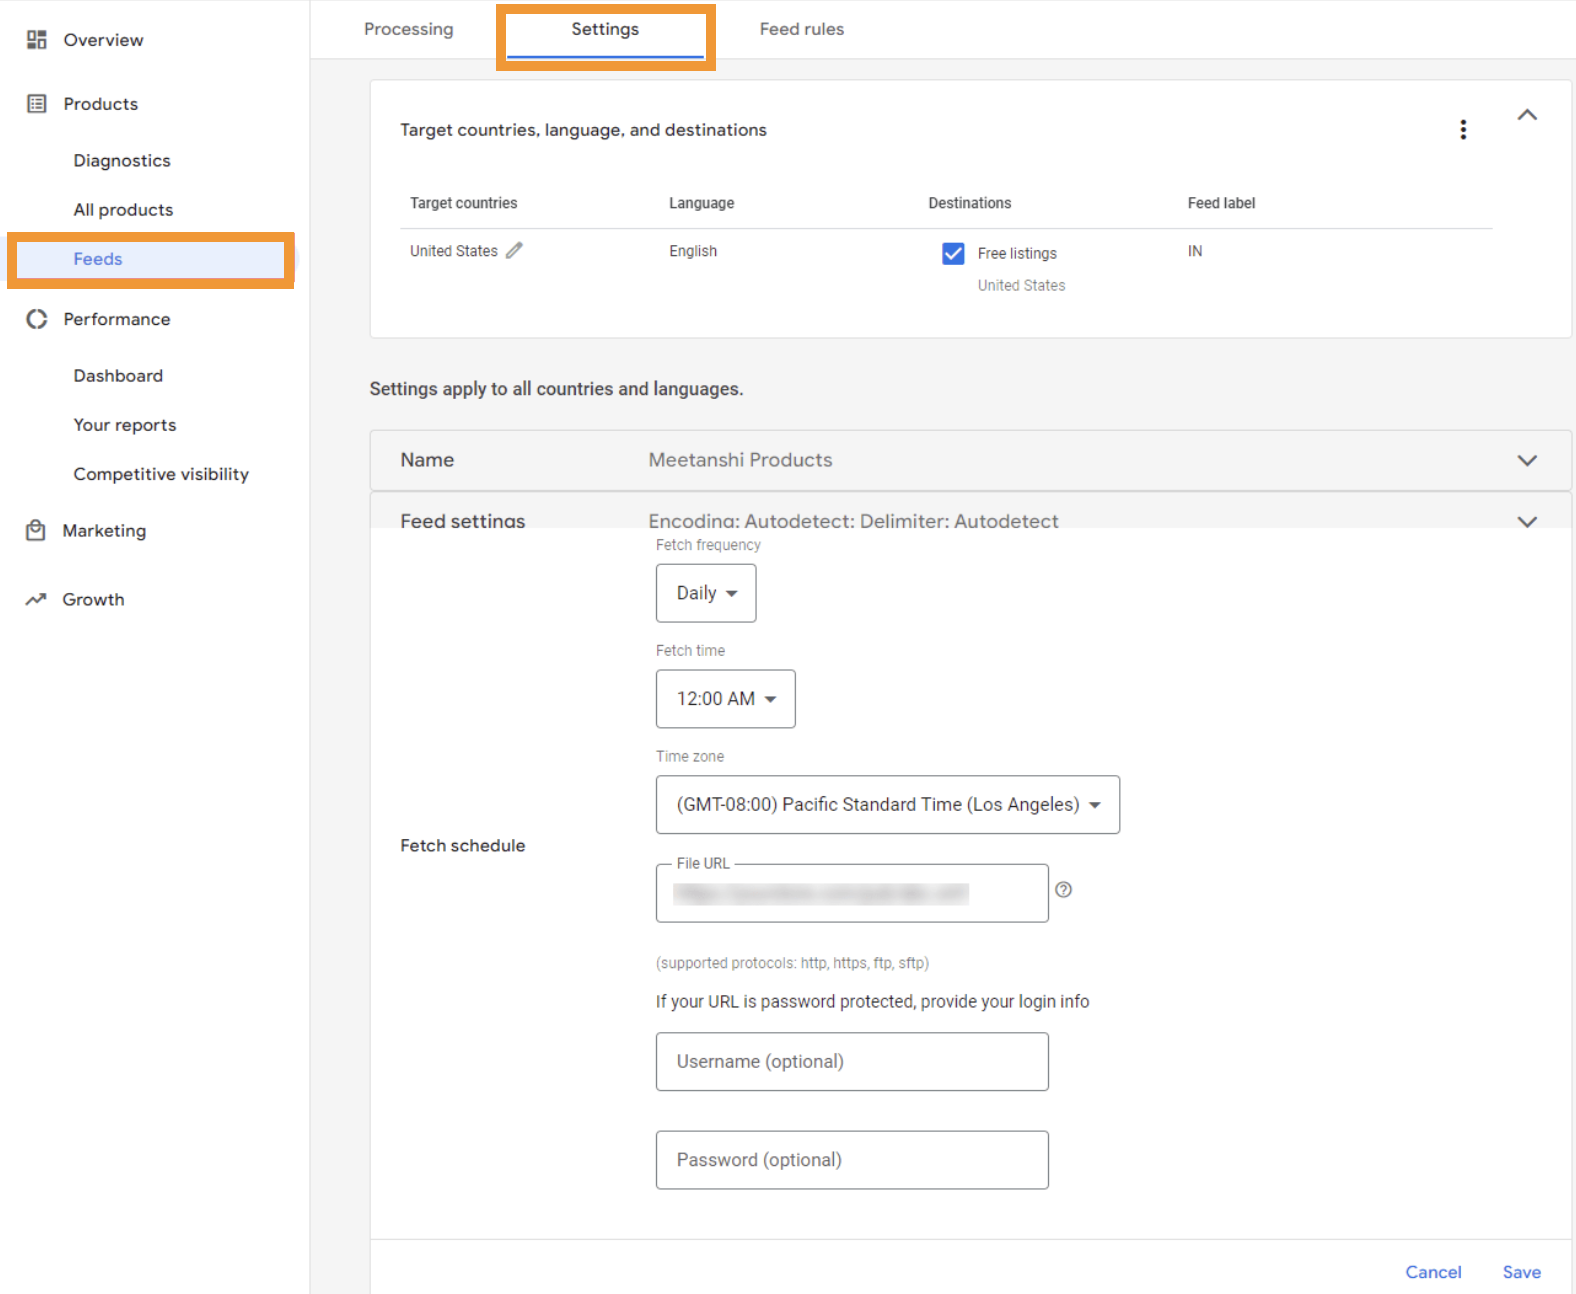
Step 8: Set Feed Fetch Schedule In Google Merchant Center
Automating the feed fetch schedule keeps your product information upto date.
In Google Merchant Center, navigate to Settings > Feed. Set the fetch frequency, time and file URL to automate regular updates of your product feed.
By following these steps, you can effectively set up Magento 2 Google Shopping Ads using the Meetanshi extension.
This will ensure that you list your products accurately and keep them updated in Google Shopping for maximum visibility and sales.
Goodbye manual updates; automate your Google product feed today.
Automate Now
Once you’ve set up your Magento 2 store for Google Shopping Ads, the next step is to ensure your product listings are optimized for better visibility. Learn how to optimize Magento 2 for the Google Shopping tab to improve your chances of higher rankings and conversions.
Run Effective Ads For Your Store
With powerful Google Shopping Ads integrated smoothly with your Magento 2 store, you can boost your online store’s visibility and drive huge sales.
By following the step-by-step guide given above, you can ensure that your products reach the right audience.