Making mistakes with your store can lead to serious trouble, such as the loss of customer trust or legal issues. One major area is GDPR Compliance, which has become essential for every e-commerce website, especially in the EU.
GDPR guidelines are important for maintaining trust and following best practices. Compliance ensures that you handle your customer’s data responsibly and avoid the pitfalls of non-compliance.
So, how will you set up GDPR Compliance in a Magento 2 store, and what’s the process to make GDPR work in your store?
This blog will help you understand the importance of GDPR and provide practical steps to comply with it.
What Does GDPR Mean?
GDPR (General Data Protection Regulation) is a crucial privacy law that came into effect in the European Union (EU) in May 2018. For those running Magento stores, understanding GDPR isn’t just about compliance; it’s about building trust with our customers.
Think of it as a rulebook for how we handle our customers’ personal information. This includes names, email addresses, and even IP addresses—basically, any data that can identify a person. Under GDPR, we need to be transparent about why and how we’re collecting this data.
You may have seen GDPR Compliance in the form of consent, where you checkmark the consent before making any purchase or allowing all cookies when you land on a website.
By ensuring GDPR compliance, you make data privacy clear to your customers.
How to Ensure GDPR Compliance in Magento 2?
Here are some factors that will definitely help you in ensuring Magento 2 GDPR compliance.
- Create a Privacy Policy page and clearly explain what data you collect, why you collect it, and how it’s used. Also, make sure it’s easily accessible from your store.
- Use clear & unambiguous consent banners to obtain consent before collecting their data. Avoid using pre-checked boxes and ensure users actively opt-in.
- As a business, ensure that Magento 2 GDPR compliance is transparent and provide rights to customers, such as the right to access, edit, and delete their personal data.
- Allow users to unsubscribe from your email list whenever they want.
How to Configure GDPR Using the Magento 2 Extension?
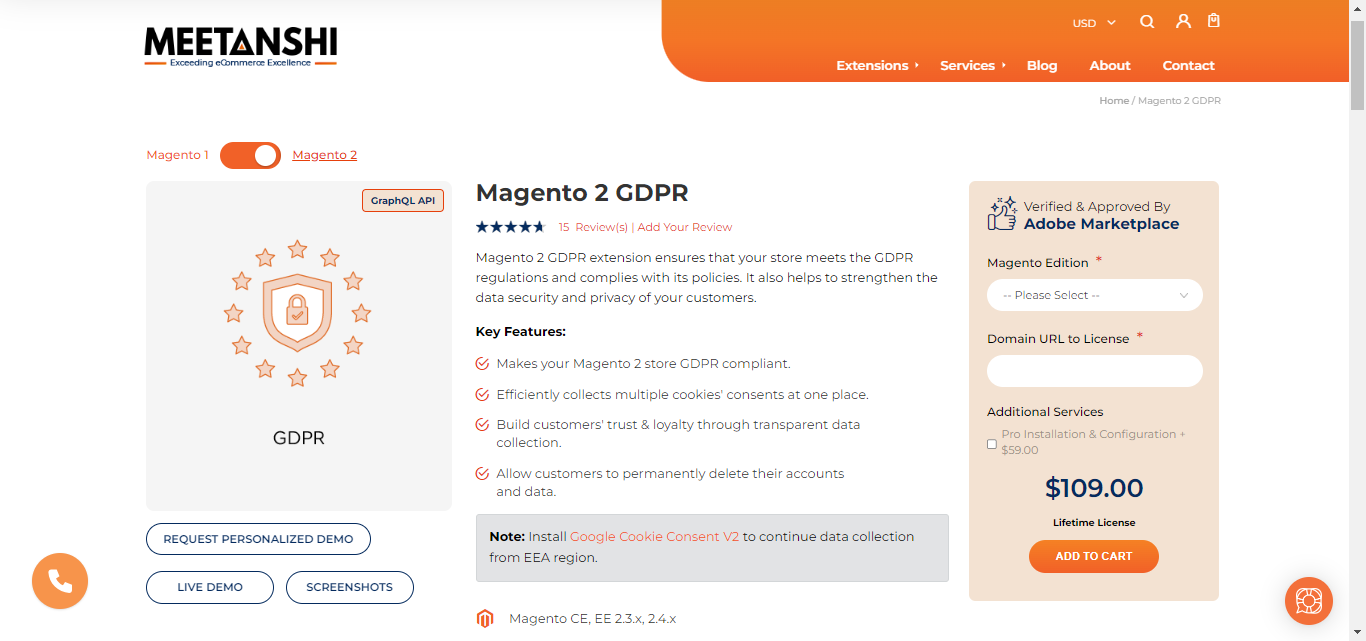
To easily set up the GDPR Extension for Magento 2, find an extension that can automatically configure your store to be GDPR compliant.
Choosing Meetanshi’s GDPR Magento 2 Extension helps you meet GDPR standards and ensures customers’ rights to control their information, building more trust.
Here’s a step-by-step guide to configure GDPR compliance with Meetanshi’s Extension. It’s actually simple to implement:
Step 1 – Install & Configure the Extension
Install the Meetanshi’s Magento 2 GDPR Extension and follow the below instructions
Get the zip folder and upload the extension to the root of your Magento 2 directory via FTP.
Then, log in to your SSH and run the below commands step by step:
- php bin/magento setup:upgrade
- For Magento version 2.0.x to 2.1.x – php bin/magento setup:static-content:deploy
- For Magento version 2.2.x & above – php bin/magento setup:static-content:deploy –f
- php bin/magento cache:flush
After installing the Meetanshi GDPR Extension, you’ll need to configure it with your Magento 2 store. Follow these steps to quickly set up GDPR compliance with Magento 2.
Now to configure, go to the Stores > Settings > Configuration to find all the necessary options to configure the extension. Firstly, go ahead and enable the GDPR option from the panel.

Next, you will see “Personal Data Protection Setting” and “Cookie Consent Setting.” Let see the steps to set them up.
Step 2 – Personal Data Protection Settings
By setting up personal data protection, you can give your customers clear insights and build their trust in how you collect and use their data. Click on the dropdown and fill out the necessary information.
Here, you will need to fill out:
- General Settings
- Customer’s Account Privacy Settings
- Personal Data Deletion and Anonymization Settings
1. General Setting
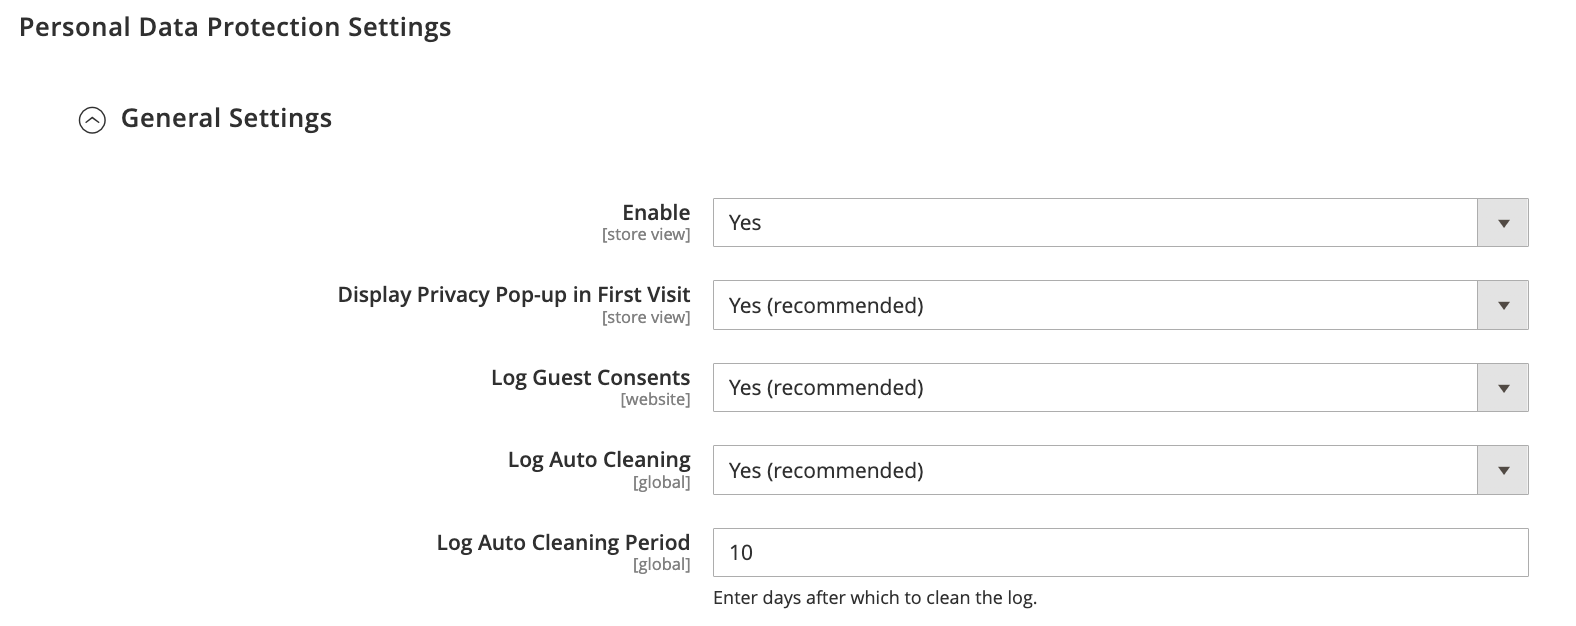
- Enable: Choose YES to turn on the extension.
- Display Privacy Pop-up on First Visit: Choose YES to add the “Privacy Policy” tab in the customer’s My Account section.
- Log Guest Consents: Choose YES to keep a record of consents from guest visitors. This will appear in the “Manage Consent Action Log Entries” grid.
- Log Auto Cleaning: Choose YES to automatically clear entries from the “Manage Consent Action Log Entries” grid.
- Log Auto Cleaning Period: Enter the number of days after which you want the Consent Action Log Entries to be automatically deleted.
2. Customer’s Account Privacy Settings
Below general settings you will see the customer’s account privacy settings tab. Expand that and fill in the following fields.

- Allow Downloading Personal Data: Choose YES to let customers download their data in a CSV file.
- Allow Anonymizing Personal Data: Choose YES to let customers anonymize their personal data.
- Allow Deleting Personal Data: Choose YES to let customers delete their account and data.
- Allow Opt-Out in Given Consents: Choose YES to let customers manage their consent preferences.
- Download Fields with Filled Values Only: Choose YES to skip empty values in downloaded files.
- Display Data Protection Officer Information: Choose YES to show the Data Protection Officer section in customer accounts.
- Section Name: Add a name for the new tab on the front page.
- Data Protection Officer Information: Enter details about the Data Protection Officer
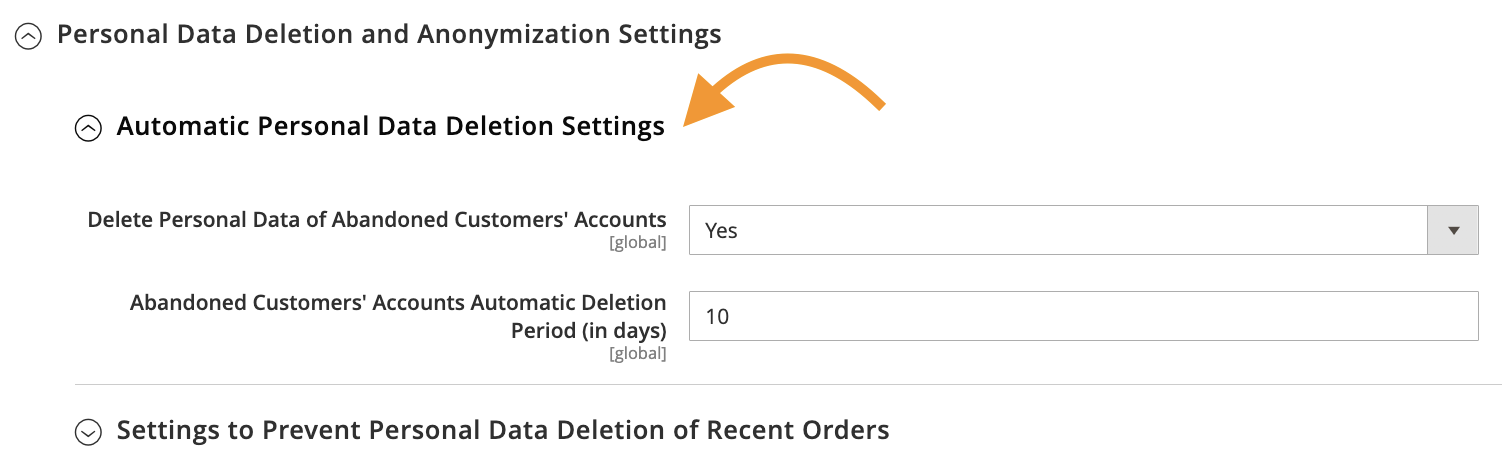
3. Personal Data Deletion and Anonymization Settings
The Personal Data Deletion and Anonymization Settings are useful when customers become inactive on your website for a period of time (based on their last purchase).
- Automatic Personal Data Deletion Settings
- Delete Personal Data of Abandoned Customers’ Accounts: Choose YES to automatically delete personal data from abandoned customer accounts.
- Abandoned Customers’ Accounts Automatic Deletion Period: Specify the number of days after which abandoned customer accounts will be automatically deleted.
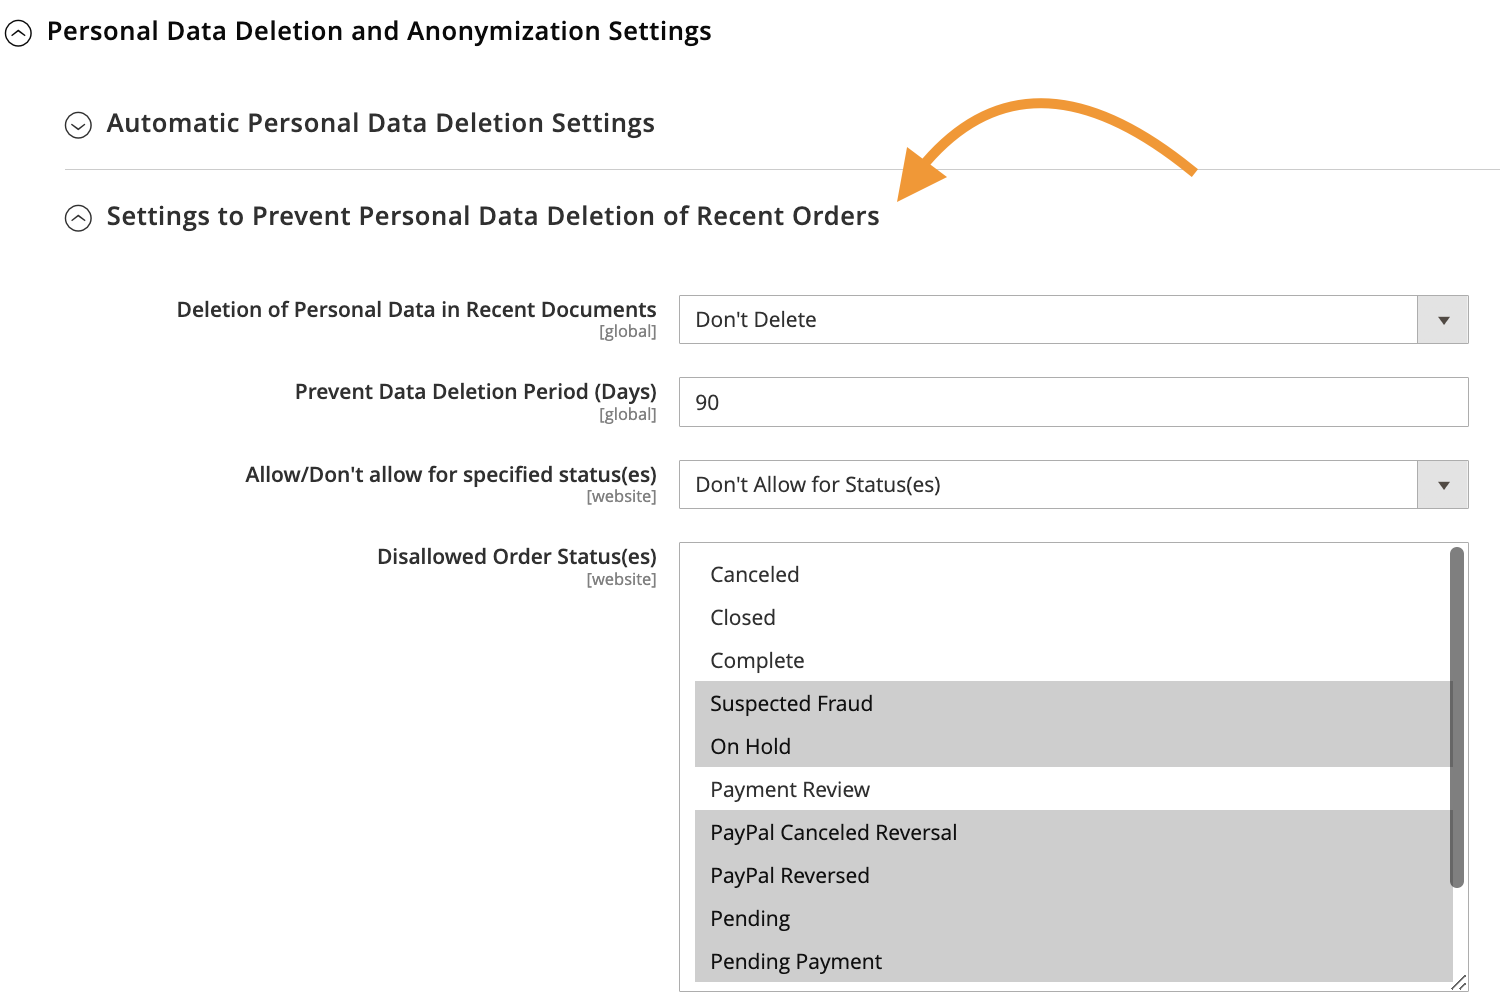
- Prevent Personal Data Deletion of Recent Orders:
- Deletion of Personal Data in Recent Documents: Choose ‘Don’t Delete’ to keep data deleting from recent orders.
- Prevent Data Deletion Period: Specify the number of days before data can be deleted.
- Allow/Don’t allow for specified status(es): Select ‘Don’t Allow for Status(es)’ to prevent data deletion, or choose ‘Allow’ otherwise.
- Disallowed Order Status(es): Specify statuses where you don’t need data deletion.
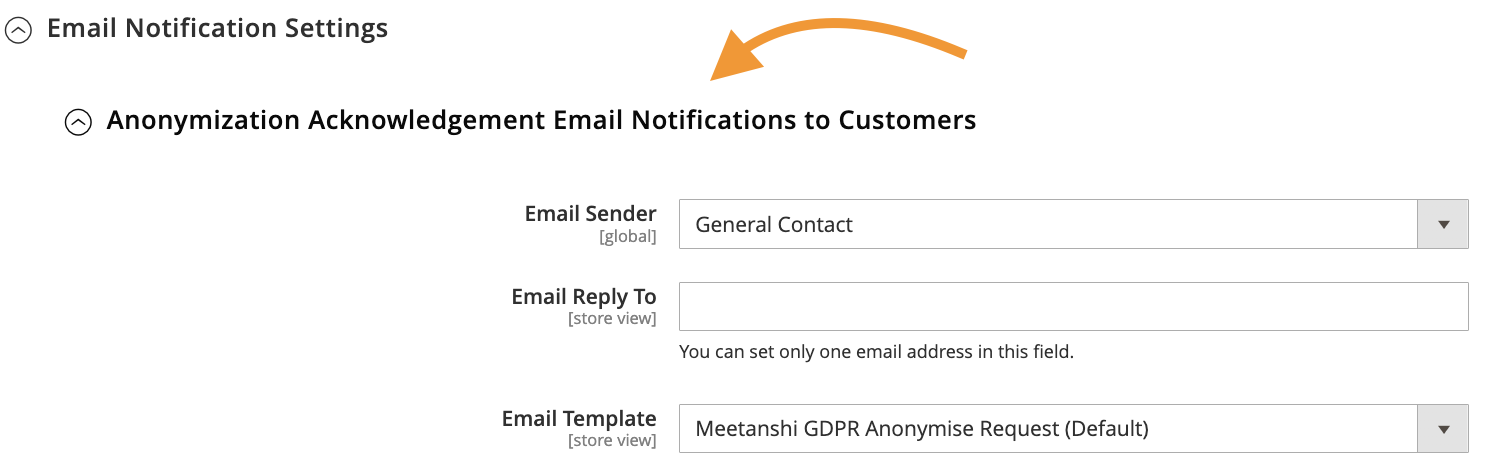
4. Email Notification Settings
From here, you can manage all email settings and make any necessary changes.
- Anonymization Acknowledgement Email Notification to Customers: Customers will receive an email confirming their request for account anonymization.
- Email Sender: Choose who sends the anonymization acknowledgement email to customers.
- Email Reply To: Set the reply-to address for anonymization acknowledgement emails to customers.
- Email Template: Pick the email design for anonymization acknowledgement notifications sent to customers.
- Personal data Deletion Email Notification: Here, you’ll find three settings to manage Email Notification Deletion, and we’ll cover each setting thoroughly to set it up correctly.
1. A) New Deletion Request Email Notification to Manager: Managers receive an email alert for new requests to delete personal data.
- Notify Manager on Deletion Request: Choose ‘Yes’ to alert the manager about a request to delete personal data.
- Email Sender: Select the sender’s email address for notifications about personal data deletion requests.
- Send Email To: Enter email addresses to receive notifications about personal data deletion requests.
- Email Template To: Choose an email template for notifications about personal data deletion requests.

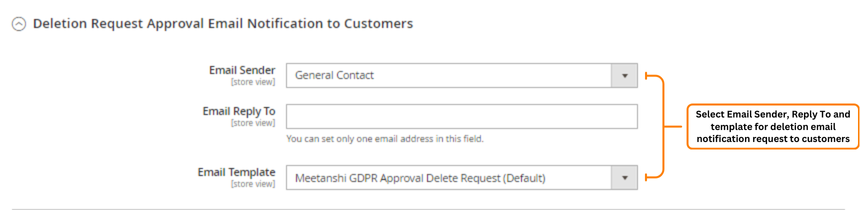
1. B) Deletion Request Approval Email Notification to Customers: Customers receive an email confirming the approval of their request to delete personal data.
- Email Sender: Choose who sends the approval email for data deletions.
- Email Reply To: Enter an email address for customer queries.
- Email Template To: Select the template for the approval notification email for data deletions.
1. C) Deletion Request Rejection Email Notification to Customers: Customers receive an email if their request to delete personal data is declined.
- Email Sender: Choose who sends the rejection email for data deletion requests.
- Email Reply To: Enter the email address for customer queries.
- Email Template To: Select the template used for notifying customers of rejected data deletion requests.
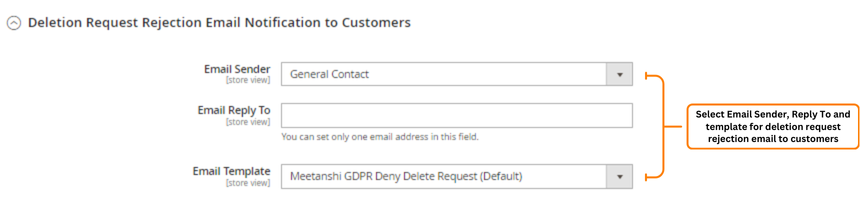
After a manager rejects a user’s request to delete their customer account, the user receives an email at their registered email address. Customers can then complete any pending orders or payments to move forward.
Step 3 – Cookie Consent Settings
To comply with GDPR, you must display a cookie consent on your website. This lets users know what information will be collected if they agree.
Here you will fill out these settings:
1. General Settings
2. Cookie Notice Display Customization Settings
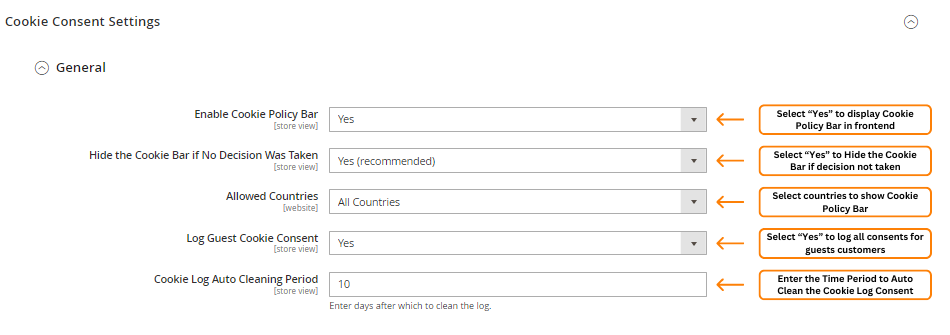
3. General Settings
To manage the cookies General Settings, navigate to Stores > Configuration > Meetanshi > GDPR > Cookie Consent Settings > General.
- Enable Cookie Policy Bar: Toggle YES to display the “Cookie Policy Bar” in the privacy policy tab of your customers’ accounts.
- Hide the Cookie Bar if No Decision Was Taken: Toggle YES to automatically hide the cookie bar if no decision is made.
- Allowed Countries: Choose countries from the list to display the cookie policy bar.
- Log Guest Cookie Consent: Toggle YES to record consents from guest visitors.
- Cookie Log Auto Cleaning Period: Enter the number of days to automatically clean up cookie consent logs.
2. Cookie Notice Display Customization Settings
In this section, you can pick the style and settings for your website’s cookie consent. Choose from three options: Sidebar, Popup, and Classic. Just select your preferred style from the drop-down menu and adjust as needed.
- Classic Bar Cookie Notice Style Settings
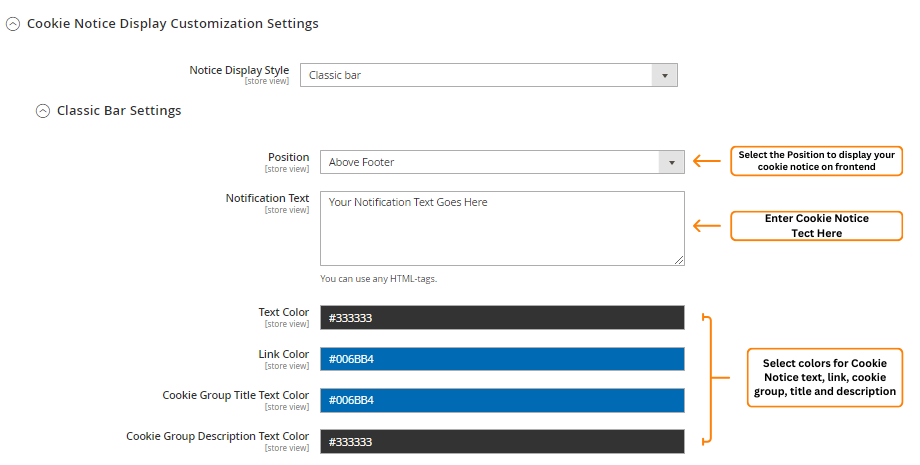
- Notification Text: Enter the message for the cookie notice.
- Text Color: Choose a color for the cookie notice text.
- Link Color: Pick a color for the cookie notice link.
- Cookie Group Title Text Color: Select a color for the cookie group title.
- Cookie Group Description Text Color: Choose a color for the cookie group description text.
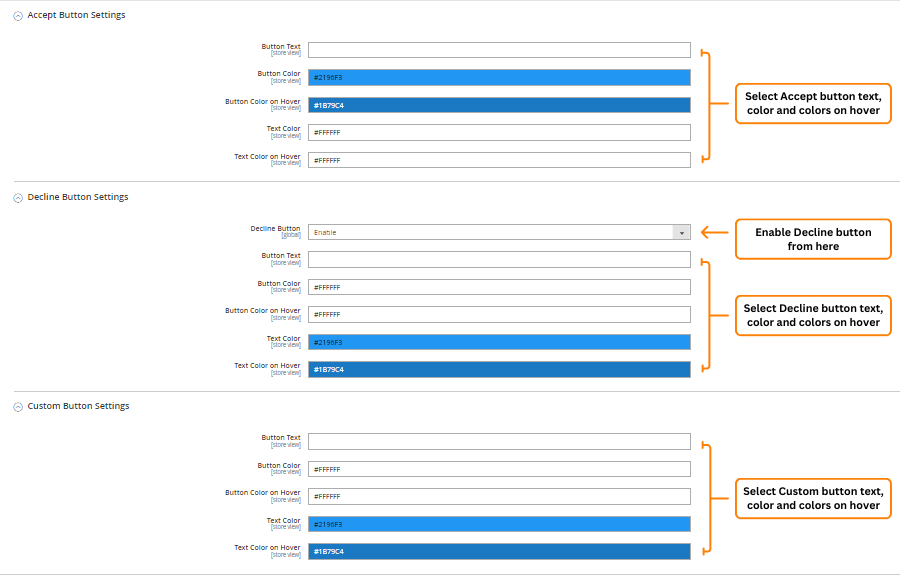
- Accept Button Settings:
- Button Text: Type the button text.
- Button Color: Pick a color for the button.
- Button Color on Hover: Pick a color for the button when hovered.
- Text Color: Pick a color for the button text.
- Text Color on Hover: Pick a color for the button text when hovered.
- Decline Button Settings:
- Decline Button: Enable the decline button here.
- Button Text: Type the button text.
- Button Color: Pick a color for the button.
- Button Color on Hover: Pick a color for the button when hovered.
- Text Color: Pick a color for the button text.
- Text Color on Hover: Pick a color for the button text when hovered.
- Custom Button Settings:
- Button Text: Type the button text.
- Button Color: Pick a color for the button.
- Button Color on Hover: Pick a color for the button when hovered.
- Text Color: Pick a color for the button text.
- Text Color on Hover: Pick a color for the button text when hovered.
Here’s how the classic bar displays cookie policy info and buttons. You can place it at the top or in the footer of the page.
- Popup Notice Style Settings
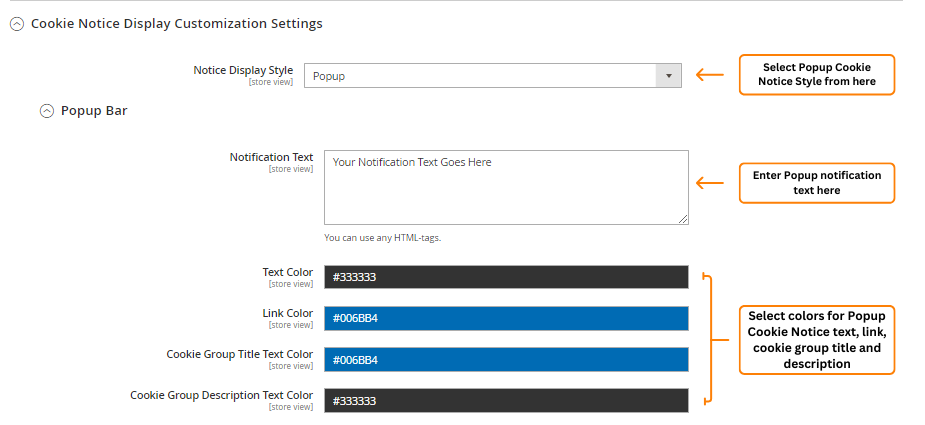
- Notification Text: Type your cookie notice text.
- Text Color: Pick a color for the notice text.
- Link Color: Pick a color for the notice link.
- Cookie Group Title Text Color: Pick a color for the group title.
- Cookie Group Description Text Color: Pick a color for the group description text.
- Sidebar Cookie Notice Style Settings

- Notification Text: Write the message for the cookie notice.
- Text Color: Pick a color for the cookie notice text.
- Link Color: Pick a color for the cookie notice link.
- Cookie Group Title Text Color: Pick a color for the cookie group title.
- Cookie Group Description Text Color: Choose a color for the cookie group description.
Manage Cookies: To manage your cookies, go to Customers > Manage Cookies. Here, you can see details like cookie name, provider, group, description, lifetime, and type. To add a new cookie, click ‘New Cookie’. To delete a cookie, select it, then choose ‘Delete’ from the actions menu.
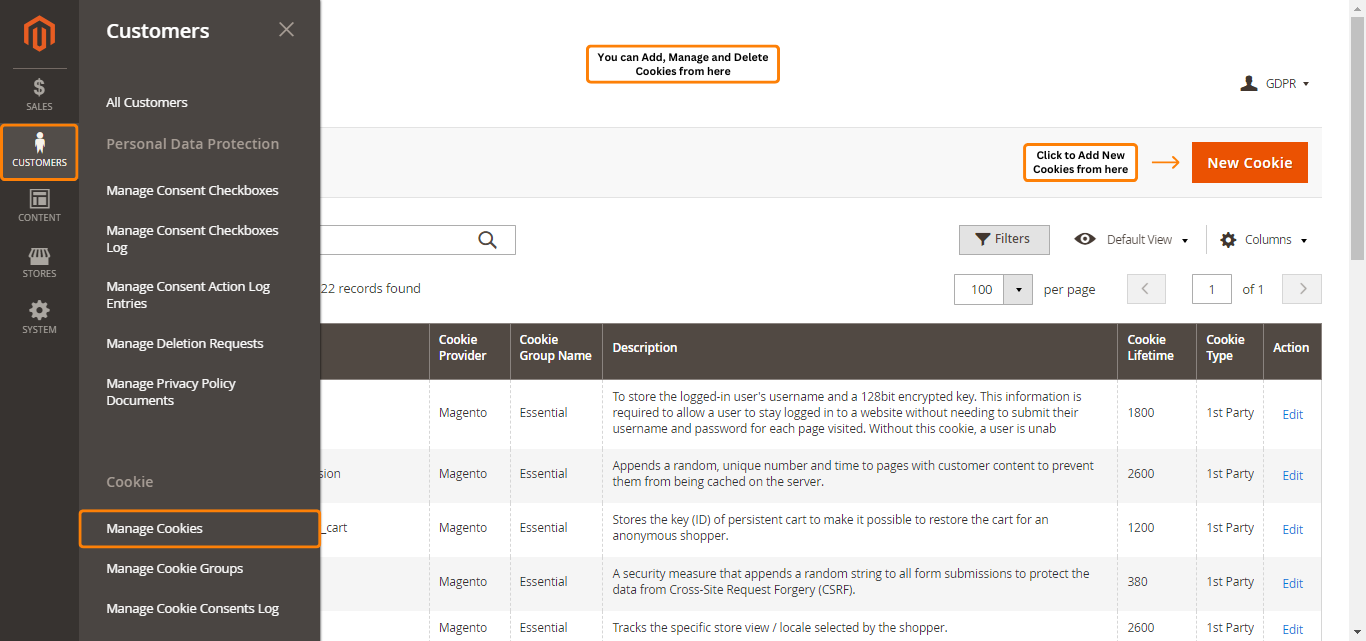
New Cookie Settings:
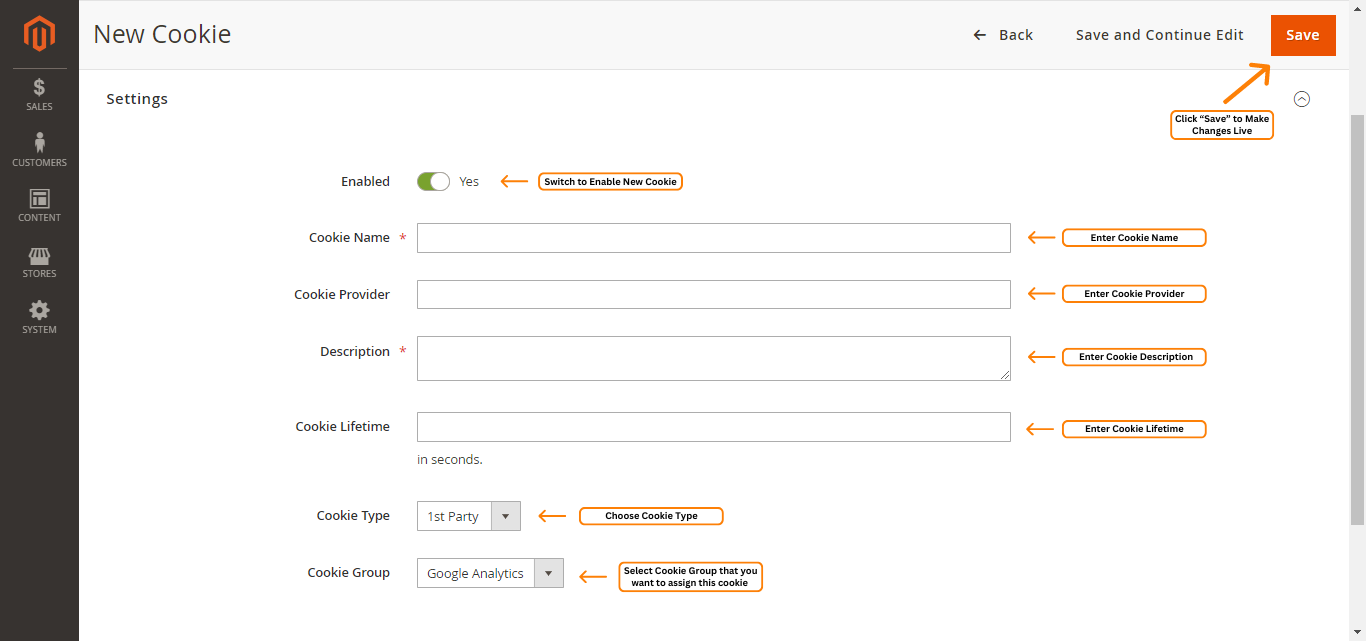
- Cookie Name: Enter the name of the cookie.
- Cookie Provider: Specify who provides the cookie.
- Description: Explain how and why the cookie is used.
- Cookie Lifetime: Set how long the cookie lasts, shown on the cookie page.
- Cookie Type: Classify the cookie based on how it uses data.
- Cookie Group: Assign the cookie to a specific group.
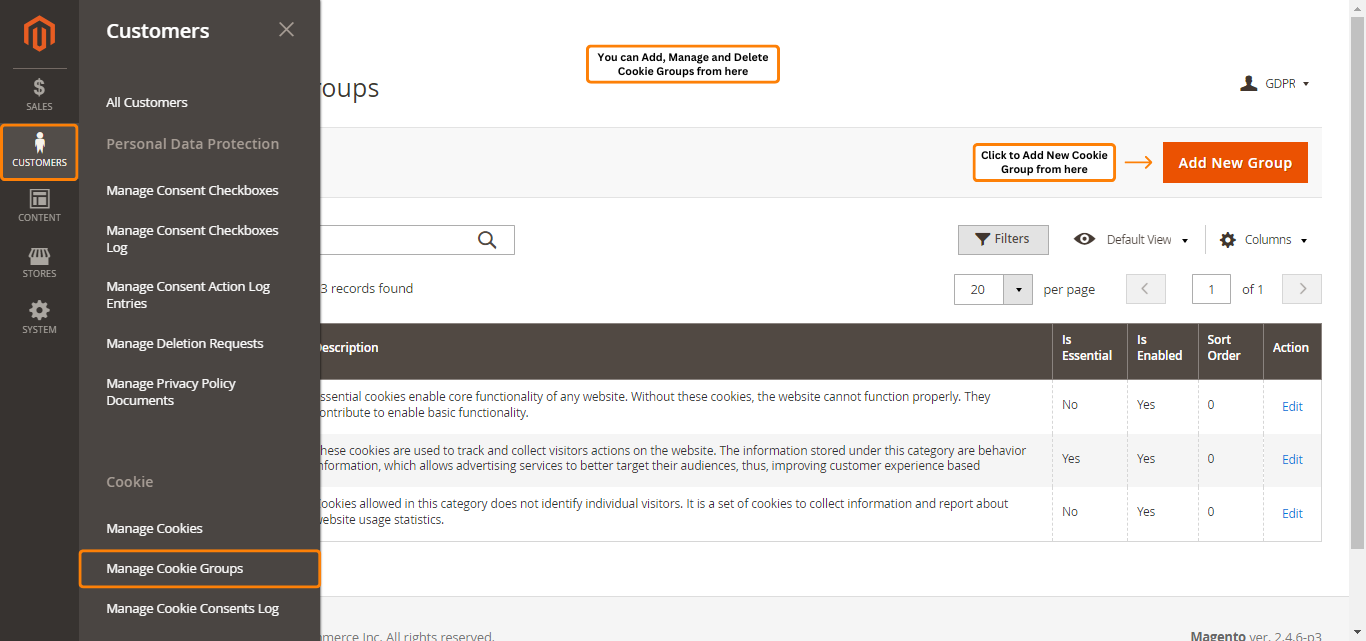
Manage Cookie Groups: To manage your cookie groups, navigate to Customers > Manage Cookie Groups. From here, you can assign cookies to essential and optional categories. To create a new group, click ‘Add New Group’. To delete a group, select it and choose ‘Delete’ from the options.
New Cookie Group Settings:
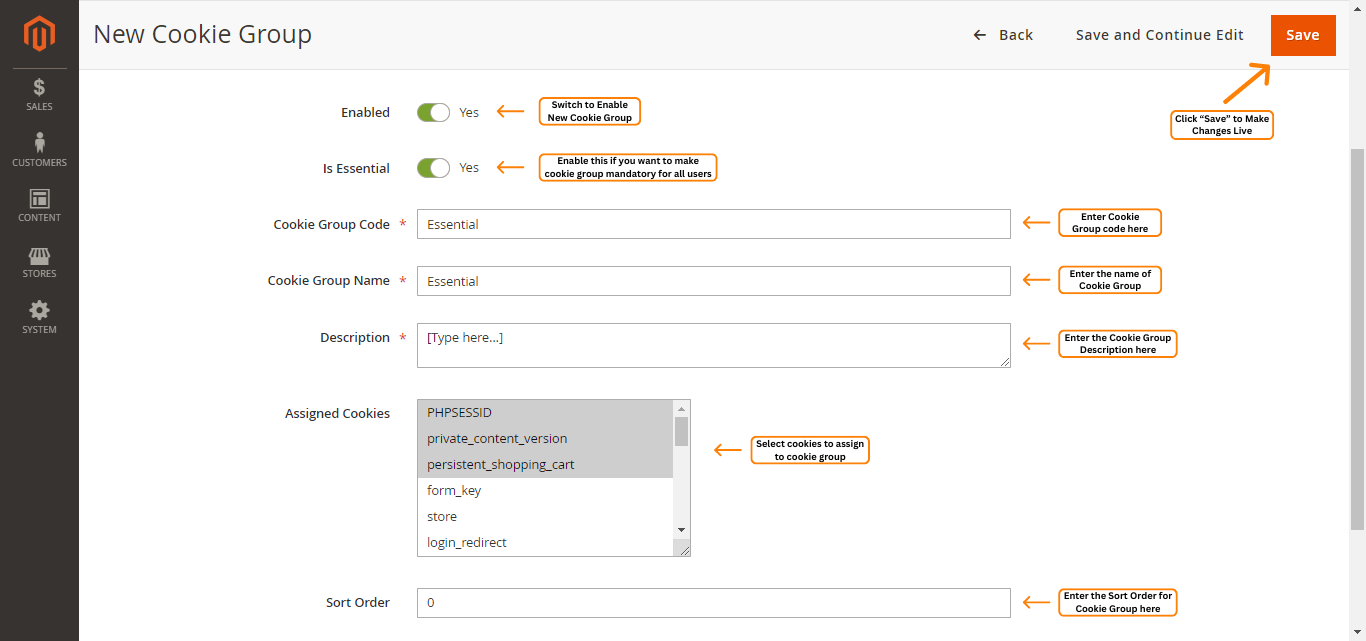
- Enabled: Turn on to activate the cookie group.
- Is Essential: Make this cookie group mandatory. Customers must allow it to access the website.
- Cookie Group Code: Enter a code for the cookie group.
- Cookie Group Name: Name the group for customers to see on the website and in the admin panel grid.
- Description: Describe the group’s purpose so customers can decide whether to allow it.
- Assigned Cookies: Choose which cookies belong to this group.
- Sort Order: Specify the group’s priority.
- Click ‘Save’ to apply the changes.
- This is how cookie groups appear on the front end. Customers can click ‘More Information’ to see a list of all cookies assigned to that group.
Step 4 – Privacy Policy Documentation Settings
With this setting, you can manage privacy policy documents. Admins can create, edit, and delete policies here. To manage privacy policies, go to Customers → Manage Privacy Policy Documents. And, to add a new policy, click “Add New Policy”.
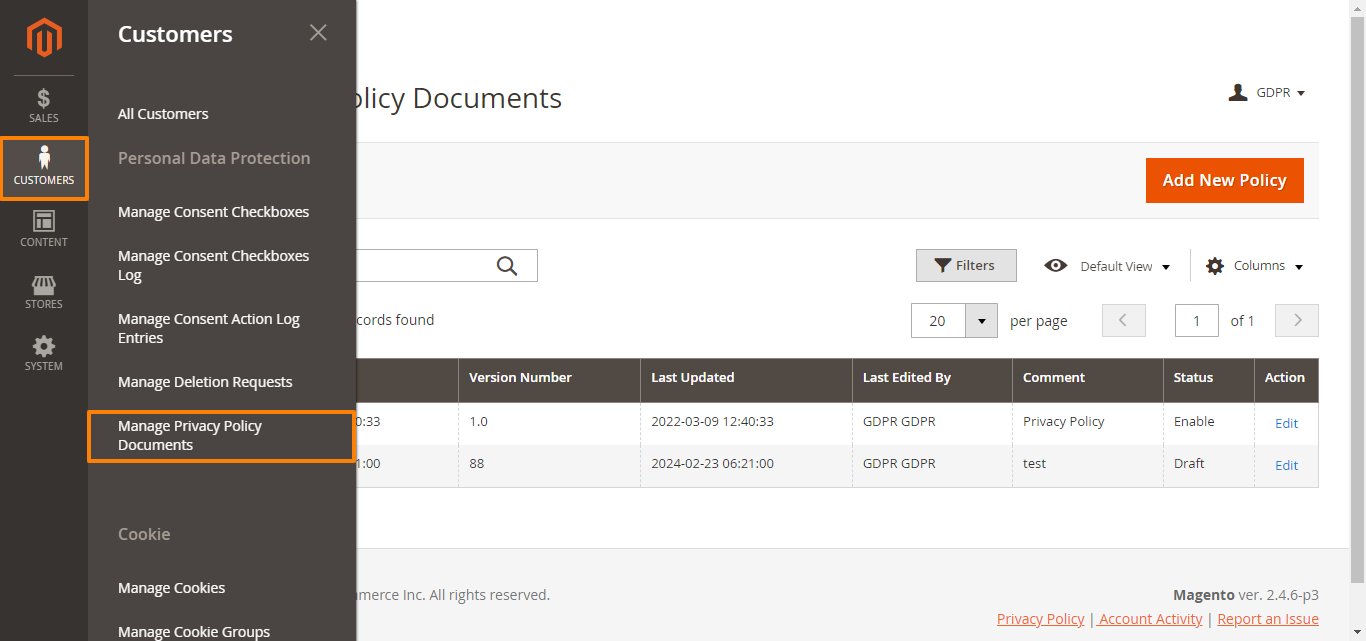

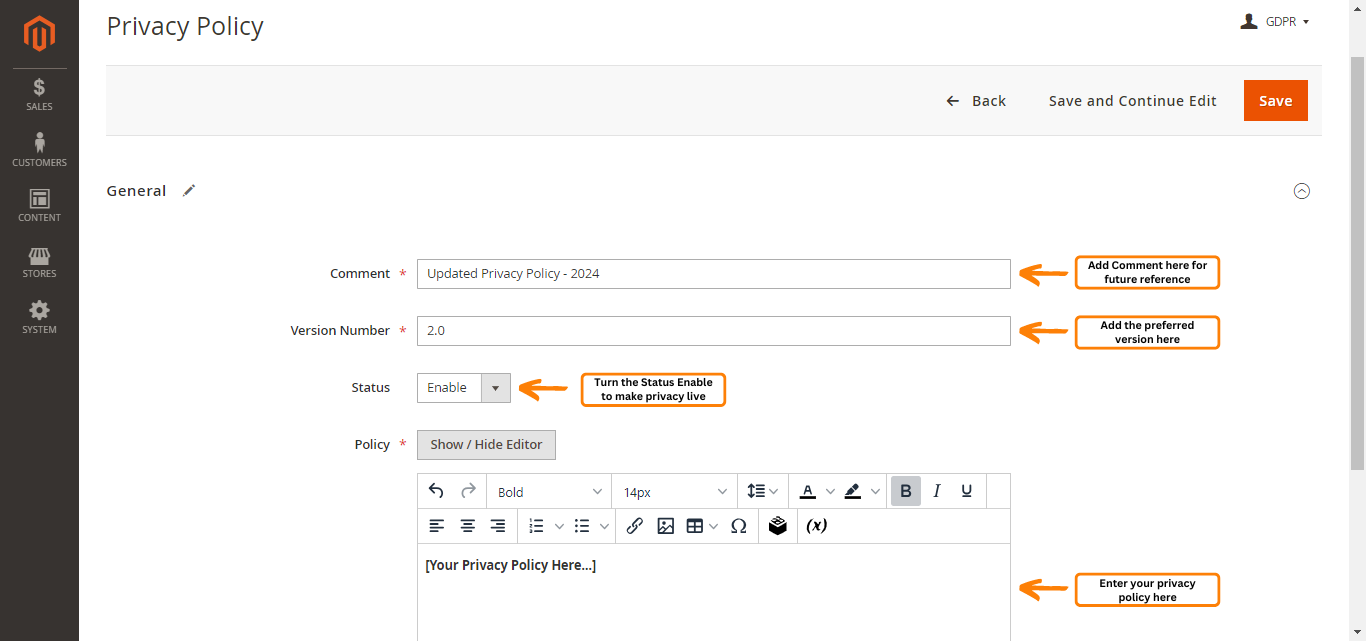
New Privacy Policy:
- Comment: Add a title or note for future reference.
- Version Number: Set the version.
- Status: Choose the status from the drop-down menu (set to Enable).
- Policy: Enter the privacy policy text.
Every time you update the privacy policy, it will appear as a popup notification on the frontend, looking like this.

Offer a Safe & Reliable Shopping Experience
Ensure you follow this ultimate guide to achieve GDPR compliance without encountering legal issues and keep your business running smoothly. Meetanshi’s GDPR Extension also keeps you updated with upcoming changes to EU laws and regulations.
Implementing GDPR changes will build trust in your customers’ shopping experience by being transparent and providing them access to their personal data—allowing them to edit or delete it as needed. This transparency can lead to higher conversions compared to non-compliant stores.