Instant response to customer queries improves conversion rate and offers much better customer satisfaction. Here’s a simple process on how to integrate an AI chatbot with Shopify to offer such support 24/7.
Methods to Integrate an AI Chatbot with Shopify
There are two main ways to add an AI chatbot to a Shopify store. Below are the methods and why one is usually a better choice for most merchants.
Method 1: Using a Shopify Chatbot App
This is the most popular method for store owners looking for a code-free solution. Shopify chatbot apps like MIT AI Chatbot & Sales Bot let you add the AI bot without any coding hassle. You only need to customize the chatbot and train it with your store data.
Method 2: Integrating Through Custom API or External Platform
This method connects an external AI system, such as OpenAI GPT models or Claude AI, to your store through the Shopify Admin API, usually with custom code or middleware. It requires technical development and maintenance.
For most Shopify merchants, using an AI chatbot app is the easiest option because of its no-code approach and quick setup. The app takes away all the technical worries, keeping your focus on bot training and understanding the interaction with your customers.
Steps to Integrate an AI Chatbot Using the Shopify App
Here are the simple steps for Shopify AI chatbot integration using MIT AI Chatbot & Sales Bot.

Step 1: Configure the Appearance Settings
Install the app, open the app dashboard, and embed it in your theme.
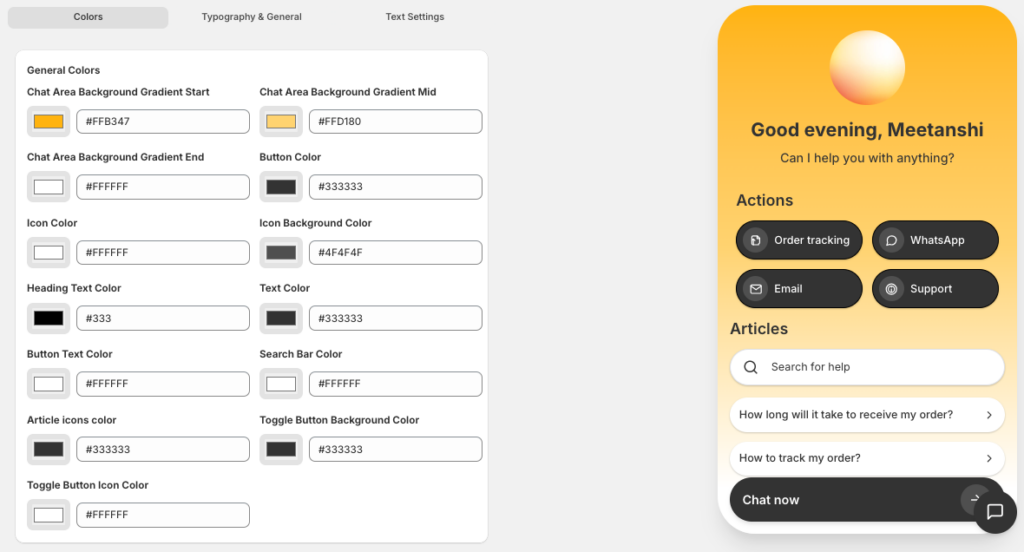
Then go to Appearance Settings to customize how the chatbot looks on your storefront. You will find three main tabs:
- Colors – Customize the chatbot’s design, such as the chat background, button colors, icons, text, and search bar.
- Typography & General – Select the fonts for the body text, heading, and subheadings.
- Text Settings – Customize the chatbot text, such as the heading message, chatbot name, welcome message, and more. You can also add a profile image or icon for the chatbot.
You get a live preview on the right in every tab to see how the chatbot will look to customers and make changes accordingly.
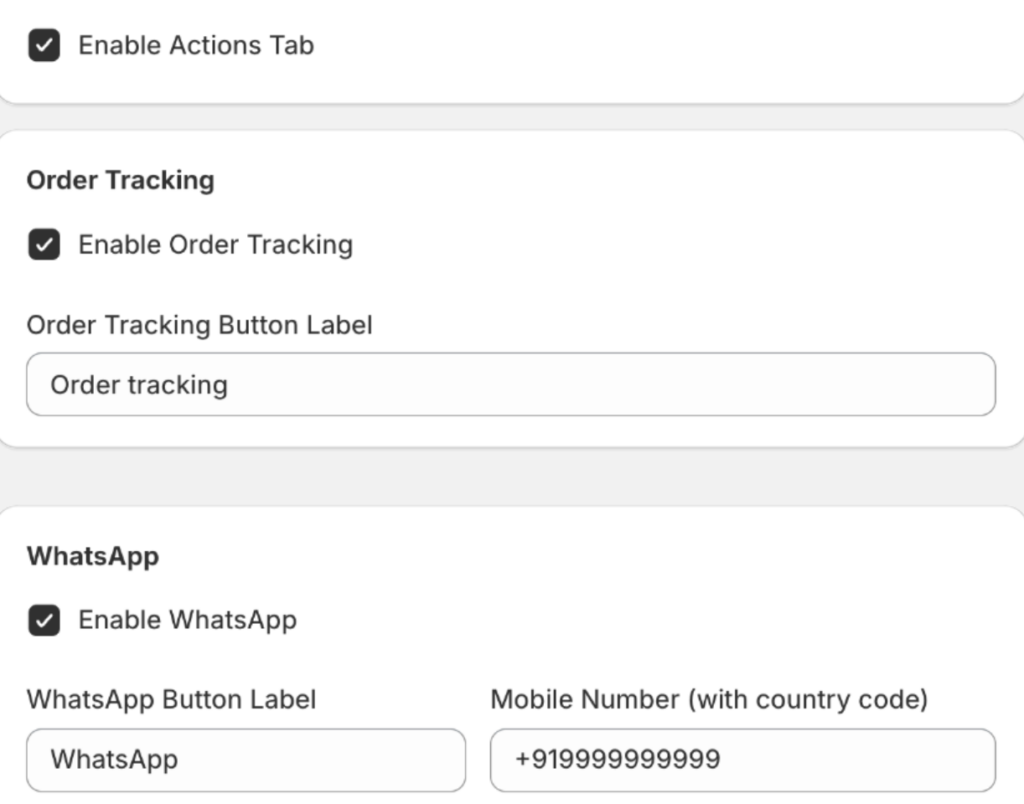
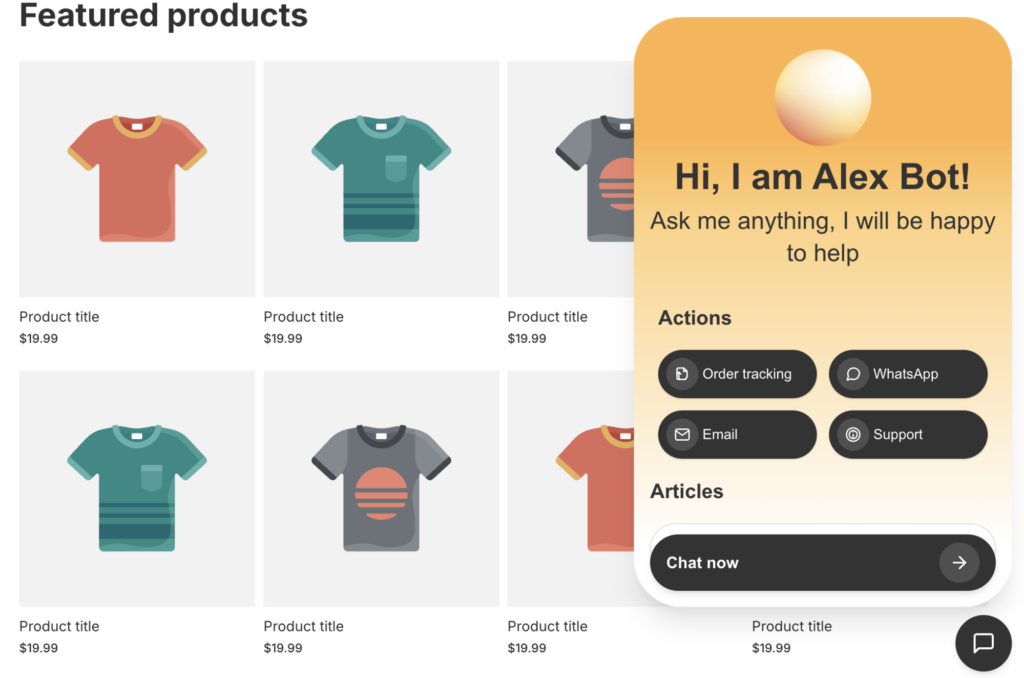
Step 2: Configure Actions and Help Articles
Next, configure the chatbot’s main functions using the Actions and Articles sections.
Actions
Create quick-access buttons on the chatbot’s home screen. These help customers perform common tasks quickly. You can add buttons for: order tracking, WhatsApp support, email support, and a customer support page.
Start by enabling the actions tab and configuring settings for each button from here. You can customize the label text and link it to the correct phone number, email address, or support page URL.
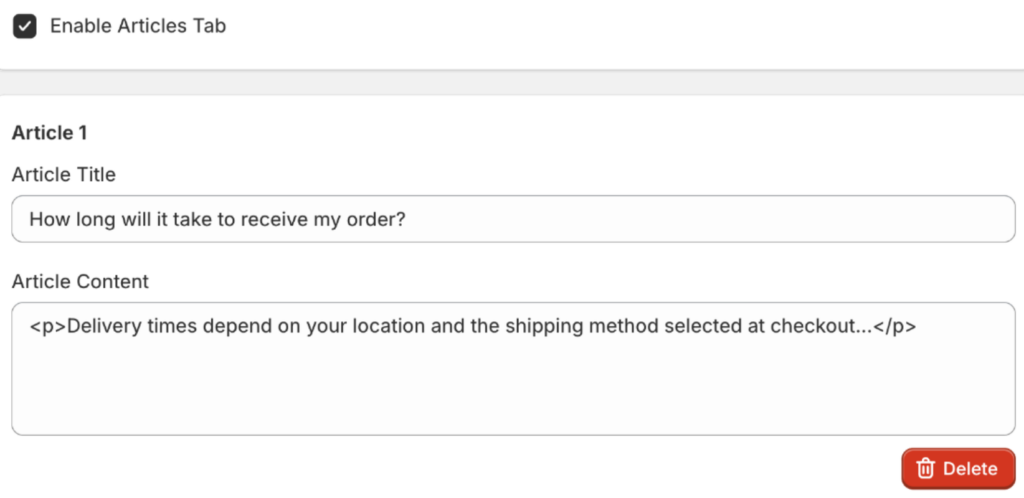
Articles
Enable the tab and create questions and answer them for the chatbot to easily address when the query occurs. You can add articles with a title and content explaining common topics such as shipping policies, return procedures, or payment options.
Anytime you feel a question is not relevant, you can directly delete it.
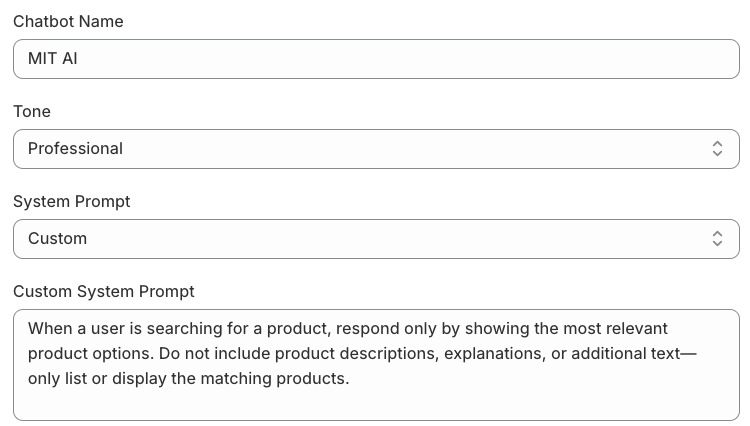
Step 3: Configure Chatbot Behavior and Personality
Head to Personality to define how the chatbot communicates with customers. Here, you will see three tabs:
- General Settings
- Policies
- Other Information
General Settings
Set the chatbot name, choose the tone of communication, and configure the system prompt that controls the chatbot’s role and behavior during conversations.
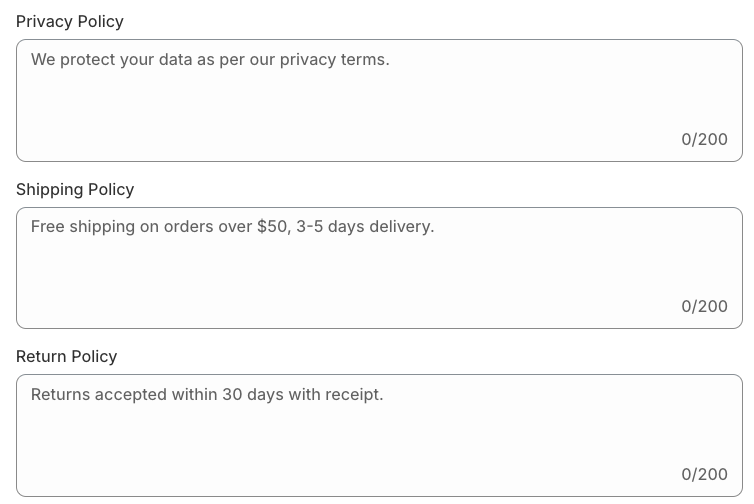
Policies and Other Information
Add relevant answers related to store policies such as shipping, returns, or privacy. And provide extra information about your store and products. For example, describe what you sell and include additional information that can help the chatbot generate more accurate responses.
Save the setting and view the AI chatbot in the frontend. Ask a few questions and check their accuracy.
Step 4: Monitor Conversations and Performance
Go to the Chats section in the app dashboard to review all chatbot conversations. Here you can view message logs, monitor interactions, and analyze how customers are engaging with the chatbot. When you click on View Chat, you can read the entire conversation between the customer and the bot.

By following these steps, you can successfully add a Shopify customer support chatbot and automate customer support.
Why Use the MIT Chatbot & Sales Bot?
This Shopify app first simplifies customer support, as it handles the routine queries and order tracking details 24/7. So, your team can focus on other high-ticket queries.
While managing this, if a human is needed, it seamlessly redirects users to WhatsApp or email, keeping your support organized and professional.
Secondly, the AI chatbot for Shopify focuses on product recommendations.
It perfectly understands the customers’ intent and recommends products directly from your store for your shoppers to view.
Without any coding, you can set up the entire chatbot in under 30 minutes.
Giving you full control over how the bot looks and interacts with your shoppers without losing the touch of your brand voice.
Whether you are just launching your store or looking to save time on support, this tool offers a customizable, high-value solution that grows with your business.
Best Practices for Shopify AI Chatbot Implementation
Using the best AI chatbot for Shopify is not just about enabling the feature; it’s about making it useful for your customers. Many successful merchants choose to build a Shopify store with AI from the ground up to ensure their themes, product descriptions, and support tools work together seamlessly.
Follow these simple best practices to get better results from your chatbot.
- Add it to product pages and in the cart, where customers usually have questions
- Connect the chatbot with your Shopify inventory to provide accurate product and pricing information
- Let the chatbot handle common questions, but provide an option to contact a support agent for complex issues
- Set a friendly or professional tone so the chatbot feels consistent with your brand
- Inform customers that they are chatting with an AI assistant
- Check chatbot conversations often and update answers to improve performance
Use these best practices to get the most out of your AI chatbot and improve your store’s performance.
Integrating an AI chatbot with Shopify helps you automate support, engage customers, and increase sales. With the right setup, you can offer quick replies and a smoother shopping experience.
Our AI Sales Bot chats with your visitors and handles any customer query 24/7.
Get for FREE