Customers want quick and easy navigation when shopping online, and allowing them to browse by brand can significantly enhance their experience.
As a Magento 2 store owner, implementing the Shop by Brand feature is an effective way to cater to customers’ brand preferences. In this guide, I’ll walk you through the steps to configure this feature in Magento 2.
Magento 2 Shop by Brand: an Overview
The “Shop by Brand” functionality in Magento 2 is designed to enhance user experience by allowing visitors to effortlessly browse and filter products based on their preferred brands.
For instance, if a customer is specifically looking for Nike sneakers, they can quickly narrow down their options by selecting the ‘Nike’ filter, instantly displaying only Nike products. This not only saves customers valuable time but also significantly boosts the likelihood of conversions.
Moreover, the Shop by Brand feature brings several additional advantages to your Magento 2 store, such as:
- It streamlines the shopping experience by allowing customers to quickly find and explore products from their favorite brands. This ease of navigation can reduce shopping time and increase customer satisfaction, ultimately leading to higher conversion rates.
- By showcasing brands prominently on your online store, the “Shop by Brand” feature helps improve brand recognition. This increased visibility is essential for fostering brand loyalty, as customers are more likely to purchase from brands they trust and recognize.
- Implementing this feature can significantly impact sales by catering to brand-loyal customers. The ability to filter and shop by brand encourages repeat purchases and can also attract new customers who are specifically searching for certain brands.
How to Configure Shop by Brand in Magento 2?
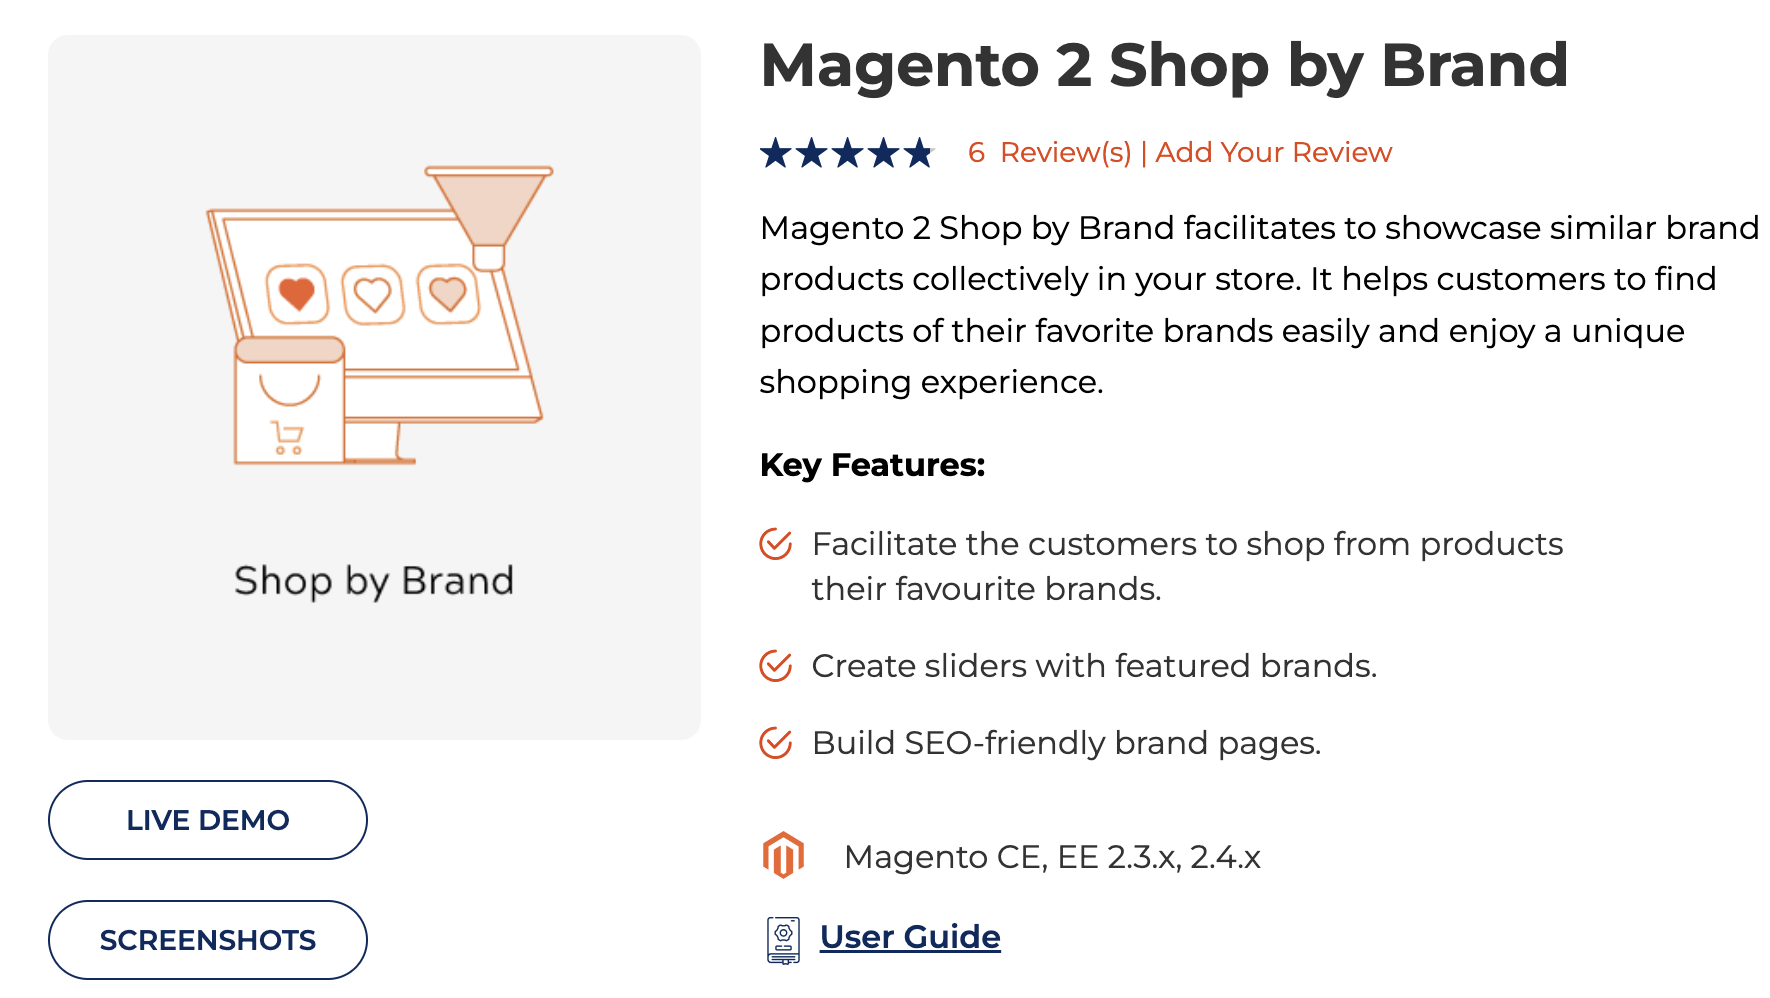
The best way to implement this feature is using a Shop by Brand Magento 2 extension as the default Magento 2 store doesn’t offer such convenience.
You can use the Meetanshi Magento 2 Shop By Brand to easily integrate the shop by brand functionality and enrich your store with informative and eye-catching brand pages.
Let’s see how to use the Meetanshi extension to add brands in a Magento 2 store –
Step 1: Installation & Configure the Extension
Firstly install the extension and extract the contents of the downloaded zip folder and upload the extension files to the root directory of your Magento 2 installation via FTP.
Log in to your SSH terminal and execute the following commands:
- php bin/magento setup:upgrade
- php bin/magento setup:static-content:deploy
- php bin/magento cache:flush
After this, navigate to Catalog > Shop By Brand > Configuration in the Magento 2 admin panel to enable the extension.
- Shop By Brand: Enable the Shop by Brand extension.
- Brand Attribute: Choose the brand attribute or create a new one if necessary.
- Brand Route: Customize the URL slug, page title, and link placements for brand pages.
- Brand Link Title: Enter the title for the brand’s page that you want to show to the customers in the frontend. By default, it is set to ‘Brands.’
- Show Brand In: This option allows you to choose the section of your online shop where you want to display the link to a brand.
- Show Brands in Category Menu: If you want to show the brands under the category menu, you can do it with the help of this option.
- What to Show: You can select the specific details that you want to show in the category menu.
- Maximum Brands to Show: Enter a number that represents the maximum count of brands you want to display.
- Show Brands Without Products on Menu: Select Yes if you want to show the brands with zero products in the category menu.
- Show Brands Name on Product Listing Page: Choose whether you want to show the brands name on product listing page or not.
- Show Brands Info in Product Page: Select the brand information that you want to show on the product page.
- Brand Logo Width in Product Page: Enter the brand logo width (in pixels) to show on the product page.
- Brand Logo Height in Product Page: Enter the brand logo height (in pixels) to show on the product page.

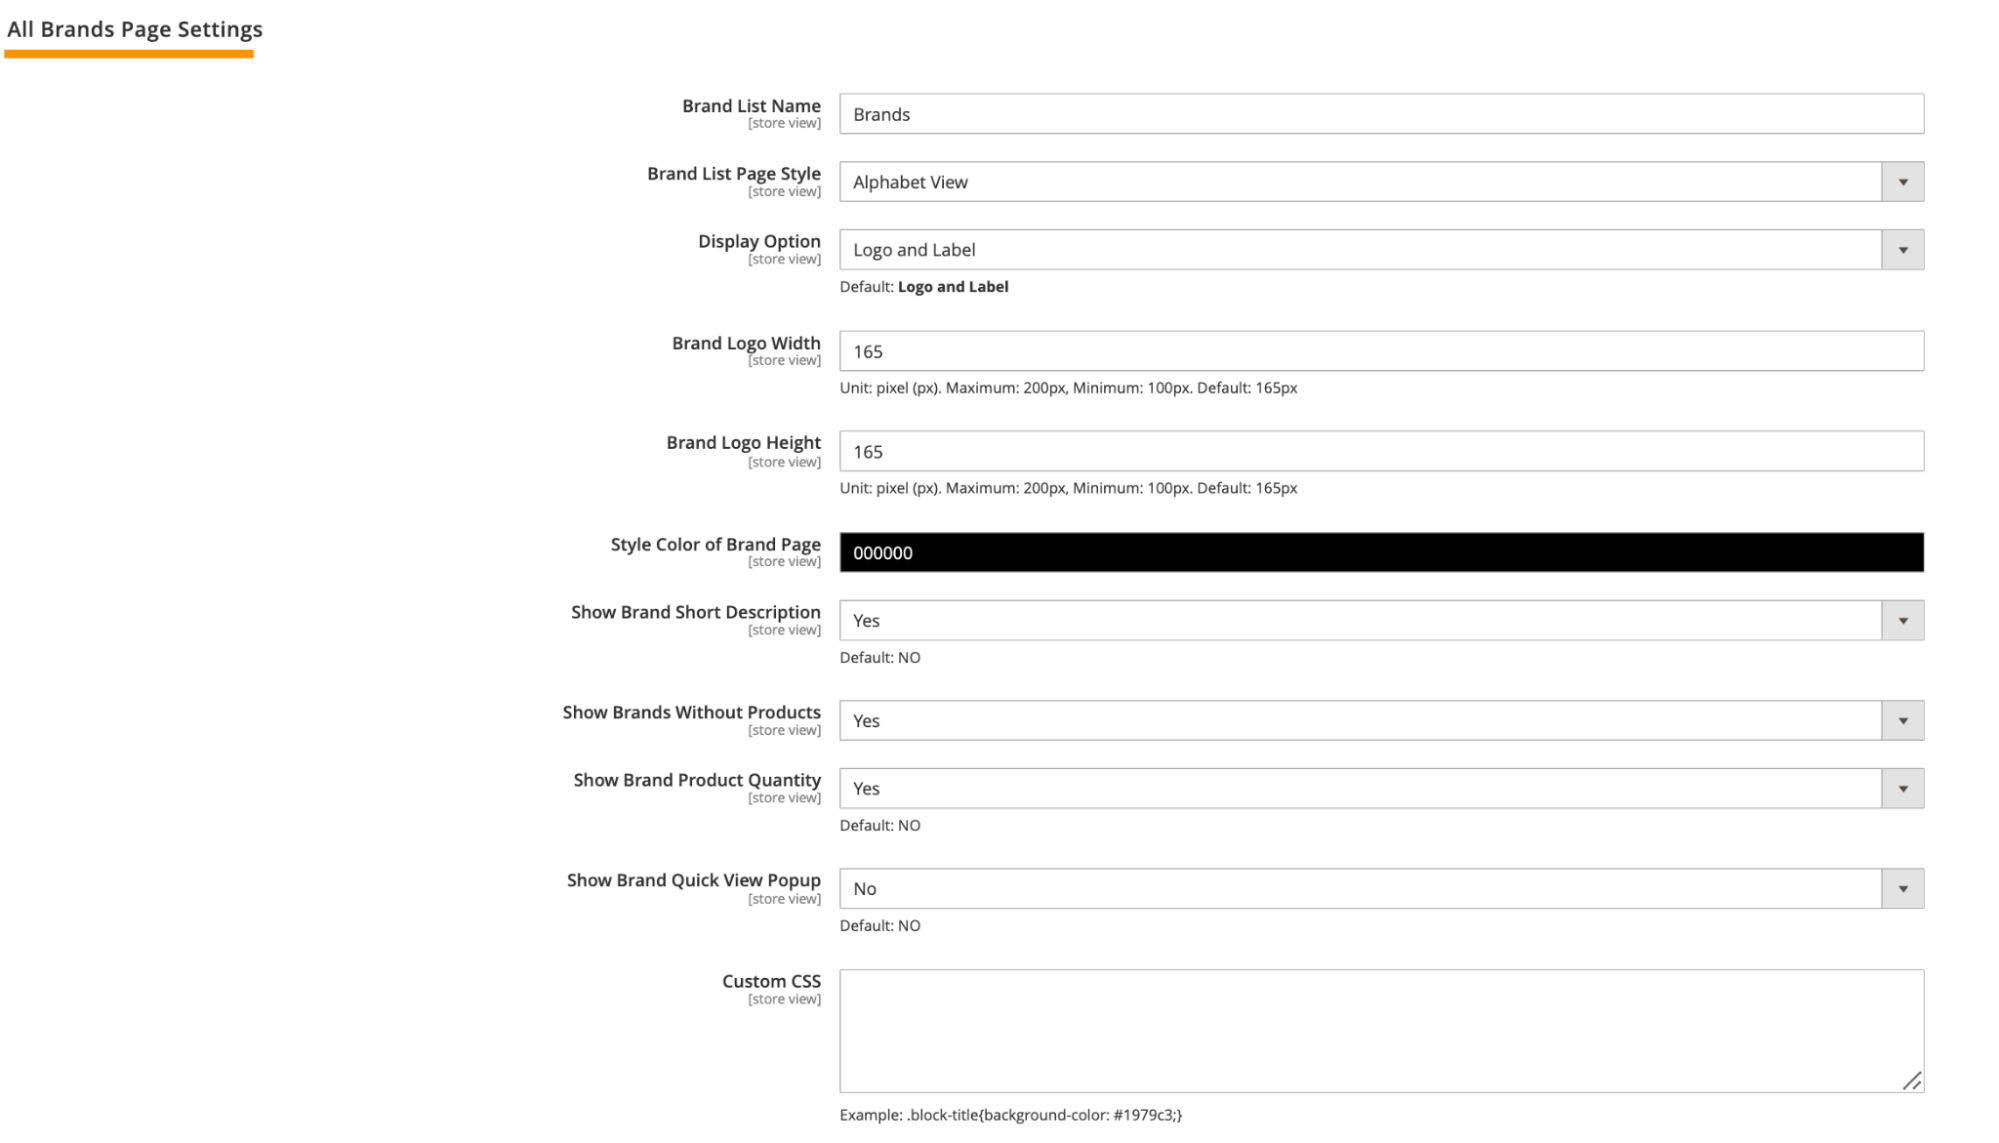
Step 2: Add Essential Brand Page Settings
Here are some of the important brand settings that have to be configured for the brand available on your Magento 2 store –
- Brand List Name: Enter the name you want to display above the brand list.
- Brand List Page Style: Choose the style for the brand list page from the dropdown.
- Brand Logo Width: Specify the width (in pixels) for the brand logos on the brand list. Brand Logo Height: Specify the height (in pixels) for the brand logos on the brand list.
- Style Color of Brand Page: Select the color style for the brand list page.
- Show Brand Short Description: Choose Yes if you want to display a short description of the brand on the brand list page.
- Show Brands Without Products: Choose Yes if you want to display brands without products on the brand list page.
- Show Brand Product Quantity: Choose Yes if you want to show the product quantity of each brand on the brand list page.
- Show Brand Quick View Popup: Choose Yes if you want to enable the quick view popup on the brand list page.
- Custom CSS: Enter any custom CSS code you want to apply to the entire brand page.
Additionally, we need to add these settings:
- Brand Filter Function
- Brand Search Settings
- Featured Brand Settings
- Brand Related Products
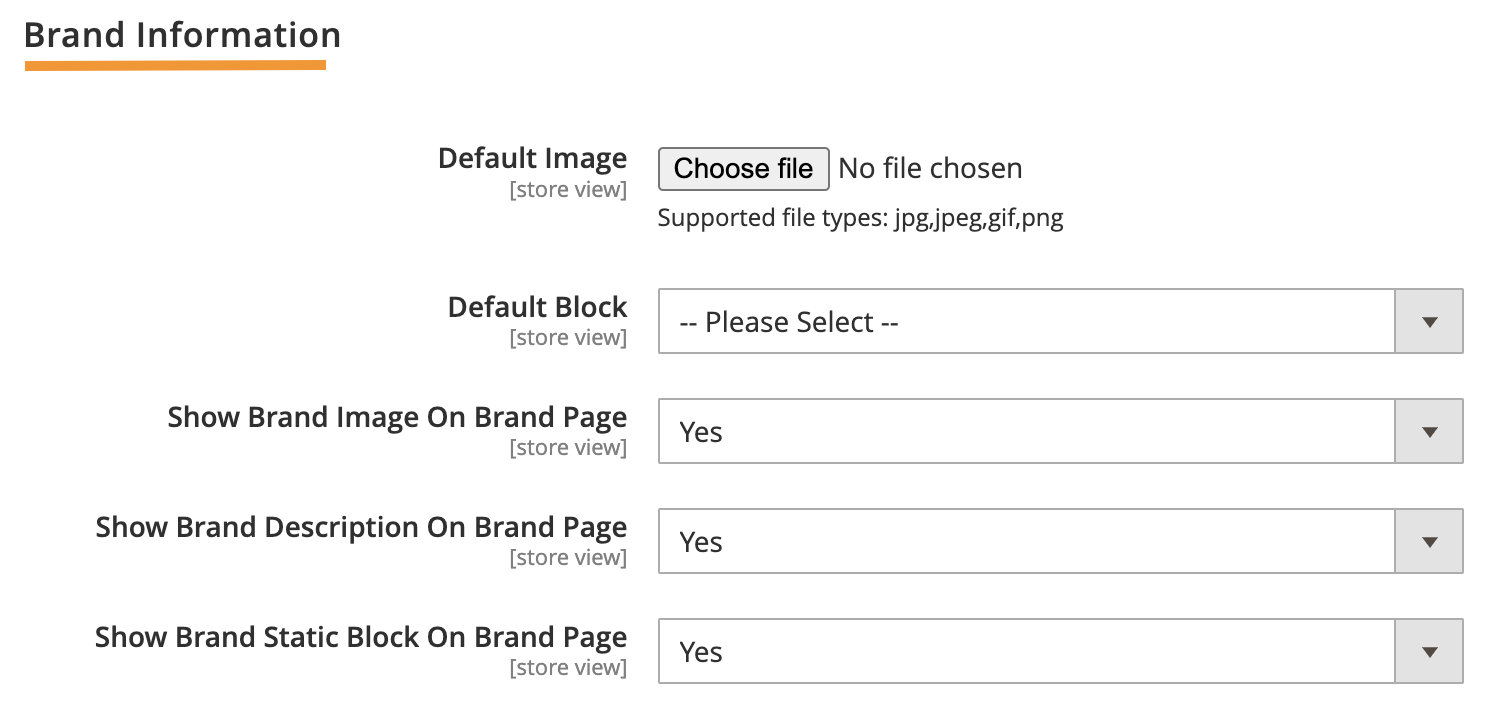
Step 3: Add Brand Information
Now, you will need to add the brand information, start with configuring the following settings:
- Default Image: Select the default image you want to show for the brands without any image.
- Default Block: Select the default block for the brands
- Show Brand Image On Brand Page: Select yes if you want to show the brand Image on the brand page
- Show Brand Description On Brand Page: Select Yes if you want to show the brand description
- Show Brand Static Block On Brand Page: Select Yes to show the static block on the brand page
Then, navigate to the Sidebar to configure thumbnail settings and more.
Featured Brand Settings
- Show Featured Brands: Select Yes if you want to show the featured brands.
- Title: Enter a custom title for the featured brands.
- Show Title: Select Yes to show the featured brand’s title.
Brand List Thumbnail
- Show Brand Thumbnail: Select Yes to show the brand thumbnail.
- Title: Enter the title for the brand list in the sidebar.
- Brand’s Qty Limit: Enter the maximum number of brands you want to display.
Category Brand
- Title: Enter the title for the brand categories in the sidebar.
- Category’s Qty Limit: Enter the maximum number of brand categories that you want to display in the sidebar.
- Show Brand Category Quantity: Select Yes to show the number of brands in the specific brand category in the sidebar.
Step 4: Add SEO Settings
- Set Pagination Rules: Decide whether to exclude pagination pages from search engine indexing.
Step 5: Import and Manage Brands
To import brand data upload a CSV file containing your brand. Then, configure these settings to manage your brand.
Access Catalog > Shop By Brand > Manage Brands to manage, add, or edit brand details, labels, and attributes.
- Default Label: Add a default label to show on the product edit page
- Catalog Input Type for Store Owner: Select the catalog input type for dropdown
- Values Required: Select Yes if you want to add the attribute value
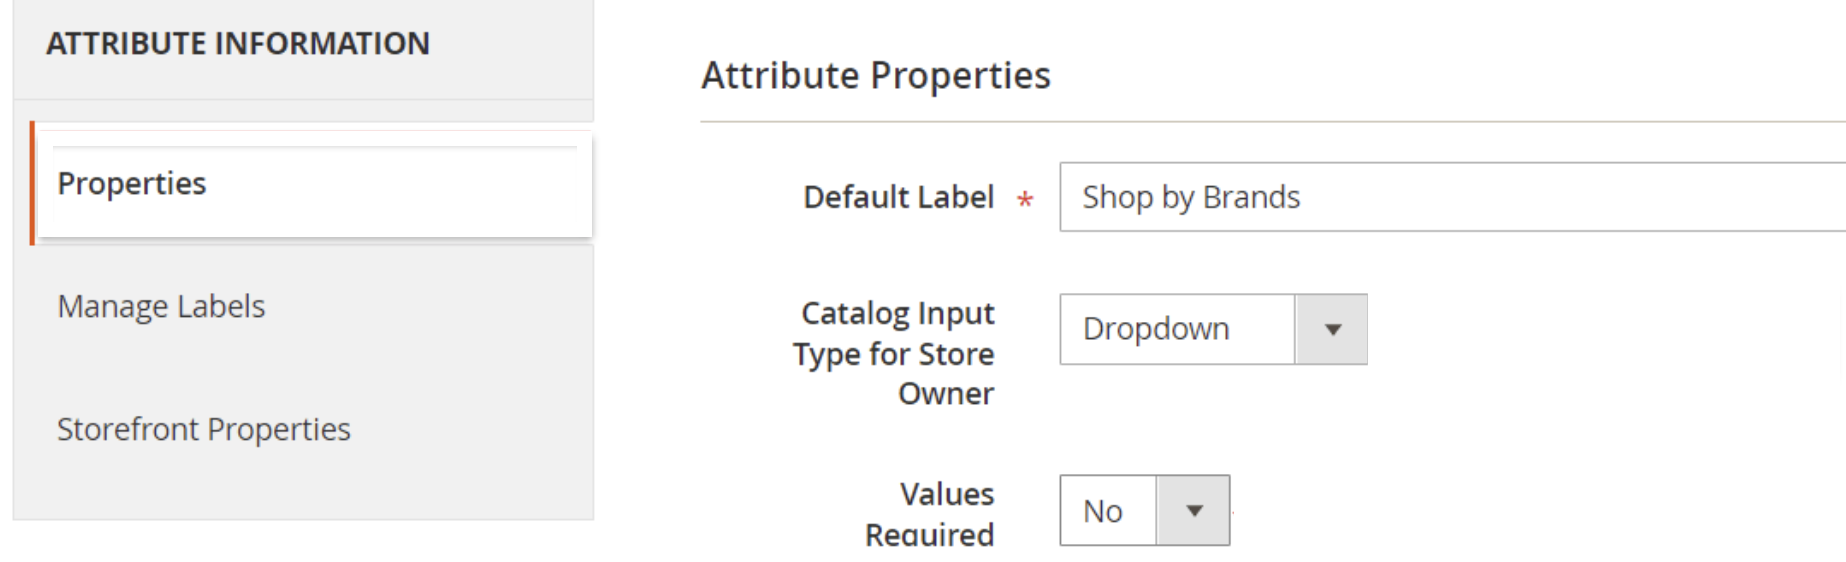
Similarly, manage brand labels and Storefront Properties.
Step 6: Option to Configure / Add New Brand
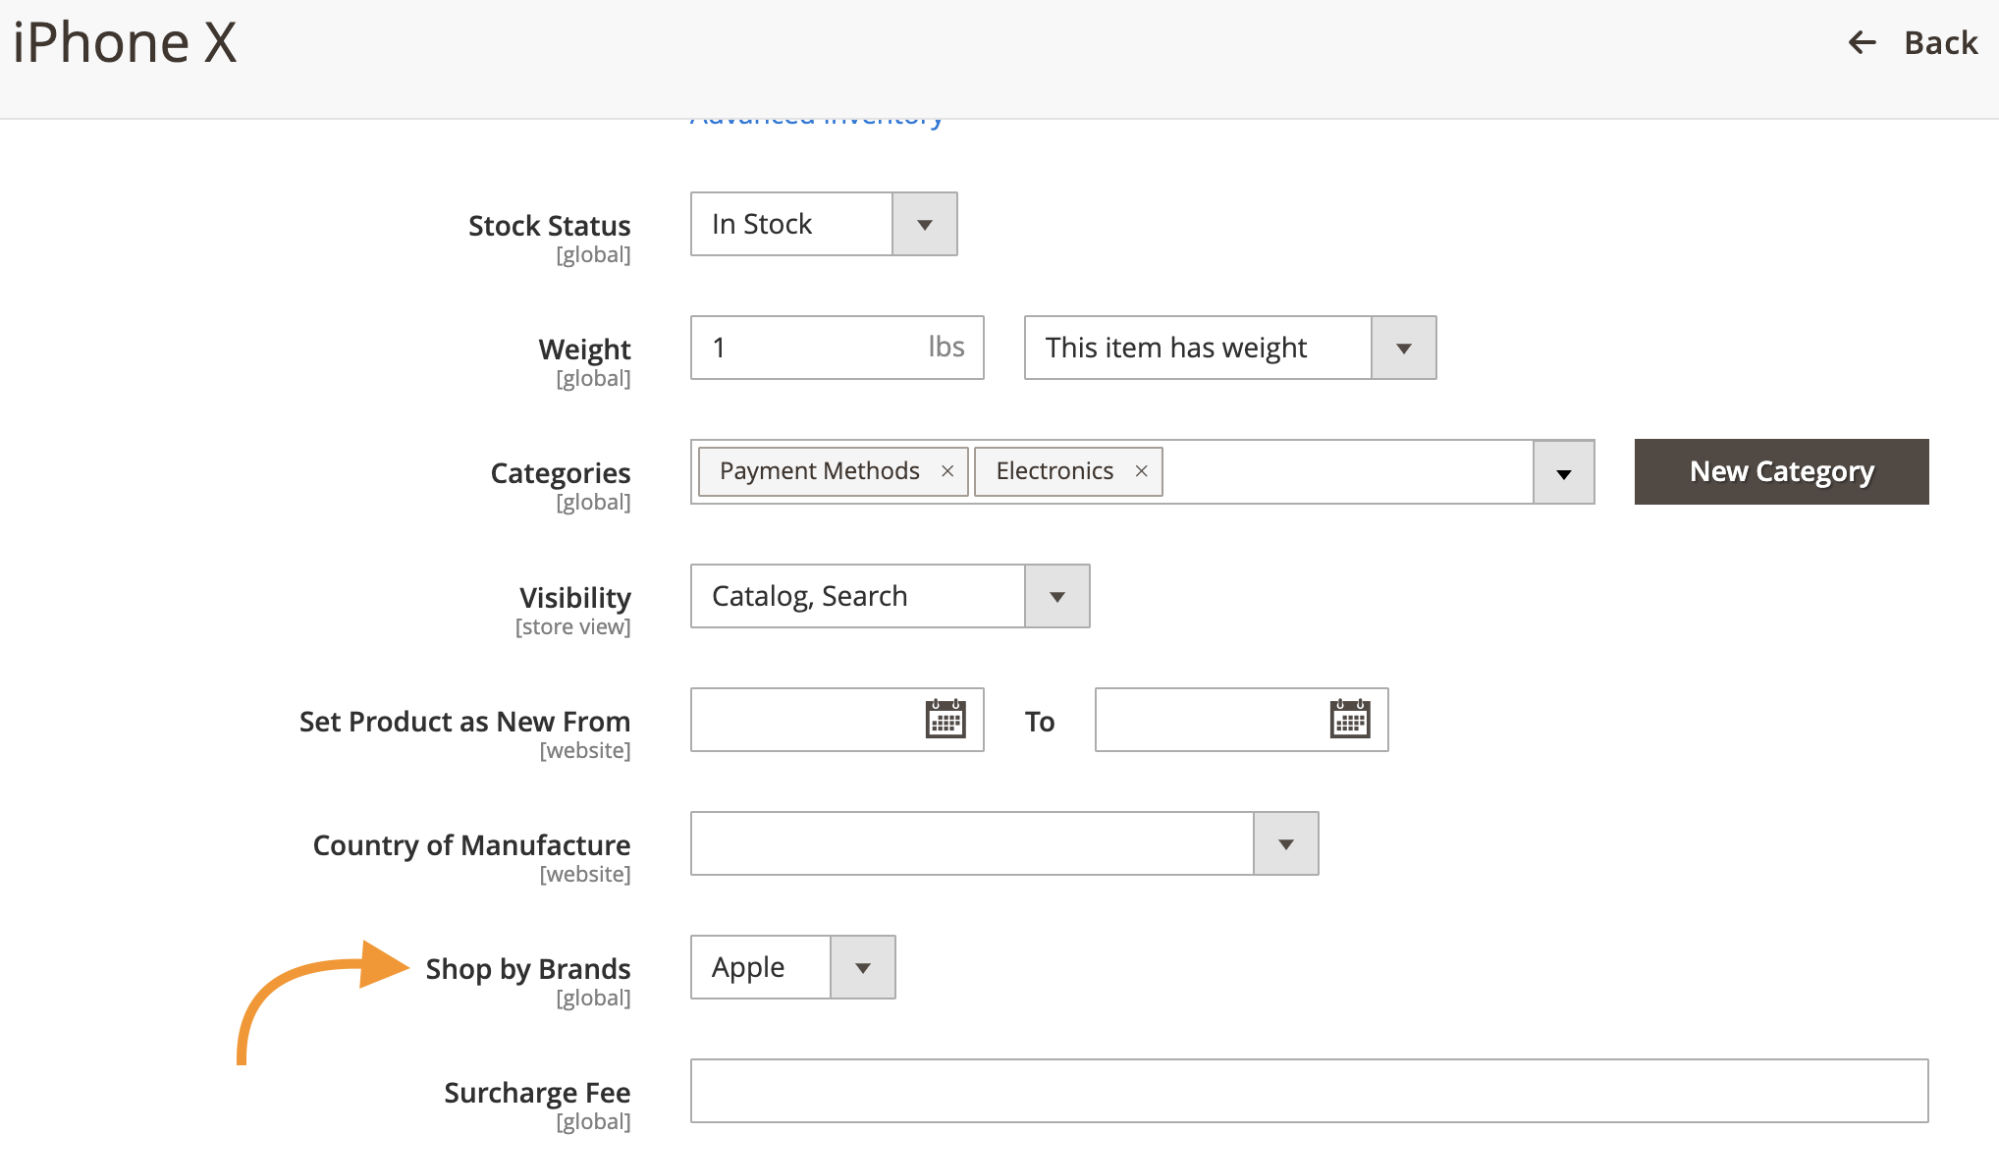
After creating and configuring your brand attributes, you can easily assign brands to products directly from the product edit page.
Simply navigate to Catalog > Products and click on any product to access its edit page.
You’ll now see the Shop by Brands option, where you can select the appropriate product brand from the list of brands you’ve configured in the Manage Brands section.
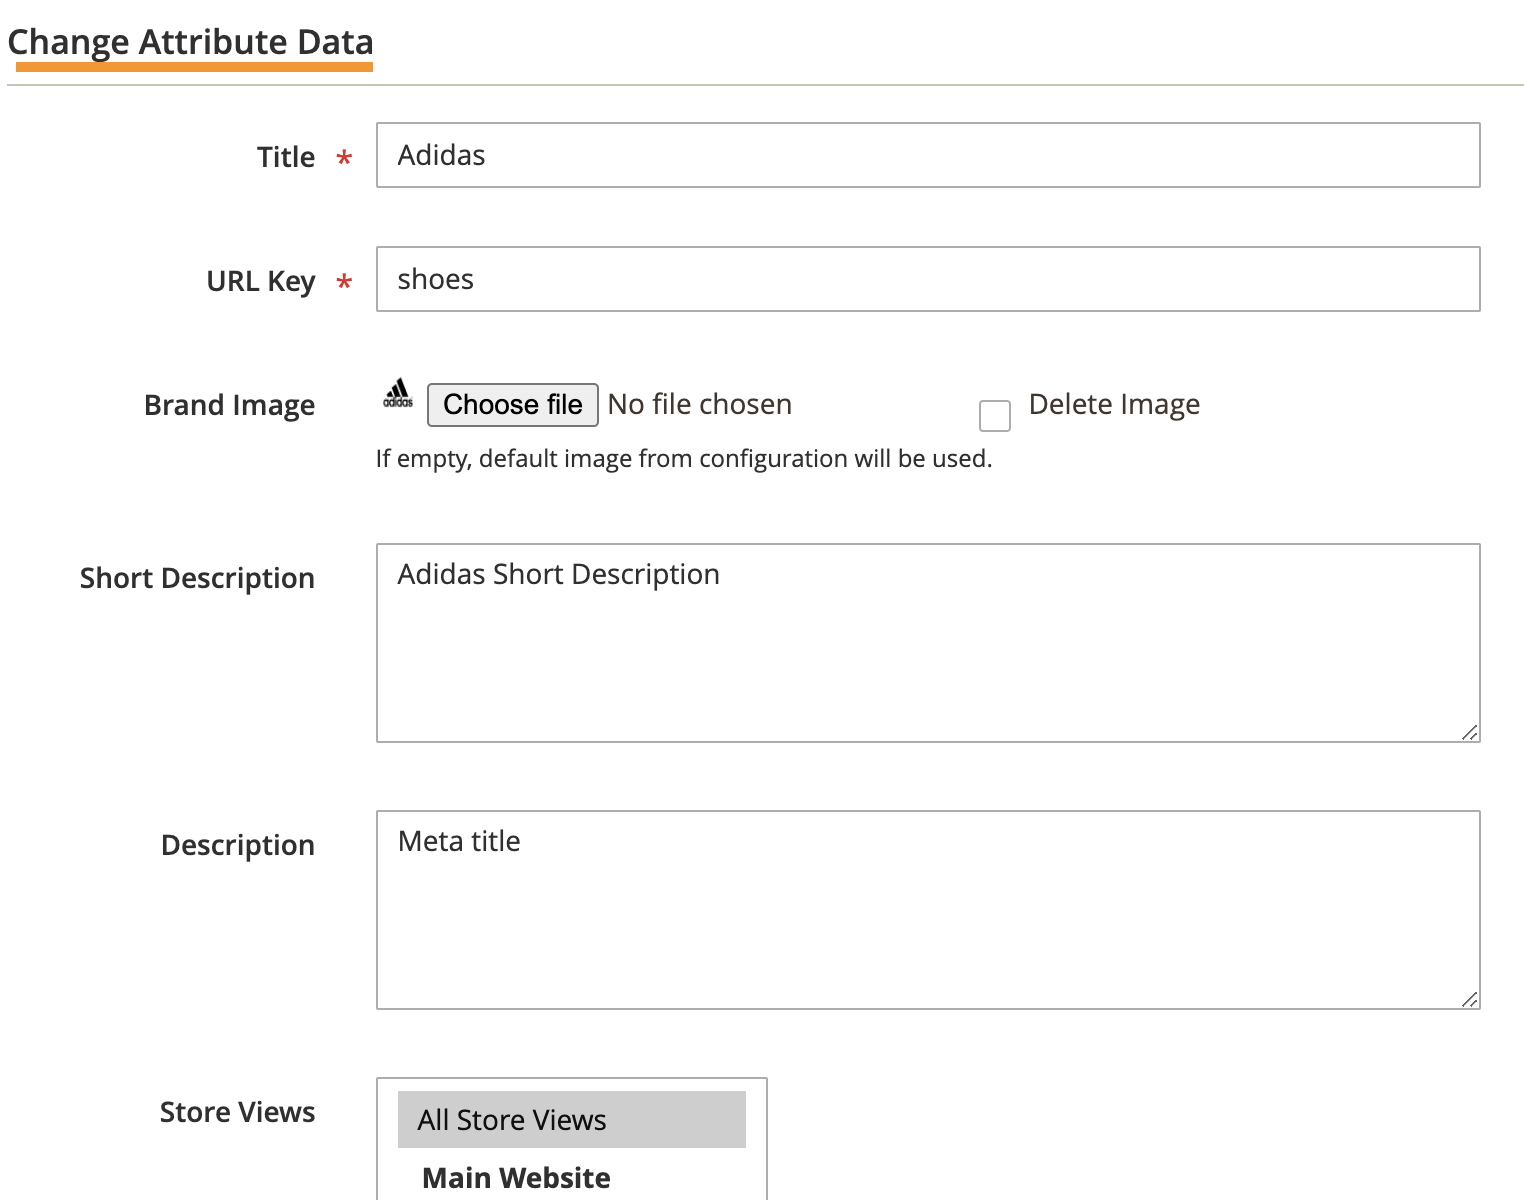
Within the Manage Brands section, you have options to either configure existing brands or add new ones. Simply click on the respective buttons to proceed.
You can configure the following brand-specific details:
- Page Title: Specify the page title for each brand, which will be displayed on the brand’s page. By default, the label set for the respective store will be used.
- URL Key: Enter a URL key for the brand’s page, ensuring it is relevant to the brand.
- Brand Image: Upload an image that represents the brand.
- Featured: Select Yes if you want to mark this brand as featured, making it appear under the featured brand section.
- Short Description: Provide a brief description of the brand.
- Description: Enter a more detailed description of the brand.
- CMS Block: Choose the appropriate CMS block to display on the brand page.
Meta Information
Configure the following meta information to optimize the brand page for search engines:
- Meta Title: Set the meta title for the brand page.
- Meta Keywords: Input relevant keywords that describe the brand.
- Meta Description: Add a meta description to give search engines a summary of the brand page’s content.
Advanced Attribute Properties
Fine-tune the brand attributes with the following advanced settings:
- Attribute Code: Create a unique attribute code without spaces for internal use.
- Scope: Define the attribute’s scope. Select from the dropdown.
- Unique Value: Select Yes if the attribute should have a unique value.
- Add to Column Option: Choose Yes to add this attribute as a column in the product grid.
- Use in Filter Options: Select Yes to enable this attribute for filtering products in the product grid.
Step 7: Select Brand on the Product Edit Page
Once you’ve created and configured the brand attributes, assigning brands to products is straightforward, just follow these steps –
- Navigate to Catalog > Products and select any product to open its edit page.
- On this page, you’ll find the Shop by Brands option, where you can easily assign a brand to the product from the list of brands you configured in the Manage Brands section.
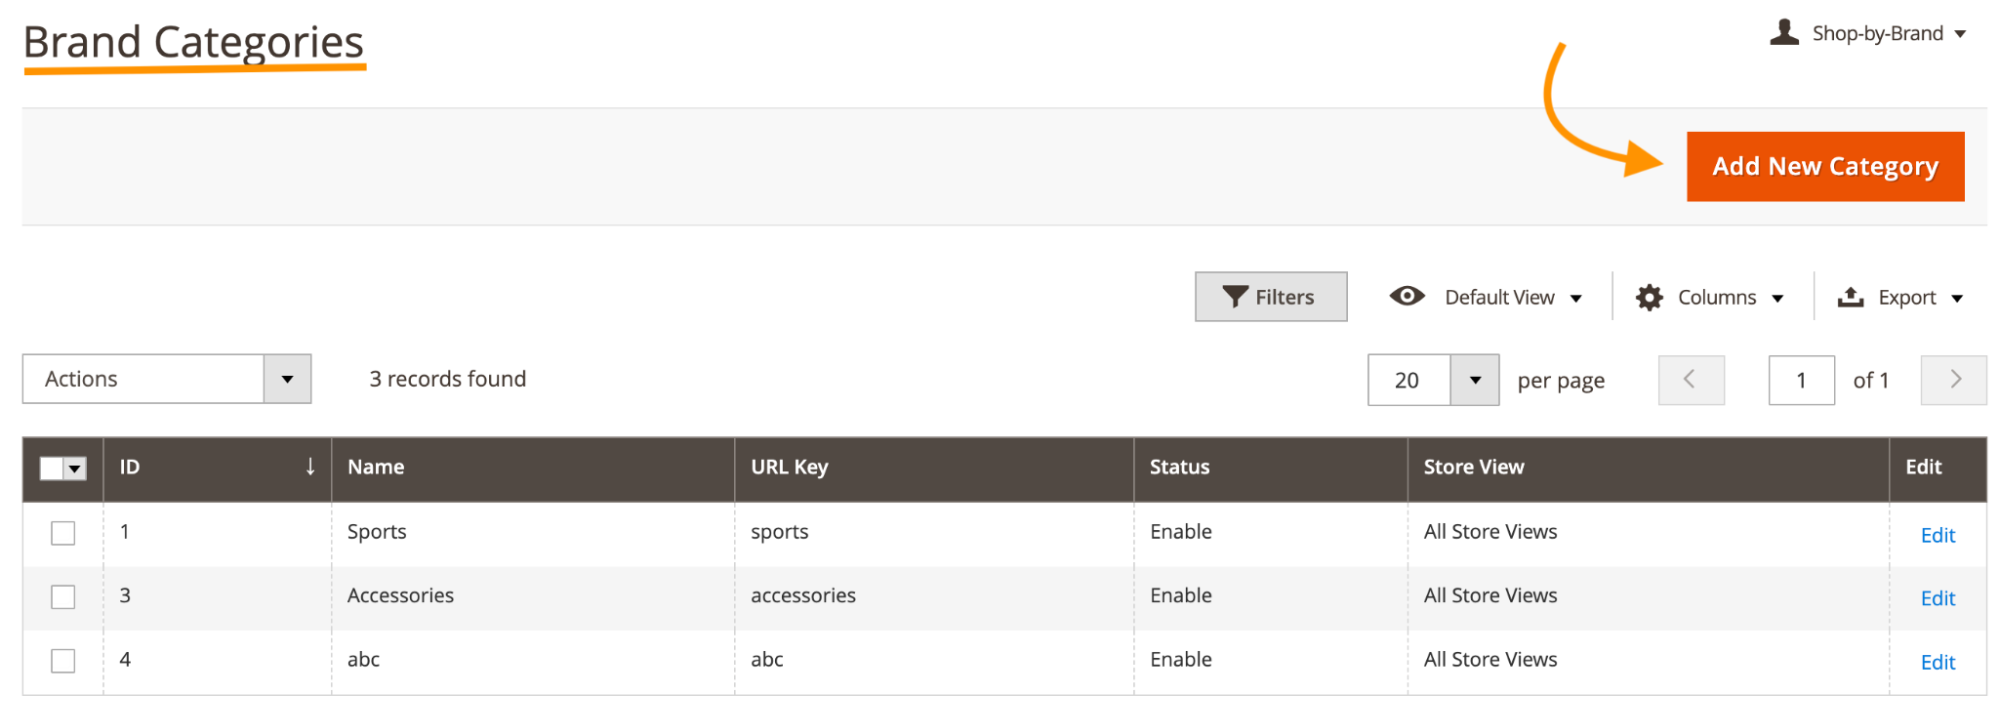
Step 8: Add Categories & Brand Widget
To manage brand categories, go to Catalog > Shop by Brand > Categories. Here, you’ll see a comprehensive list of all brand categories along with pertinent details displayed in a single grid.
To add a new brand category, click on the Add New Category button located in the top right corner.
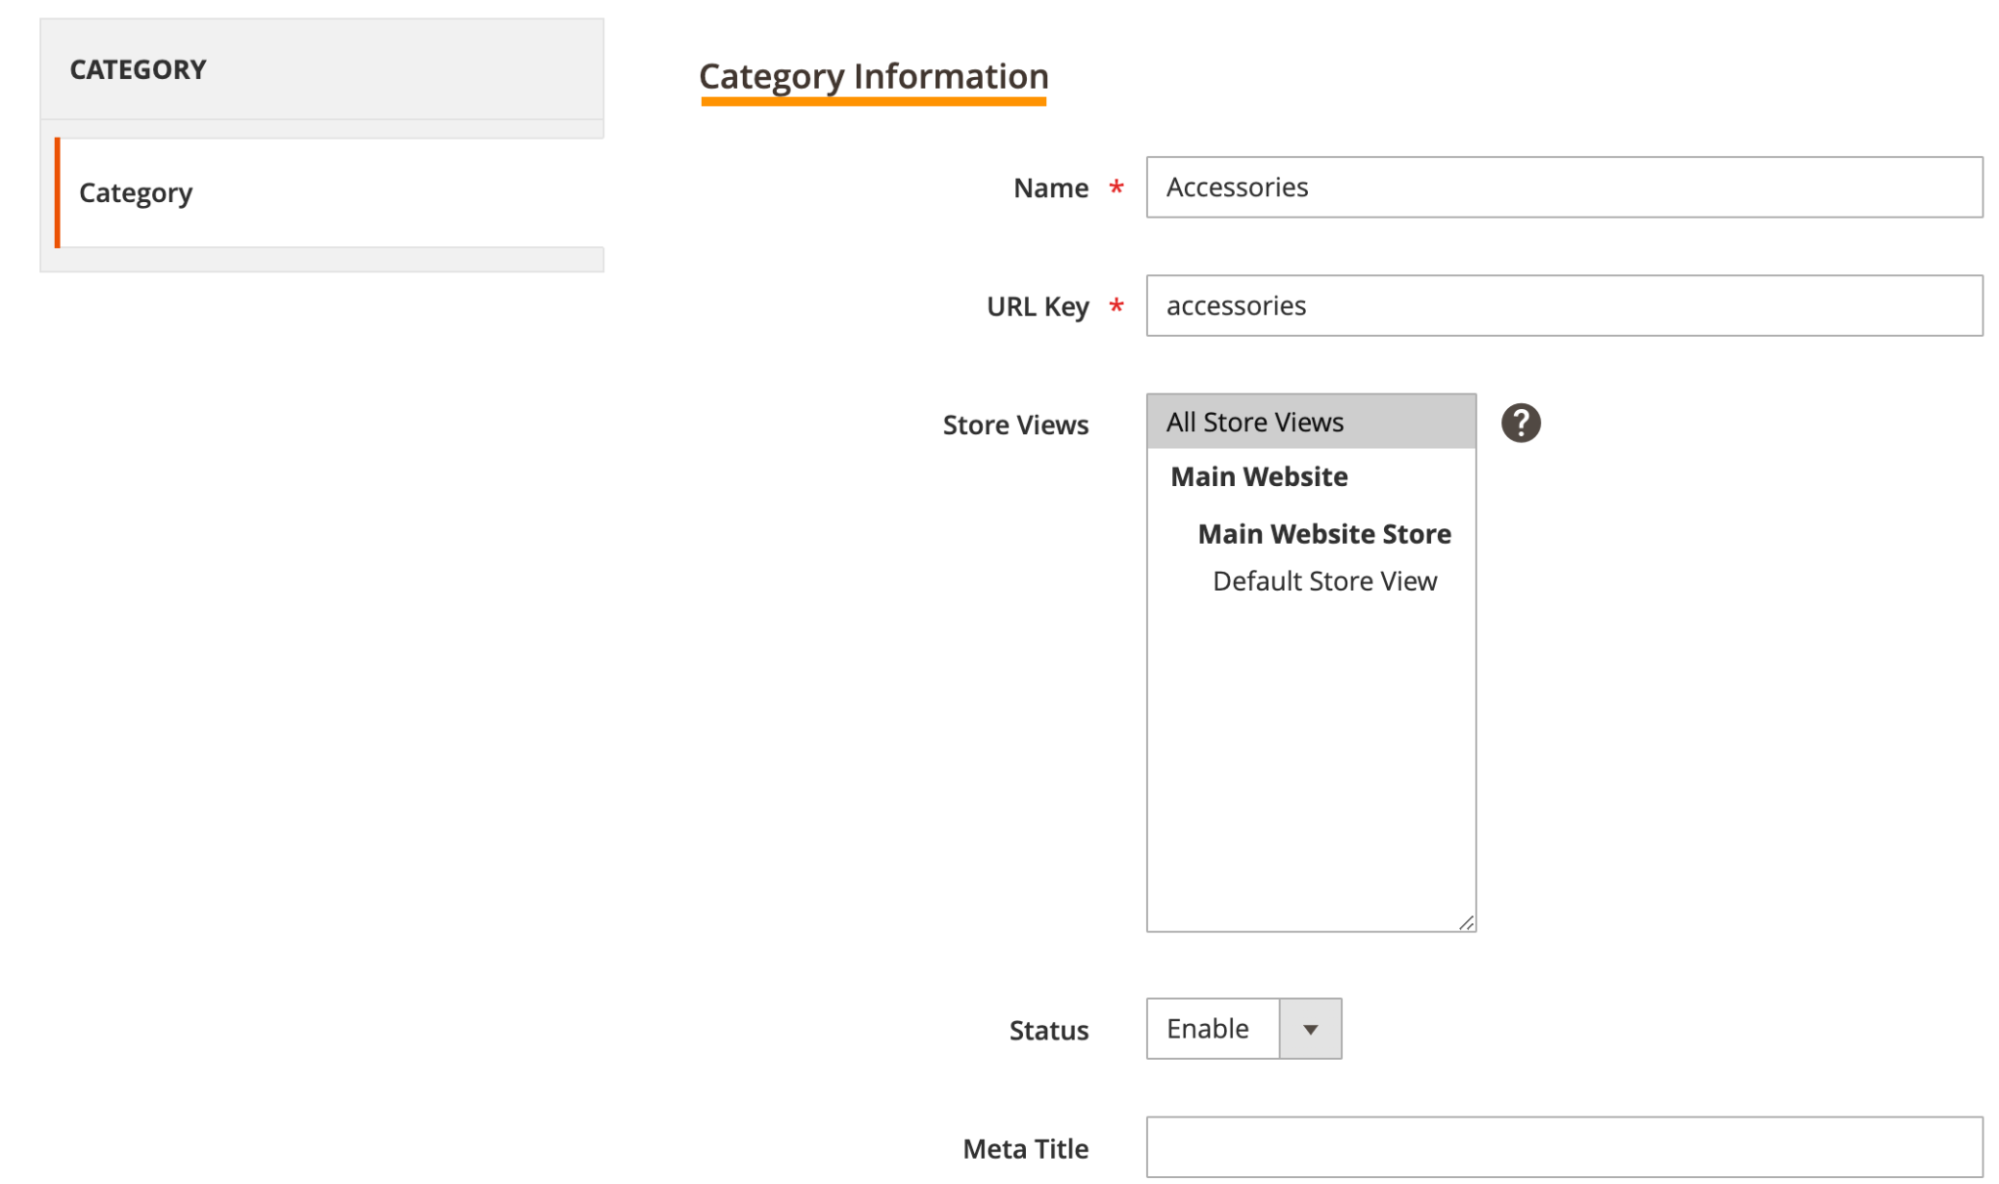
Category Configuration –
You can configure a brand category with the following options:
- Name: Enter the name of the brand category.
- URL Key: Set a URL key for the brand category.
- Store Views: Select the store views where the brand category will be applicable.
- Status: Enable or disable the brand category.
- Meta Title: Provide a meta title for the brand category page.
- Meta Keywords: Enter meta keywords that describe the brand category page.
- Meta Description: Add a meta description to summarize the content of the brand category page.
- Meta Robots: Choose the Meta Robots setting for the brand category page.
Manage Brands
Assign brands to the category and select the applicable store views from this section.
Shop By Brand Widget
The Shop By Brand extension offers various widgets to display brands across different pages in your Magento store. To view the active widgets, go to Content > Widgets.
To add a new widget, click on the Add Widget button at the top right of the widget grid. Then, select the following:
- Type: Choose the widget type you want to enable on your store. The extension provides three new widgets:
- Meetanshi Brand Category ID Widget
- Meetanshi Brand Option ID Widget
- Meetanshi Featured Brand Widget
- Design Theme: Select the Magento design theme you want to apply.
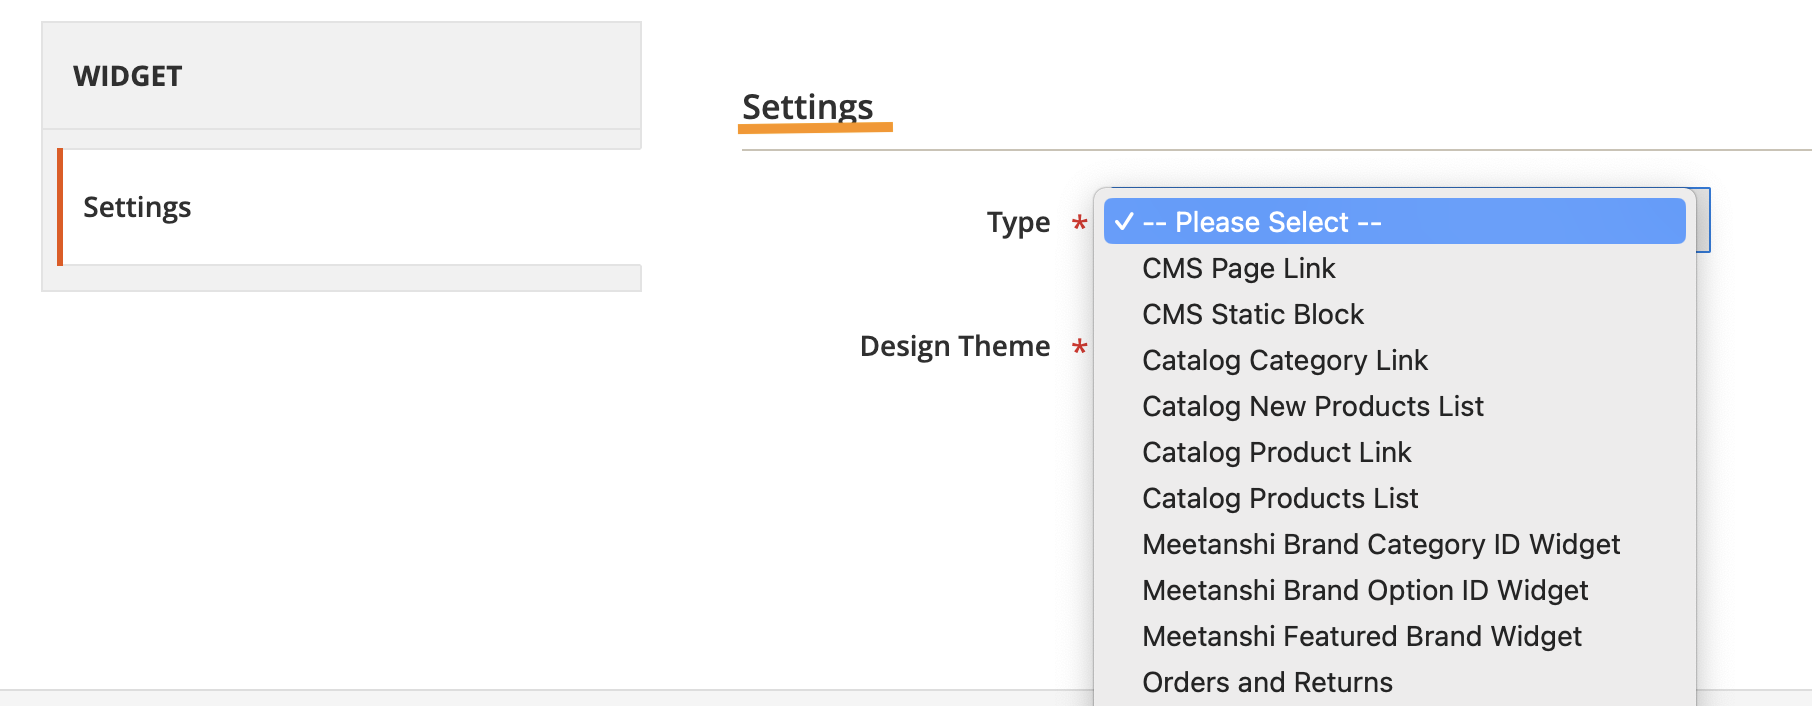
After selecting the widget type and design theme, click on Continue to configure the selected widget.
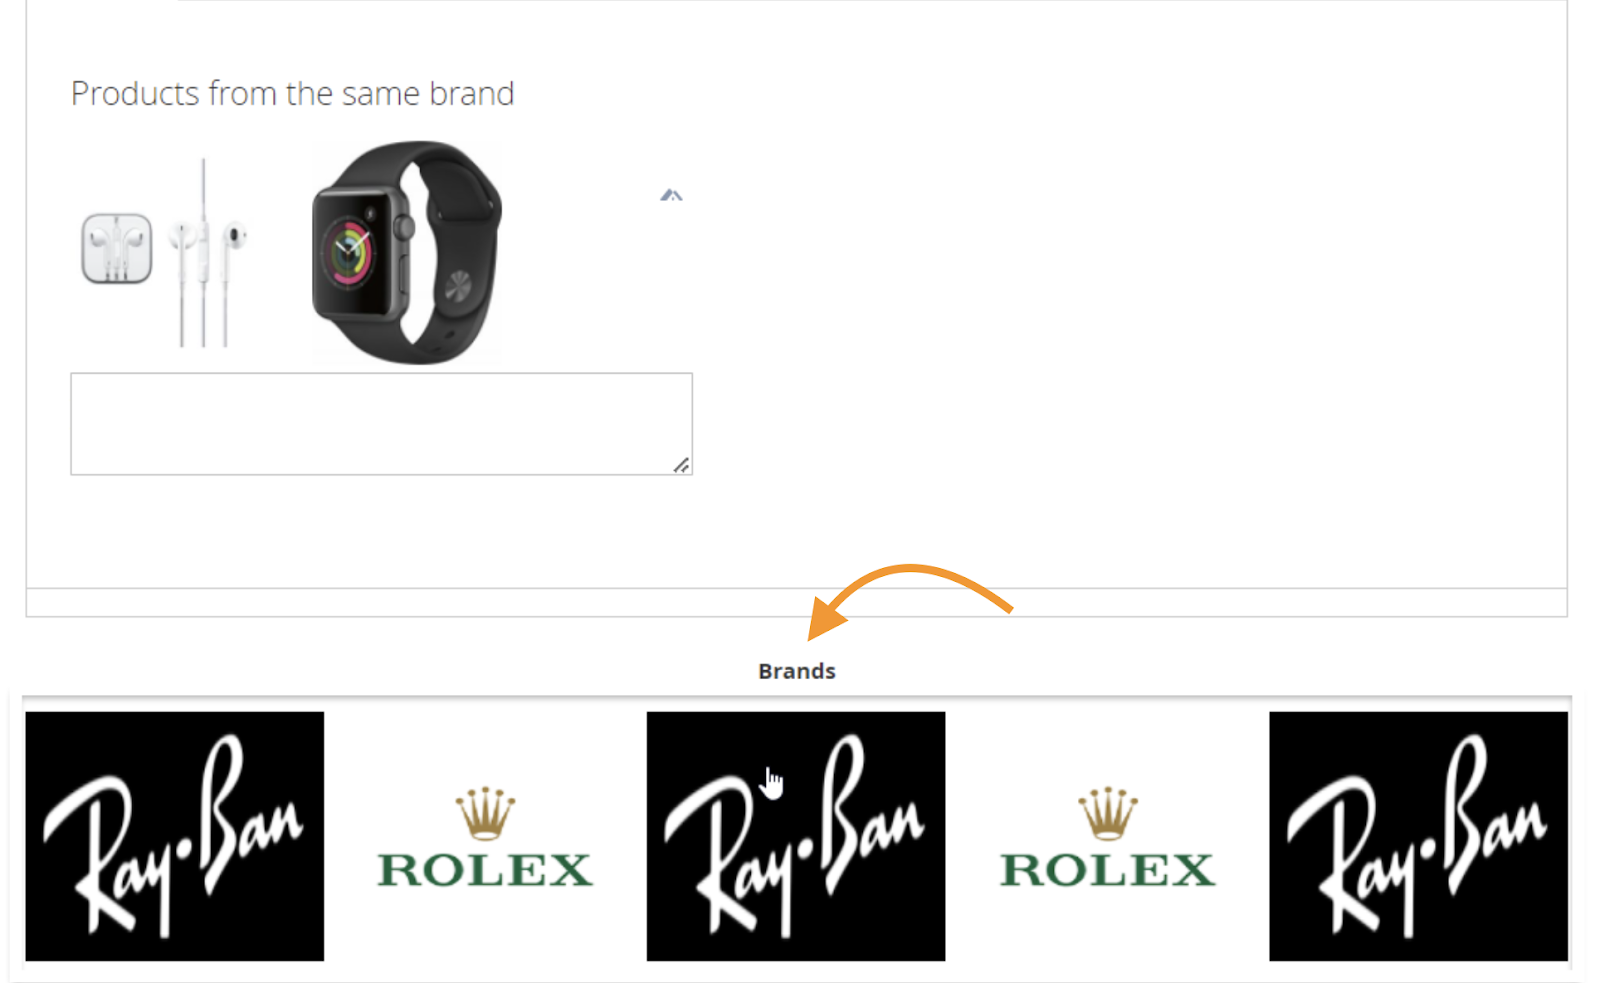
Step 9: Show Shop By Brand in Frontend
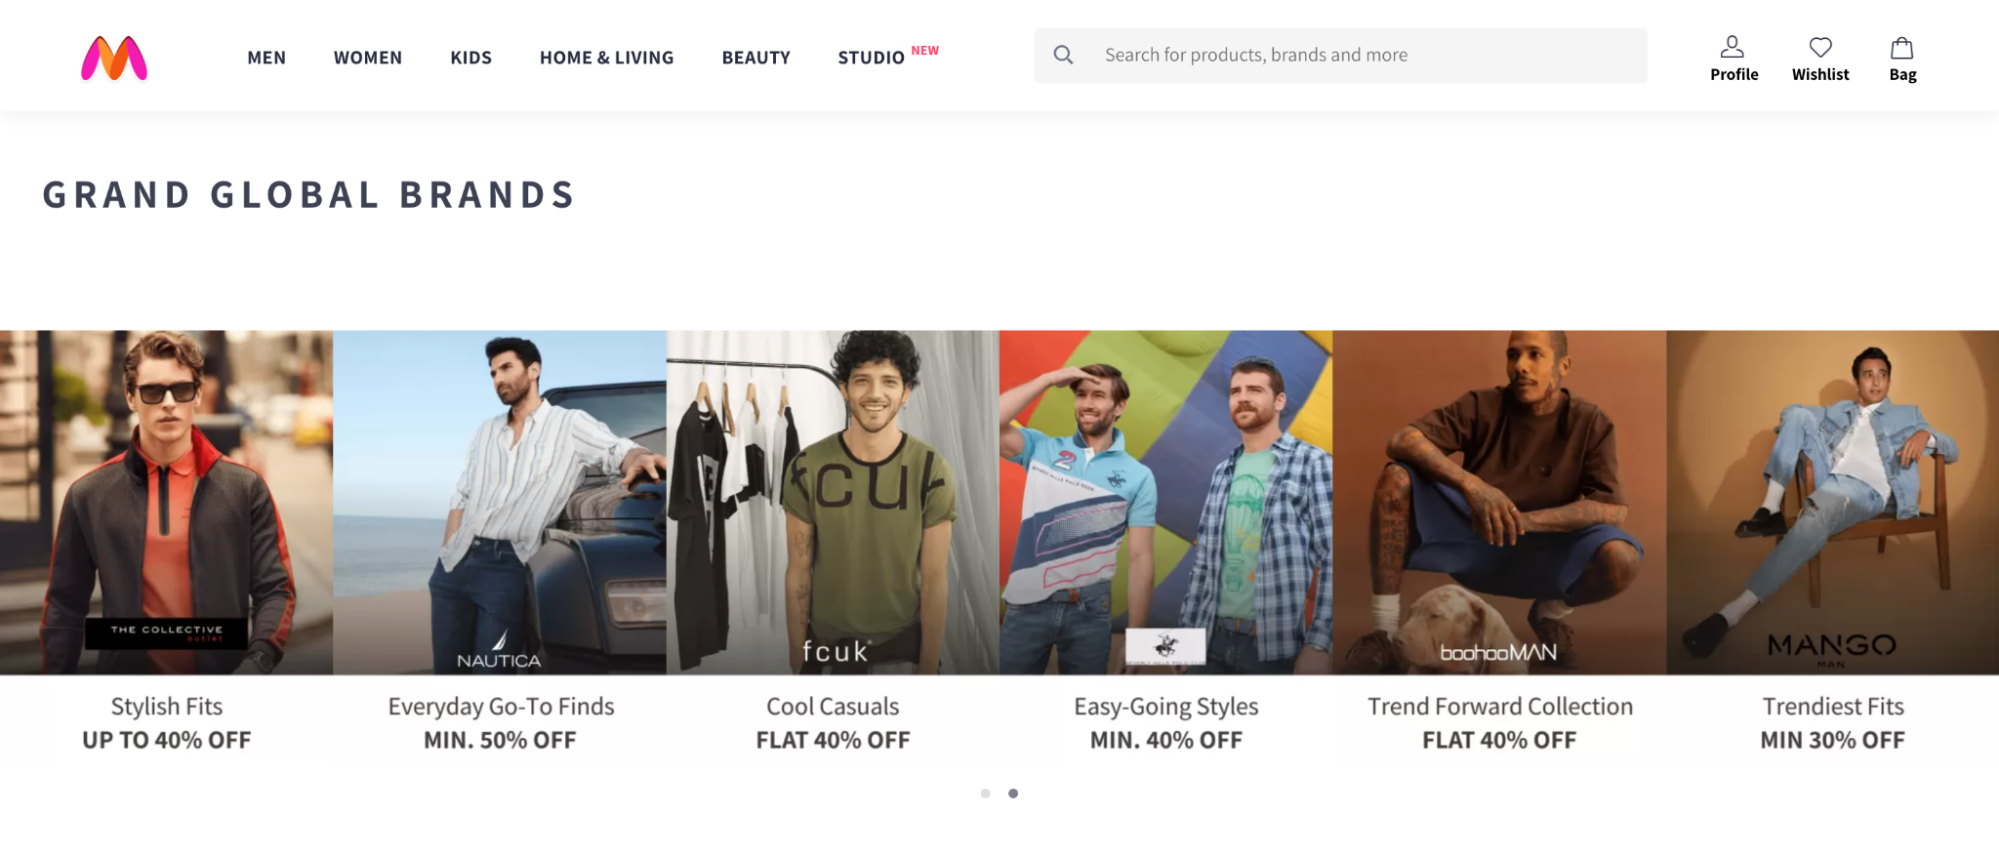
The shop by brand is displayed on the front end as per the configurations set in the backend.
Boost Sales by Catering to Brand-loyal Customers
The Shop by Brand functionality in your Magento 2 store can significantly impact repurchase rates and build trust in your store. By showcasing brands on your website, you can attract customers seeking brand credibility and recognition, fostering strong customer loyalty.
The Magento 2 Shop by Brand extension by Meetanshi is an easy solution for adding search-by-brand functionality to your online store, allowing you to leverage the benefits of shopping by brands and ultimately driving more sales and customer satisfaction.