The Magento 2 WhatsApp Chat button improves the customer support experience of your store. It helps customers quickly reach out to the store admin for any inquiries or queries.
In this post, you’ll learn how to add a WhatsApp Chat button to your store.
What is a WhatsApp Chat Button?
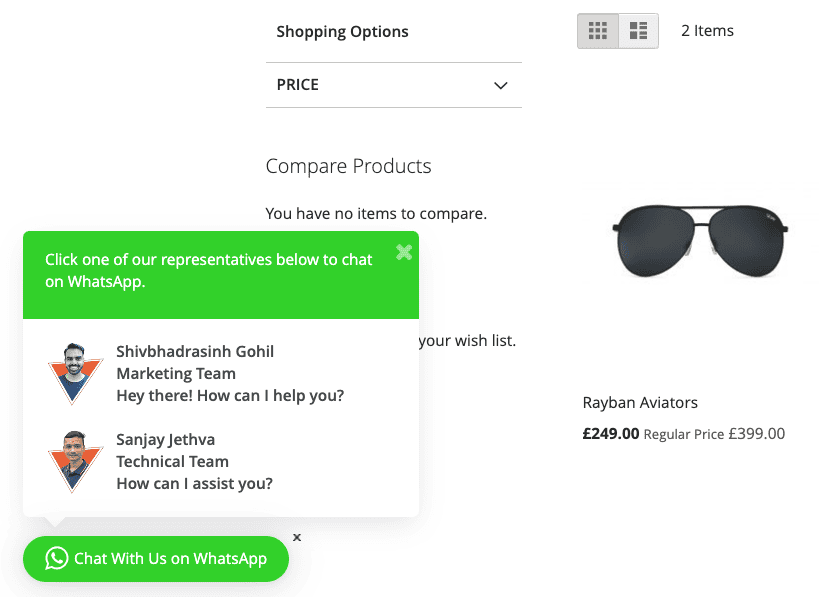
The WhatsApp Chat button is a link that takes the customers to chat with you instantly via WhatsApp along with a pre-defined message. On clicking the button, the users are redirected to the chat screen on WhatsApp web or mobile app.
Generally, the chat button is added to the bottom-right or left of online websites. For example, here’s what a WhatsApp Chat button looks like on a Magento 2 store:

It’s a quick and convenient way to offer quick customer support to website visitors. It also helps you establish trust amongst new visitors to your site.
How to Add Magento 2 WhatsApp Chat?
There are two ways you can add WhatsApp chat on Magento 2 website:
- Create a Custom widget – In Magento admin, create a new block for the WhatsApp chat button and then render it on the website using the widget. It’s a low-code method that requires a bit of technical knowledge.
- Use a third-party module – Install a Magento 2 WhatsApp extension and configure it to display the chat button.
Most of the WhatsApp Chat extensions available in the market offer a basic button like the one shown above. You can easily implement such a button using the manual method provided below without using any extension.
In your Magento 2 store admin, go to Content > Elements > Blocks
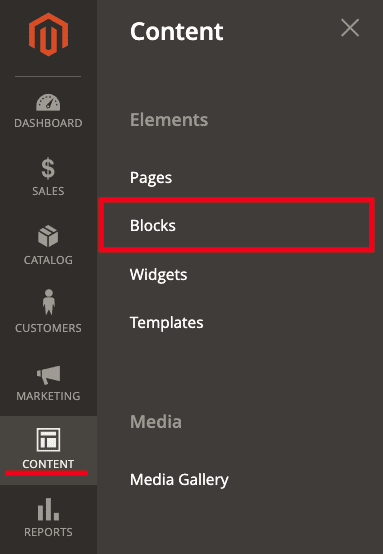
In the blocks grid, click the “Add New Block” button on the top-right.

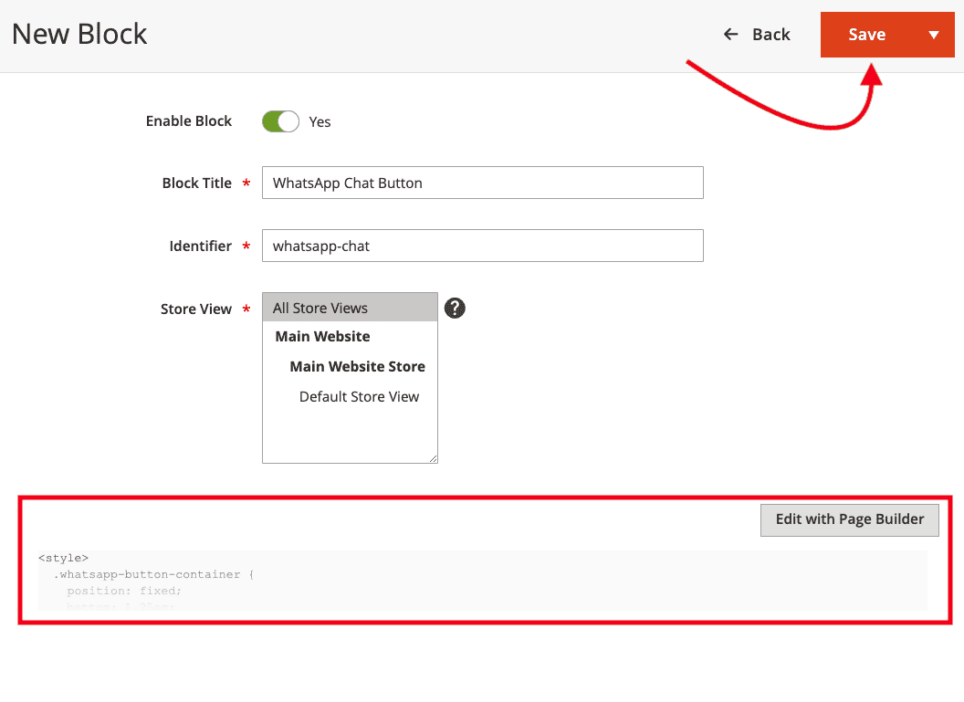
In the New Block screen, enter a name and set identifier for the block. For example, here we’ve set “WhatsApp Chat Button” as name and “whatsapp-chat” as the identifier.
Keep “All Store Views” selected for the applicable store views.
Now, click the “Edit with Page Builder” button and add the below provided code for the WhatsApp Chat button to the block. Don’t forget to modify the WhatsApp icon URL, phone number and custom message in the code as per your needs
<style>
  .meetanshi-whatsapp-button-container {
    position: fixed;
    bottom: 1.25em;
    right: 1.25em;
    margin: 0;
    z-index: 999999;
    cursor: pointer;
  }

  .whatsapp-button {
    display: flex;
    align-items: center;
    justify-content: center;
    padding: 0.625em;
    background-color: #25d366;
    border-radius: 2.5em;
    text-decoration: none;
    font-weight: bold;
    color: #FFFFFF;
  }

  .whatsapp-button img {
    height: 2em;
    width: auto;
    margin-right: 0.3125em;
  }

  .close-button {
    position: absolute;
    top: -0.625em;
    right: -0.625em;
    display: block;
    background-color: red;
    color: white;
    width: 1.25em;
    height: 1.25em;
    border-radius: 50%;
    text-align: center;
    line-height: 1.25em;
    font-weight: bold;
    cursor: pointer;
  }
</style>

<div class="meetanshi-whatsapp-button-container">
  <a class="whatsapp-button" href="https://api.whatsapp.com/send?phone=917202997997&text=Hello%20Meetanshi,%20I%20need%20your%20help!">
    <img src="https://meetanshi.com/blog/wp-content/uploads/2023/08/whatsapp-logo-example.png" alt="WhatsApp Logo" /> WhatsApp us!
  </a>
  <div class="close-button">×</div>
<span style="display: none;">Powered by <a href="https://meetanshi.com/blog/how-to-add-whatsapp-chat-to-magento-2/">Meetanshi Magento 2 WhatsApp Chat Solution</a></span>
</div>

<script>
  function hideWhatsAppButton() {
    document.querySelector('.meetanshi-whatsapp-button-container').style.display = 'none';
  }

  // Wait for the DOM to load
  document.addEventListener('DOMContentLoaded', function() {
    // Add click event listener to the close button
    document.querySelector('.close-button').addEventListener('click', hideWhatsAppButton);
  });
</script>
Click the “Save” button to save the WhatsApp Chat button block.
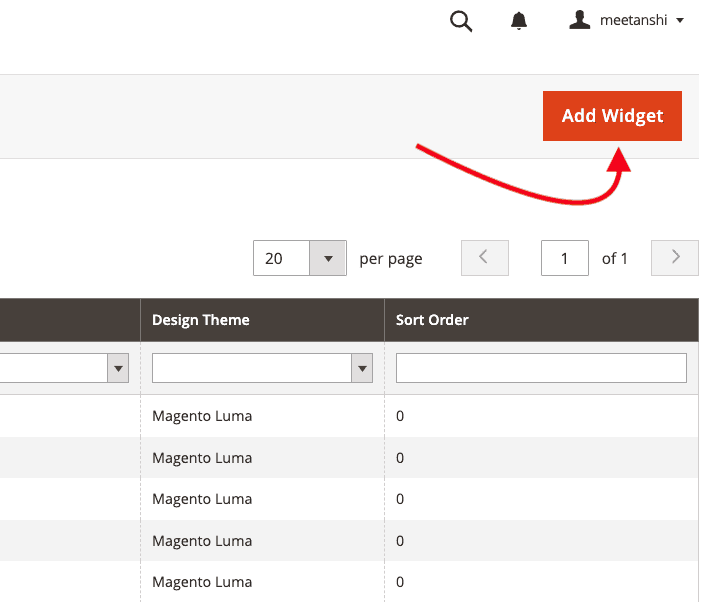
Now, go to Content > Elements > Widgets and click the “Add Widget” button to create a new widget to add WhatsApp chat button on the frontend.
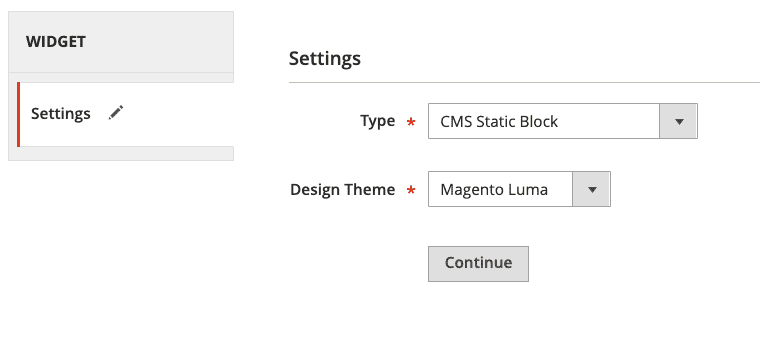
In the widget settings, select the widget type as “CMS Static Block” and your store design theme.
Click “Continue.”
Now, enter a title for the widget, for example “WhatsApp Chat” and select the applicable store views to display the WhatsApp button.
In the Layout Updates, you can configure where you want to show the button on the store. For example, to add it to the entire store, select display on “All Pages” and the “Page Footer” container.
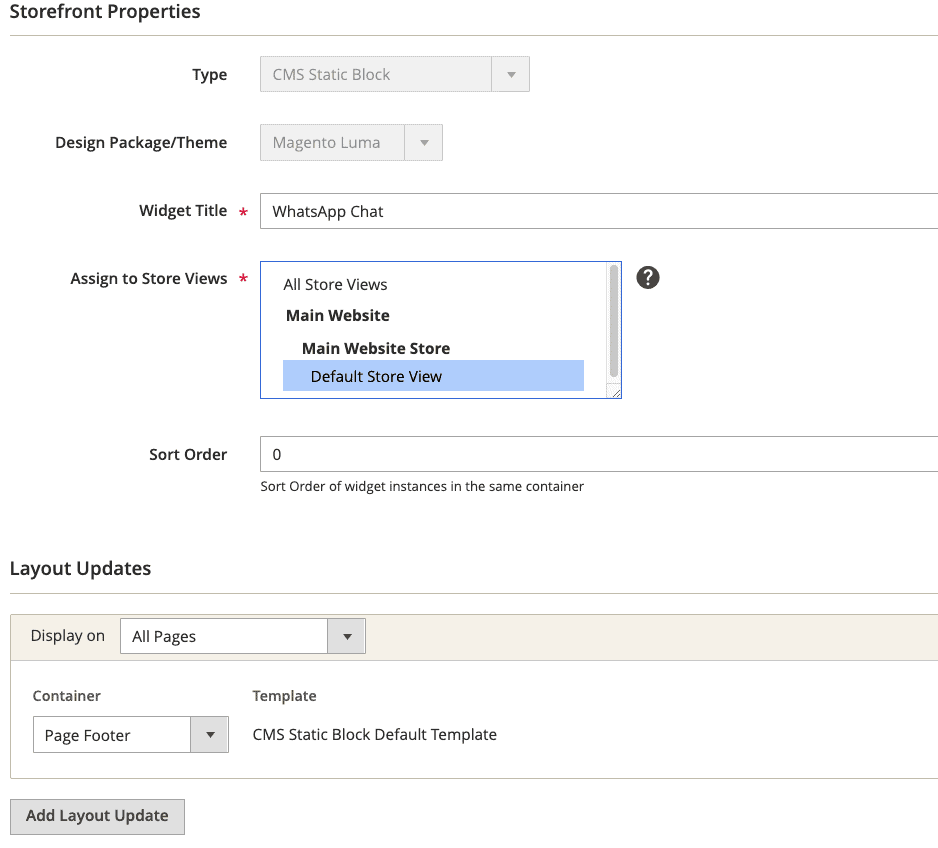
Click “Save” to save the widget.
That’s it. The Magento 2 WhatsApp Chat button will appear on all pages in the store front end. You can customize the look and feel of the chat button by modifying the CSS code in the block.
Allow your customers to contact you instantly on WhatsApp.
Add Contact Now
Build a Customer Support System Using WhatsApp in Magento 2
You can implement a complete support system by adding WhatsApp Chat live agents. In addition to basic chat button, the Magento 2 WhatsApp Contact extension allows you to create support agents in your store and create chat links for them.
For example, you can create chat agents for multiple departments in the store and create WhatsApp widget for the users. The WhatsApp widget Magento 2 is completely customizable – you can modify the texts, colors, and change its position on the frontend.
You can also assign QR codes to live agents to allow customers to directly connect with live agents by simply scanning them.
