When shoppers land on a broken link, a well-designed 404 page can guide them back. This blog will help you create a Shopify 404 page using an app that gives you complete customization flexibility.
Why Create a Custom 404 Page?
Shopify by default adds a 404 page template in your store, which you can access from the template list in your theme code editing settings.
But here, the template has an extremely basic setting that leaves your shoppers more clueless than ever.

Shopify default 404 page template
A thoughtfully designed 404 allows store owners to guide lost visitors back to useful areas of the site, such as popular collections or the homepage, reducing frustration and bounce rates.
Here, you can either customize the entire template code or add a polished 404-page section alongside other storefront sections.
| Pointers | Template code | 404-page section |
| Manual efforts | High | Low |
| Coding skills | Needed | Not needed |
| Integration time | Time-consuming | Quick |
Instead of purchasing an expensive 404 page app, you can use our app to easily add a 404 page section, delivering stronger value with a single, versatile solution.
How to Create a Shopify 404 Custom Page?
The smart solution is to use MIT Sections Pro as it offers a ready-made, lightweight 404 section that you can directly integrate into your Shopify theme. It has an option to add an image as well.
This is how engaging it will look compared to the default one.

Let’s see the app working.
Step 1: Find the 404 Section
Firstly, install the MIT Sections Pro from the Shopify App Store. From the app dashboard, click the Browse section and search for the 404 section.
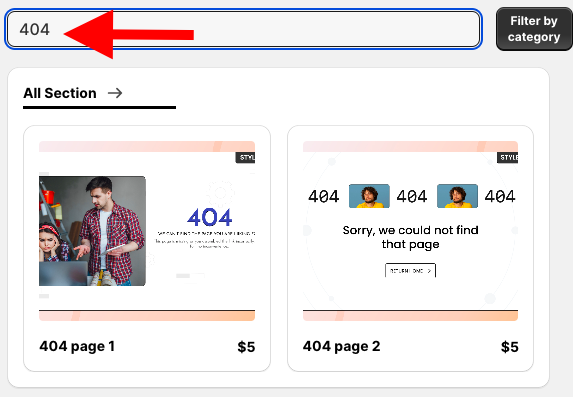
You can choose whichever align with your store. Here we will purchase the 404 page 1. Click the Buy now button after selecting the section of your choice and complete the payment process.
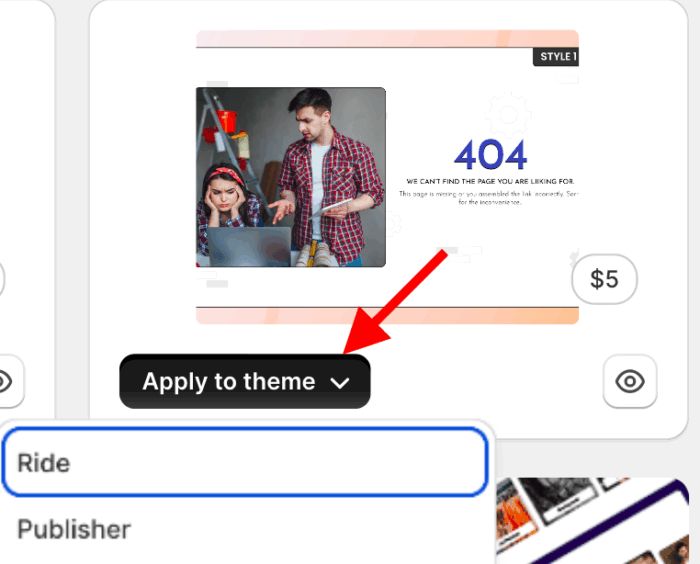
Then, back on the app dashboard, click My sections. Look for the purchased section, click Apply to theme, and select the theme you want to apply the section to.
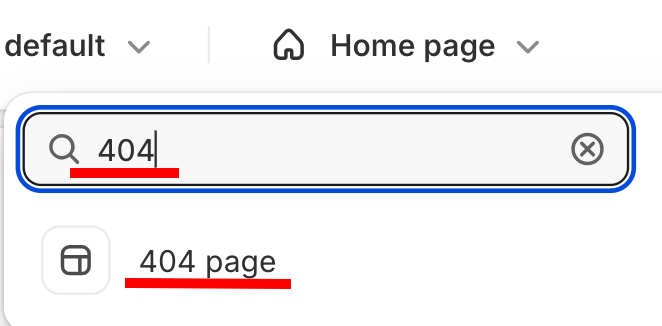
Now, click on Customize theme and select the Shopify theme from the dropdown. It will redirect you to the theme editor. From the top dropdown menu in your theme editor, search for the 404 page and select it to add a section.
Then, from the left sidebar, click Add section and select Meetanshi 404: 01

Step 2: Customize the 404 Page
After selecting the section, click Meetanshi 404:01 to expand the customization settings. You get many extra options to edit compared to the default one.

Step 3: Preview the Changes
Once done making the changes, click Save. Preview the changes in the frontend, and this is how fine it will look.

A good 404 page communicates to the shoppers that they have landed on the wrong page and directs them with the next action they must take to continue their navigation within your store.
Fixing 404 errors in Shopify not only helps shoppers but also search engines to properly crawl important pages in your store.
Customize Your 404 Page Today!
Using the methods mentioned here, you can start creating a Shopify 404 page.
To style a more engaging and stunning section like this, it is best to use the MIT Sections Pro app, which provides 130+ ready-to-use sections and is super flexible.
You can install the app and many sections for free and even get a free trial of all the templates before making the purchase. Plus, we don’t lock your access anywhere; you can customize it and use it anywhere in your Shopify theme.
Your all-in-one solution to create a professional Shopify store
Install App Now