If you’re wondering how to create a Shopify timeline section, the process is simple.
You can set it up with multiple methods; here, we will discuss two of them. First, let us start with understanding the Shopify timeline.
What is the Shopify Timeline?
A Shopify timeline is a visual way to share your brand’s story with customers. It’s a section on your website that shows key events and achievements in chronological order. This helps customers connect with your brand on a more personal level by showing them your journey from the beginning to the present day.
You can use it to highlight events like when your company was founded, when you launched a new product line, or when you reached a significant milestone.
Ways to Add Shopify History Timeline
There are mainly three options available to add this feature to your Shopify store.
In-built feature – Some Shopify themes offer a built-in timeline section that allows you to showcase your brand’s key milestones or product journey with limited functionalities. These are easy to add and configure without coding.
Custom code – You can create a custom timeline section using Shopify Liquid, HTML, and CSS if you want full design control. This method requires technical knowledge and plenty of time to integrate the timeline, but it offers flexibility to match branding and layout exactly.
Even features like a Shopify Click-to-Call button can be implemented manually with Liquid and JavaScript.
Shopify app – Shopify apps offer user-friendly editors for adding, editing, and reordering events. They provide pre-designed templates, customizable styles, responsive layouts, and advanced features like animations, enabling quick creation of professional timelines without coding.
Here, we will discuss the custom code and Shopify app method in detail.
Method 1: Directly Add Shopify Timeline Section Using an App
Using the free MIT Sections Pro app, you can add a tremendous, readymade timeline section to your Shopify store, which looks something like this.
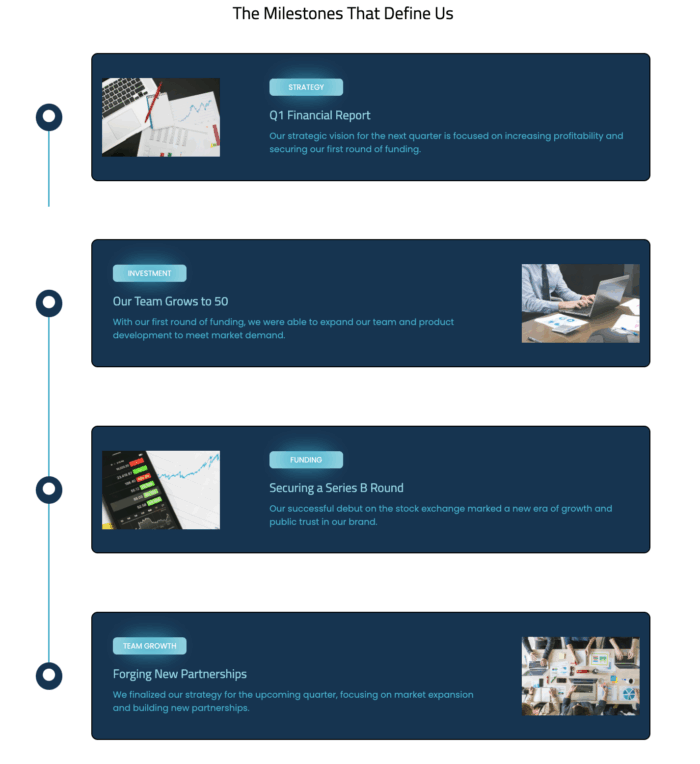
Our app goes beyond the basic, built-in sections; we offer various designs for sections with different customization options and easy-to-use features, so you can blend the sections as you want and give them a touch of your brand.
Let’s understand the config of the app.
Step 1: Find the Timeline Section
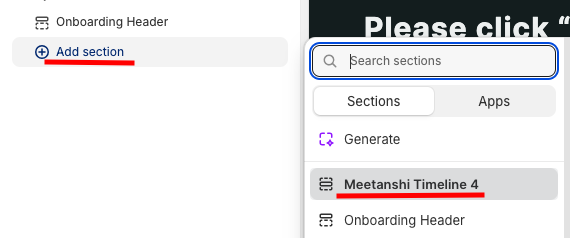
First, install the MIT Sections Pro from the Shopify app store, then from the app dashboard, click Browse sections and search for the Timeline section.
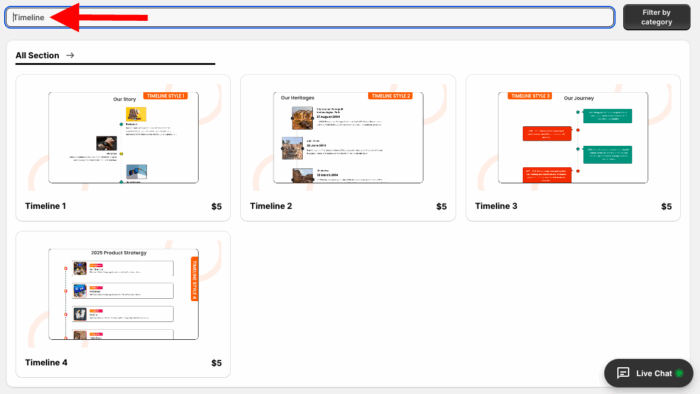
Here, we will move forward with Timeline 4. You can choose whichever fits your store.
Step 2: Click the “Try for Free” Button
Select the section and click Try for Free to get a trial of the section before buying it.
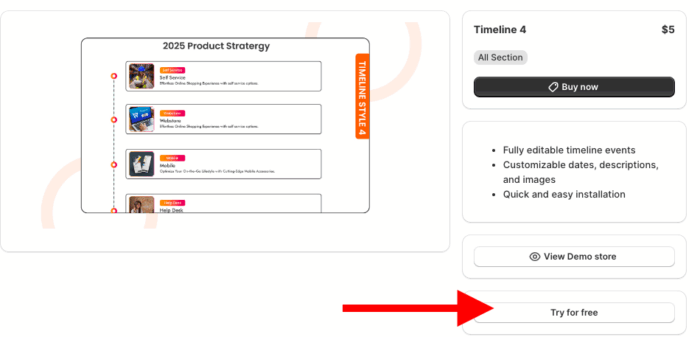
When using a free trial, you will be redirected to the MIT demo store. Once you purchase the section, you will be able to use it in your store.
Then, from here, click the Add section and select Meetanshi Timeline 4.
Step 3: Design the Timeline Section
Here you can find numerous customization options to edit the section and use it as you want.
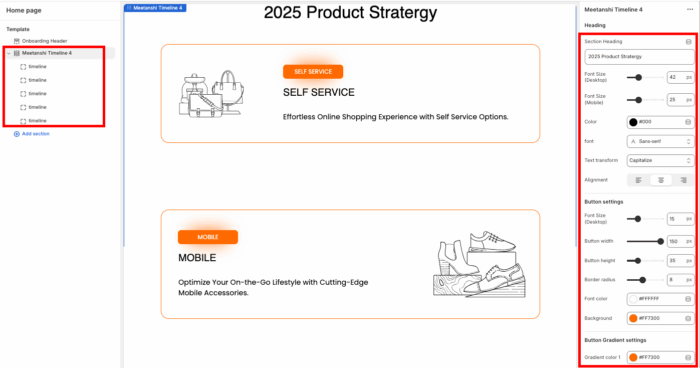
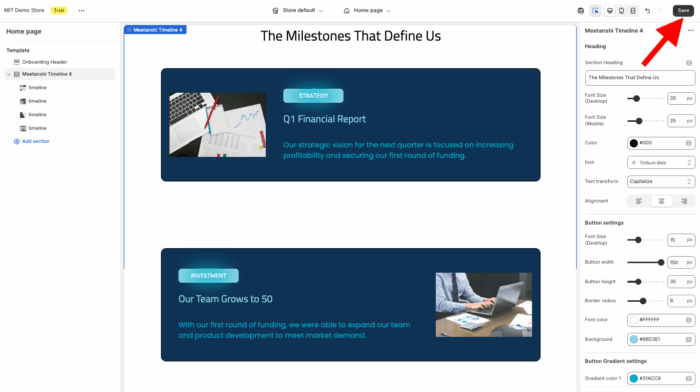
Once done making the changes, save them.
Method 2: Manually Add Shopify Timeline: Steps
You can add a timeline section using custom code by following the steps and code provided below.
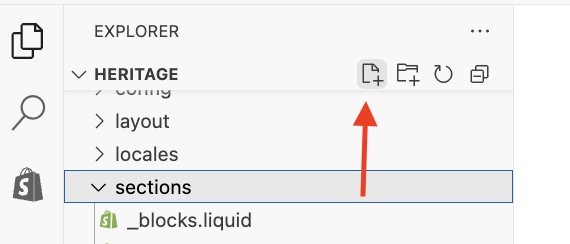
Step 1: Head to the Edit Section
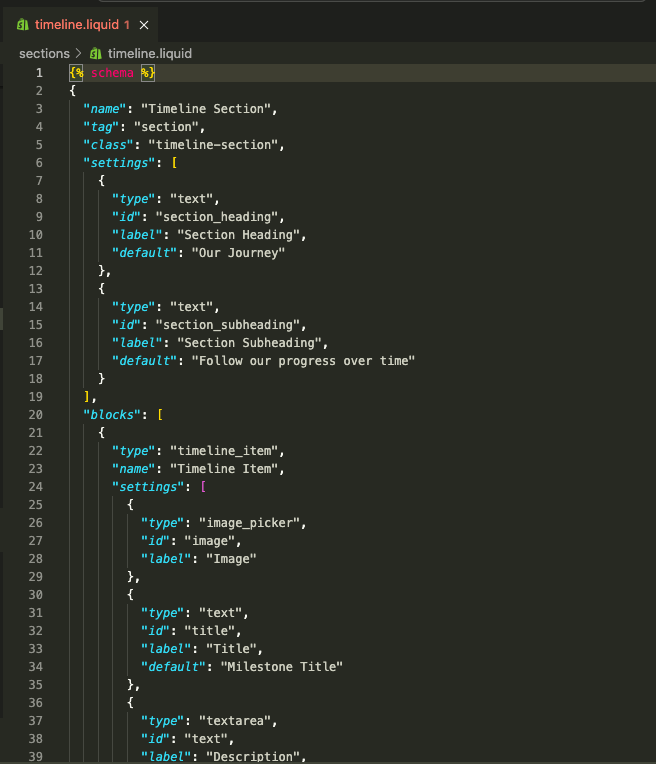
Open your Shopify admin and navigate to Online Store > Themes > …(three dots) > Edit code. Head to the Sections folder and add a new section. Give your new section a name timeline.liquid.
Step 2: Add Timeline Code
Paste the following code into the newly created section and save it.
{% schema %}
{
 "name": "Timeline Section",
 "tag": "section",
 "class": "timeline-section",
 "settings": [
   {
     "type": "text",
     "id": "section_heading",
     "label": "Section Heading",
     "default": "Our Journey"
   },
   {
     "type": "text",
     "id": "section_subheading",
     "label": "Section Subheading",
     "default": "Follow our progress over time"
   }
 ],
 "blocks": [
   {
     "type": "timeline_item",
     "name": "Timeline Item",
     "settings": [
       {
         "type": "image_picker",
         "id": "image",
         "label": "Image"
       },
       {
         "type": "text",
         "id": "title",
         "label": "Title",
         "default": "Milestone Title"
       },
       {
         "type": "textarea",
         "id": "text",
         "label": "Description",
         "default": "This is a description of the milestone."
       }
     ]
   }
 ],
 "presets": [
   {
     "name": "Timeline Section",
     "category": "Custom",
     "blocks": [
       {
         "type": "timeline_item"
       },
       {
         "type": "timeline_item"
       },
       {
         "type": "timeline_item"
       }
     ]
   }
 ]
}
{% endschema %}
{% style %}
.timeline-section {
 padding: 60px 20px;
 background-color: #f9f9f9;
 color: #000; /* Ensures all text inside defaults to black */
}
.timeline-section .section-title {
 text-align: center;
 margin-bottom: 40px;
 color: #000;
}
.timeline-section .section-title h2,
.timeline-section .section-title p {
 color: #000;
}
.timeline {
 position: relative;
 max-width: 900px;
 margin: 0 auto;
}
.timeline::after {
 content: '';
 position: absolute;
 width: 6px;
 background-color: #e0e0e0;
 top: 0;
 bottom: 0;
 left: 50%;
 margin-left: -3px;
}
.timeline-item {
 padding: 20px 40px;
 position: relative;
 background-color: inherit;
 width: 50%;
 color: #000;
}
.timeline-item img {
 max-width: 100%;
 margin-bottom: 10px;
}
.timeline-item.left {
 left: 0;
}
.timeline-item.right {
 left: 50%;
}
.timeline-item::after {
 content: "";
 position: absolute;
 width: 20px;
 height: 20px;
 right: -10px;
 background-color: white;
 border: 4px solid #ff6f61;
 top: 30px;
 border-radius: 50%;
 z-index: 1;
}
.timeline-item.right::after {
 left: -10px;
}
.timeline-content {
 background-color: white;
 padding: 20px;
 border-radius: 6px;
 box-shadow: 0 3px 6px rgba(0,0,0,0.1);
 color: #000; /* Text inside timeline blocks */
}
.timeline-content h3,
.timeline-content p {
 color: #000;
}
@media screen and (max-width: 768px) {
 .timeline::after {
   left: 31px;
 }
 .timeline-item {
   width: 100%;
   padding-left: 70px;
   padding-right: 25px;
 }
 .timeline-item.right {
   left: 0%;
 }
 .timeline-item::after {
   left: 15px;
 }
}
{% endstyle %}
<div class="timeline-section">
 <div class="section-title">
   <h2>{{ section.settings.section_heading }}</h2>
   <p>{{ section.settings.section_subheading }}</p>
 </div>
 <div class="timeline">
   {% for block in section.blocks %}
     {% assign is_even = forloop.index0 | modulo: 2 %}
     <div class="timeline-item {% if is_even == 0 %}left{% else %}right{% endif %}">
       <div class="timeline-content">
         {% if block.settings.image != blank %}
           <img src="{{ block.settings.image | image_url: width: 400 }}" alt="{{ block.settings.title }}">
         {% endif %}
         <h3>{{ block.settings.title }}</h3>
         <p>{{ block.settings.text }}</p>
       </div>
     </div>
   {% endfor %}
 </div>
</div>
Step 3: Show the Code on the Frontend
To display this section in the frontend, we need to add it to the page; for that, navigate to Online store > Themes > Customize.
From the theme editor, click the Add section and select the Timeline section.

Edit it as per your requirements and save it.

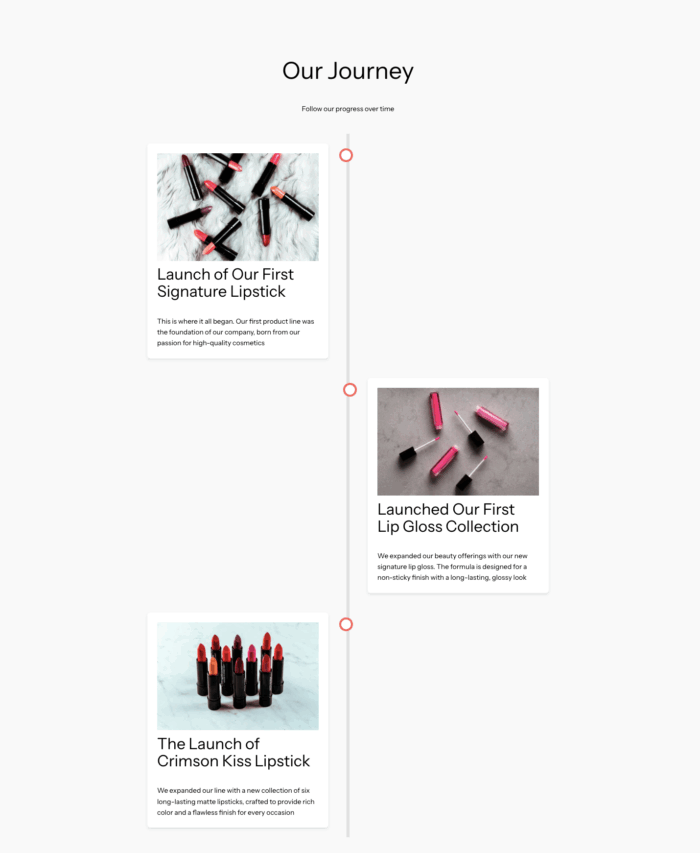
This is how it will look, basic and minimal.
Why Add a Direct Shopify Timeline Section?
With the MIT Sections Pro app, you can easily create a Shopify timeline section without touching any code.
Integrating a Shopify timeline section offers a cost-effective and risk-free solution. The MIT Sections Pro app, available for free installation, provides a budget-friendly timeline section with various templates to choose from.
You can utilize this section repeatedly without any limitations. But choosing custom code can be a bit risky. You might run into errors, and if it’s not quite what you wanted, you’ll have to redo everything from scratch.
This smart and best solution saves time, ensures design consistency, and enhances your store’s overall storytelling.
Your all-in-one solution to create a professional Shopify store
Install App Now