Google Sheets makes it easy for you to manage your data.
Manually adding Magento 2 data into Google Sheets is too time-consuming and messy. In this blog, I will show you how to connect Magento 2 to Google Sheets.
Let’s dive in.
Why Connect Google Sheets to Magento 2?
As Google Sheet helps to maintain your Magento 2 data effectively. It also allows you to:
- Keep your data updated from time to time
- Improve reporting and make communication effective
- Make your operations easy and fast
This integration brings about significant changes in how you conduct real-time reporting. Additionally, you can also manage bulk editing and modification, which is accessible to all teammates.
Methods to Export Magento 2 to Google Sheets
There are a few different ways to connect Magento 2 to Google Sheets. Few of them are super easy, while others give you more control over exporting if you are comfortable with coding.
Here are 4 methods of how to integrate Magento and Google Sheets:
- Use Extension: It’s one of the simplest ways. You just need to install a ready-to-use extension that exports your data directly to Google Sheets.
- ETL Platforms: ETL stands for Extract, Transform & Load. These platforms help to move data between apps automatically without coding.
- Export Manually: You can export the data from Magento to a Google sheet manually. It gives you flexibility and it’s great for quick tasks.
- Google App Script: If you know technical skills and coding, then you can use this method. It allows you to create a custom setup that automatically exports the data to the sheets. This method gives you full control over the exporting process.
We will explore each of the above-mentioned methods in detail in the following sections, so you can choose the one that works best for you.
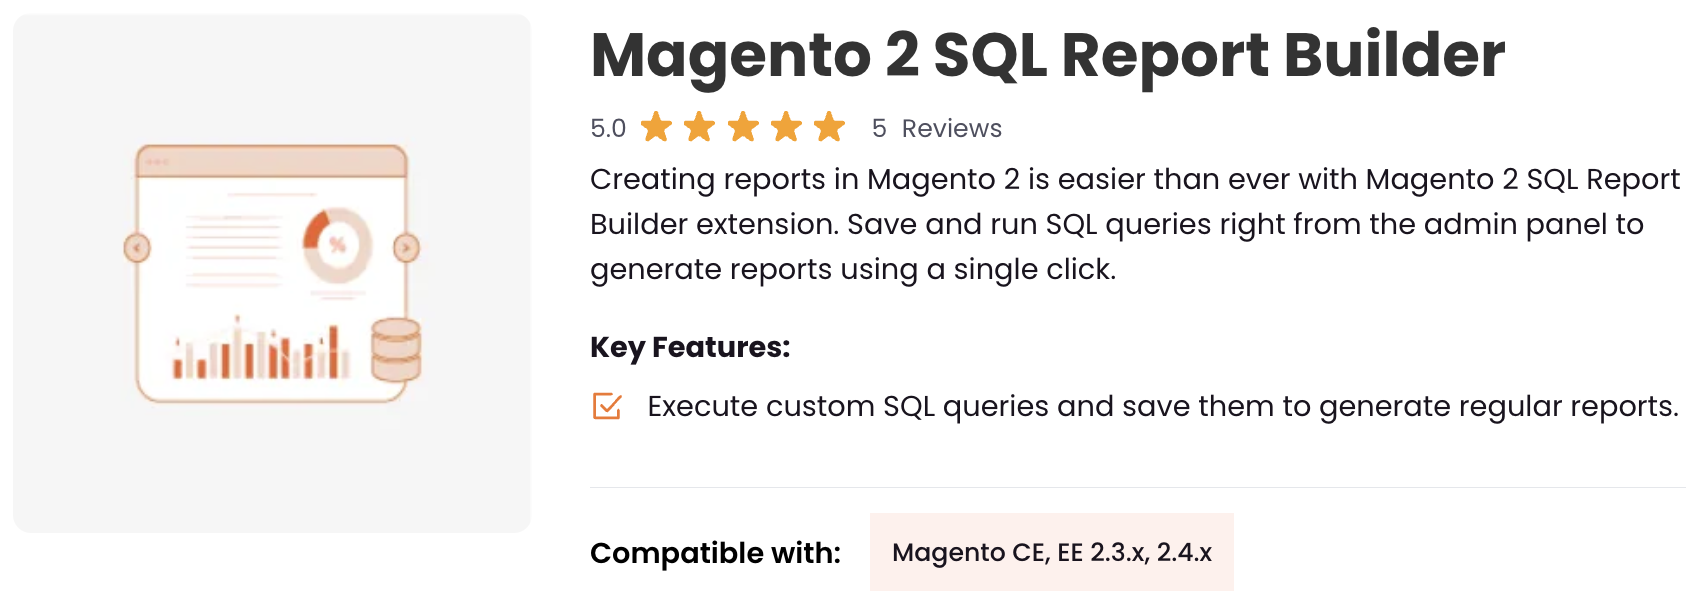
How to Use Meetanshi SQL Report Builder to Automate Magento 2 to Google Sheets Exports?
If you are looking for a reliable and easy option to export Magento 2 data to Google Sheets, the Meetanshi SQL Report Builder is a great choice.
It doesn’t require any coding skills and it works very smoothly. Even non-tech persons can use it easily.
Here are the steps to export your data.
Step 1: Install and Enable the Extension
Firstly, install the Meetanshi SQL Report Builder extension on your Magento 2 store. Then, you need to enable the extension.
Step 2: Add a new SQL report
Go to the admin panel, click on SQL Report Builder > Manage SQL Report. Now, add a new SQL Report.

Step 3: Define SQL Query
Now, as per your requirements, add the SQL query to get the required data. For example, here we run a query to get the number of new customers by month.
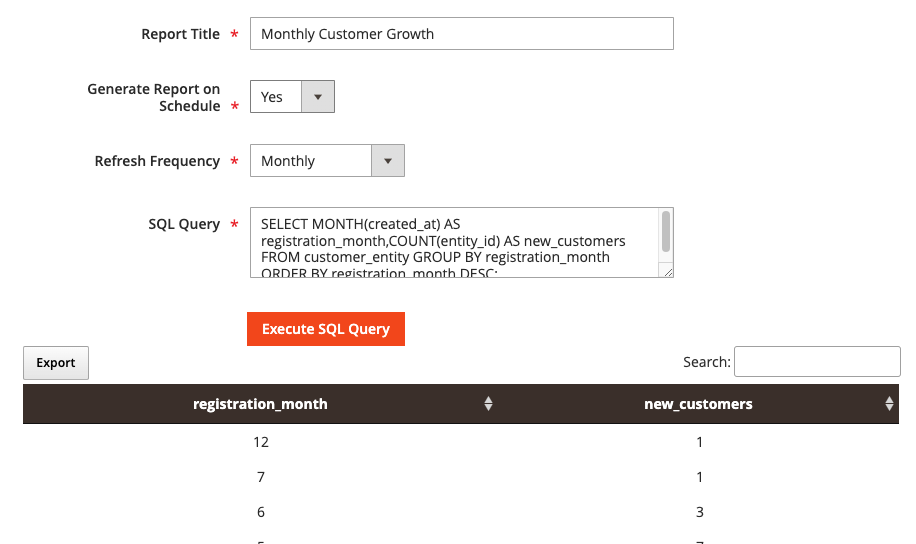
Then, click Execute SQL Query.
If the results look good, set the Generate Report on Schedule option to Yes and set the Refresh Frequency as per your requirements.
Then Save the report.
Now, in the reports grid, click the CSV button against the created report to copy its URL.
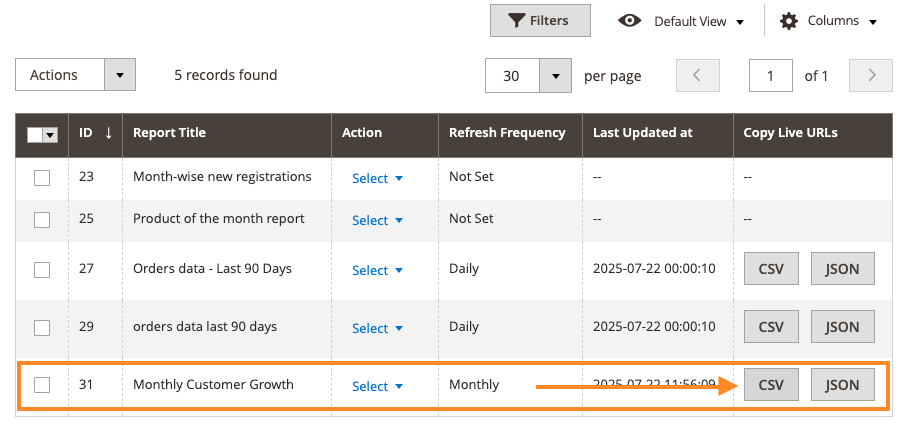
Go to Google Sheets and click use the copied URL with the following function to get the live data from Magento 2 to Google Sheets:
=IMPORTDATA(“the_copied_url_here”)

Now, it will load the data from the Magento 2 report.
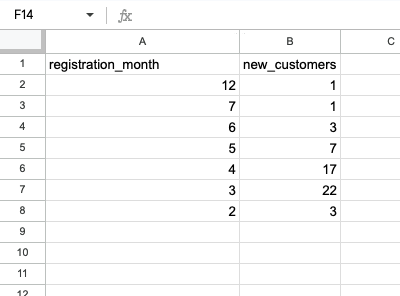
Now, you have direct integration from Magento 2 to Google Sheets using the SQL Report Builder extension. Further, since we have set up automatic refreshes, the data in Google Sheets will auto-update without any manual steps.
You can follow similar steps to automate data from your store to Google Sheets for building reports.
Manually Export Magento 2 to Google Sheets
Exporting data manually is also a good method. Magento has an in-built feature for this.If you have a small database, you can use this method to export your Magento 2 data to Google Sheets.
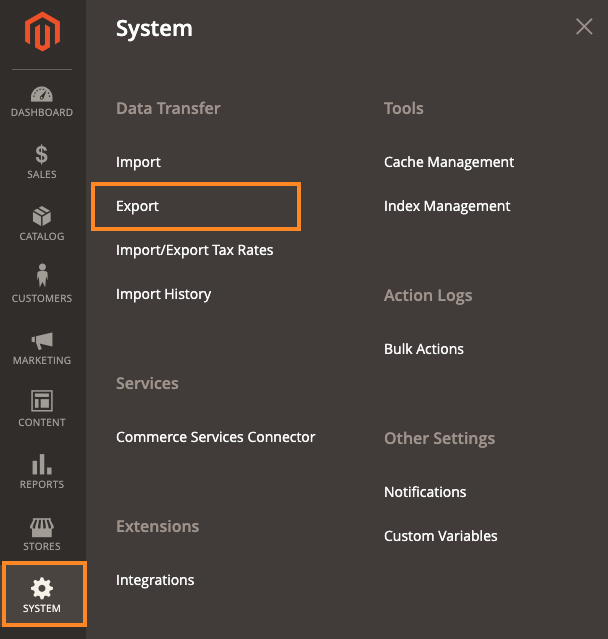
In your Magento 2 admin, go to the System > Data Transfer > Export.
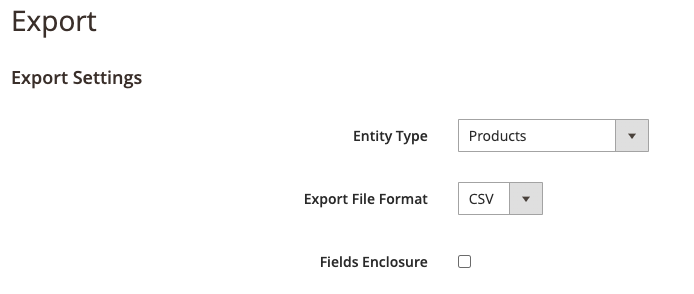
Choose the Entity Type (for e.g., Products) and select CSV as format.
Select the attributes you want to export into CSV and click Continue.

Once you have the CSV file, you can import it into Google Sheets manually. But this method does not offer any automation feature; i.e. you will need to perform manual export-imports every time you need fresh data.
Google App Script Code to Get Magento 2 Data
If you know coding, Google App Script can help you automate Magento 2 export to Google Sheets without doing it manually every time.
This method gives you full control over exporting data. Here are the steps to perform this;
Enable Magento 2 API
Log in to Magento Admin: Go to System > Integrations and click Add New Integration.
Fill in the required details like Name (e.g., “Google Apps Script Export”), email, etc.
Go to the API tab.
Under Resource Access, select the data you want to export. For example, to export products, choose Catalog -> Products -> All.
Click Save.

Find your new integration in the list and click Activate. Confirm the required permissions and you’ll get the integration tokens.
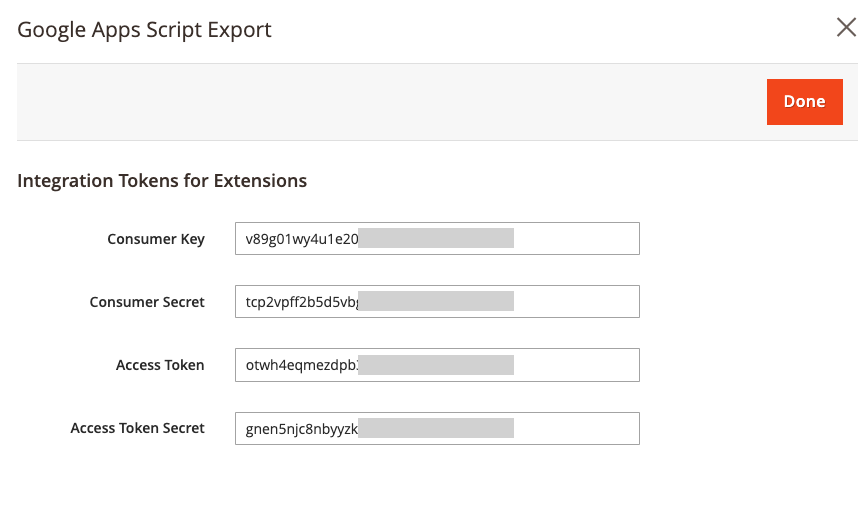
Note down these details, which will be later used to authenticate the API requests to get data.
Use Magento 2 API in Google Apps Script
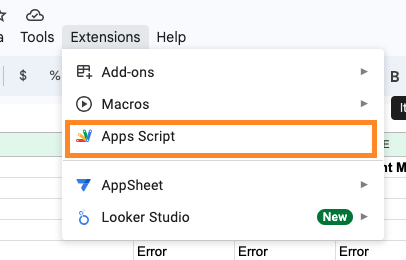
Open the Google Sheet where you want to get the Magento data.
Click Extensions > Apps Script. A new browser tab will open with the Apps Script editor. This is your code editor.
Delete any default code (function myFunction() { … }) and paste the following JavaScript code into the editor.
// --- CONFIGURATION ---
const MAGENTO_BASE_URL = "https://your-magento-domain.com/rest/V1/"; // REPLACE with your Magento URL (must end with /rest/V1/)
const MAGENTO_ACCESS_TOKEN = "YOUR_MAGENTO_ACCESS_TOKEN";       // REPLACE with your token from Magento (Part 1)
const MAGENTO_API_ENDPOINT = "products";                        // REPLACE with the API endpoint (e.g., "products", "customers", "orders")
const WORKSHEET_NAME = "Magento Export Data";                   // REPLACE with your desired sheet/tab name in Google Sheets
const PAGE_SIZE = 100;                                          // Number of items per API request (Magento max is often 100)

// --- Core Function to Fetch Data from Magento API (with Pagination) ---
function fetchMagentoData() {
  const allItems = [];
  let currentPage = 1;
  let totalCount = -1; // -1 ensures the first fetch happens

  const headers = {
    'Authorization': 'Bearer ' + MAGENTO_ACCESS_TOKEN,
    'Content-Type': 'application/json'
  };

  try {
    while (totalCount === -1 || allItems.length < totalCount) {
      // Construct URL for the current page
      const url = `${MAGENTO_BASE_URL}${MAGENTO_API_ENDPOINT}?searchCriteria[currentPage]=${currentPage}&searchCriteria[pageSize]=${PAGE_SIZE}`;
      Logger.log('Fetching from: ' + url);

      const options = {
        'method': 'GET',
        'headers': headers,
        'muteHttpExceptions': true // Critical: Allows us to read response code for errors
      };

      const response = UrlFetchApp.fetch(url, options);
      const responseCode = response.getResponseCode();
      const responseBody = response.getContentText();

      if (responseCode >= 200 && responseCode < 300) {
        const data = JSON.parse(responseBody);
        const items = data.items || []; // Magento API often returns data in 'items' array

        if (totalCount === -1) {
          totalCount = data.total_count || items.length; // Set totalCount on first successful fetch
          Logger.log(`Total estimated items: ${totalCount}`);
        }

        if (items.length === 0 && currentPage > 1) { // If no items on subsequent pages, we're done
          break;
        }
        if (items.length === 0 && currentPage === 1 && totalCount === 0) { // No items at all
            break;
        }

        allItems.push(...items); // Add fetched items to the main array
        currentPage++;

        // Log progress for large fetches
        Logger.log(`Fetched ${allItems.length} of ${totalCount} items so far.`);

      } else {
        // Handle HTTP errors (4xx, 5xx)
        const errorMessage = `API Error - Code: ${responseCode}, Message: ${responseBody}`;
        Logger.log(errorMessage);
        SpreadsheetApp.getUi().alert('API Error', 'Failed to fetch data from Magento. Check Apps Script logs (Ctrl+Enter) for details. Error: ' + responseBody, SpreadsheetApp.getUi().ButtonSet.OK);
        return null; // Return null on error
      }
    }
    Logger.log('Total items fetched: ' + allItems.length);
    return allItems;

  } catch (e) {
    // Handle script execution errors
    Logger.log('Script Exception during fetch: ' + e.toString());
    SpreadsheetApp.getUi().alert('Script Error', 'An unexpected error occurred during data fetching. Check Apps Script logs (Ctrl+Enter) for details.', SpreadsheetApp.getUi().ButtonSet.OK);
    return null;
  }
}

// --- Function to Write Data to Google Sheet ---
function writeDataToSheet(data) {
  if (!data || data.length === 0) {
    Logger.log('No data to write to sheet.');
    SpreadsheetApp.getUi().alert('No Data', 'No data was fetched from Magento to write to the sheet.', SpreadsheetApp.getUi().ButtonSet.OK);
    return;
  }

  const ss = SpreadsheetApp.getActiveSpreadsheet();
  let sheet = ss.getSheetByName(WORKSHEET_NAME);

  // Create sheet if it doesn't exist
  if (!sheet) {
    sheet = ss.insertSheet(WORKSHEET_NAME);
    Logger.log(`Created new sheet: ${WORKSHEET_NAME}`);
  } else {
    sheet.clearContents(); // Clear existing content
    Logger.log(`Cleared existing data from sheet: ${WORKSHEET_NAME}`);
  }

  // Extract all unique headers from all objects
  const allHeaders = new Set();
  data.forEach(item => {
    Object.keys(item).forEach(key => allHeaders.add(key));
  });
  const sortedHeaders = Array.from(allHeaders).sort(); // Optional: Sort headers alphabetically

  const values = [];
  values.push(sortedHeaders); // Add headers as the first row

  // Add data rows
  data.forEach(item => {
    const row = sortedHeaders.map(header => {
      let value = item[header];
      // Handle nested objects/arrays by stringifying them (optional: improve this for specific needs)
      if (typeof value === 'object' && value !== null) {
        return JSON.stringify(value);
      }
      return value;
    });
    values.push(row);
  });

  // Write all data to the sheet
  sheet.getRange(1, 1, values.length, values[0].length).setValues(values);
  Logger.log('Data successfully written to Google Sheet.');
  SpreadsheetApp.getUi().alert('Success!', `Data exported successfully to sheet '${WORKSHEET_NAME}'.`, SpreadsheetApp.getUi().ButtonSet.OK);
}

// --- Main Execution Function (Called from Menu) ---
function exportMagentoDataToSheets() {
  const ui = SpreadsheetApp.getUi();
  const response = ui.alert(
    'Confirm Export',
    'Do you want to fetch and export data from Magento to Google Sheets?',
    ui.ButtonSet.YES_NO
  );
  if (response == ui.Button.YES) {
    Logger.log('Export process started.');
    const magentoData = fetchMagentoData();
    if (magentoData) {
      writeDataToSheet(magentoData);
    } else {
      Logger.log('Data fetching failed or returned no data.');
    }
  } else {
    Logger.log('Export cancelled by user.');
  }
}

// --- Custom Menu Setup ---
function onOpen() {
  const ui = SpreadsheetApp.getUi();
  ui.createMenu('Magento Export')
      .addItem('Export Data to Sheet', 'exportMagentoDataToSheets')
      .addToUi();
}

// Optional: Install menu on script installation too
function onInstall() {
  onOpen();
}
In the above script, make sure to replace the base URL and access token.
Save the code and refresh the Google Sheet.
Click the option in the top menu for Magento Export > Export Data to Sheet.
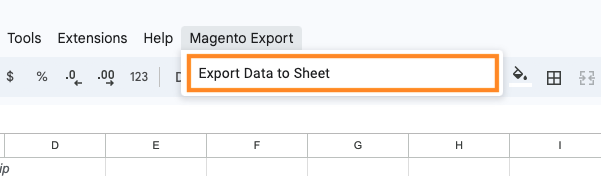
This will run the app script, call the Magento 2 API, and get the required data from Magento 2 to Google Sheet.
Which Method is Best for You?
From the above three methods, the best one considering the technical dependency, amount of effort, and the need to generate reports regularly is the SQL Report Builder. In less time, it does more for you.
The SQL Report Builder comes with an auto-update feature that other methods lack.
Your Magento 2 Google Sheets data always stays updated due to its automatic refreshes feature, saving you time to create a new sheet from scratch whenever the need arises.
Additionally, the Meetanshi SQL Report Builder:
- doesn’t need any coding, just a few simple steps
- one-time setup for generating regular reports
- saves created SQL reports to update the content automatically
With simple settings, you can define your SQL queries and export the final output in a CSV file, completely removing the steps to export and edit your CSV file whenever you need fresh data.
Goodbye manual reporting forever; get our no-code solution to auto-update your data.
Get Now