Your brand has a story, and a single video can’t tell it all. A video slider is a smart path for your Shopify store, replacing traditional video content with a dynamic gallery of moving visuals.
Instead of a lone video, you can lead customers through a series of product demos, behind-the-scenes looks, and customer spotlights, all in one seamless browsing experience.
In this blog, I am going to explain how to add a video slider in Shopify without using any apps.
How to Add a Video Slider in Shopify? (Technically)
Here is the simple 3-step process to add a video slider in Shopify for free.
- Create Shopify Video Slider Section
- Add the Video Slider Code
- Show Video Slider in the Frontend
Step 1: Create Shopify Video Slider Section
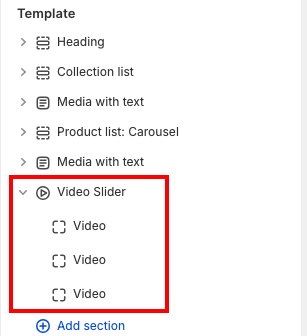
Firstly, you need to create a new section for this in your theme.
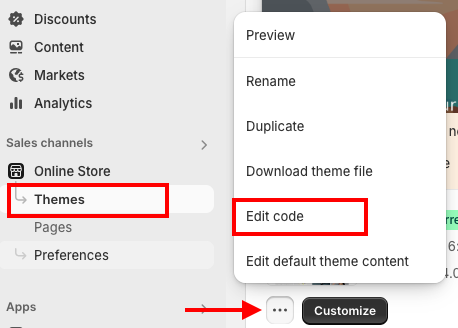
For that, navigate to Online store > Themes > (…) three dots > Edit Code
Then, in the left sidebar, click Sections, add a file, and name it as videoslider.liquid
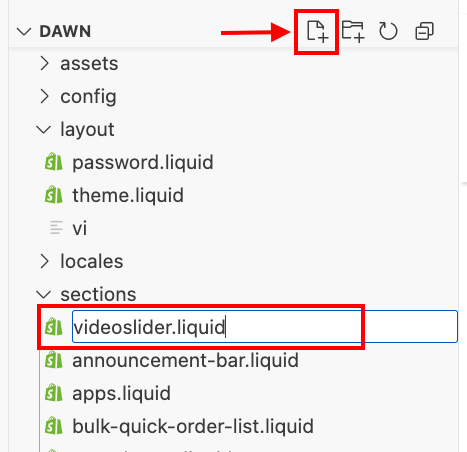
And you have created a section, now time to add the code
Step 2: Add the Video Slider Code
Paste the following Shopify video slider code in the created video_slider section and Save it.
<div class="video-slider-wrapper">
  {% comment %} Section title, heading size, and alignment {% endcomment %}
  {% if section.settings.section_title != blank %}
    <{{ section.settings.heading_size }} class="video-slider-title" style="text-align: {{ section.settings.heading_alignment }};">
      {{ section.settings.section_title }}
    </{{ section.settings.heading_size }}>
  {% endif %}

  <div class="swiper video-slider">
    <div class="swiper-wrapper">
      {% for block in section.blocks %}
        <div class="swiper-slide">
          <video
            src="{{ block.settings.video_url }}"
            controls
            {% if block.settings.autoplay %} autoplay muted loop {% endif %}
            style="width:100%; height:auto;"
          ></video>
        </div>
      {% endfor %}
    </div>

    <div class="swiper-button-next"></div>
    <div class="swiper-button-prev"></div>
    <div class="swiper-pagination"></div>
  </div>
</div>

<style>
  .video-slider-wrapper {
    max-width: 1000px;
    margin: auto;
    /* Apply spacing settings */
    padding-top: {{ section.settings.padding_top }}px;
    padding-bottom: {{ section.settings.padding_bottom }}px;
    margin-top: {{ section.settings.margin_top }}px;
    margin-bottom: {{ section.settings.margin_bottom }}px;
  }
  .video-slider video {
    border-radius: 8px;
    border: 1px solid #ddd; /* Added thin border */
  }
  .video-slider-title {
    margin-bottom: 20px; /* Adjust as needed for spacing below the title */
  }

  /* Force Swiper to display horizontally if external CSS is overriding */
  .swiper-container, .swiper {
    overflow: hidden; /* Ensures content stays within bounds */
  }
  .swiper-wrapper {
    display: flex !important; /* Force flex display to ensure horizontal layout */
    box-sizing: content-box; /* Important for preventing issues with padding/border */
    width: fit-content !important; /* Allows wrapper to take natural width of slides */
    gap: {{ section.settings.space_between }}px;


  }
  .swiper-slide {
    flex-shrink: 0 !important; /* Ensure slides don't shrink */
    /* For 3 slides, each should ideally take 1/3rd of the wrapper width, minus spaceBetween */
    width: calc((100% - (2 * {{ section.settings.space_between  }}px)) / 3) !important; /* DYNAMICALLY CALCULATED WIDTH */
    position: relative; /* Needed for absolute positioning of video controls if any */
    transition-property: transform; /* Smooth transitions */
  }

  /* Basic styling for navigation buttons and pagination dots */
  .swiper-button-next,
  .swiper-button-prev {
    color: #000; /* Adjust color as needed */
  }
  .swiper-pagination-bullet {
    background: #ccc; /* Inactive dot color */
  }
  .swiper-pagination-bullet-active {
    background: #000; /* Active dot color */
  }
</style>

<script>
  document.addEventListener("DOMContentLoaded", function() {
    // Check if Swiper is loaded before initializing
    if (typeof Swiper !== 'undefined') {
      new Swiper(".video-slider", {
        loop: true,
        navigation: {
          nextEl: ".swiper-button-next",
          prevEl: ".swiper-button-prev",
        },
        pagination: {
          el: ".swiper-pagination",
          clickable: true,
        },
        slidesPerView: 3, // Changed to 3 to show three videos
        spaceBetween: {{ section.settings.space_between }}, // DYNAMIC SPACING VALUE
      });
    } else {
      console.error("Swiper.js library not found. Please ensure it's loaded in theme.liquid.");
    }
  });
</script>

{% schema %}
{
  "name": "Video Slider",
  "settings": [
    {
      "type": "text",
      "id": "section_title",
      "label": "Videos title",
      "default": "Video slider"
    },
    {
      "type": "radio",
      "id": "heading_size",
      "label": "Heading size",
      "options": [
        { "value": "h1", "label": "H1" },
        { "value": "h2", "label": "H2" },
        { "value": "h3", "label": "H3" }
      ],
      "default": "h2"
    },
    {
      "type": "radio",
      "id": "heading_alignment",
      "label": "Heading alignment",
      "options": [
        { "value": "left", "label": "Left" },
        { "value": "center", "label": "Center" },
        { "value": "right", "label": "Right" }
      ],
      "default": "center"
    },
    {
      "type": "range",
      "id": "space_between",
      "min": 0,
      "max": 100,
      "step": 4,
      "unit": "px",
      "label": "Space between videos",
      "default": 20
    },
    {
      "type": "range",
      "id": "padding_top",
      "min": 0,
      "max": 100,
      "step": 4,
      "unit": "px",
      "label": "Padding top",
      "default": 36
    },
    {
      "type": "range",
      "id": "padding_bottom",
      "min": 0,
      "max": 100,
      "step": 4,
      "unit": "px",
      "label": "Padding bottom",
      "default": 36
    },
    {
      "type": "range",
      "id": "margin_top",
      "min": 0,
      "max": 100,
      "step": 4,
      "unit": "px",
      "label": "Margin top",
      "default": 0
    },
    {
      "type": "range",
      "id": "margin_bottom",
      "min": 0,
      "max": 100,
      "step": 4,
      "unit": "px",
      "label": "Margin bottom",
      "default": 0
    }
  ],
  "blocks": [
    {
      "type": "video",
      "name": "Video",
      "settings": [
        {
          "type": "url",
          "id": "video_url",
          "label": "Video URL (MP4)"
        },
        {
          "type": "checkbox",
          "id": "autoplay",
          "label": "Autoplay",
          "default": false
        }
      ]
    }
  ],
  "max_blocks": 10,
  "presets": [
    {
      "name": "Video Slider",
      "category": "Custom"
    }
  ]
}
{% endschema %}
Step 3: Show Video Slider in the Frontend
Now that the section is ready, add it to a page.
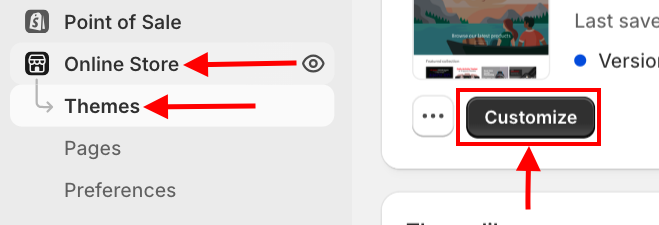
Navigate back to the Shopify admin > Online Store > Themes > Customize
On the page you want to add the slider (e.g., the homepage), click + to add the section
Find the newly created Video Slider section and open it. The section will appear on your page in the left sidebar
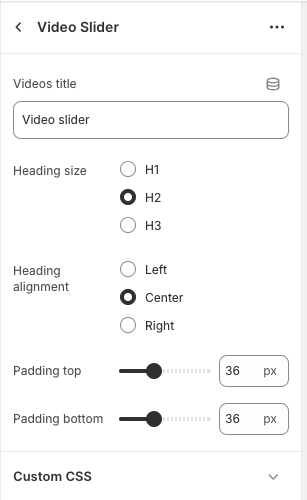
Click Video Slider to expand its settings on the right-hand side; from there, you can make changes as you want.
Then you need to add videos to the slider. For that, click Video and paste the video URL (MP4) for each video you want to display.
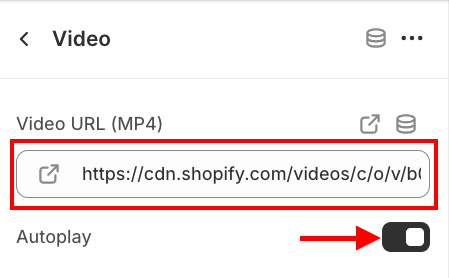
You can get a video link from Shopify admin > Content > Files and upload your MP4 and copy its URL directly from there.
You can also enable the Autoplay button for each video if you wish. Click Save to apply the changes
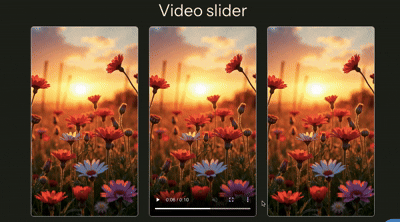
That’s it! Your video slider is now ready. You can go back to the code at any time to adjust the styling or add more advanced features.
This is how it looks
How to Add a Video List Using An App? (Quick & Easy)
A perfect video slider list should be clean and well-structured, showing videos in an easy-to-browse grid. It should work well on all devices and load quickly, with clear thumbnails that invite shoppers to watch.
Here’s how it should look.

Opting for our MIT Pro Sections app, you can get numerous options to modify, such as clickable buttons, a separate heading for each video, infinite video playing, and more. Using our app will be a win-win for you.
Let’s see the steps to use it.
Step 1: Install and Choose Your Suitable Section
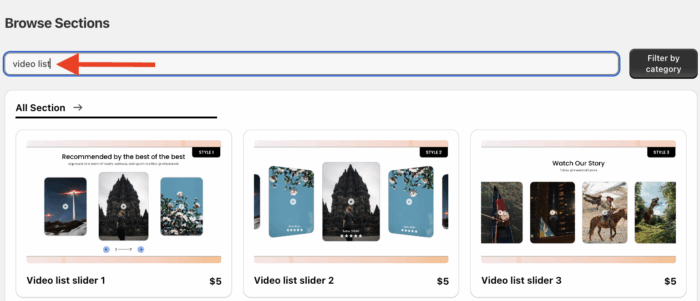
Install the MIT Pro Sections from the Shopify App Store, then from the app dashboard, click Browse Section and search for the Video list slider section. Here, we will move forward with video list slider 3.
Step 2: Click the “Try for Free” Button
Select the section and click Try for Free to claim this section without any cost.
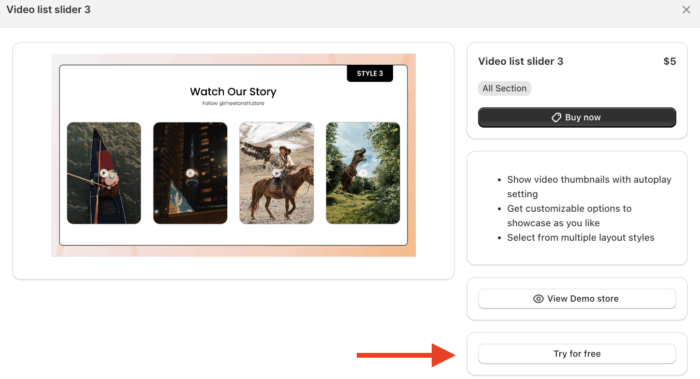
During the free trial, you will be redirected to the MIT demo store. After purchasing the section, you can add it to your store’s theme.
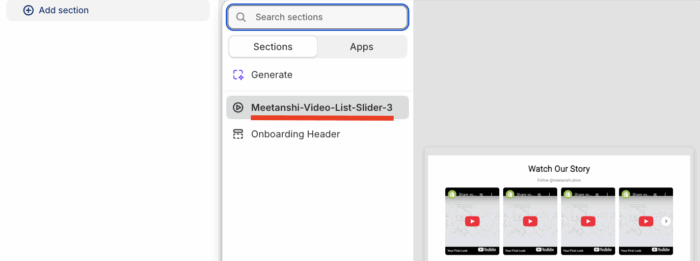
From here, click the Add section and select Meetanshi Video list 3.
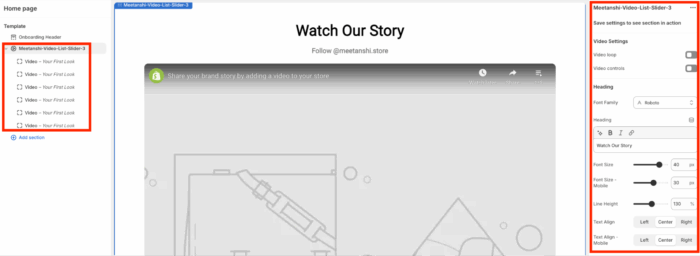
Step 3: Edit and Save the Section
From the theme editor, you can make changes as per your requirements. Here you get 40+ customization options to edit the video grid.
Once you are done, save the changes.
Bonus customization: Add scrolling logos to your homepage to build trust among your shoppers. This helps you add animated sections in your store without affecting your page speed.
Create Stunning Video List with MIT Sections Pro
A video list section boosts engagement and enhances browsing experience by showcasing your brand effectively.
Follow these tips to add a video grid to Shopify that converts visitors into customers.
- Compress MP4 files for fast loading; ensure consistent aspect ratios for a constant look
- Test your grid on all devices to check that your video grid is fully compatible
- Use high-quality videos with a clear purpose
- After implementation, check page speed using tools like Google PageSpeed Insights
Your all-in-one solution to create a professional Shopify store
Install App Now