Starting 27 September 2026, merchants selling to EU shoppers must display the new Legal Guarantee Notice and qualifying GARAN labels. Meeting this strict deadline requires showing both disclosures clearly before purchase.
This guide explains the exact rules for each element and where to place them across your Shopify store. You will learn how to implement both using ready-made apps or native theme features to keep your business fully compliant.
What is the Difference Between EU Guarantee Notice and GARAN Labels?
Both elements come from the same EU regulation, but they serve different purposes and follow different rules.
The EU Legal Guarantee Notice is a mandatory, storewide notice. It reminds shoppers of their statutory right to a minimum two-year guarantee against defective goods. It is a static file that you display without any edits. Every store selling physical goods to EU consumers must show it.
The GARAN Label is required only when a manufacturer offers a free commercial durability guarantee lasting longer than two years for the whole item. It contains dynamic fields where you must add the brand, model, and guarantee duration.
| Feature | EU Legal Guarantee Notice | GARAN Label |
| Requirement | Mandatory storewide | Conditional per product |
| Trigger | Any sale of physical consumer goods | Free commercial durability guarantee exceeding 2 years |
| Content | Static text set by the EU | Dynamic fields: brand, model, and duration |
| Customization | Zero editing allowed | You must fill in the specific product details |
| Placement | Product pages, cart, and checkout | Assigned only to qualifying product pages |
Steps to Add EU Guarantee Notice to Shopify
Adding the EU Legal Guarantee Notice to your Shopify theme ensures buyers see required statutory information before purchasing. You can set this up natively using the Shopify editor without paid apps.
Step 1: Open the Theme Editor
Log in to your Shopify admin dashboard. From the left sidebar, navigate to Online Store > Themes.
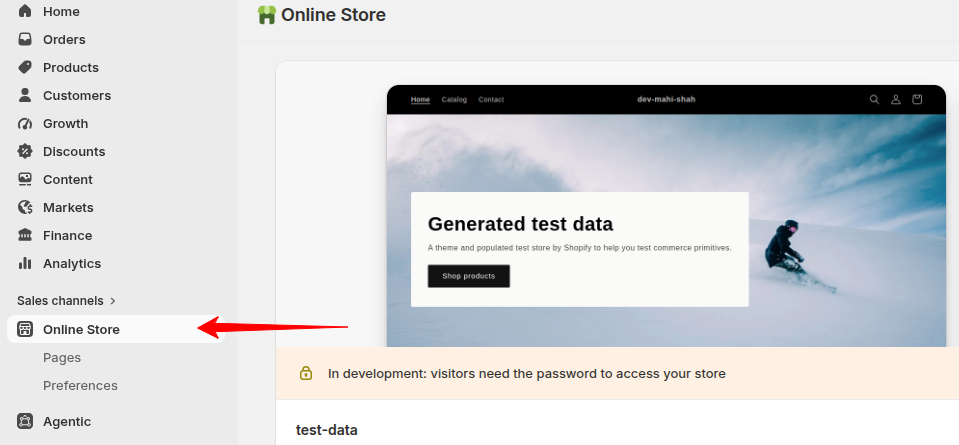
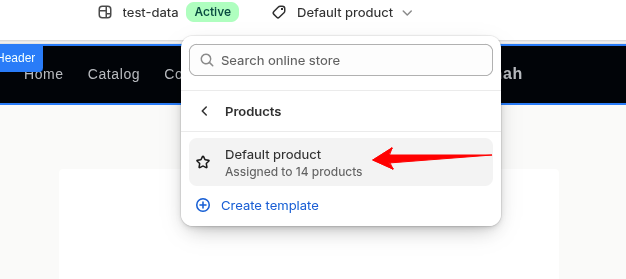
Locate your active theme and click the Customize button. In the top center dropdown, switch the template view from Home page to Products > Default product to edit your product detail layout.
Step 2: Add a Custom Liquid Block
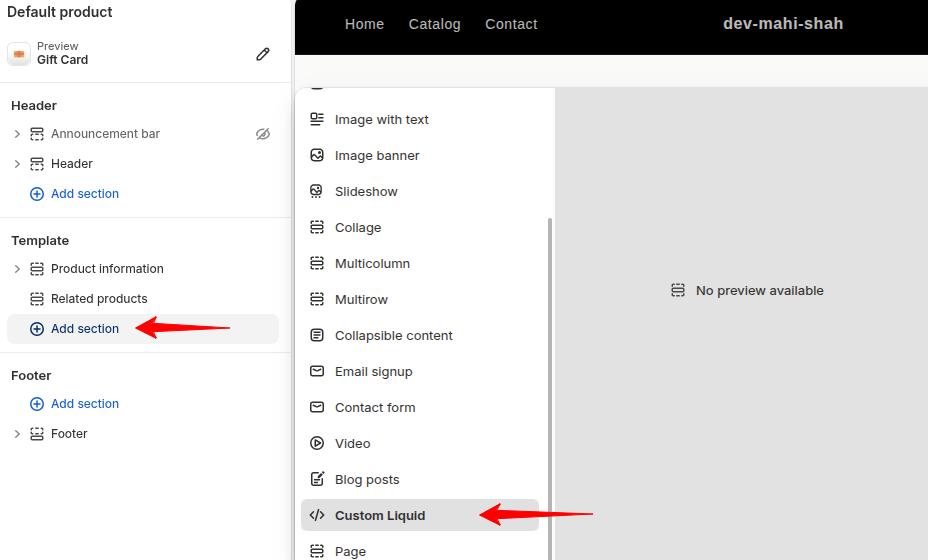
Look at the left-hand sidebar containing your template sections. Under the Product information section, click Add section and select Custom Liquid.
Drag this block to place it near the price, variant selectors, or buy buttons so it remains clearly visible before checkout.
Step 3: Add the Liquid Code
First, upload your official EU Legal Guarantee Notice graphic to your store under Content > Files and copy the file URL. Then, paste the following snippet into your Custom Liquid block:
<div class="eu-guarantee-notice" style="margin: 15px 0; padding: 12px; border: 1px solid #e5e5e5; border-radius: 6px; display: flex; align-items: center; gap: 12px;">

  <img src="YOUR_UPLOADED_IMAGE_URL" alt="EU Legal Guarantee Notice" style="max-width: 80px; height: auto;" />

  <div style="font-size: 13px; line-height: 1.4; color: #333;">

    <strong>EU Statutory Legal Guarantee:</strong> All goods sold to consumers within the EU are covered by a minimum 2-year legal guarantee of conformity.

    <a href="https://europa.eu/youreurope/citizens/consumers/shopping/guarantees-returns/index_en.htm" target="_blank" rel="noopener noreferrer" style="color: #0056b3; text-decoration: underline; display: block; margin-top: 4px;">Learn more on Your Europe</a>

  </div>

</div>
Replace YOUR_UPLOADED_IMAGE_URL with your direct file link. Displaying mandatory European regulatory details on product pages is becoming standard practice; for example, stores follow similar transparency requirements when setting up EU GPSR for Shopify to display verified safety and responsible person data.
Step 4: Preview the Notice
Click Save in the top right corner.
Use the screen toggle to review how the notice renders on both desktop and mobile devices. Ensure the graphic displays crisply, the text is easy to read, and the link to the EU portal opens correctly in a new tab.
Steps to Add GARAN Label to Shopify
Unlike the static storewide notice, the GARAN label applies only to specific items that come with an extended manufacturer durability guarantee. You can manage this conditionally across your catalog using native Shopify Metafields and a custom Liquid section without paying for extra apps.
Step 1: Create a Product Metafield
From your Shopify admin, go to Settings > Custom data.
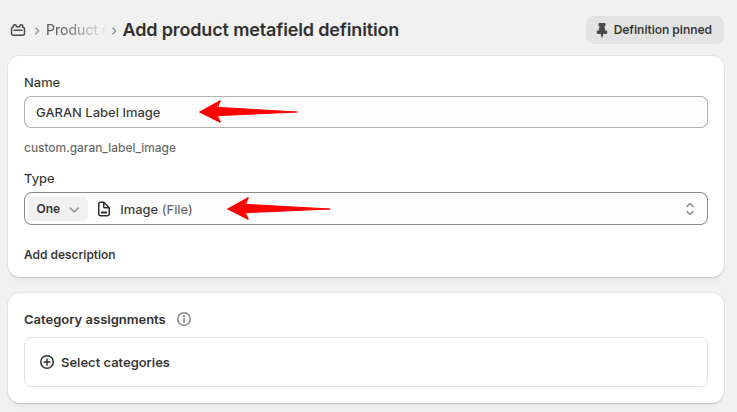
Under the Metafields section, click on Products, then click Add definition.
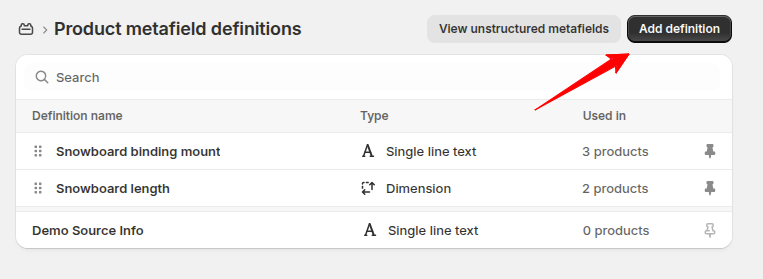
Set the Name to GARAN Label Image, the Namespace and key to custom.garan_label_image, and choose the type as File (select images only).
This metafield will hold the customized GARAN badge for each eligible product.
Step 2: Add the Guarantee Label to a Product
Navigate to Products in your Shopify admin and select a product that carries a qualified durability guarantee. Scroll down to the bottom of the product edit page to find the Metafields card.
Click on GARAN Label Image, upload your generated product badge containing the correct duration, brand, and model details, and click Save. Leave this field blank for products that do not qualify.
Step 3: Add a Custom Liquid Block
In the top-center dropdown menu, select Products > Default product. In the left-hand panel, locate the Product information section, click Add block, and choose Custom Liquid. Drag the block so it sits directly beneath your price, variant picker, or buy buttons.
Click on the newly added Custom Liquid block to open its settings on the right. Paste the following snippet into the code box:
{% if product.metafields.custom.garan_label_image != blank %}

  <div class="garan-label-wrapper" style="margin: 15px 0;">

    <img

      src="{{ product.metafields.custom.garan_label_image | image_url: width: 300 }}"

      alt="EU Commercial Guarantee of Durability (GARAN)"

      style="max-width: 140px; height: auto; display: block;"

    />

    <a href="https://europa.eu/youreurope/citizens/consumers/shopping/guarantees-returns/index_en.htm" target="_blank" rel="noopener noreferrer" style="font-size: 12px; color: #0056b3; text-decoration: underline; margin-top: 4px; display: inline-block;">

      View EU Durability Guarantee Details

    </a>

  </div>

{% endif %}
Click Save. Because of the {% if %} condition, this block will automatically remain completely invisible on products that do not have a GARAN badge uploaded.
Step 5: Preview the Product Page
Open a product where you uploaded the badge to confirm the GARAN label displays cleanly beside your product details.
Next, check a regular product that lacks the guarantee to ensure the block remains completely hidden. Finally, test the display on mobile to verify proper sizing.
EU Guarantee Notice & GARAN Best Practices
Following proper design and catalog rules keeps your store compliant with EU consumer protection standards.
- Use Official Graphics Only: Download standard files from the European Commission. Never modify the fonts, colors, dimensions, or icons.
- Translate for Target Markets: Notices must appear in the local official language of the EU countries you serve. Use Shopify Markets to serve translated versions.
- Keep Out of Media Galleries: Display badges in the product description area near the price or buy button, never as a gallery photo.
- Add a Clickable Link: Shoppers cannot scan screen QR codes on mobile devices. Always include a direct link to the Your Europe portal.
- Verify Manufacturer Claims: Only show the GARAN label if the durability guarantee is free, lasts over two years, and covers the complete item.
- Check Model Numbers: Ensure the brand name and model number on the label match your product packaging and invoice data.
Adopting these best practices keeps your store safe from regulatory penalties. To prepare your shop for other European trade rules, check our guide on EU compliance essentials for Shopify stores to ensure your entire checkout and catalog stay compliant.
Get Help from Professionals
Setting up dynamic guarantee notices, mapping metafields, and updating theme files across large catalogs takes time. If you run a busy store or sell across multiple European countries, working with seasoned specialists ensures full compliance without manual errors.
Our team can configure custom Liquid sections, manage multi-language rules, and test your layout across all device types. If you want expert assistance to get your storefront fully compliant before the deadline, visit Meetanshi to handle the complete setup for you.
FAQs
Can I add the notice without an app?
Yes, you can add it directly using Shopify’s native Theme Editor and Custom Liquid blocks. This method requires no paid apps or recurring subscriptions.
Where do I place the notice on non-Plus plans?
Standard Shopify plans do not permit code edits inside checkout. Instead, display the notice prominently on product pages near the add-to-cart button and inside your cart drawer so shoppers clearly see it before purchasing.
How do I show a different language per country?
Use Shopify Markets alongside the free Translate & Adapt app. This allows you to serve localized graphics and guarantee text matching the official language of each European market you target.
Which products need the GARAN label?
Only items that come with a free manufacturer durability guarantee lasting more than two years for the complete product. Items covered solely by the mandatory two-year legal baseline do not require this badge.
Does editing the theme affect checkout?
No, adding Liquid blocks only affects your product and cart templates without touching payment or checkout processing. If you want to refine your purchase funnel further, check our guide on Shopify checkout page customization to optimize your customer experience.