Search engines use schema markup to understand the pages. It’s used to display products in rich snippets and organic shopping. Therefore, Shopify schema markup can help you improve organic visibility in search engines.
By default, the Shopify themes come with limited structured data markups.
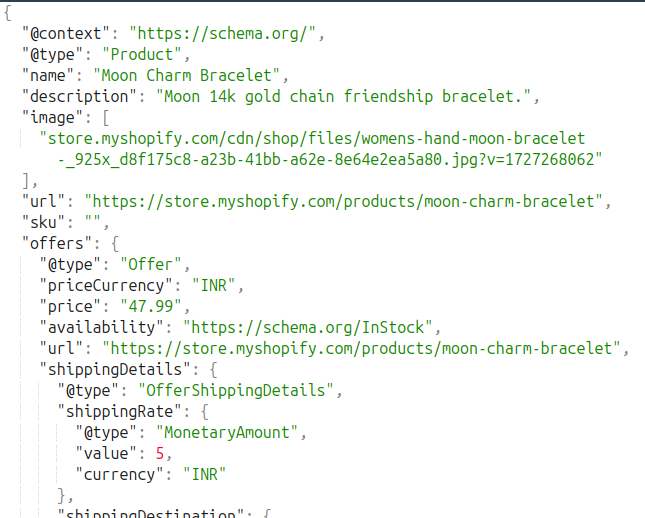
For example, the product pages have basic attributes like name, price, and URL. You can improve it by adding more attributes like description, image, and shipping details. In this guide, we explore the manual method to implement schema markup in Shopify.
How Shopify Themes Handle Structured Data?
In Shopify, the themes are written in liquid, which is a templating language. It generates the client-side HTML code.
The Shopify theme files use the structured_data filter to generate structured data markup code in JSON-LD format. It’s present in the liquid files for products, collections, articles, pages, etc.
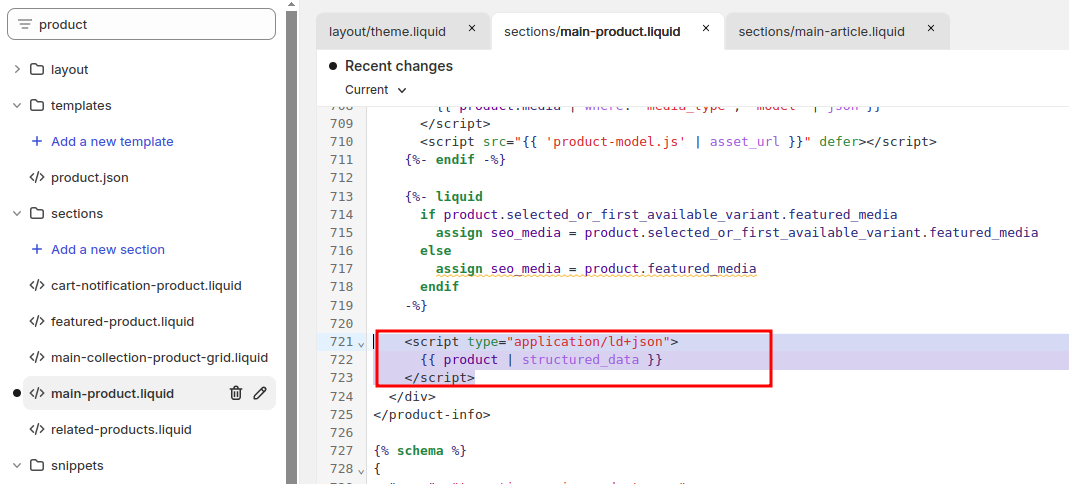
For example, here’s how it looks like in the product page liquid file (main-product.liquid):
<script type="application/ld+json">
      {{ product | structured_data }}
    </script>
In the above code, the structured_data filter dynamically generates and adds JSON-LD structured data for the product.

The only drawback here with this in-build code is that it generates schema markup code with limited information. For example, the product schema does not contain shipping details and a return policy, which is required for Google merchant listing.
You can use a Shopify app or manually modify the theme liquid files to fix structured data markups. In the following sections, you’ll learn the manual method.
How to Edit Structured Data in Shopify via Theme Code?
You can prepare custom structured data code in liquid format and replace it with the default ones. This requires you to change the liquid file for each page type in the store. You can also use Shopify variables and use if-else conditions for dynamic values.
Let’s say you want to add product schema markup in Shopify with additional attributes like shipping details and merchant return policy. Here are the steps to implement it.
Step 1: Prepare the Structure Data Format Code
Use a schema markup generator tool to generate a code snippet file with the required attributes.
Step 2: Include Shopify Variables
Now, to make the values dynamic as per the product, you’ll need to replace the attribute values with Shopify variables.
For example:
- Product name – “{{ product.title | escape }}”
- Product URL – “{{ shop.url }}{{ product.url }}”
- Brand – “{{ product.vendor | escape }}”
Similarly, replace all the dynamic values with their Shopify variables.
You can also implement if-else logic to change the schema markup code and attributes in case of product variants. Here’s the complete code to implement for Shopify product pages. It supports product variants and contains all attributes required for merchant listing.
<script type="application/ld+json">
{
  "@context": "https://schema.org/",
  {% if product.variants.size > 1 %}
  "@type": "ProductGroup",
  "name": "{{ product.title | escape }}",
  "description": "{{ product.description | strip_html | escape }}",
  "url": "{{ shop.url }}{{ product.url }}",
  "brand": {
    "@type": "Brand",
    "name": "{{ product.vendor | escape }}"
  },
  "productGroupID": "{{ product.id }}",
  "variesBy": [
    {% for option in product.options %}
      "{{ option.name | escape }}"{% unless forloop.last %}, {% endunless %}
    {% endfor %}
  ],
  "hasVariant": [
    {% for variant in product.variants %}
      {
        "@type": "Product",
        "sku": "{{ variant.sku | escape }}",
        "name": "{{ product.title | escape }} - {{ variant.title | escape }}",
        "description": "{{ product.description | strip_html | escape }}",
        "image": [
          {% if variant.image %}
            "{{ variant.image.src | img_url: 'master' }}"
          {% else %}
            "{{ product.featured_image | img_url: 'master' }}"
          {% endif %}
        ],
        "offers": {
          "@type": "Offer",
          "priceCurrency": "{{ shop.currency }}",
          "price": "{{ variant.price | money_without_currency | remove: ',' }}",
          "itemCondition": "https://schema.org/NewCondition",
          "availability": "{% if variant.available %}https://schema.org/InStock{% else %}https://schema.org/OutOfStock{% endif %}",
          "url": "{{ shop.url }}{{ product.url }}?variant={{ variant.id }}",
          "shippingDetails": {
            "@type": "OfferShippingDetails",
            "shippingRate": {
              "@type": "MonetaryAmount",
              "value": 5.00,
              "currency": "{{ shop.currency }}"
            },
            "shippingDestination": {
              "@type": "DefinedRegion",
              "addressCountry": "US"
            },
            "deliveryTime": {
              "@type": "ShippingDeliveryTime",
              "handlingTime": {
                "@type": "QuantitativeValue",
                "minValue": 0,
                "maxValue": 1,
                "unitCode": "DAY"
              },
              "transitTime": {
                "@type": "QuantitativeValue",
                "minValue": 1,
                "maxValue": 5,
                "unitCode": "DAY"
              }
            }
          },
          "hasMerchantReturnPolicy": {
            "@type": "MerchantReturnPolicy",
            "returnPolicyCategory": "https://schema.org/MerchantReturnFiniteReturnWindow",
            "merchantReturnDays": 30,
            "returnFees": "https://schema.org/FreeReturn",
            "returnMethod": "https://schema.org/ReturnByMail",
            "applicableCountry": "US"
          }
        }
      }{% unless forloop.last %},{% endunless %}
    {% endfor %}
  ]
  {% else %}
  "@type": "Product",
  "name": "{{ product.title | escape }}",
  "description": "{{ product.description | strip_html | escape }}",
  "image": [
    "{{ product.featured_image | img_url: 'master' }}"
  ],
  "url": "{{ shop.url }}{{ product.url }}",
  "sku": "{{ product.variants.first.sku | escape }}",
  "offers": {
    "@type": "Offer",
    "priceCurrency": "{{ shop.currency }}",
    "price": "{{ product.price | money_without_currency | remove: ',' }}",
    "availability": "{% if product.available %}https://schema.org/InStock{% else %}https://schema.org/OutOfStock{% endif %}",
    "url": "{{ shop.url }}{{ product.url }}",
    "shippingDetails": {
      "@type": "OfferShippingDetails",
      "shippingRate": {
        "@type": "MonetaryAmount",
        "value": 5.00,
        "currency": "{{ shop.currency }}"
      },
      "shippingDestination": {
        "@type": "DefinedRegion",
        "addressCountry": "US"
      },
      "deliveryTime": {
        "@type": "ShippingDeliveryTime",
        "handlingTime": {
          "@type": "QuantitativeValue",
          "minValue": 0,
          "maxValue": 1,
          "unitCode": "DAY"
        },
        "transitTime": {
          "@type": "QuantitativeValue",
          "minValue": 1,
          "maxValue": 5,
          "unitCode": "DAY"
        }
      }
    },
    "hasMerchantReturnPolicy": {
      "@type": "MerchantReturnPolicy",
      "returnPolicyCategory": "https://schema.org/MerchantReturnFiniteReturnWindow",
      "merchantReturnDays": 30,
      "returnFees": "https://schema.org/FreeReturn",
      "returnMethod": "https://schema.org/ReturnByMail",
      "applicableCountry": "US"
    }
  }
  {% endif %}
}
</script>
In the above code, you can modify the static values for attributes for shipping details and merchant return policy as per your business.
Pro Tip: You can also ask ChatGPT to help you prepare a schema markup code with Shopify variables.
Step 3: Add Code to Theme Template Files
Log into your Shopify admin and go to Online Store > Themes. Click the three dots and select Edit Theme Code from the menu.
In the theme editor, open the main-product.liquid file and find “structured_data”.
You’ll find the default structured data code snippet in the code file.
Replace this <script type=”application/ld-json”>……… </script> with the code that you prepared for the Shopify product page schema markup.
Click the Save button.
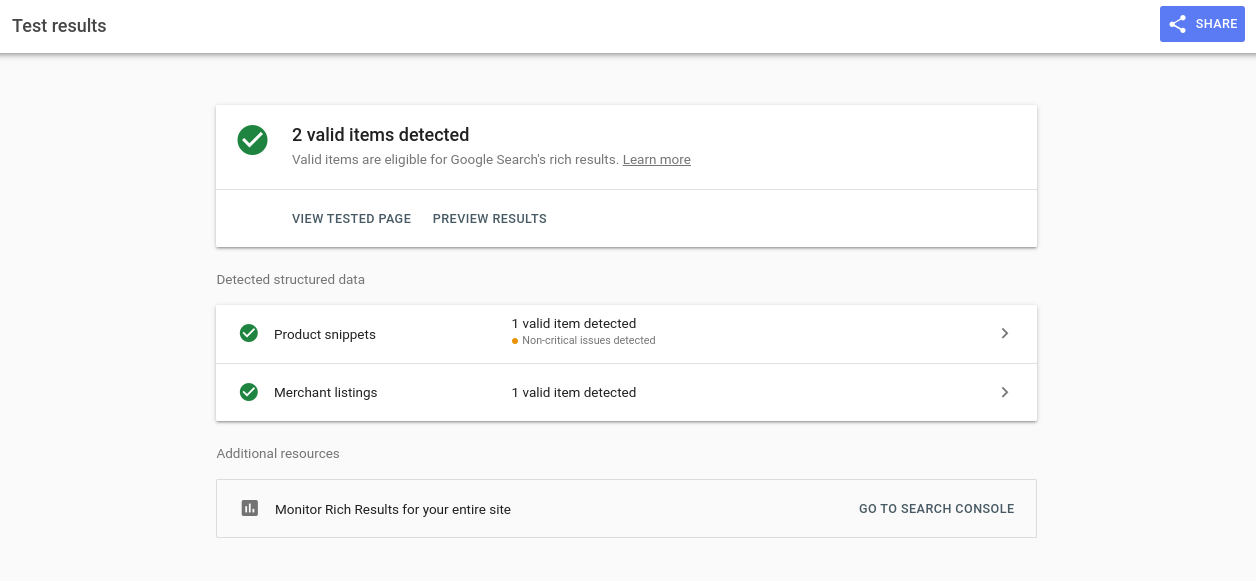
Step 4: Test Schema Markup Implementation
Once the code is added, the structured data will be applied to all the product pages in Shopify. You can verify the implementation and validate the code by using the Google Rich Results Test or any other structured data testing tool.
Similarly, you can add other schema types to your Shopify store and improve its appearance on search engines.
Different Types of Schema Markups You Can Add to Shopify
There are various types of schema that you can add to Shopify for improved SEO and visibility. Each type of schema goes in a specific theme file in the Shopify structure.
Here’s an overview of the structured data types for Shopify and where to add them:
| Schema Type | Description | Shopify Liquid File |
| Product | Describes individual product details | main-product.liquid |
| Offer | Provides offer details like price and stock | main-product.liquid |
| Review | Displays product reviews | main-product.liquid |
| BreadcrumbList | Shows navigational breadcrumbs | theme.liquid |
| Organization | Information about the business/organization | theme.liquid |
| Article | Describes blog posts or articles | main-article.liquid |
| LocalBusiness | Describes a local business and its details | theme.liquid |
| WebSite | General information about the website | theme.liquid |
| SearchAction | Adds structured data for search functionality | theme.liquid |
Note: The liquid file name for each page type could vary from theme to theme.
How to Find Issues with Your Shopify Schema Markup?
Open the Google Search Console property for your Shopify store. In the left menu bar, click Product Snippets under Shopping.
Here, you can find valid and invalid items with product schema markup. Invalid and missing schema markups are a common Shopify SEO issue that many store owners neglect.
You can also find reasons why the items are invalid, along with extra suggestions to improve them.

Once you’ve fixed the issues, you can click on each issue in the Google Search Console and re-validate them to fix these errors.
Win Rich Snippets with Shopify Schema Markup
It’s your time to make your store shine on search engines. Try the steps above to implement schema markup code in Shopify without using any app.
You can reach out to us in case you need any help adding schema markup or Shopify search engine optimization.
