Just like how impact and greatness are achieved through joint effort, a successful e-commerce shipment, and delivery relies on different essential documents.
The one significant document you cannot deny for seamless package transit is the Shopify Packing Slip.
If you are a Shopify store owner wanting to learn how to create Packing slips in Shopify, then this blog is for you.
What is a Packing Slip in Shopify?
A Packing slip is a document with the details of the items ordered in the package. It is useful for both sellers and buyers as the package content is verified at various touchpoints of the journey from sellers to buyers. Eventually, it enables seamless shipping and delivery.

The two main functions of Shopify Packing slips are:
- It serves as a checklist for sellers so that they can ensure they have packed and sent all the ordered products to the shipment.
- After buyers receive the package, they can use the slip to check on missing items and help in easy returns or exchanges.
The basic Packing slip includes details of the order such as order number and date, quantity, SKU number, product number, contact information, address, email address, shipping carrier, shipping method, etc,
Moreover, you can customize the Shopify Packing slip by adding more attributes to fit your business needs. Those attributes include a brief product description, weight, and volume of the ordered items, any instructions from the customer, etc.
Benefits of Shopify Packing Slips
- You can double-verify all the items ordered before shipping, including precise counts of numerous SKUs.
- The orders you send in one package can be split up into many shipments to deliver to different locations.
- Using Package slips makes the identification of damaged goods easier and hastens the process of refunds or exchanges.
- Even the missing products can also be identified quickly to replace and accelerate the transit process to deliver them within a short delay time.
How to Create a Packing Slip in Shopify?
The prerequisite to generating Packing slips for your orders is you need to have a Shopify admin account. It is simple to create a Packing slip in Shopify, and those easy step-by-step processes are covered here.
Individual Packing slip printing
Login to your Shopify account, go to the admin dashboard, and click Orders in the menu.
On the order page, you can see the list of orders you got. Just click the check box next to the order for which you want to print the Packing slip.
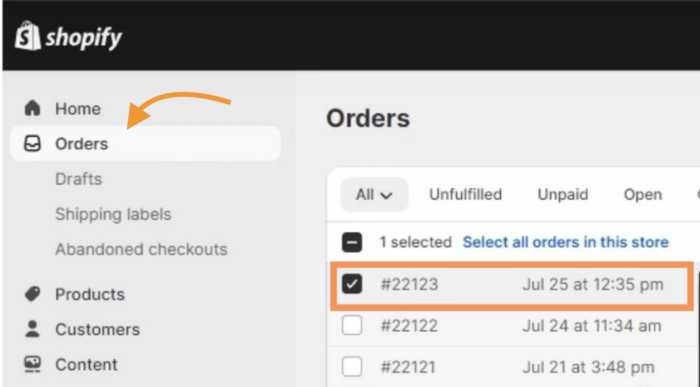
After selecting the order, click (…) more options in the middle-bottom of the page and select the “Print Packing slips” option.
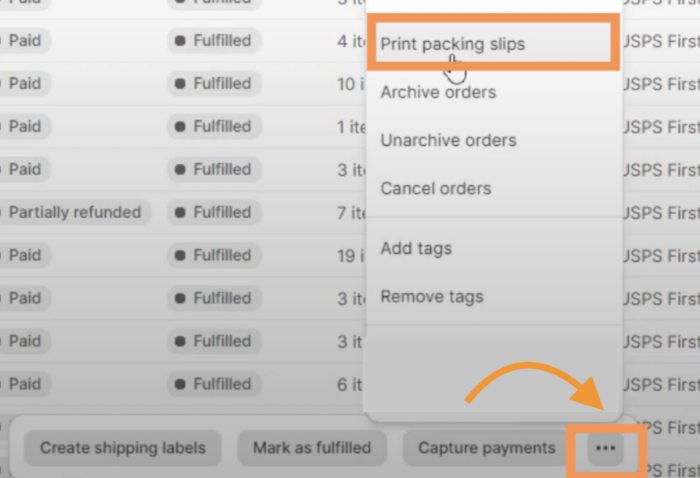
After clicking the print Packing slips option, the dashboard will show you a PDF of the generated Packing slip. You can either print or save, depending on your needs.
To create Packing slips for multiple orders that will be sent in multiple shipments, you can use Shopify’s bulk actions.
Bulk action lets you select multiple orders automatically after you select the first and last order in the list. It relieves you from checking every checkbox while you have bulk orders in hand.
How to Edit Packing Slips in Shopify?
Shopify generates Packing slips with the default template, which is already coded. Therefore, if you want to add or remove elements in the slip, you can edit the Shopify Packing slip template code.
To do so, you need to be comfortable with HTML, CSS, and Liquid.
Steps to customize Packing slips in Shopify:
- Go to the settings and click on the Shipping and Delivery on your Shopify admin page.
- Click on the Packing slip Section.
- After that, click Edit to make changes to the code and Save.
- If you are not satisfied with the changes, you can simply click the “Revert to default” to go back to the default template.
Bonus Tips to Enhance Packing Slip in Shopify
Here are simple tips to make the most out of it to improve your brand awareness, customer trust, and retention.
- Customizing the Packing slip template is recommended. On that account, you can make minor tweaks to the template to keep your customer experience and brand voice better.
- Adding an order or customer note to the Packing slip is a good practice. And for that, use variables such as {{ note }} or {{ order.note }} in your Liquid template to dynamically insert a note into your Packing slip.
- The customization will be even better if you add personalized notes to make your customer feel special. For instance, inserting their name, wishing on birthdays or any other special days, etc.
- You might often encounter issues while Shopify printing slips altogether, such as incorrect information, formatting issues, difficulty in bulk printing, etc. Try simple fixes to rectify such issues by adjusting the template code, checking printer settings, verifying browser compatibility, etc.
Frequently Asked Questions
How to Add a Logo to Packing Slips in Shopify?
To add a logo to your Packing slip, just follow the steps to edit the Liquid code. Within the Liquid code editor, add or replace code to include your logo.
How to Remove Address From Packing Slip in Shopify?
In the Liquid code editor, find the section that outputs the address. It resembles the code snippet like {{ shop.address }}. Once you find that, carefully remove that section or make that section a comment to disable it temporarily. Use {% comment %} and {% endcomment %} tags to change the section as comment.
What Information Can You Include in a Packing Slip?
The Packing slip should have information such as the sender address, receiver address, shipment details, list of items in the package, quantity of each item, SKU number, etc.
Enhance Your Operational Efficiency
No details are too small! And often, small things create a big impact.
Shopify Packing slips may seem like a small part of the e-commerce business, but play a vital role in business improvement. So, with these steps start creating Shopify packing slips or let our Shopify developer do that for you.
This way you can save time and resources. Also, you can increase revenue by focusing more on innovating ideas and improving product quality to keep revenue flowing.