Magento 2 supports creating multiple stores under a single admin panel. This can be useful for the growing brands to expand their business to more than one location. Multi-store setup in Magento 2 helps in several ways, such as
- Easy administration of business through single configuration.
- Cost reduction for third-party modules and integrations.
- Retention of common customer database.
You can create as many stores as you want in Magento 2, and manage them through a common admin panel. This can be pretty useful when you are taking your business global, and want to create a Magento 2 Multi-language store setup.
If you are a Magento beginner, and lost in figuring out the differences between store and store view, check out this post. You can enable single store mode in Magento 2 when needed to turn off all store view options and scope indicators.
In this tutorial, find the complete stepwise method to set up Magento 2 Multi Store.
Steps to Set up Multiple Stores in Magento 2
Creating multiple stores under single administration is possible in the Magento 2 platform. You can create multiple stores under single website, or create individual stores under different websites.
In this example, we are going to create a separate website for the new store.
Simply log into your Magento 2 admin panel and follow these steps create your own Magento 2 multi-store site:
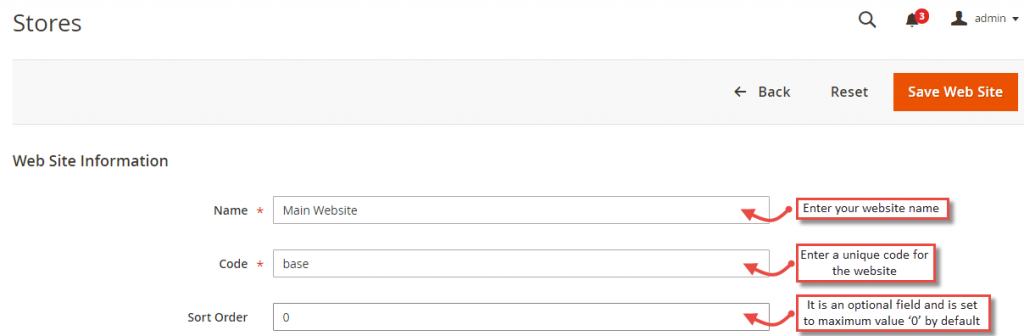
Step 1: Create a New Website
In the left menu, navigate to Store > Settings > All Stores. In the All Stores section, click on Create Website, and configure the following settings:
- Name: Enter a name for the new website.
- Code: Set a unique code for the fresh website.
- Sort Order: Enter the sort order for the website, the default is ‘0’. (Optional)
Step 2: Create a New Store
Now, let’s create a new Magento 2 store under the fresh website we created. Go to Store > Settings > All Stores, click Create Store, and configure the following settings:
- Web Site: Choose the website that we created earlier. (This store will be created under the selected website)
- Name: Enter a name for this store name. (For example: meetanshi)
- Code: Set a unique code for this store.
- Root Category: Choose the category for the store view.

Click the Save Store button to create a new store in Magento 2.
Step 3: Create a New Store View
Finally, create a new Store View under the store we created earlier. To do that, go to Store > Settings > All Stores, and create a store view using the following settings:
- Store: Select the store under which you want to create the new store view.
- Name: Enter the name of the new store view. (For example: Meetanshi)
- Code: Set a unique code for the store view.
- Status: Choose enable to make the store view active.
- Sort Order: Enter the sort order for the store view, the default is ‘0’. (Optional)
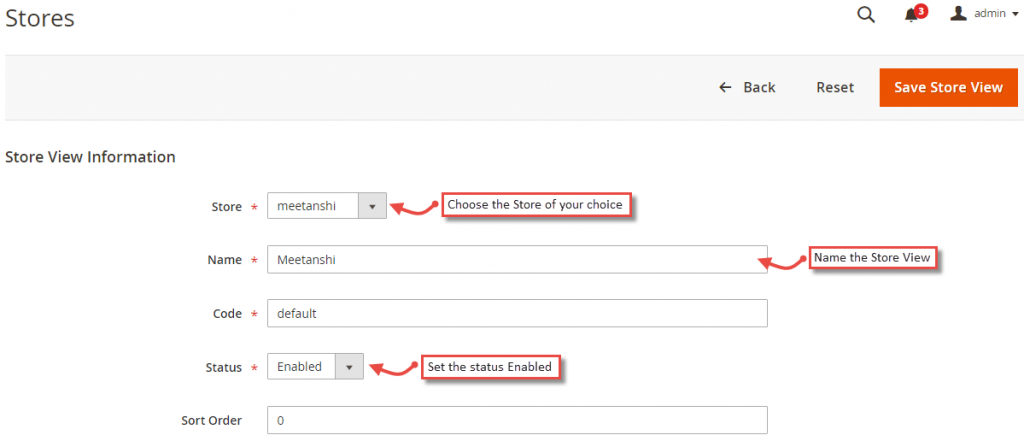
Click Save Store View button to savbe the store view.
Step 4: Enable Developer Mode
This step is optional if you already have developer mode enabled in Magento 2.
First, provide access to the required directories using the following commands:
chmod -R a+wX var

chmod -R a+wX app/etc

chmod -R a+wX pub
Next, use the following command to enable developer mode in Magento 2:
bin/magento deploy:mode:set developer
Alternatively, you can also enable developer mode in Magento 2 by replacing
MAGE_MODE’ => ‘default’ with MAGE_MODE’ => ‘developer’ in the app/etc/env.php file.
Step 5: Add index.php and .htaccess files
Create a new folder in the Magento 2 folder, i.e. demo5, and copy the index.php and .htaccess files from the root directory into it.
Replace the following code in the index.php file:
<?php
require realpath(__DIR__) . '/../app/bootstrap.php'; // path of root magento bootstrap.php
$params = $_SERVER;
$params[\Magento\Store\Model\StoreManager::PARAM_RUN_CODE] = 'base'; // change this with the code you chose in step. 4
$params[\Magento\Store\Model\StoreManager::PARAM_RUN_TYPE] = 'website'; // store or website
$bootstrap = \Magento\Framework\App\Bootstrap::create(BP, $params);
$app = $bootstrap->createApplication('Magento\Framework\App\Http');
$bootstrap->run($app);
Step 6: Create Base URL
Next, go to Stores > Settings > Configuration > General > Web, choose the website that we created in Step 1, expan the Base URLs and configure the following settings:
- Base URL: Enter the base URL for the website.
- Base Link URL: Enter the base link URL for the website.
- Base URL for Static View Files(default value): Enter URL for static view files.
- Base URL for User Media Files(default value): Enter URL for media files.Fill the same in the fields under Base URLs (Secure) if needed for ‘https’ access.
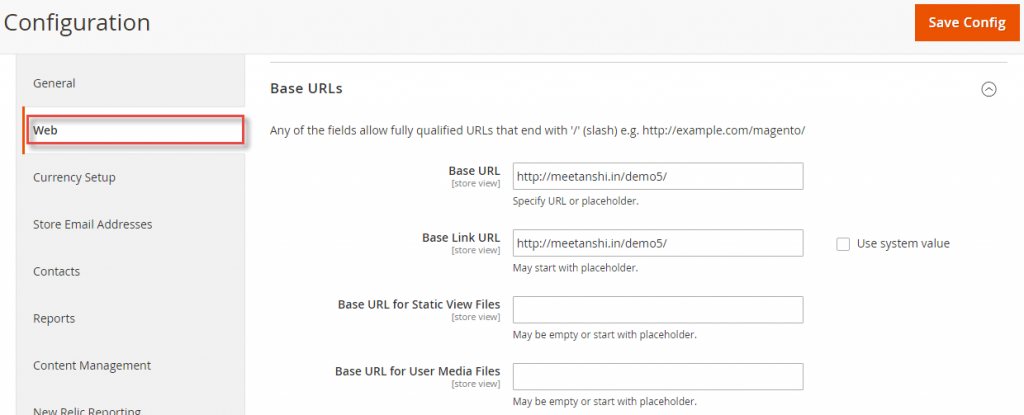
Finally, click Save Config to save the settings.
Step 7: Flush Magento 2 Cache
In the end, flush the Magento 2 cache.
Navigate to System > Tools > Cache Management and click Flush Magento Cache.
That’s it!
In case you are finding it challenging to create Magento 2 multi-store, you can always hire Magento certified professionals to do that for you. Our professionals are available to hire on a fixed hourly rate or on project basis. Contact us with your requirements and one of the our executives will get back to you shortly.
Do not forget to share this guide to set up Magento 2 multi store with your Magento friends via social media.
Thank you!!
