Are you thinking of moving your old Shopify store to a new one?
Surely, not a bad idea! It might seem like an easy task, but there is a chance that you might miss out on some important steps while you migrate Shopify to another Shopify store.
Here is a step-by-step guide that tells you exactly how to migrate from the old Shopify store to the new one seamlessly without missing out on any steps.
Let’s jump in and get your Shopify store moving without missing a beat.
Shopify to Shopify Migrations: The Needs
Migrating from Shopify to the Shopify store surely helps boost the branding of your business.
It gives you better features to explore, a new and fresh look, better app integration opportunities, and strong security. Your brand can get a new image for better sales, and it gives you a chance to implement new marketing ideas.
- A new Shopify store will give you more advanced features and a better plan that suits your business needs.
- Migrating gives you a rebranding opportunity It allows you to have a fresh start as per your choice
- A new store brings updated security and data protection, privacy laws, and security-purpose features.
What Data Can You Migrate from Shopify to Another Shopify Store?
When transferring your old Shopify store to a new one, what you take with you is essential as you build your new store around it. Here are all the data you can migrate from your existing Shopify store to a new one:
- Product List
- Inventory List
- Purchase order data
- Export customers
- Export discount coupons
- CMS pages
- Blogs
Now, let us see how to migrate them. Bookmark this and keep it as a checklist so you do not forget to migrate a Shopify store from one account to another.
6 Steps on How to Migrate Shopify to Shopify
Step 1: Create a New Shopify Account
Step 2: Go Back To The Old Store, Export The Data
Step 3: Import The Exported Data To The New Store
Step 4: Set Up The Payment Process
Step 5: Add DNS Settings
Step 6: Add Shipping Information
Step 1: Create a New Shopify Account
For creating a new store it is important to create a new Shopify account. The first and foremost thing that you should do is to create a fresh new Shopify account.
You can create a Shopify account by clicking on “Start Free Trial”. You just have to follow the same process as you did to build your previous store. Later on, choose a plan that you want to have later.

Step 2: Go Back To The Old Store, Export The Data
To import all the data into the new store, it is important to first export all the data from your old store.
You can export all the data like products, customers, inventory, discounts, etc. Once you export the data you can easily import it to the new store.
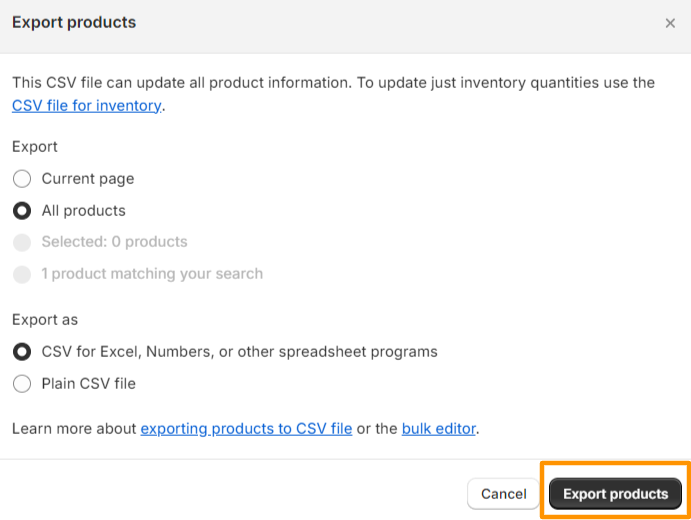
Export Product List
You can export your products from the product list that you created and sold.
- Go to the “product” option from the sidebar menu.
- Select the “Export” option to export all the products that you have listed
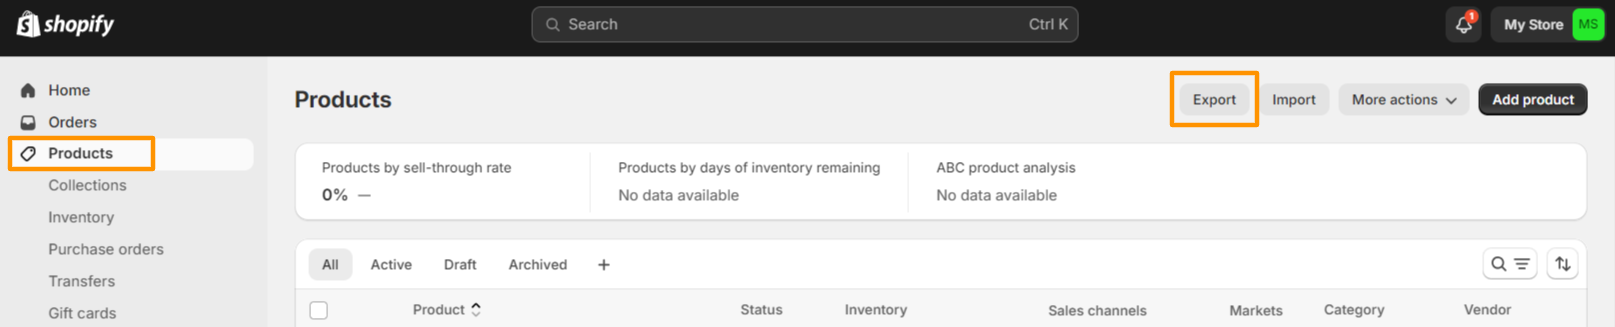
- When you select “export,” you will get options to choose and download in that particular format.
- Export products successfully
Export Inventory List
Exporting inventory is as simple as exporting products.
- Go to the “inventory” option from the sidebar menu
- Click on the “Export” option
- Select the preferable format for downloading and simply click on “Export Variants”
- Your inventory data will be successfully exported
Export Purchase Order Data
Go to the “purchase order data” option. It is available under the product menu in the sidebar
- Select the purchase order data from the sheet. Click on the “purchase order” details
- Click on the “more actions” option
- Export PDF option will be available. Click on PDF to export the purchase order data for the record. Your purchase data will get downloaded easily.
The purchase order data record is mainly for the business owners to keep the record and for further reference or any work.
Export Customers
- Go to the “customers” option from the sidebar menu
- Click on “export” data to download all the customer details
- Select the appropriate export option and simply click on the “export customers” option.
Export Discounts
- Click on the “discount” option from the sidebar menu
- For exporting, click on the “export” option to export the discounts that you have created for your customers
- Select the appropriate option for exporting discounts
Step 3: Import The Exported Data To The New Store
To import data, log in to your new Shopify admin panel. Migrate all information from one Shopify store to another, including products, inventory, customers, and more.
Let’s understand how to import data into your new Shopify store.
Import Products
- Click on “product” from the sidebar menu
- Select on “import” product

- Add your exported product file
- Upload and preview exported products

- Your products will be successfully exported
Import Customers
- Click on “customers” from the sidebar menu
- Import the exported file of customers from the old Shopify store.
- Click on “import” customers
- There will be an “add file” pop-up box, and you can add your exported file of customers
- After a process, you will be able to see what and which customers missed getting imported and failed.
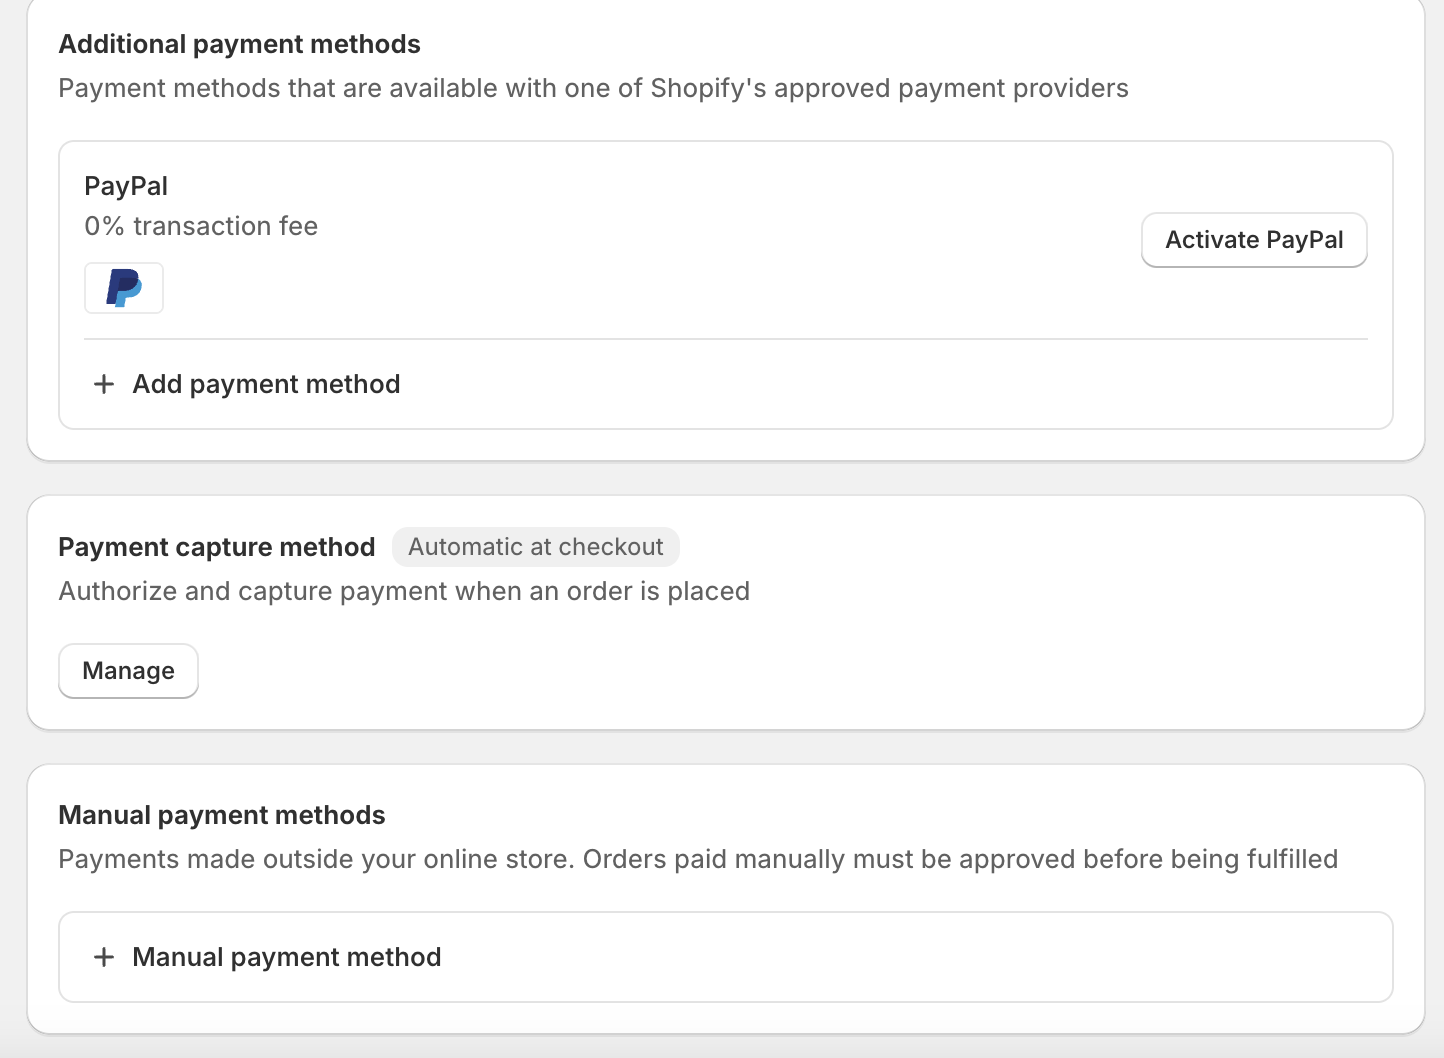
Step 4: Set Up The Payment Process
One of the important processes in any e-commerce business is to add payment options for your customers. Let’s look at how you can add payment providers to your store.
- Click on “settings” from the left side corner
- Click on the “payment” option from the sidebar menu
- Choose a provider and add a payment method according to your business
Step 5: Add DNS Settings
Update your DNS settings in your new Shopify store. It is important to update a record in your domain to make a point in your Shopify new store.
Step 6: Add Shipping Information
Once you import all the data, it is important to add all the shipping and delivery information.
- Click on “settings” from the left corner
- Select the “shipping and delivery” option
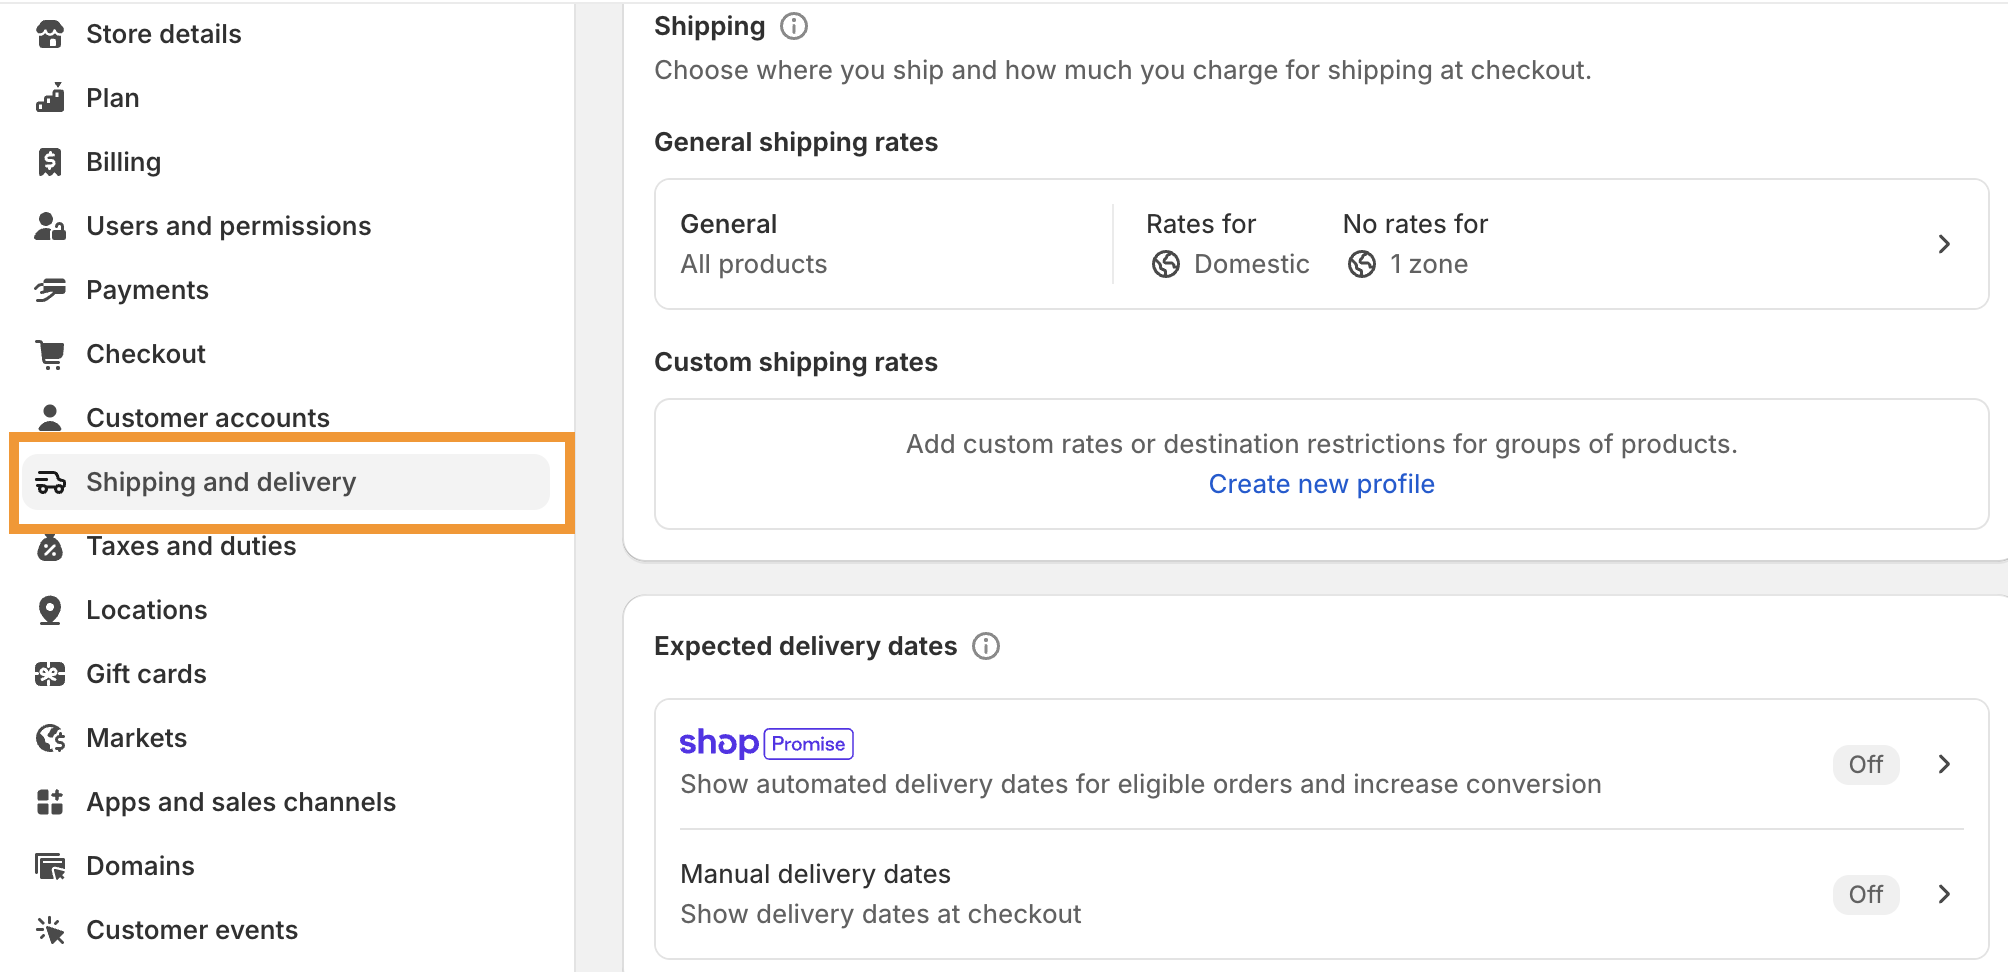
- You will be able to add all the details related to shipping and delivery details.
- In this section, you will be able to add the general shipping details for domestic shipping. Where you ship and deliver your products, add product shipping charges according to the location.
- Add expected delivery dates. At what estimated time will you be able to deliver your products to your customers?
- You will be able to add your rate. By default, your region is selected based on your domain registration.
- Add your pricing rate, and you can also name them. You can add multiple rates according to your business.
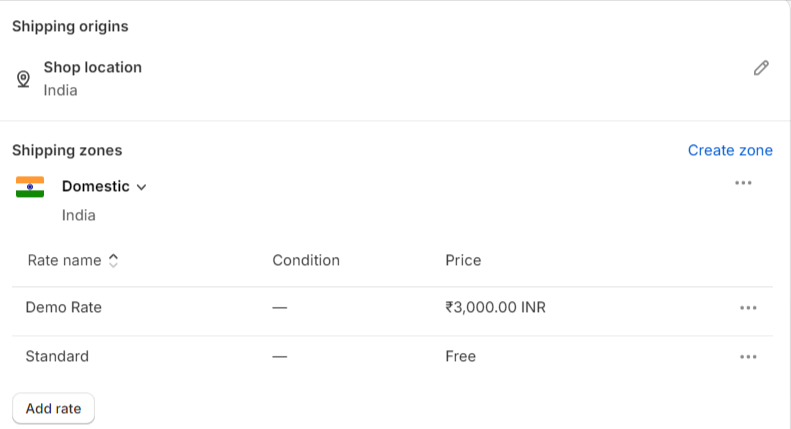
Domestic Shipping Details:
- For the domestic pricing range, you can set your rates and price. You can add multiple rates to ship in your region. For example, here, the region is India.
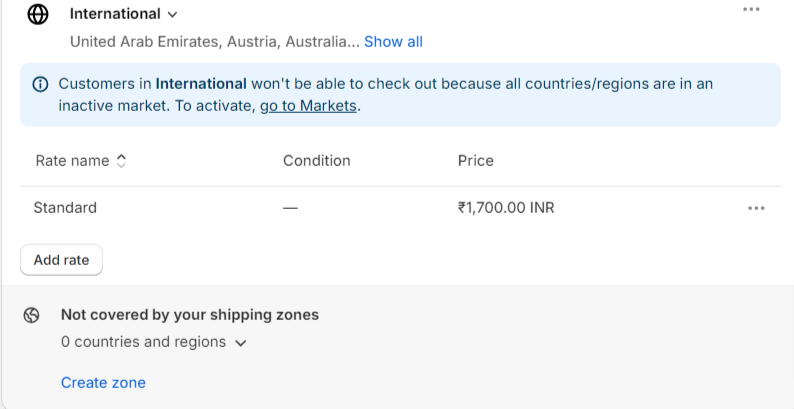
International Shipping Details:
- You can add your international pricing and shipping details. You will be able to add multiple rates and shipping details.
- Simply click on “save” all the shipping details and taxes that are payable at the end of the page.
Migrate Shopify to Another Shopify Store: Tips from Our Experts
You want to have a seamless Shopify-to-Shopify migration. You do not want any problems and want to make it a scary process. Apart from the steps, let’s hear some top advice from our experts.
- Backup Your Old Store Data: Take a complete backup of your existing store. This backup includes all the details like product, customer information, and transaction histories to safeguard against data loss.
- Optimizing For SEO: Improve your new store’s visibility on search engines by fine-tuning SEO elements like keywords, meta descriptions, and image alt texts to enhance organic traffic.
- Check The New URL Structure & Redirects: Verify that the new store’s URL structure is logical and functional. Set up redirects from old pages to corresponding new ones to maintain search rankings and user access.
- Migrate at The Right Time: Choose a low-traffic period for migration to minimize disruptions to your business operations and customer shopping experience.
- Test User Experience: After migration, thoroughly test your new store to ensure all features work as intended. Check navigation, loading speeds, and checkout processes to ensure a smooth user experience.
Transfer Shopify to Another Shopify Store with Meetanshi
To migrate Shopify to another Shopify store might seem straightforward, but it’s pretty tricky. You could lose important information if it’s not done carefully. And honestly, who has the time to make sure everything goes perfectly? That’s where we come in.
Here at Meetanshi, we take care of everything for you. From start to finish, we handle your Shopify store’s move, making sure nothing gets missed. So, you can relax and focus on your business, knowing your store is in good hands.
Ready to make the move without the hassle? Reach out to us today, and let’s get your store transitioned smoothly and efficiently.