A slow Magento 2 database directly impacts your store’s performance and, ultimately, your shoppers’ experience.
But, no more.
This blog is our Magento expert-approved list of all the important Magento 2 database optimization steps you can take today to speed up your store and stabilize checkout in 2026.
5+ Magento 2 Database Optimization Steps (+ How Fix)
The database is the core of your Magento 2 store, preserving all product, customer, and order data and different configurations. Over time, the database gets bloated with unnecessary logs and inefficient indexing, directly resulting in slow loading times, poor admin performance, and even costly server downtime.
Here are the exact steps you must follow to improve speeds by up to 2x, and ensure your store remains fast and stable even as your sales volume grows.
Step 1: Remove Unnecessary Entries
Magento stores various background data (like product and inventory updates) internally. This data can build up and slow down your store. The best way to avoid this is to leverage Magento’s automatic cleanup feature to remove old or unused data, which keeps the database fast.
Here’s the process to do it directly from the admin panel:
- Head to Stores > Configuration under Settings.
- Expand Advanced and select System in the left sidebar.
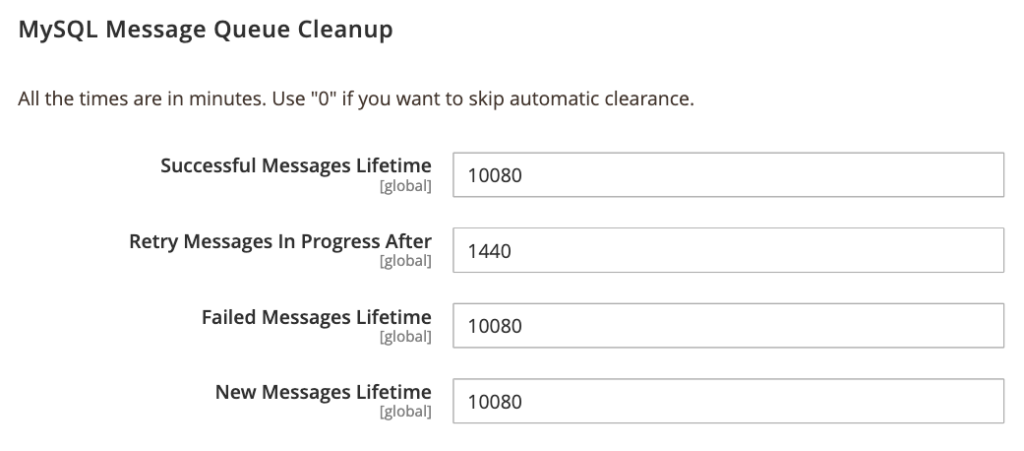
- Scroll to the MySQL Message Queue Cleanup.
Add the relevant values for the fields, and click Save Config to apply the changes.
Step 2: Set an Automatic Log Clearing
You can manage and clear logs in Magento 2 using the command line (CLI), the admin panel, or by manually clearing the database tables via a tool like phpMyAdmin.
Using the Command Line Interface is the best and fastest way to delete large log files (like system.log and exception.log) from the var/log directory on your server. You can trigger the cleanup manually using the CLI.
To clean database logs instantly, run:
php bin/magento log:clean
If you want to keep logs only for a specific number of days, use the –days option:
php bin/magento log:clean --days=1
This command will remove all log data older than one day.
Magento creates log files (system.log, exception.log, debug.log) in the var/log directory. These files can be safely deleted and will be automatically recreated as needed.
To do so, head to your Magento project’s root directory in your terminal or SSH client.
Run the following command to delete all files within the var/log directory:
rm -rf var/log/*
This helps free up disk space and ensures that only fresh logs are stored going forward.
Step 3: Set Indexers to “Update on Schedule”
Changing the index mode from “Update on Save” to “Update on Schedule” is a good practice primarily for resource management, especially on large systems with frequent data changes.
Whenever you make any changes in the product price, stock, or category, it immediately recalculates and updates the affected index tables. This involves heavy database write operations.
When you change from “Update on Save” to “Update on Schedule,” it simply flags the index as needing an update. The actual intensive recalculation of the index happens later, when a cron job runs.
To change an indexer’s mode, use the Admin Panel, go to System > Tools > Index Management, select the indexer, choose Update by Schedule from the Actions dropdown, and click Submit.

Step 4: Use OpenSearch as the Primary Engine
Enabling OpenSearch as the primary search engine for Magento 2 is mandatory for versions 2.4.x and newer, as it replaces the less efficient MySQL-based search. It provides faster, more accurate search results and reduces the load on your main database.
Every time a shopper searches for something in your store, the default MySQL search forces the main database server to scan the larger product tables to get the results.
OpenSearch uses inverted indexing technology. When a search happens, it immediately returns the product IDs without taxing the main database without disturbing the main database.
Here’s how to use it as a primary search engine.
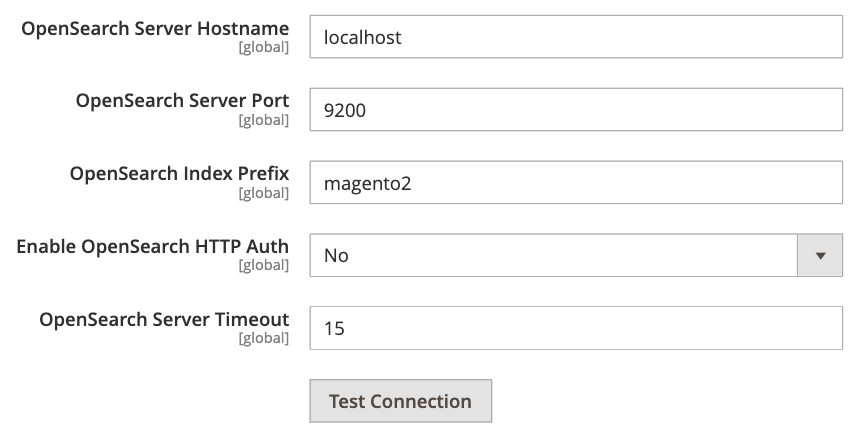
Log in to your Magento Admin and go to Stores > Configuration, in the left-hand menu, expand the Catalog section, and click Catalog Search.
Then, in the Search engine field, fill in all the details and click Test connection to verify that all the information is correct.
Step 5: Avoid Using Flat Catalogue
The main reason to avoid using Flat Catalogue is its compatibility issues with the latest Magento 2 versions.
The flat catalog is deprecated by Magento, starting with version 2.3.0. It was an essential feature for Magento 1 and 2 stores, but now search engines like OpenSearch handle this functionality much better.
Continuing to use it can cause indexing issues, data inconsistency, and performance degradation. Here are the steps to disable it.
Go to Stores > Configuration> Catalog > Storefront in the Magento admin panel.
- Set Use Flat Catalog Category to No
- Set Use Flat Catalog Product to No
- Click Save config.

Step 6: Update Your MySQL Database
Updating the MySQL database is good practice for smooth operation, whether you’re upgrading Magento, adding extensions, or applying security patches, and prevents errors or data conflicts.
The Magento 2 MySQL database update process usually involves three main steps: backing up your current database, applying system or module upgrades, and letting Magento automatically update the database using Command Line Interface (CLI) commands.
Most updates are handled using the following core command:
bin/magento setup:upgrade
Once completed, Magento automatically updates the required database tables and structure.
After updating the database, it’s also essential to:
- Run dependency compilation
- Deploy static content (for production mode)
- Flush and clean caches
These steps ensure that both the backend database and frontend store remain fully synchronized.
Tips to Avoid the Impact on Your Magento 2 Database
These are some bonus tips that definitely block unnecessary stress on your Magento 2 DB.
Prioritize a Multi-Layer Caching Strategy
Optimizing cache should be done at three levels: application, server, and network.
Application-Level Caching avoids cache flushes to maintain performance. Use Redis for Magento’s cache and sessions instead of the file system. This faster, in-memory store reduces DB load.
Full Page Caching prevent requests from reaching the Magento database. It stores and instantly serves fully rendered HTML pages. For optimal results, Varnish should be placed in front of your web server to handle requests.
Server-Level Caching should be configured on web servers like Nginx or Apache using proper cache headers, allowing browsers to store these files locally. Using a CDN further improves performance by delivering static content from the closest server.
Audit All Third-Party Extensions
Regularly auditing extensions is needed because outdated or unnecessary modules can slow down your website and expose it to security risks, which is why you can audit your installed extensions in three simple phases.
Start by identifying all the modules installed on your store. You can use the following CLI command to get a complete list: php bin/magento module:status
Once you have the list, review each extension and disable anything that is no longer required. Also, check the developer’s reputation and the last update date of the extension. Extensions that haven’t been updated in a long time have a higher security and performance risk.
If you suspect an issue, disable the extension via CLI to confirm the problem. Keep a list of all installed extensions and their versions for easy future updates.
Separate Your Web and Database Servers
Moving the database (MySQL/MariaDB) to a separate server from the web application is a top hardware optimization for busy or growing Magento 2 stores. This separation greatly boosts both performance and security.
The process involves preparing the new database server and updating your Magento configuration to point to the new location.
Prepare the new database server for your database (MySQL/MariaDB) and secure it by only allowing your web server’s IP to connect.
Migrate the database to the new database server, and import it. Then, create a new database user with the required permissions for Magento.
Update Magento configuration edit the php file and replace localhost with the new database server IP or hostname.
After saving the changes, flush the cache and test your storefront to confirm everything works correctly.
Let Experts Manage This Task
Attempting this solo setup is not a good idea. While detailed Magento 2 database optimization steps unlock the major performance gains, they come with a high risk. One wrong move, and you could face irreversible data loss or a site crash.
To ensure the safest optimization of your Magento store’s database, consider hiring a Magento developer service. A professional will maintain an up-to-date, properly configured database, apply the correct strategies, and help you avoid unnecessary complexity and hassle.
We help you create a high-performing, scalable, and secure Magento 2 store.
Talk with Us