A Cash on Delivery order form effectively streamlines checkout, allowing COD shoppers to place their order quickly.
Your shoppers fill a simple form with a few fields to place their order — no going through lengthy checkout procedures.
In this blog, I will cover how to add a COD form in Shopify in the easiest way possible among your different options.
But let’s first understand why this form is necessary.
Why Add a COD Form in Shopify?
A COD form is a great win for your store, especially for shoppers using COD as their preferred payment option:
- It simplifies the checkout process
- Filters out the not-so-serious buyers
- Improves the retention rate
While Shopify doesn’t have a direct way to add a COD form, you can still do it in two ways.
Ways to Add a Shopify COD Form
- Using a snippet code: You need to enter a custom code in the theme file of your Shopify store. You might need a developer’s assistance to write & embed the code, or you can do it yourself, but you are comfortable.
- Using a COD form app: This is a simpler option, as you only need to install and enable the app. The app will take care of the rest, from collecting order details to customizing the COD form for specific customers or countries.
The latter comes with more customization options, which are limited to using a code snippet since you’ll need to update the code manually whenever changes are required.
How to Add a COD Form to Shopify? (Using an App)
Using the Shopify Apps For COD is the easiest method to add a COD form; here, you can use the MIT Quick Order Form COD — it works without coding, customizable, and FREE to use.
Using the app, you only need to follow these four steps:
- Step 1: Install and Configure the App
- Step 2: Create Your Popup Form
- Step 3: Add Your Shipping Methods
- Step 4: Configure Simple and Advanced Settings
Step 1: Install and Enable the App
Head to the Shopify app store and install the MIT Quick Order Form COD form.
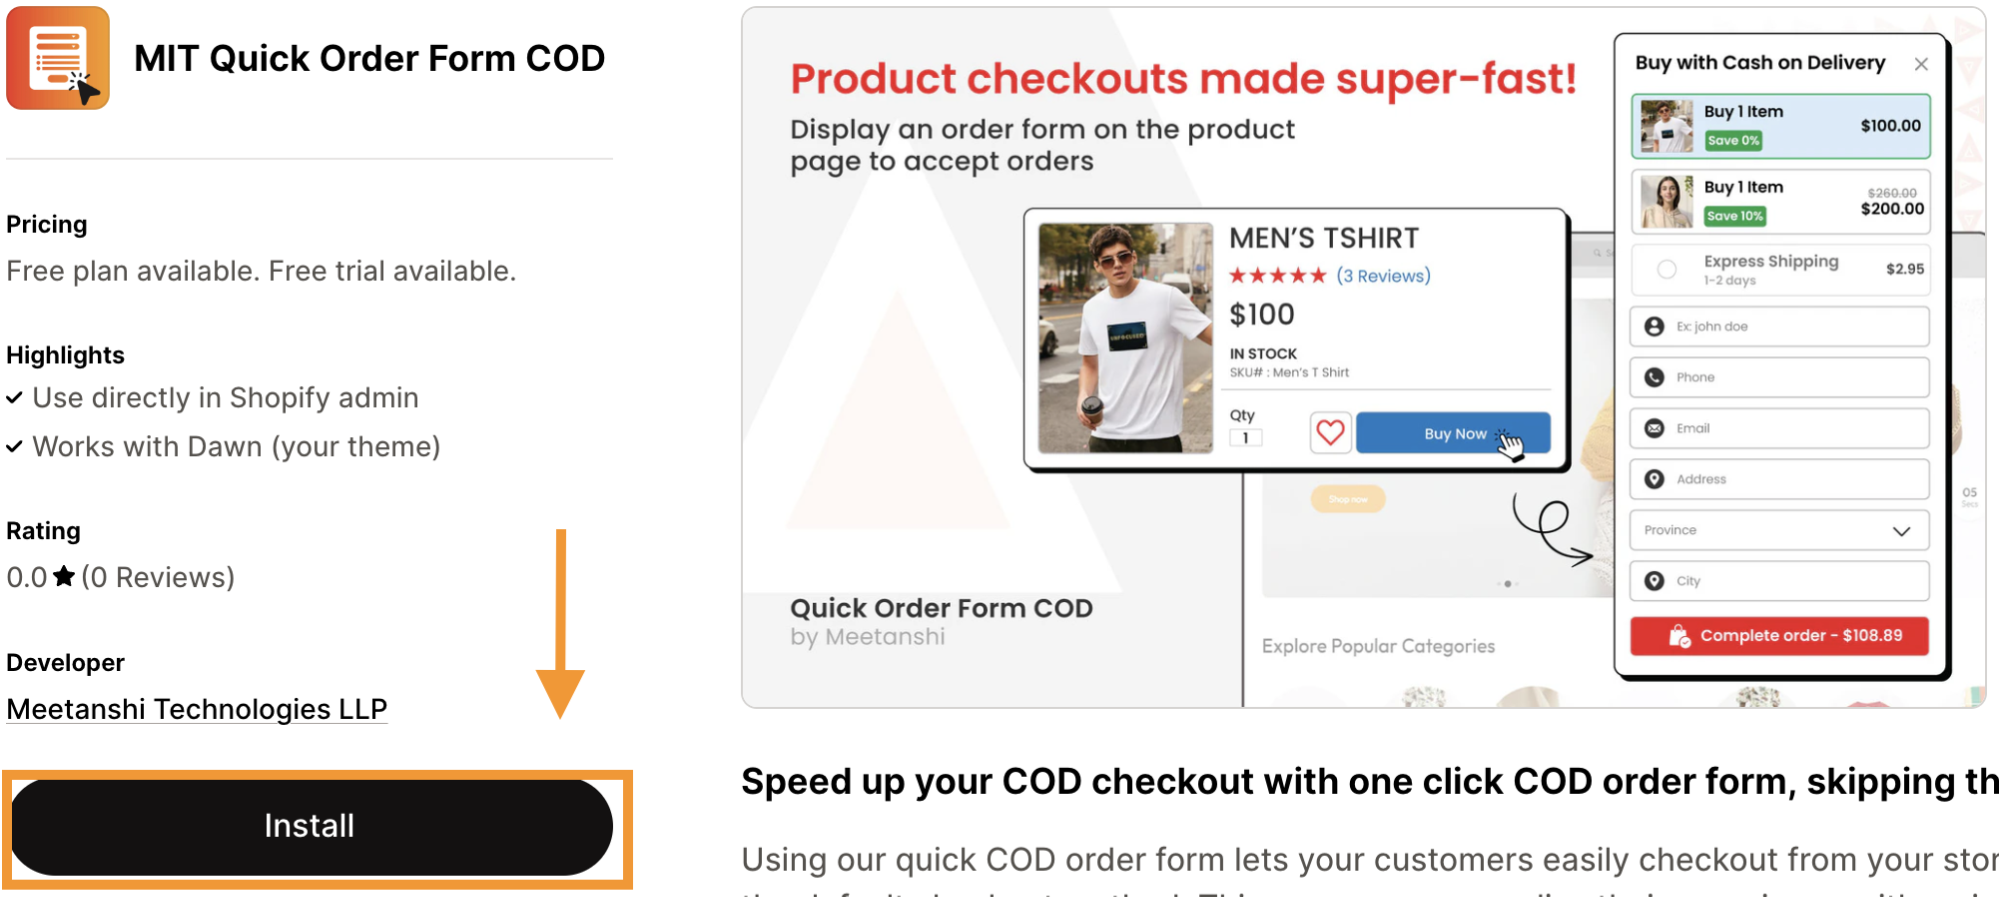
Then, from the Shopify admin panel, head to the app dashboard and enable the quick order form on the product pages.
Step 2: Create Your Popup Form
Now, you can start creating your form the way you like.
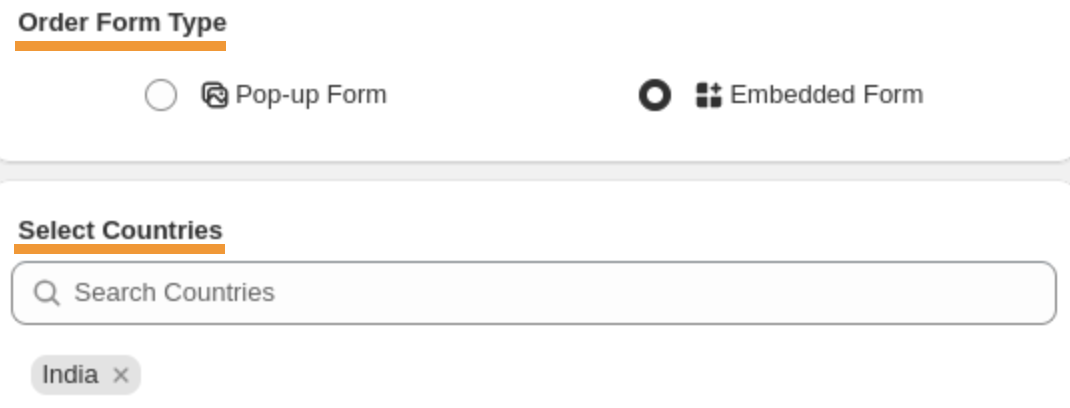
Start with choosing a form style:
- Pop-up Form to display the form as a modal pop-up for your customers.
- Embedded Form to directly integrate the order form directly onto a product or checkout page.
Then, select the countries where you want to display your order form.
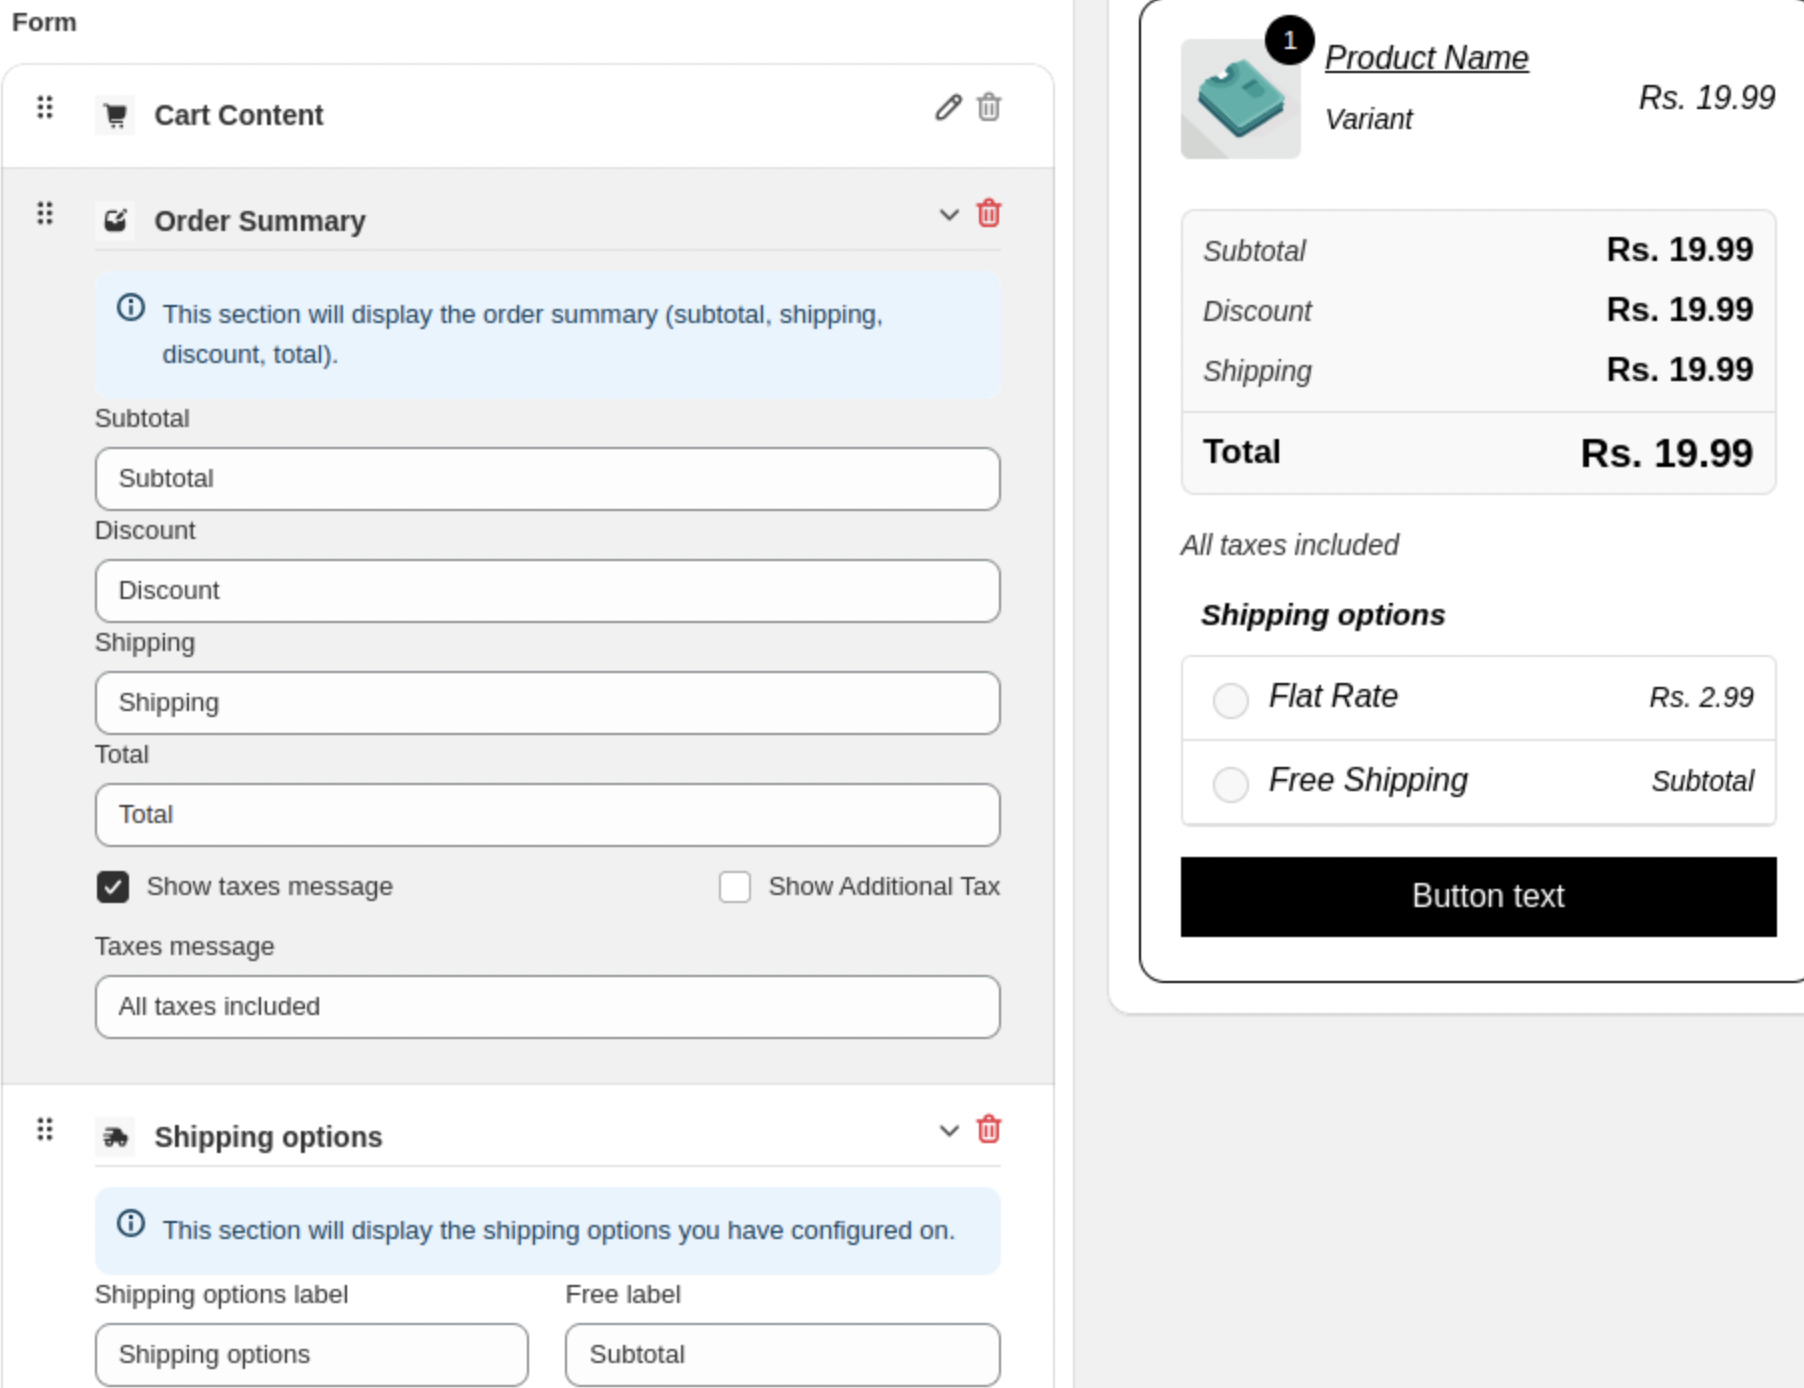
Then, you will have to fill in a few fields to customize the style of your order form.
- Cart Content: Share in brief about the items in the customer’s cart.
- Order Summary: Show a breakdown of the items ordered, including: subtotal, discount, shipping, total, show taxes message, show additional tax, and more.
- Shipping Options: Show the shipping option with a customized label
- Free Label: Write a label for free shipping
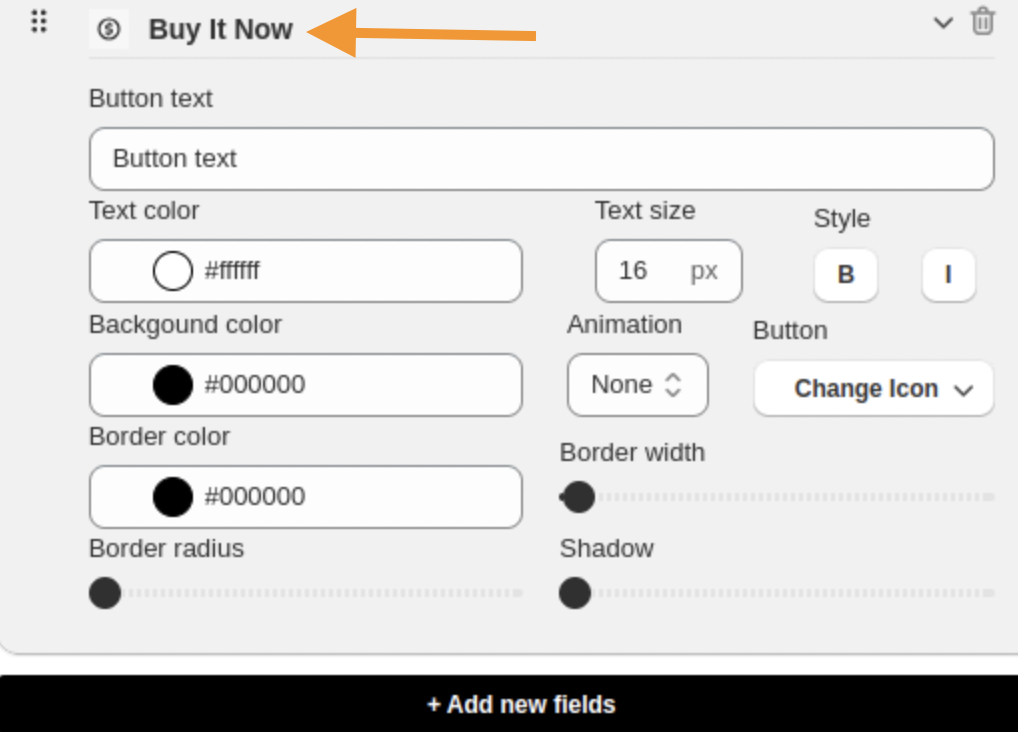
Now, you can make design customizations to make your form look appealing.
You have the option customize the Buy Now button and make other changes like text color, size, style, and more
Step 3: Add Your Shipping Methods
You can customize your shipping rates and easily add shipping rates based on different criteria.
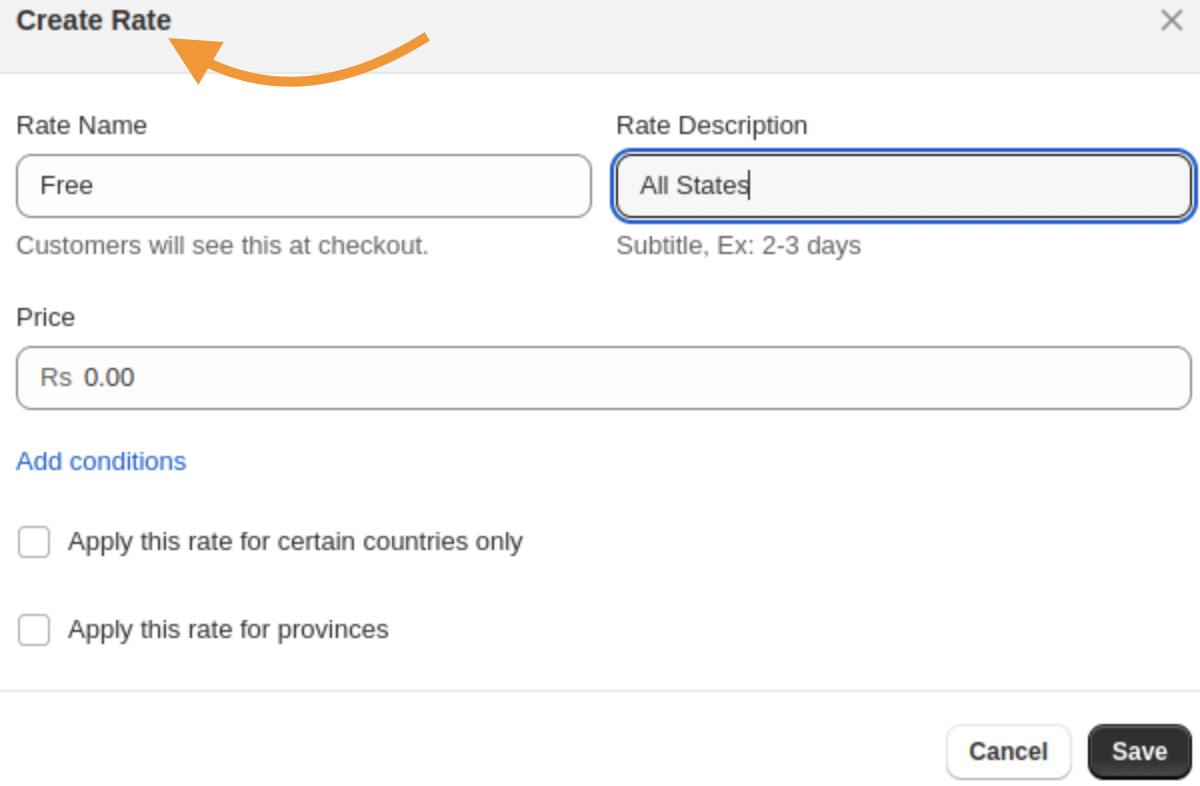
Click on the Add Rate button and create a new rate with different configurations.
- Rate Name:Give the shipping option a name
- Rate Description: Add a brief explanation of the shipping rate
- Price: Add a price for the shipping rate
- Add Conditions: Select a specific condition for the rate: Based on Order Prices or Based on Order Weight
- Minimum Price: Set a minimum order price for this shipping method
- Maximum Price: Set a maximum order price for this shipping method
- Apply This Rate for Certain Countries: Restrict the shipping rate to specific countries
- Apply This Rate for Provinces: Limit this rate to particular provinces or states
Step 4: Configure Simple and Advanced Settings
Here you will find a combination of simple and advanced settings for your COD form.
Manage redirection
Redirect customers after they click the Buy Now button for COD or display the default thank you message.
You can choose to redirect the customers to:
- Default Thank You Page
- Custom URL
- WhatsApp Chat
Add Additional Fee to COD Orders – Using this option charge an extra fee for Cash on Delivery (COD) orders:
- Charge an Additional Fee: You can charge a fixed amount or a percentage of the order value, with customizable fee names.
Orders Blocker by IP Address, Phone, Email – Easily restrict orders from specific IP addresses, product quantity, and more.
- Restrict Orders by IP Address: Allow only a certain number of orders from a single IP within a set timeframe.
- Block Orders by Product Quantity: Prevent orders exceeding a specific total product quantity.
- Manage Blocked and Allowed IP Addresses: Specify which IPs are prohibited or allowed to place orders.
- Phone and Email Restrictions: Enter specific phone numbers and email addresses that cannot place orders.
- Custom Block Message: Display a message to notify blocked customers about the restriction.
Product Page Settings – Here you can control the visibility of the add to cart and buy now button.
- Hide Add to Cart Button: Remove the default Shopify Add to Cart button to streamline the page.
- Hide Buy Now Button: Eliminate Shopify default Buy Now button for a cleaner layout.
Restrict Countries – Allow specific countries to access the COD form
Lastly set an order eligibility criteria and Click the Save button.
Advanced setting
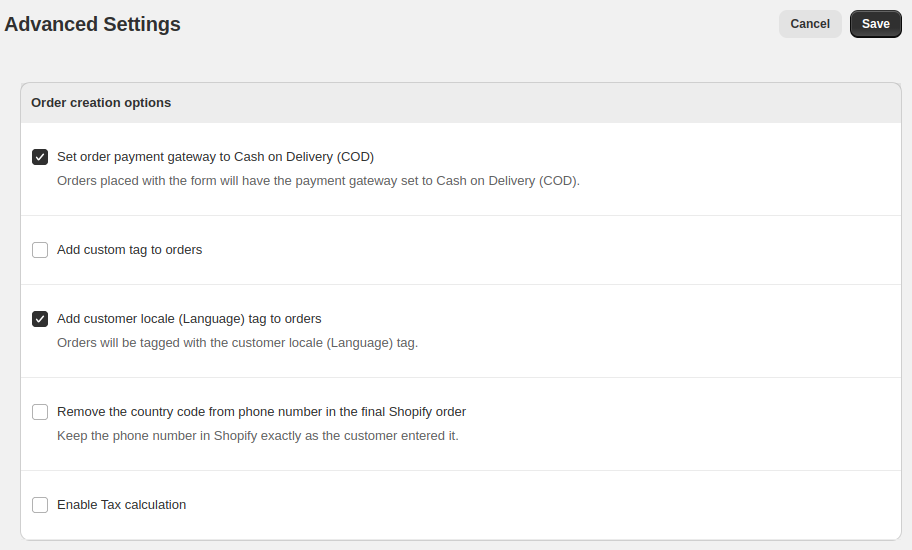
Order Creation Options – Add order handling and payment preferences
- Set Order Payment Gateway to Cash on Delivery (COD): Make sure the orders placed through the Quick Order Form are marked for COD payment.
- Add Custom Tags to Orders: Add specific tags to categorize and track orders.
- Add Customer Locale Language Tag to Orders: Auto-tag orders based on the customer’s language.
- Remove Country Code from Phone Numbers: Add customer’s phone numbers by removing the country code.
- Enable Tax Calculation: Activate tax calculations on orders made via the form to show taxes applied individually.
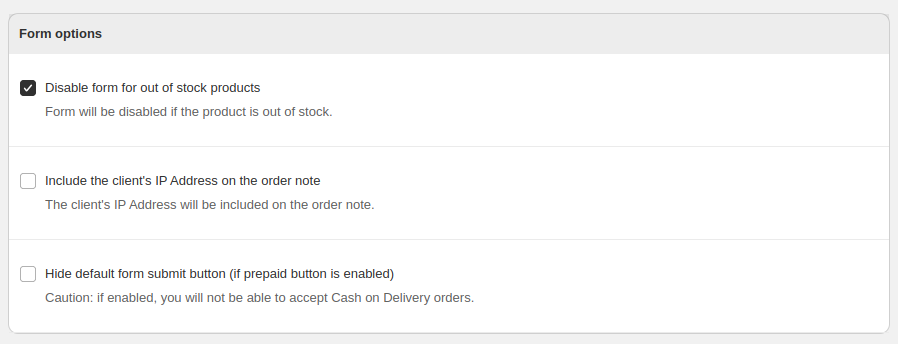
Form Options – Adjust the functionality and look of your Quick Order Form:
- Disable Form for Out-of-Stock Products: Auto-hide the form for products out-of-stock.
- Include Customer IP Address in Order Notes: Add the customer’s IP address to the order notes for added security and verification.
- Hide Default Form Submit Button (if Prepaid Button is Enabled): Hide the standard submit button
Limit Form by Products or Collection –
Control where the Quick Order Form is available across your products and collections:
- Enable Form for Specific Products or Collections: Show the form on selected products or collections.
- Disable Form for Certain Products or Collections: Hide form from specific products or collections
Select Products
Select individual products to make them eligible or ineligible for the Quick Order Form.
Select Collections
Select entire collections to enable or restrict the Quick Order Form.
And with that, you have completed the process of adding a COD form to your Shopify store. 🎉
Simplify the Buying Process for Your Shoppers
The Quick Order Form for COD is the easiest way to make shoppers happy and become their favorite store. The Meetanshi Quick Order Form COD makes it easy for you create your form for FREE. Try the app for free now!