Magento Folks!
We all love Magento because of its extensive customization capabilities, and this blog post is dedicated to another Magento 2 customization tutorial
In this blog, I am going to show you the method to display product image in order create page in Magento 2.
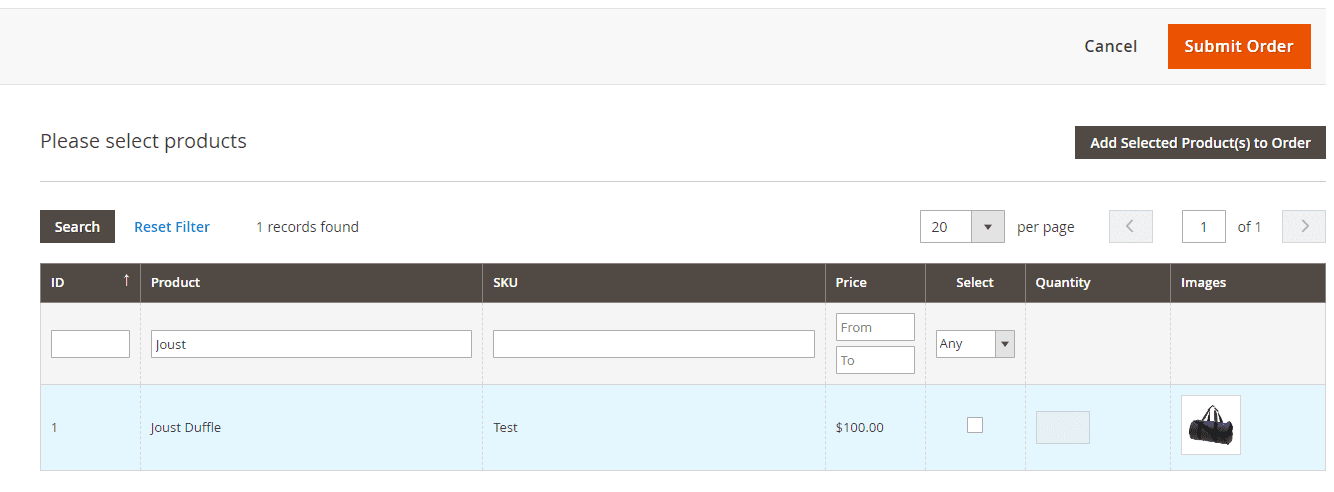
Creating customer orders from the backend is an easy-peasy process in Magento 2. The admin can go to Sales > Orders, select the products and create an order with just a few clicks! The product selection grid shows the product name, SKU, Price, etc.
These details are generally enough to add and identify the items you want, but not always when you have hundreds or thousands of products to choose from! Things can get really confusing. Adding the product image to the grid can make it easier to select the correct product.

Displaying images in the select products grid can make it a bit easier to choose the products.
In this blog post, I will share the entire method to do that!
Let’s see how to display product image in order create page in Magento 2.
Method to Display Product Image in Order Create Page in Magento 2
In order to display product image in order create page in Magento 2, we need to override the default grid.
You can simply follow these steps to do that:
Step 1: Create di.xml at app\code\Vendor\Module\ with the following code:
<?xml version="1.0"?>
<config xmlns:xsi="http://www.w3.org/2001/XMLSchema-instance" xsi:noNamespaceSchemaLocation="urn:magento:framework:ObjectManager/etc/config.xsd">
    <preference for="\Magento\Sales\Block\Adminhtml\Order\Create\Search\Grid" type="Vendor\Module\Block\Adminhtml\OverrideOrder\Create\Search\Grid" />
</config>
Step 2: Add the following code in the Grid.php file at app\code\Vendor\Module\Block\Adminhtml\OverrideOrder\Create\Search\
protected function _prepareColumns()
    {
      $this->addColumn(
            'thumbnail',
            [
                'filter' => false,
                'sortable' => false,
                'header' => __('Images'),
                'name' => 'thumbnail',
                'inline_css' => 'thumbnail',
                'index' => 'image',
                'class' => 'image',
                'renderer' => 'Vendor\Module\Block\Adminhtml\Product\Grid\Renderer\Image',
            ]
        );
    }
Step 3: Lastly, create \Vendor\Module\Block\Adminhtml\Product\Grid\Renderer\Image.php and add the following code:
<?php
namespace Vendor\Module\Block\Adminhtml\Product\Grid\Renderer;

use Magento\Backend\Block\Widget\Grid\Column\Renderer\AbstractRenderer;
use Magento\Framework\DataObject;
use Magento\Store\Model\StoreManagerInterface;
use Magento\Framework\View\Asset\Repository;
use Magento\Catalog\Helper\ImageFactory;
use Magento\Framework\Image\AdapterFactory;
use Magento\Store\Model\StoreManager;
use Magento\Store\Model\ScopeInterface;

class Image extends AbstractRenderer
{
    private $_storeManager;
    private $helperImageFactory;
    private $assetRepos;
    private $adapterFactory;
    private $scopeConfig;
    private $storeManager;
    /**
     * @param \Magento\Backend\Block\Context $context
     * @param array $data
     */
    public function __construct(\Magento\Backend\Block\Context $context,
                                Repository $assetRepos,
                                ImageFactory $helperImageFactory,
                                AdapterFactory $adapterFactory,
                                StoreManager $storeManager,
                                StoreManagerInterface $storemanager, array $data = [])
    {
        $this->_storeManager = $storemanager;
        $this->assetRepos = $assetRepos;
        $this->helperImageFactory = $helperImageFactory;
        $this->adapterFactory = $adapterFactory;
        $this->storeManager = $storeManager;
        $this->scopeConfig = $context->getScopeConfig();

        parent::__construct($context, $data);
        $this->_authorization = $context->getAuthorization();
    }
    /**
     * Renders grid column
     *
     * @param Object $row
     * @return  string
     */
    public function render(DataObject $row)
    {
        $mediaDirectory = $this->_storeManager->getStore()->getBaseUrl(
            \Magento\Framework\UrlInterface::URL_TYPE_MEDIA
        );

        if($this->_getValue($row)){
            $imageUrl = $mediaDirectory.'/catalog/product'.$this->_getValue($row);
        }else{
            $plUrl = $this->scopeConfig->getValue('catalog/placeholder/thumbnail_placeholder',ScopeInterface::SCOPE_STORE,0);
            $imageUrl = $mediaDirectory.'/catalog/product/placeholder/'.$plUrl;
        }
        return '<img src="'.$imageUrl.'" style="width: 5rem;border: 1px solid #d6d6d6;"/>';

    }
}
That’s it!
Now, the default product grid in the Magento 2 create order page will be overridden. The above code will add a new column for the product image to the grid.
This is how you can display product image in order create page in Magento 2. You can create order in M2 admin panel to assist your customers placing orders when they require.
Similar read: How to Add Image Thumbnail Column in Magento 2 Admin UI Grid
Loved this post? Rate this post with five stars & share it via social media.
Feel free to comment in case of any doubts or queries; I’d be happy to help you!
Thanks for reading!
