A product attribute defines a characteristic of the product, it is a property of the product.
For online stores, the product attributes becomes utmost important to display the product online in as many ways as possible. The product attributes help merchants offer the products in the most detailed way possible. Also, it makes easy for the visitors to browse through the products, filter them and find the exact item as per their need.
By default, Magento 2 provides product attributes but you can also create one! You can also add comment text for product attributes in Magento 2 that facilitates providing additional guidance regarding the input field such as how it will be used.
Magento 2 product attributes can be created while creating a product, or from the product attribute page.
Here, I’ll give the step-wise method to create product attribute in Magento 2 from Stores menu.
The steps are in accordance with the latest Magento 2.3.1
Steps to Create Product Attribute in Magento 2:
- Enter the basic properties
- Enter the advanced properties
- Enter the Field Label
- Enter the Store Front properties
- Save
Implement each step as shown below:
1. Enter the basic properties
- Log in to Admin Panel
- Navigate to Stores > Attributes > Product
- Click “Add New Attribute“

- Under Attributes Properties,
- Enter a Default Label to identify the attribute.
- In the “Catalog Input Type for Store Owner” field, set type in input control to be used for data entry.
- If you had selected drop-down or multiple select input types:
- Under “Manage Options“, click “Add Options“
- Enter the first value that you want to appear on the list. You can enter one value for the Admin, and a translation of the value for each store view. If you have only one store view, you can enter only the Admin value and it will be used for the storefront as well.
- Repeat the previous step for each option to be included in the list.
- For the option to be used as the default value, select “Is Default“
- If you had selected drop-down or multiple select input types:
- Set “Yes” to “Values Required” if you want to require the customer to choose an option before the product can be purchased.

2. Enter the advanced properties
- Set a unique attribute code. It should be lowercase characters without any spaces.
- Select the scope from Store View, Website, or Global to indicate where in the store the attribute s allowed to be used.
- Enable the field “Unique Value” to avoid duplicate values.
- With “Input Validation for Store Owner” field, you can validate the data entered in the text field.
- Set the “Add to Column Option” to “YES” to add this attribute to the list of column options
- Set the “Use in Filter Option” to “YES” to add the attribute to the list of filter options.

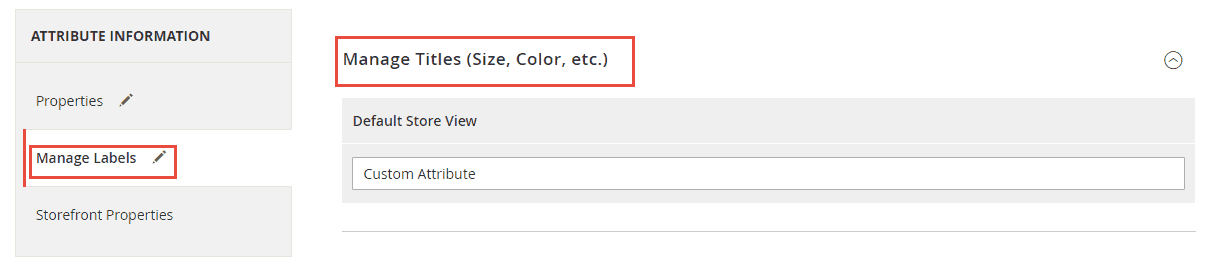
3. Enter the Field Label
- Go to “Manage Labels” under Attribute Information
- Expand “Manage Titles“
- Enter a Title to be used as a label for the field. In the case of multi-language support, enter the title for each view.
4. Enter the Store Front properties
- Go to “Store Front Properties” under Attribute Information
- Enable the “Use in Search” field for the attribute to be available for search.
- Enable “Comparable on Storefront” field to include it in product comparison.
- For catalog input field to be drop down, multiple select or price:
- Set “Use in Layered Navigation” to “YES” to use the attribute as a filter in layered navigation.
- Set “Use in Search Results Layered Navigation” to “Yes” to use the attribute in layered navigation on search results pages.
- Set the relative position of the attribute in the layered navigation block in “Position“.
- Enable”Use for Promo Rule Conditions” field to use the attribute in price rules.
- Enable “Allow HTML Tags on Storefront” field to allow the text to be formatted with HTML and use WYSIWYG editor
- Enable the “Visible on Catalog Pages on Storefront” field to make the attribute visible in catalog page listing.
- If Product Listing is supported with your theme, the attribute can be appeared and used as sort parameter by enabling “Used in Product Listing‘ and “Used for Sorting in Product Listing“

5. Save
Click the “Save Attribute” button to save the configuration.
That was it!
You can also refer to Create Product Attribute in Magento 2 from our Magento 2 video tutorial series:
You can see the custom_attribute created and listed in the Product Attribute grid:

If you want to implement the programmatic solution to create product attribute, check our blog Create Product, Category and CMS Page Attributes in Magento 2
Thank you.
