The Magento 2 orders have an order status that is linked with a state in the order processing flow. When there are thousands of orders to be managed, the correct idea of Magento 2 Order status and order state and the steps to create them can be helpful.
Difference between Order Status & Order State in Magento 2:
Magento 2 order state is the position of the order in the current processing workflow.
Pre-defined Order State:
- New
- Processing
- Complete
- Pending Payment
- Cancelled
- Closed
- Payment Review
- On hold
- Fraud
However, for order status, you can create Magento 2 custom order status too. Each order state can have more than one order statuses assigned to it for making things simpler! The status of each order is displayed in the Status column of the Order grid in the backend.
Understand the below order status workflow:
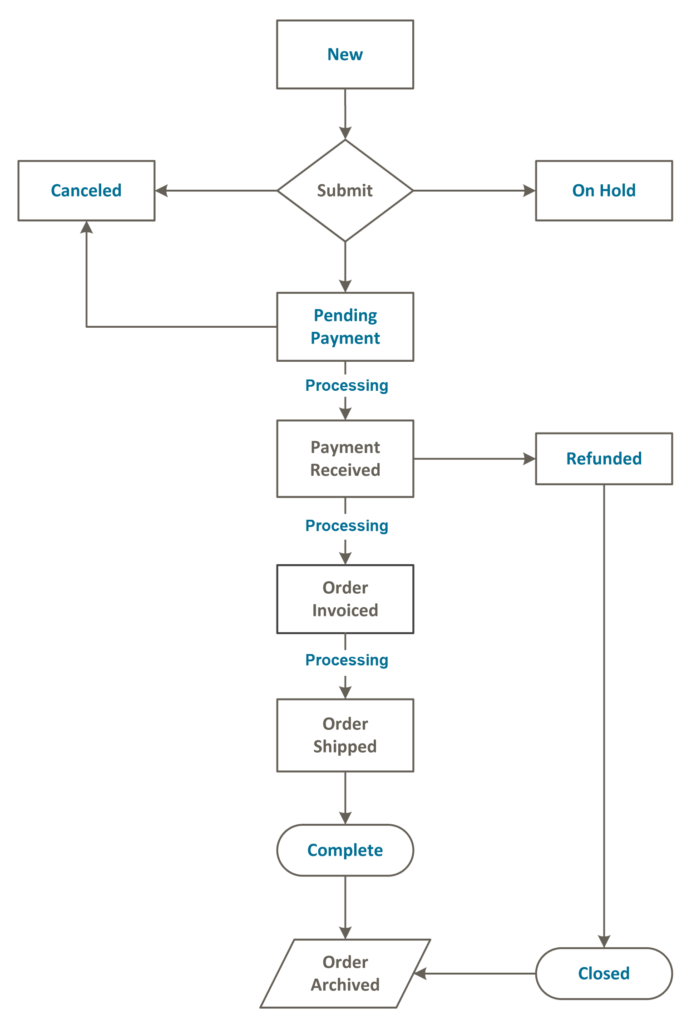
Source: Magento Tech Resources
Steps to Create Magento 2 Order Status & Order State:
1. Login to admin panel
2. Go to Stores > Settings > Order Status

3. Click “Create New Status“
4. Under Order Status Information,
- Status Code – The first character must be a letter (a-z), and the other can be a combination of letters and numbers while underscore is to be used instead of space.
- Status Label – This is shown on the admin backend and the storefront

5. If you need any labels for different store views, enter it in the Store View Specific Labels section as shown here

6. Click Save Status
Steps to Assign An Order Status to a State:
1. On the Order Status page, click “Assign Status to State“
2. Under Assignment Information,
- Order Status – Select the order status that you want to assign which are listed by status label
- Order State – Set Order State to the place in the workflow where the order status belongs.
- Use Order Status As Default – Tick the checkbox if you want to make this status the default order state.
- Visible on StoreFront – Tick the checkbox if you want to make this status visible from the frontend.
3. Click Save Status Assignment
Steps to Edit Order Status in Magento 2:
1. Click on the Order Status that you want to edit from the backend Order grid
2. Change the order status settings as required
3. Click Save Status
Steps to Remove Order Status from an assigned state:
1. Consider the Order Status you want to unassign on the Order Status grid.
2. Click on the Unassign link in the Action column.
Likewise change order status programmatically in Magento 2 for example a custom order status “printed”. When the admin prints out the packing slip, the order status is changed to “printed. You can also create order in Magento 2 admin panel and assist your customers in placing order when they need.
I’d be happy to help you out.
Also, do not forget to share the post with the Magento community via social media.
Thank you. Likewise you can also create an attribute for custom order in Magento 2 which will be seen in admin grid and will be helpful in your business to manage and fulfill online orders efficiently.
