A picture can express a thousand words!
Do you want the Magento 2 store customer to upload a profile picture? Or you require them to upload a picture of important documents like license, signature, etc.
The default Magento 2 does not support for the same.
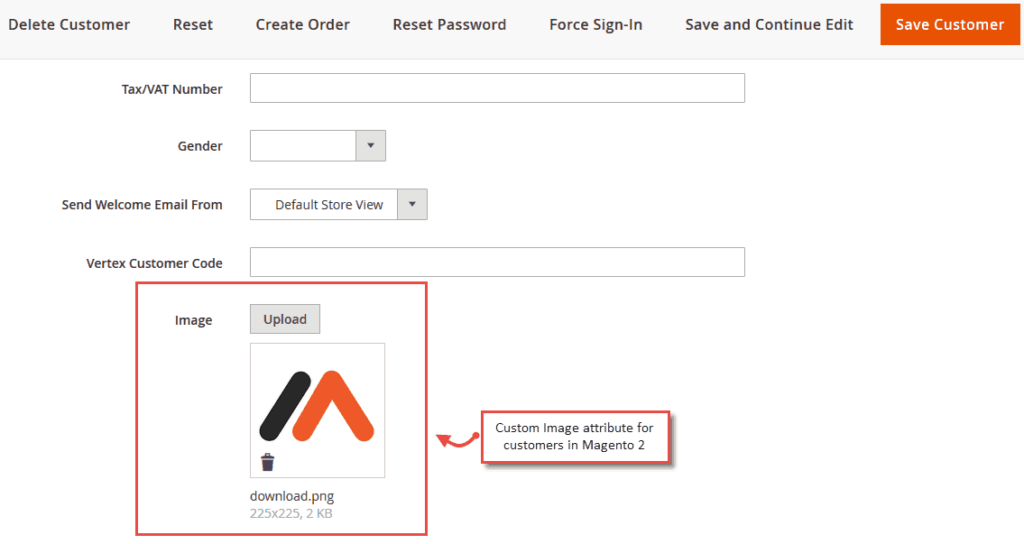
Hence, the post gives the programmatic method to create custom image attribute for a customer in Magento 2 as shown in the figure:

The frontend customer can use it as shown here:

Steps to create custom image attribute for a customer in Magento 2:
1. Create InstallData.php file at app/code/[Vendor]/[module]/Setup/InstallData.php
<?php

namespace [Vendor]\[module]\Setup;

use Magento\Eav\Setup\EavSetupFactory;
use Magento\Customer\Setup\CustomerSetupFactory;
use Magento\Framework\Setup\InstallDataInterface;
use Magento\Framework\Setup\ModuleContextInterface;
use Magento\Framework\Setup\ModuleDataSetupInterface;

class InstallData implements InstallDataInterface
{
    private $eavSetupFactory;
    private $customerSetupFactory;

    public function __construct(
        EavSetupFactory $eavSetupFactory,
        CustomerSetupFactory $customerSetupFactory
    )
    {
        $this->eavSetupFactory = $eavSetupFactory;
        $this->customerSetupFactory = $customerSetupFactory;
    }

    public function install(
        ModuleDataSetupInterface $setup,
        ModuleContextInterface $context
    ) {
        $setup->startSetup();

        $eavSetup = $this->eavSetupFactory->create(['setup' => $setup]);
        $customerSetup = $this->customerSetupFactory->create(['setup' => $setup]);

        $attributeCode = 'customer_image';

        $customerSetup->addAttribute(
            \Magento\Customer\Model\Customer::ENTITY,
            $attributeCode,
            [
                'type' => 'text',
                'label' => 'Customer File/Image',
                'input' => 'file',
                'source' => '',
                'required' => false,
                'visible' => true,
                'position' => 200,
                'system' => false,
                'backend' => ''
            ]
        );

        // used this attribute in the following forms
        $attribute = $customerSetup->getEavConfig()
            ->getAttribute(\Magento\Customer\Model\Customer::ENTITY, $attributeCode)
            ->addData(
                ['used_in_forms' => [
                    'adminhtml_customer',
                    'adminhtml_checkout',
                    'customer_account_create',
                    'customer_account_edit'
                ]
                ]);

        $attribute->save();
        $setup->endSetup();
    }
}
2. Add Image Upload Field in Customer Registration Page,
Create customer_account_create.xml file at app/code/[Vendor]/[Module]/view/frontend/layout/customer_account_create.xml
<?xml version="1.0"?>
<page xmlns:xsi="http://www.w3.org/2001/XMLSchema-instance" layout="1column" xsi:noNamespaceSchemaLocation="urn:magento:framework:View/Layout/etc/page_configuration.xsd">
    <body>
        <referenceContainer name="form.additional.info">
            <block class="Magento\Framework\View\Element\Template" name="custom_additional_field_register" template="[Vendor]_[Module]::customer/form/imagefieldregister.phtml"/>
        </referenceContainer>
    </body>
</page>
3. Create imagefieldregister.phtml file at app/code/[Vendor]/[Module]/view/frontend/templates/customer/form/imagefieldregister.phtml
    <fieldset class="fieldset file-upload">
    <div class="field customer_file_upload">
        <label for="customer_image" class="label"><span><?php /* @escapeNotVerified */
                echo __($helper->FileLabel1()) ?></span></label>
        <div class="control">
            <input type="file" name="customer_image" id="customer_image" title="<?php /* @escapeNotVerified */
            echo __('Custom Image') ?>" class="input-text" data-validate="{required:false}">
        </div>
    </div>
    </<fieldset>
4. To display the image in the custom account section,
Cretae customer_account_edit.xml file at app/code/[Vendor]/[Module]/view/frontend/layout/customer_account_edit.xml
<?xml version="1.0"?>
<page xmlns:xsi="http://www.w3.org/2001/XMLSchema-instance" xsi:noNamespaceSchemaLocation="urn:magento:framework:View/Layout/etc/page_configuration.xsd">
    <update handle="customer_account"/>
    <body>
        <referenceContainer name="form.additional.info">
            <block class="[Vendor]\[Module]\Block\Customer\Account" name="additional_field_account" template="[Vendor]_[Module]::customer/form/imagefieldaccount.phtml"/>
        </referenceContainer>
    </body>
</page>
5. Cretae imagefieldaccount.phtml file at app/code/[Vendor]/[Module]/view/frontend/templates/customer/form/imagefieldaccount.phtml
<fieldset class="fieldset create account" data-hasrequired="<?php /* @escapeNotVerified */ echo __('* Required Fields') ?>">
    <legend class="legend">
        <span><?php /* @escapeNotVerified */echo __('Image Uploaded') ?></span>
    </legend>
    <?php if ($url = $block->getFileUrl()): ?>
    <div class="field">
        <img src="<?php echo $url ?>" alt="image" />
    </div>
    <?php endif;?>
</fieldset>
6. Create Account.php file at app/code/[Vendor]/[Module]/Block/Customer/Account.php
<?php

namespace [Vendor]\[Module]\Block\Customer;

use Magento\Backend\Block\Template\Context;
use Magento\Framework\UrlInterface;
use Magento\Customer\Model\SessionFactory;
use Magento\Framework\View\Element\Template;

class Account extends Template
{
    protected $urlBuilder;
    protected $customerSession;
    protected $storeManager;
    protected $customerModel;

    public function __construct(
        Context $context,
        UrlInterface $urlBuilder,
        SessionFactory $customerSession,
        \Magento\Store\Model\StoreManagerInterface $storeManager,
        \Magento\Customer\Model\Customer $customerModel,
        array $data = []
    )
    {
        $this->urlBuilder            = $urlBuilder;
        $this->customerSession       = $customerSession->create();
        $this->storeManager          = $storeManager;
        $this->customerModel         = $customerModel;

        parent::__construct($context, $data);

        $collection = $this->getContracts();
        $this->setCollection($collection);
    }

    public function getBaseUrl()
    {
        return $this->storeManager->getStore()->getBaseUrl();
    }

    public function getMediaUrl()
    {
        return $this->getBaseUrl() . 'pub/media/';
    }

    public function getCustomerImageUrl($filePath)
    {
        return $this->getMediaUrl() . 'customer' . $filePath;
    }

    public function getFileUrl()
    {
        $customerData = $this->customerModel->load($this->customerSession->getId());
        $url = $customerData->getData('customer_image');
        if (!empty($url)) {
            return $this->getCustomerImageUrl($url);
        }
        return false;
    }
}
Note: Custom image is store at pub/media/customer path.
Use the above solution and let customers upload their favourite profile picture in the site!
Feel free to share the solution with fellow developers via social media.
Thanks.
