Themes in Magento 2 defines the look and feel of your store. Having the graphics and appearance details, the parent theme customization is not advisable.
Hence, the theme inheritance!
(Note: There is no limitation for the level of the theme inheritance)
If you want to customize the appearance, it is sane to create child theme in Magento 2 rather than implementing the changes in the parent theme. Because, if the changes are directly implemented in the parent theme, upgrading the Magento version results in loss of theme changes in the parent theme. Banner displayed in the frontend is not designed keeping in mind any custom theme designs. The solution to this issue is to Overriding Extension Files Using Your Magento 2 Theme.
To easily extend the theme and minimize the maintenance tasks, create child theme in Magento 2 and customize it. By definition, the child theme is a theme that inherits all the properties of the parent theme. It is useful to customize the existing parent theme design as per the requirements.
Steps to Create Child Theme in Magento 2:
Before following these steps, note that “Meetanshi” is the vendor name and “luma” is the parent theme name.
1. Create a child theme folder named as {parent-theme-name}_child in the following folder path.
Magento root folder/app/design/frontend/Meetanshi/luma_child
Name your child theme related to the parent theme. It can be anything that is developer friendly!
2. Create file theme.xml inside the child theme to specify the parent theme inherited by the child theme
<theme xmlns:xsi="http://www.w3.org/2001/XMLSchema-instance"
       xsi:noNamespaceSchemaLocation="urn:magento:framework:Config/etc/theme.xsd">
    <title>{Child Theme Name}</title>
    <parent>{parent-theme-vendor-name}/{parent-theme-name}</parent>
    <media>
        <preview_image>media/preview.png</preview_image>
    </media>
</theme>
Example:
<theme xmlns:xsi="http://www.w3.org/2001/XMLSchema-instance"
       xsi:noNamespaceSchemaLocation="urn:magento:framework:Config/etc/theme.xsd">
    <title>Luma Child</title>
    <parent>Magento/luma</parent>
    <media>
        <preview_image>media/preview.png</preview_image>
    </media>
</theme>
3. Create a registration.php file for registering your child theme.
<?php
\Magento\Framework\Component\ComponentRegistrar::register(\Magento\Framework\Component\ComponentRegistrar::THEME,
    'frontend/{theme-vendor-name}/{parent-theme-name}_child',
    __DIR__
);
{theme-vendor-name} should exactly match the vendor folder name. Vendor name should be capitalized. Ex: Meetanshi
<?php
 \Magento\Framework\Component\ComponentRegistrar::register(
    \Magento\Framework\Component\ComponentRegistrar::THEME,
    'frontend/Meetanshi/luma_child',
    __DIR__
 );
4. Create composer.json
{
    "name": "{theme-vendor-name}/theme-frontend-{parent-theme-name}-child",
    "description": "N/A",
    "require": {
        "php": "~5.5.0|~5.6.0|~7.0.0|~7.1.0|~7.2.0|~7.3.0",
        "{parent-theme-vendor-name}/{parent-theme-name}": "100.0.*",
        "magento/framework": "100.0.*"
    },
    "type": "magento2-theme",
    "version": "100.0.1",
    "license": [
        "OSL-3.0",
        "AFL-3.0"
    ],
    "autoload": {
        "files": [
            "registration.php"
        ]
    }
}
Example:
{
    "name": "meetanshi/theme-frontend-luma-child",
    "description": "N/A",
    "require": {
        "php": "~5.5.0|~5.6.0|~7.0.0|~7.1.0|~7.2.0|~7.3.0",
        "magento/luma": "100.0.*",
        "magento/framework": "100.0.*"
    },
    "type": "magento2-theme",
    "version": "100.0.1",
    "license": [
        "OSL-3.0",
        "AFL-3.0"
    ],
    "autoload": {
        "files": [
            "registration.php"
        ]
    }
}
5. Create web directory inside the child theme with the following empty directories and files. The whole directory structure for the child theme is:

6. Provide access/permission for child theme directories and files. Go to child theme directory in the terminal and run this command to give permissions for the child theme directory: chmod -R 777 *Note: If you are working in a local or development server you can provide 777 access for both files and directories. If live server, then you have to give 755 for directory and 644 for files.
7. The admin panel shows the created child theme.
- Login to admin panel
- Go to Content > Themes
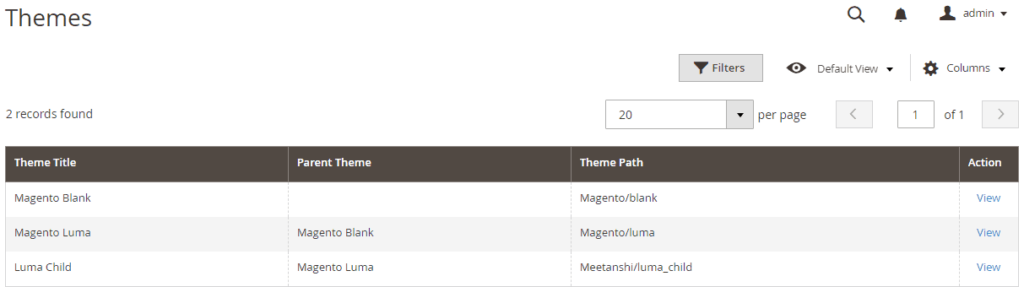
- Select child theme in admin configuration
- Go to Content > Design > Configuration.

- Select the child theme
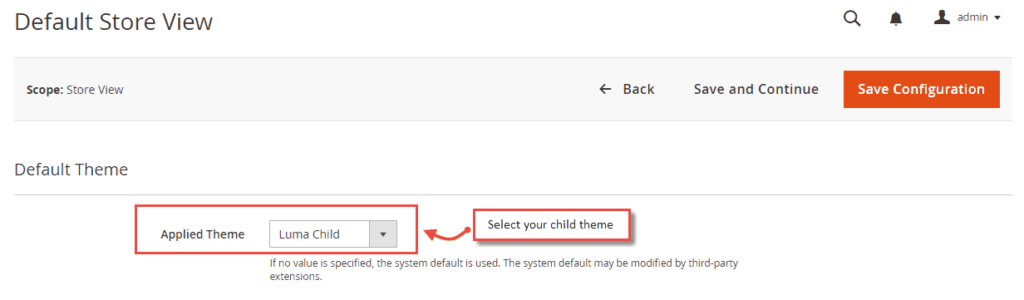
- Save
- Flush the cache
8. Take a backup of pub/static folder for images, CSS, and js. Also, delete the static folder and run static content deploy.
9. Go to the Magento root folder in your terminal and deploy static content using the following command:
php bin/magento setup:static-content:deploy10. The newly created child theme will also deploy in the pub/static folder.
That’s all for creating a Magento 2 child theme! You can now go on with customizing your child theme.
Do rate the post with 5 stars if found useful.
Thank you.
