In this simple guide, learn to add Valentine’s Day effect to Shopify.
We have covered two methods to help you to transform your store into a dedicated Valentine’s theme.
- Method 1: Using a no-code Shopify app (Easiest)
- Method 2: Custom code solution
So, let’s dig in and see how each method works.
Add Valentine’s Day Effect to Shopify: Step by Step
Method 1: Using Shopify App
Here, we will use the MIT Festival Effects & Decor to add a Valentine effect without editing your theme code file. Here are the simple steps to follow:
- Step 1: Select the 3D Heart Effect
- Step 2: Customize Your Preferences
- Step 3: Save and Display
Step 1: Select the 3D Heart Effect
Install and enable the MIT Festival Effect Pro app. Then, from the app dashboard, select Effects > Create New > 3D Heart.
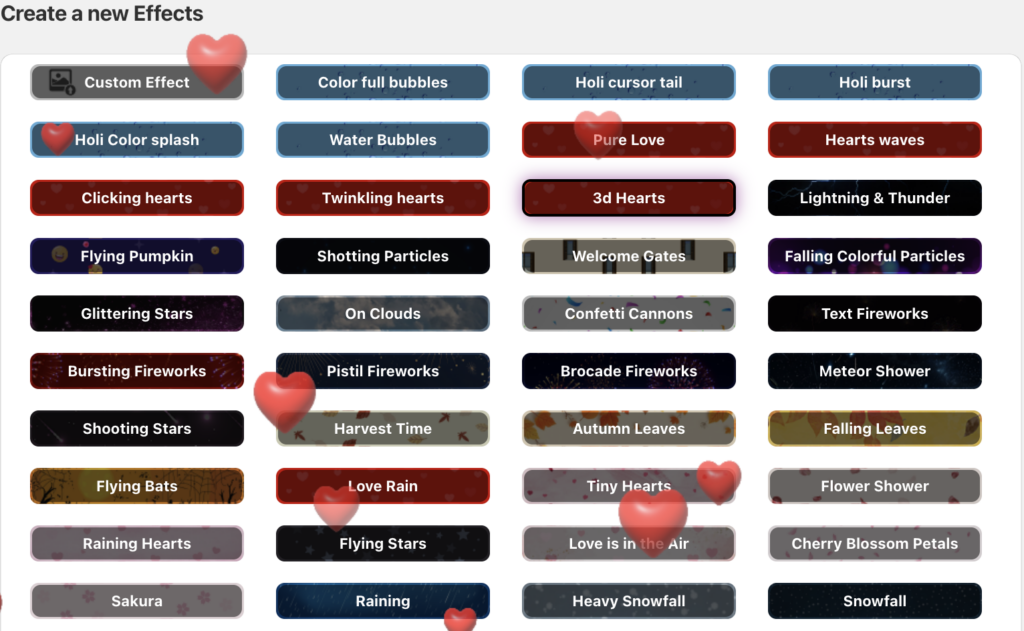
You can select any other Valentine’s effects, like Clicking Hearts, Pure Love, Heart Waves, and Twinkling Heart. The process to add other effect stays the same.
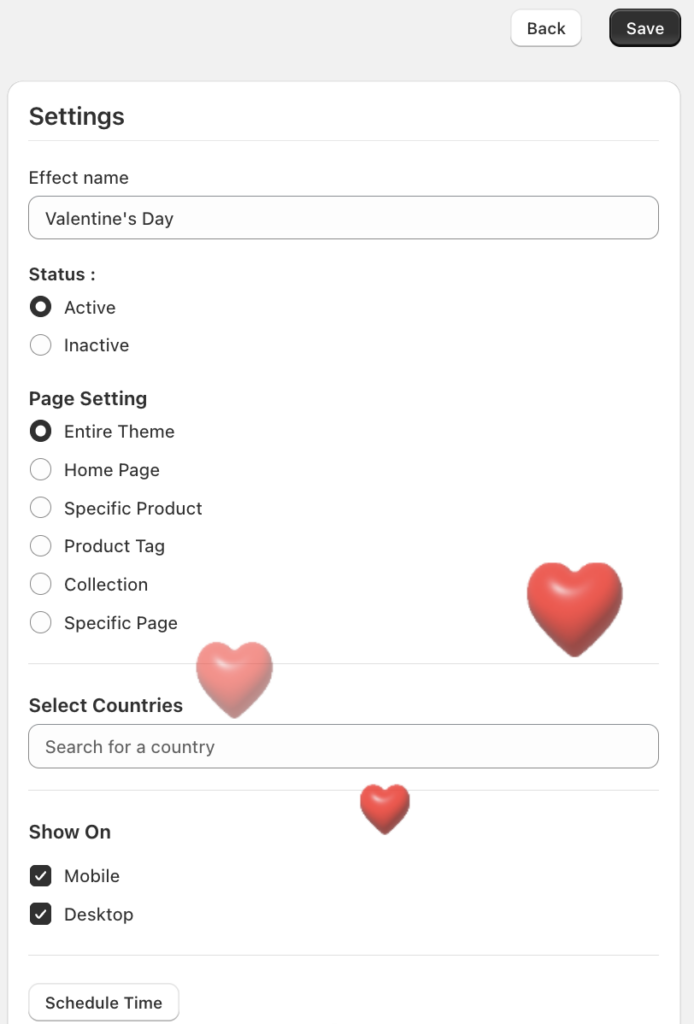
Step 2: Customize Your Preferences
Then from the right-hand side card, add customization to control how your effect is displayed across different pages and customers.
Configure the following:
- Add the effect name (this is only for internal use).
- Set the status to active.
- Select the pages you want to show the effect.
- Select the countries to show the effect.
- Option to display on desktop, mobile, or both.
- Schedule the effect using a start and end date.
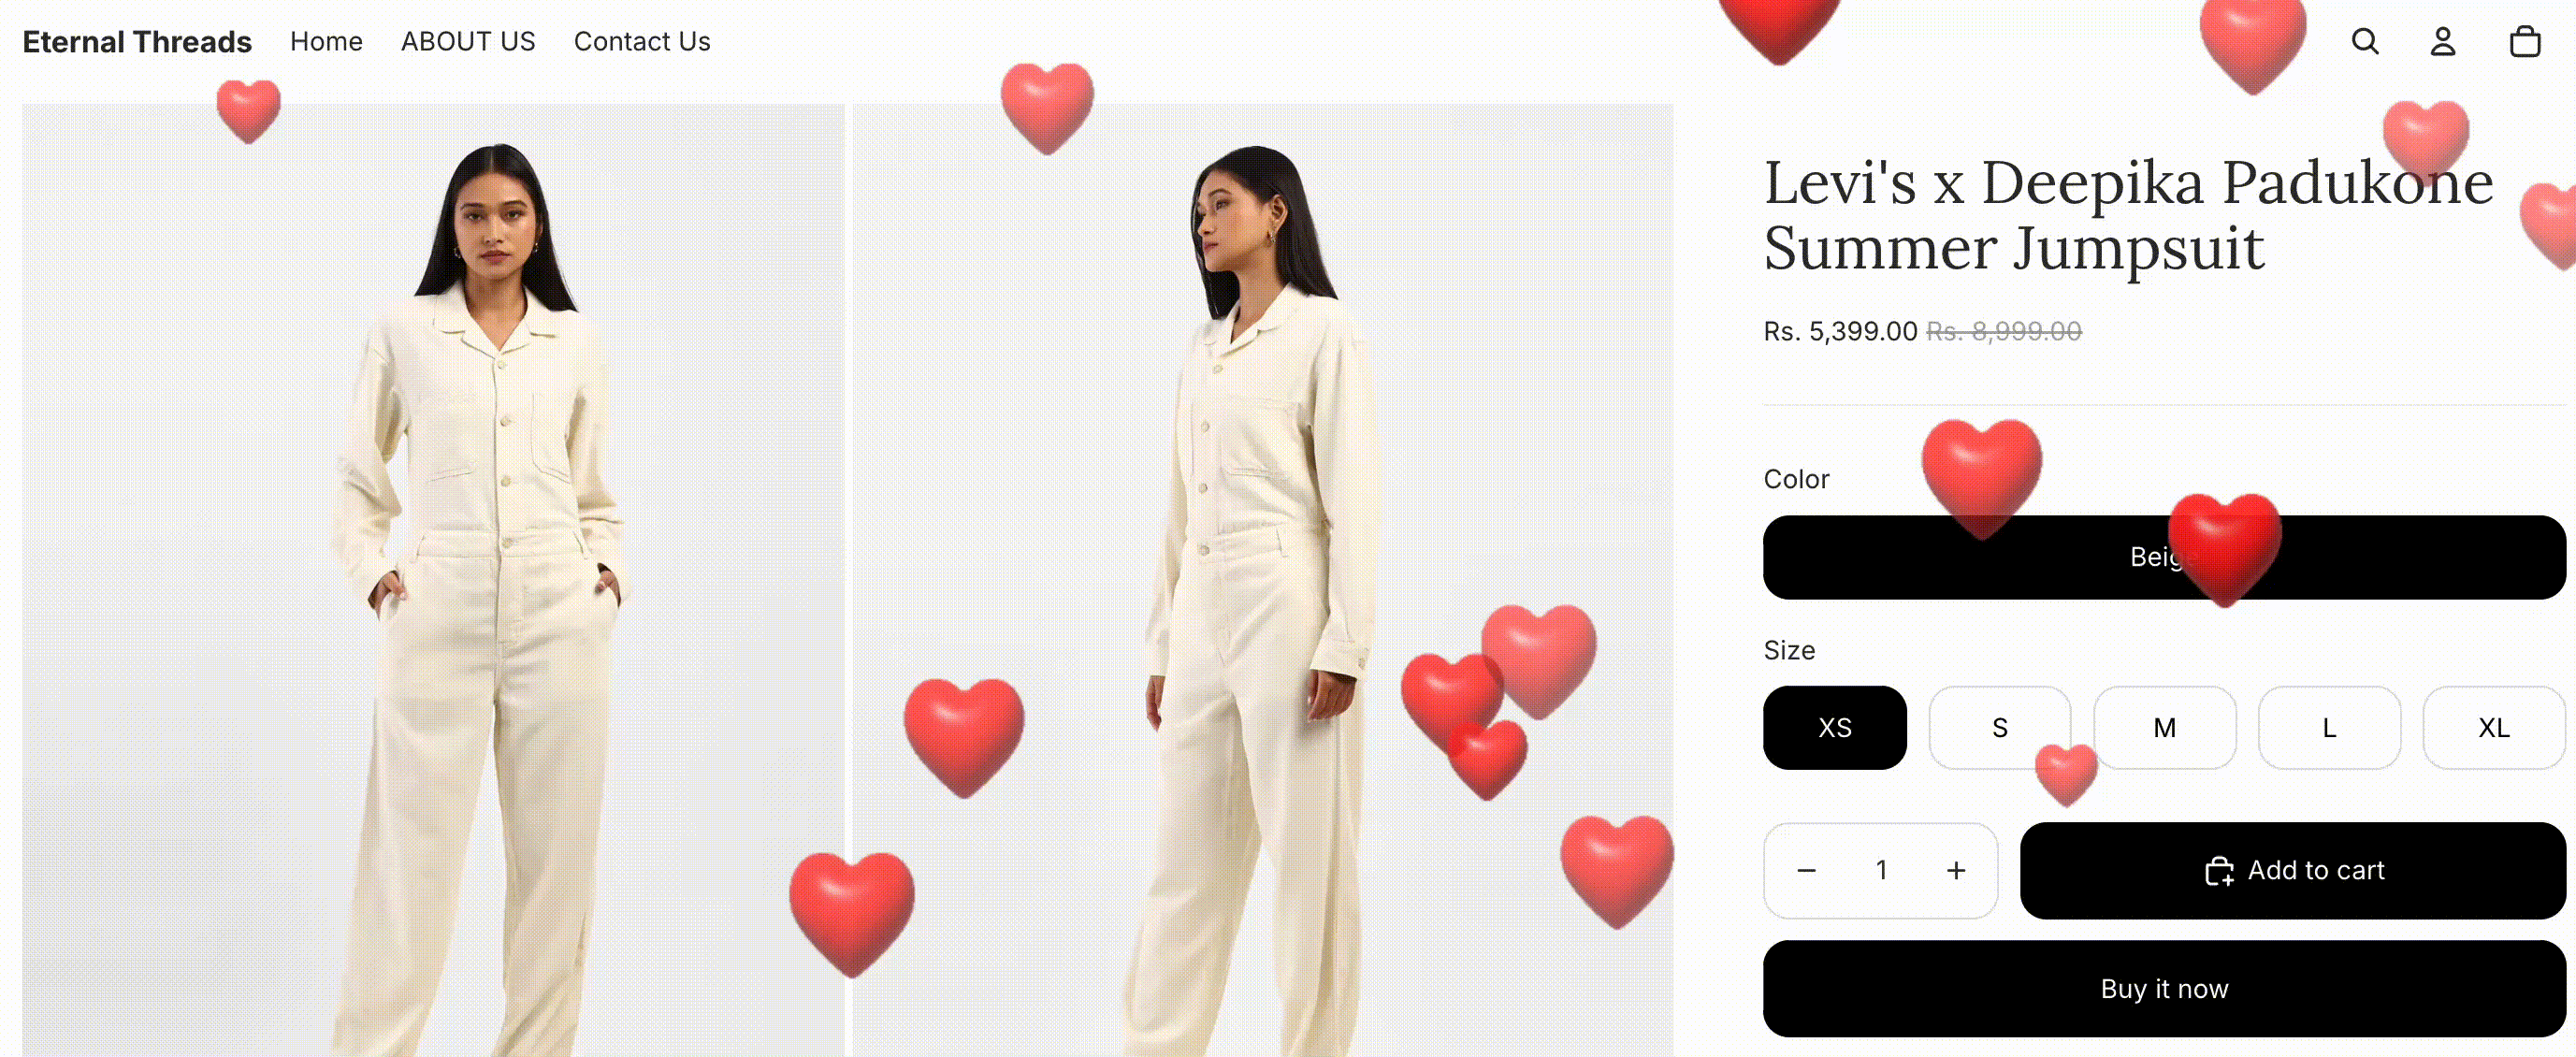
Step 3: Save and Display
Click on Save and finish this process. Now, take a review of the Valentine’s Day effect and make changes if needed.

Method 2: Custom Code
If you prefer a DIY approach, you can manually add the falling hearts code snippet to your Shopify theme. Here are the steps to follow:
- Step 1: Create a Snippet
- Step 2: Paste the Code
- Step 3: Edit the theme.liquid File
- Step 4: Display the Effect in the Frontend
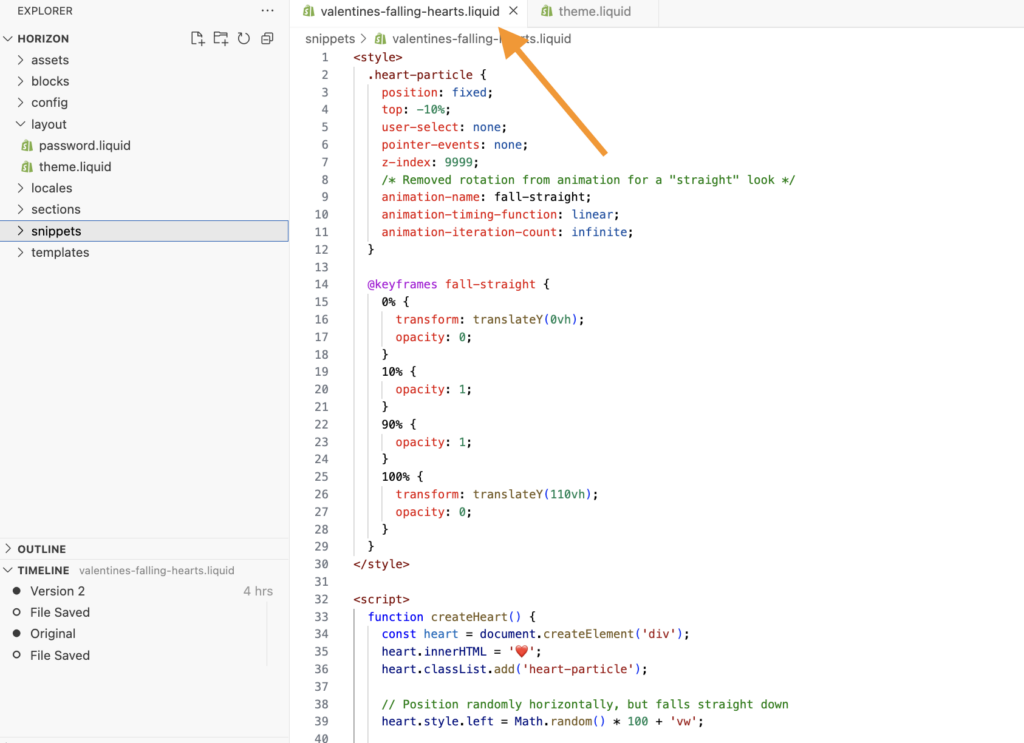
Step 1: Create a Snippet
Head to Online Store > Themes. Then, click the three dots (…) > Edit Code.
Scroll down to Snippets and click Add a new snippet, naming it valentines-falling-hearts.
Step 2: Paste the Code
Paste the following code into your new valentines-falling-hearts.liquid snippet:
<style>

  .heart-particle {

    position: fixed;

    top: -10%;

    user-select: none;

    pointer-events: none;

    z-index: 9999;

    /* Removed rotation from animation for a "straight" look */

    animation-name: fall-straight;

    animation-timing-function: linear;

    animation-iteration-count: infinite;

  }

  @keyframes fall-straight {

    0% {

      transform: translateY(0vh);

      opacity: 0;

    }

    10% {

      opacity: 1;

    }

    90% {

      opacity: 1;

    }

    100% {

      transform: translateY(110vh);

      opacity: 0;

    }

  }

</style>

<script>

  function createHeart() {

    const heart = document.createElement('div');

    heart.innerHTML = '❤️';

    heart.classList.add('heart-particle');

    // Position randomly horizontally, but falls straight down

    heart.style.left = Math.random() * 100 + 'vw';

    // Increased duration (8-12 seconds) makes them fall much slower

    heart.style.animationDuration = Math.random() * 4 + 8 + 's';

    // Keeping size consistent for a cleaner "proper" look

    heart.style.fontSize = '20px';

    document.body.appendChild(heart);

    // Increased timeout to match the slower animation

    setTimeout(() => {

      heart.remove();

    }, 12000);

  }

  // Slower creation rate (one heart every 800ms) to avoid clutter

  setInterval(createHeart, 800);

</script>
Step 3: Edit the theme.liquid File
Then, open the Layout folder in the theme editor and click on theme.liquid.
Scroll to the very bottom of the file and paste this line before the </body> tag:
{% render 'valentines-falling-hearts' %}
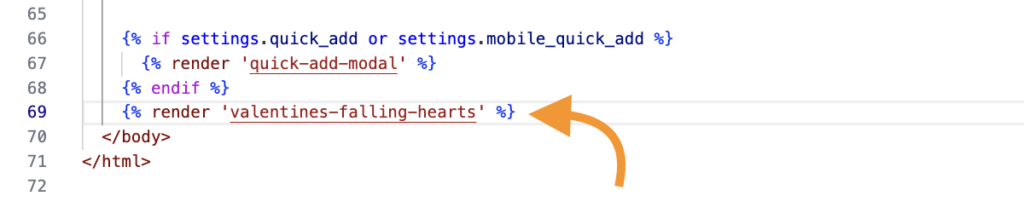
Click Save and finish the process.
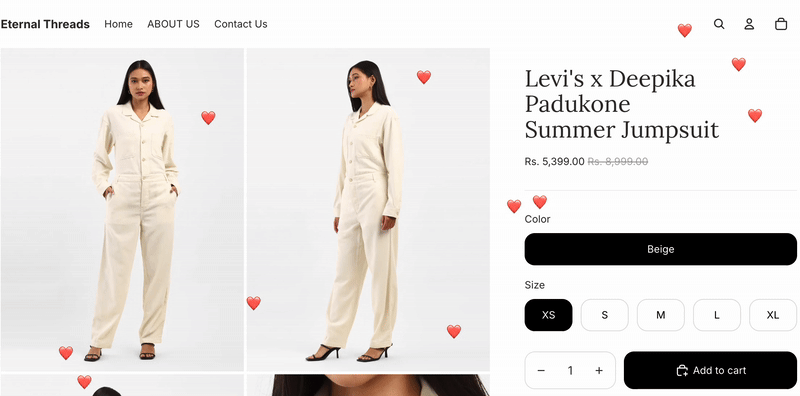
Step 4: Display the Effect in the Frontend
This is how the falling hearts effect will look using the code snippet method.
Which Method Should You Pick?
The best method for adding festival effects to Shopify depends on your technical comfort level and how much time you want to invest.
While the app provides a code-free solution, manual implementation requires technical expertise, as there is a risk of breaking your theme if not done correctly.
| Features | Shopify App | Custom Code |
| Implementation | Automated. Installed via App Blocks or Script Tag API. | Manual. Script/style injection via Theme Code Editor. |
| Theme Edits | None. No direct modification of core Liquid files. | High. Requires manual edits to theme.liquid and assets. |
| Risk | ✅ Low. Isolated from core logic; easy to toggle off. | ⚠️ High. Syntax errors can break site layout or checkout. |
| Dependency | None. You can do it yourself | High. Requires a developer for setup and updates. |
Option 1: Using a Shopify App
Using an app like MIT Festival Effects & Decor offers several advantages:
- Access 50+ seasonal effects, including Snowfall, Diwali, and Halloween.
- Easily add custom cursors, cursor trails, and pop-ups without touching code.
- Preview and manage all active effects directly from your Shopify admin panel.
Option 2: Using Custom Code
Manual coding is an alternative, but it comes with significant limitations for most store owners:
- You must edit theme files every time you want to change an effect, which can be daunting for non-technical users.
- You will likely need to write custom code for every individual effect or hire a developer to do it for you.
- Custom code often requires extensive tweaking to meet specific design requirements.
Recommendation: To avoid the risks of complex coding while maintaining the flexibility to change effects instantly, we recommend using the MIT Festival Effects & Decor app.
