Showcasing your team is a powerful way to build customer trust and connect on a personal level. In this blog, we have mentioned a quick and easy way to add a team section to Shopify; you can use either an app or custom code.
Let’s start with the methods we can use to add this feature.
Methods to Add a Team Member Section to Shopify
There are mainly two methods to add this to your store.
- Using Custom Code – Creating a custom team section on Shopify gives you full control over customization, but requires technical skills and a huge amount of time. This allows for precise branding with team member details.
- Using the Shopify App – Shopify apps provide ready-made, customizable team sections with no coding. They offer easy interfaces for team info, layout, social links, and updates, integrating seamlessly with any Shopify theme for a responsive design.
Each method aims to offer a clean design to keep your store UI looking crisp; issues like a blurry logo on Shopify or image clarity issues can make it harder for shoppers to trust your brand.
Method 1: Directly Add Team Member Section Using App
If you want to add an extraordinary section like the one displayed below, you have to use MIT Sections Pro. Our app gives you numerous styles of sections, ease of use, and a code-free environment to design your Shopify store.

Here is the complete process to create a team member section using our app.
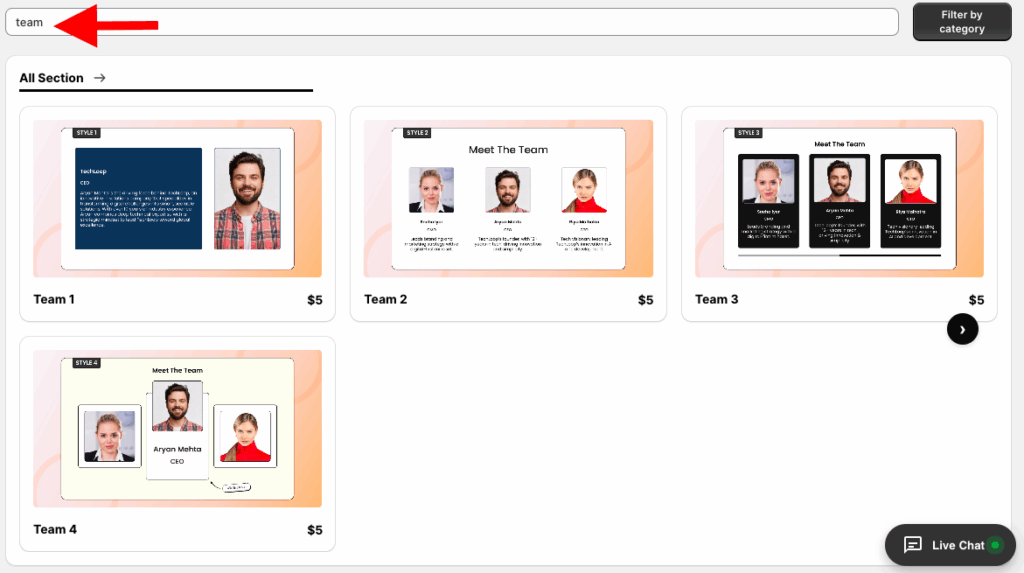
Step 1: Install the App and Find the Desired Section
Install the MIT Sections Pro from the Shopify app store, from the app dashboard, click Browse sections, and search for the Team section.
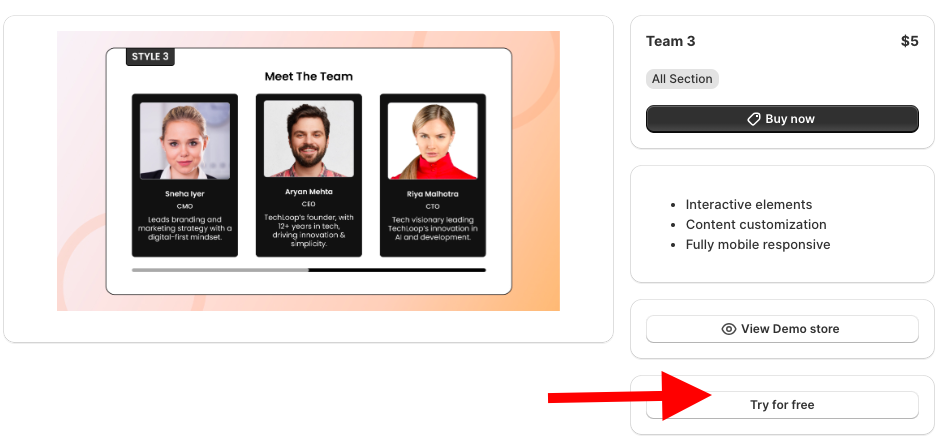
Step 2: Click the “Try for Free” Button
Select the section you like. Here, we select the Team 3 section.
Click Try for Free, and you will get a free trial of the section features, working, and preview.
While using the free trial, you will be redirected to the MIT demo store. Once you purchase the theme, you can use it in your Shopify theme.
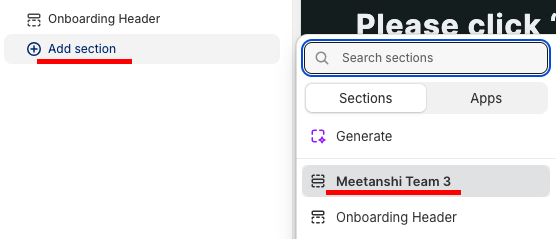
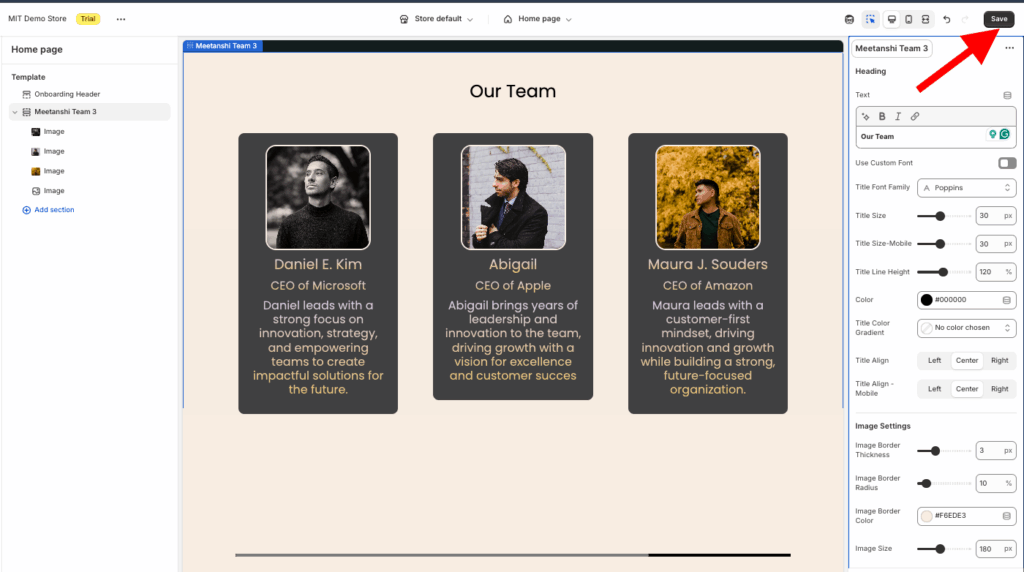
From here, click the Add section and select Meetnashi Team 3.
Step 3: Modify and Save the Section
Click the Meetnashi Team 3 to explore the customization features. Here, you get 60+ options to craft the section as you want and make it yours.

Once you’re done making the changes, save them.
Method 2: Adding the Team Member Section Using Code
These are the steps to add a team member section using custom code.
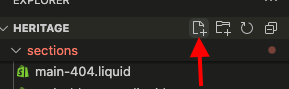
Step 1: Create a New Section
From the Shopify admin panel, go to Online store > Themes > …(three dots) > Edit code. Then, from the Sections folder, add a new section and name it team-section.liquid.
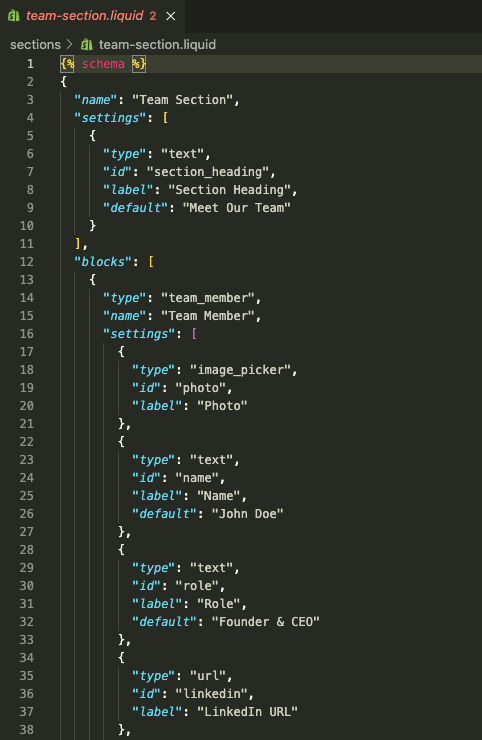
Step 2: Paste the Team Member Section Code
Copy the code below, paste it into the newly created section, and click Save.
{% schema %}
{
 "name": "Team Section",
 "settings": [
   {
     "type": "text",
     "id": "section_heading",
     "label": "Section Heading",
     "default": "Meet Our Team"
   }
 ],
 "blocks": [
   {
     "type": "team_member",
     "name": "Team Member",
     "settings": [
       {
         "type": "image_picker",
         "id": "photo",
         "label": "Photo"
       },
       {
         "type": "text",
         "id": "name",
         "label": "Name",
         "default": "John Doe"
       },
       {
         "type": "text",
         "id": "role",
         "label": "Role",
         "default": "Founder & CEO"
       },
       {
         "type": "url",
         "id": "linkedin",
         "label": "LinkedIn URL"
       },
       {
         "type": "url",
         "id": "twitter",
         "label": "Twitter URL"
       }
     ]
   }
 ],
 "presets": [
   {
     "name": "Team Section",
     "category": "Custom"
   }
 ]
}
{% endschema %}
<section class="team-section page-width">
 {% if section.settings.section_heading != blank %}
   <h2 class="team-title">{{ section.settings.section_heading }}</h2>
 {% endif %}
 <div class="team-grid">
   {% for block in section.blocks %}
     <div class="team-card">
       {% if block.settings.photo %}
         <img src="{{ block.settings.photo | img_url: '400x400' }}" alt="{{ block.settings.name }}" class="team-photo" />
       {% endif %}
       <h3 class="team-name">{{ block.settings.name }}</h3>
       <p class="team-role">{{ block.settings.role }}</p>
       <div class="team-socials">
         {% if block.settings.linkedin %}
           <a href="{{ block.settings.linkedin }}" target="_blank">LinkedIn</a>
         {% endif %}
         {% if block.settings.twitter %}
           <a href="{{ block.settings.twitter }}" target="_blank">Twitter</a>
         {% endif %}
       </div>
     </div>
   {% endfor %}
 </div>
</section>
<style>
.team-section {
 text-align: center;
 padding: 50px 20px;
}
.team-title {
 font-size: 2rem;
 font-weight: bold;
 margin-bottom: 40px;
}
.team-grid {
 display: grid;
 grid-template-columns: repeat(auto-fit, minmax(220px, 1fr));
 gap: 30px;
}
.team-card {
 background: #fff;
 padding: 20px;
 border-radius: 12px;
 box-shadow: 0px 4px 10px rgba(0,0,0,0.08);
 transition: transform 0.3s ease;
}
.team-card:hover {
 transform: translateY(-5px);
}
.team-photo {
 width: 120px;
 height: 120px;
 object-fit: cover;
 border-radius: 50%;
 margin-bottom: 15px;
}
.team-name {
 font-size: 1.2rem;
 font-weight: 600;
}
.team-role {
 font-size: 1rem;
 color: #555;
 margin-bottom: 10px;
}
.team-socials a {
 margin: 0 8px;
 text-decoration: none;
 font-size: 0.9rem;
 color: #0073e6;
}
.team-socials a:hover {
 text-decoration: underline;
}
</style>
Step 3: Add the Section to Frontend
Now again, from the Shopify admin panel, go to Online store > Themes > Customize. From the theme editor, click Add section and select Team section.

Edit the section from the sidebar; very few options are available.
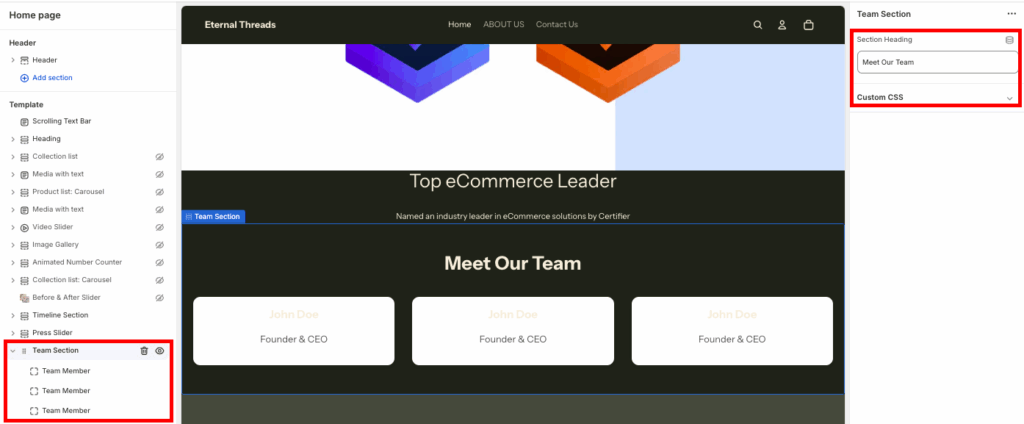
Once you are done making the changes, this is how it will look (basic & boring).

Why Pick MIT Sections Pro App?
MIT Sections Pro offers a stunning, customizable team member section. You’re in charge of its design and can adjust templates to match your brand perfectly.
Even with the free template, you get full control over editing the section to make it your own.
The app provides over 130+ free and paid sections, including banners, testimonials, and FAQs. Letting you build a professional Shopify store without coding.
- Another template for the team member section is available with higher customization features
- No cost for installation, completely free, making it easy for all merchants to tap into advanced customization
- Compile these sections anytime, anywhere, with zero coding and easy-to-configure functionalities
- Works with all Shopify themes and is crafted to optimize a high page speed for a seamless experience
- We don’t lock your access anywhere. You can complete customization control in editing the section (even if you are using the free template)
- No need to be stuck with the same section, easy to add/replace a section with your expanding store
- Reasonable pricing for all business sizes (small, medium, large), with a free trial available to ensure store compatibility before commitment
Your all-in-one solution to create a professional Shopify store
Install App Now