Static images say little, but a slideshow speaks volumes. With just a few steps, you can have a dynamic feature on your Shopify store.
In this blog, you’ll learn to add a slideshow section in Shopify using different methods.
Let’s get started.
Methods to Add a Slideshow Section
There are three methods to add this section to your Shopify store, each with different functionality and complexity.
- Using a built-in theme editor – Shopify default theme includes a basic slideshow option that can be added directly from the theme editor. It’s simple to set up but comes with very limited customization.
- Adding a custom code – If your theme doesn’t support slideshows or you want more control, you can manually create one using Liquid, CSS, and JavaScript. This requires technical expertise and takes more time to implement.
- Through a Shopify app – The easiest method is to use a dedicated Shopify app. It lets you add a fully customizable slideshow with advanced features without no coding.
Using Shopify Built-in Theme Editor (Dawn Theme)
Here are the steps to add a Shopify slideshow section through the theme editor in the Dawn theme.
Step 1: Head to the Theme Editor
To add a section, go to your Shopify admin panel, then navigate to Online store > Theme, and click Customize.
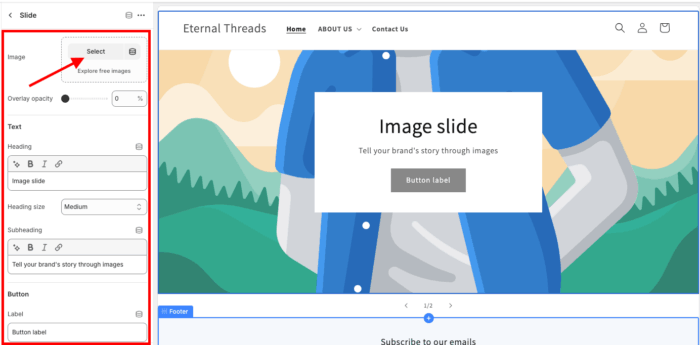
Step 2: Add the Slideshow Section
From the theme editor section, click Add section under templates, and look for Slideshow and select it.

Then, using the settings, add the image you want to display in the slideshow and configure other settings.
Step 3: Save the Changes
Once you finish making the edits. Save them. And this is how simple it will look.

Steps to Display a Slideshow Section Via Liquid Code
The following are the steps and the code to add the Shopify image slideshow section.
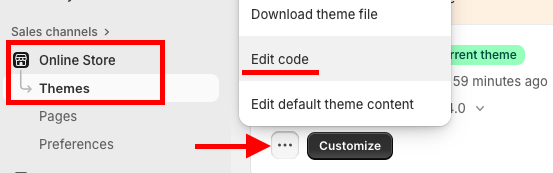
Step 1: Access the Theme Code
From your Shopify admin panel navigate to Online store > Themes > …(three dots) > Edit code
Step 2: Paste the Slideshow Liquid Code
Next, create a new section and name it Slideshow1.liquid.
Paste the provided code into this new section and save the changes.
{% style %}
.custom-slideshow-container {
position: relative;
width: 100%;
overflow: hidden;
}
.slideshow-slide {
display: none;
width: 100%;
text-align: center;
max-width: 50%;
margin: 0 auto;
}
.slideshow-slide.active {
display: block;
}
.slideshow-slide img {
width: 100%;
height: auto;
display: block;
object-fit: contain;
}
.slideshow-nav-arrow {
position: absolute;
top: 50%;
transform: translateY(-50%);
cursor: pointer;
background-color: rgba(0, 0, 0, 0.5);
color: white;
padding: 10px;
border-radius: 50%;
user-select: none;
z-index: 10;
}
.slideshow-nav-arrow.prev {
left: 20px;
}
.slideshow-nav-arrow.next {
right: 20px;
}
.slideshow-dots-container {
text-align: center;
padding: 10px;
position: absolute;
bottom: 20px;
width: 100%;
z-index: 10;
}
.slideshow-dot {
height: 12px;
width: 12px;
margin: 0 5px;
background-color: #bbb;
border-radius: 50%;
display: inline-block;
cursor: pointer;
}
.slideshow-dot.active {
background-color: #555;
}
{% endstyle %}
<div class="custom-slideshow-container" data-autoplay="{{ section.settings.autoplay }}">
{% for block in section.blocks %}
<div class="slideshow-slide" data-slide-index="{{ forloop.index0 }}">
{% if block.settings.image != blank %}
{{ block.settings.image | image_url: width: 1920 | image_tag: loading: 'lazy', alt: block.settings.image.alt }}
{% else %}
<div class="slideshow-placeholder">
{{ 'image' | placeholder_svg_tag }}
</div>
{% endif %}
</div>
{% endfor %}
{% if section.blocks.size > 1 %}
<a class="slideshow-nav-arrow prev" onclick="changeSlide(-1)">❮</a>
<a class="slideshow-nav-arrow next" onclick="changeSlide(1)">❯</a>
<div class="slideshow-dots-container">
{% for block in section.blocks %}
<span class="slideshow-dot" onclick="currentSlide({{ forloop.index }})"></span>
{% endfor %}
</div>
{% endif %}
</div>
<script>
let slideIndex = 1;
let slideshowTimeout;
const autoplayEnabled = document.querySelector('.custom-slideshow-container').dataset.autoplay === 'true';
function showSlides(n) {
let i;
const slides = document.getElementsByClassName("slideshow-slide");
const dots = document.getElementsByClassName("slideshow-dot");
if (n > slides.length) { slideIndex = 1 }
if (n < 1) { slideIndex = slides.length }
for (i = 0; i < slides.length; i++) {
slides[i].style.display = "none";
}
for (i = 0; i < dots.length; i++) {
dots[i].className = dots[i].className.replace(" active", "");
}
slides[slideIndex-1].style.display = "block";
if (dots[slideIndex - 1]) {
dots[slideIndex - 1].className += " active";
}
if (autoplayEnabled) {
clearTimeout(slideshowTimeout);
slideshowTimeout = setTimeout(() => changeSlide(1), 5000); // Change image every 5 seconds
}
}
function changeSlide(n) {
showSlides(slideIndex += n);
}
function currentSlide(n) {
showSlides(slideIndex = n);
}
showSlides(slideIndex);
</script>
{% schema %}
{
"name": "Custom Slideshow",
"settings": [
{
"type": "checkbox",
"id": "autoplay",
"label": "Enable autoplay",
"default": true
}
],
"blocks": [
{
"type": "slide",
"name": "Slide",
"settings": [
{
"type": "image_picker",
"id": "image",
"label": "Image"
}
]
}
],
"presets": [
{
"name": "Custom Slideshow",
"category": "Image",
"blocks": [
{
"type": "slide"
},
{
"type": "slide"
},
{
"type": "slide"
}
]
}
]
}
{% endschema %}
Step 3: Add Collection in Theme Editor
Once the file is saved, navigate to the theme editor using this navigation: Online Store > Themes > Customize. From there, click the Add section and locate the section you just created.
After adding your desired images, configure the settings and save your changes.
And this is how it’ll showcase, very basic.

Add a Pre-built Shopify Slideshow Section
Your slideshow shouldn’t just decorate your homepage; it should drive engagement, enhance slides with buttons, headlines, and descriptions that guide shoppers seamlessly through your store.
Something like this:

Using our MIT Section Pro, you can quickly create a modern and fancy slideshow section exactly like above.
Step 1: Install and Select a Section
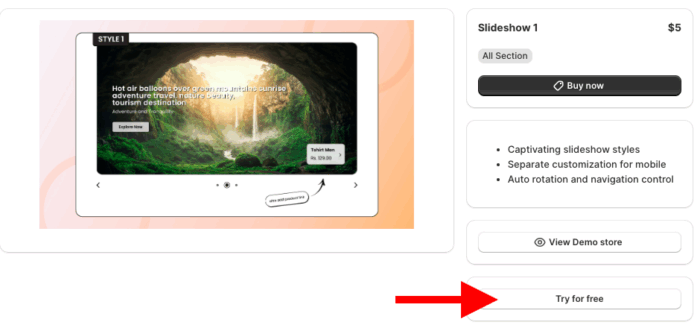
Install the MIT Sections Pro app from the Shopify App Store. From the app dashboard, click the Browse section and search for the Slideshow section.
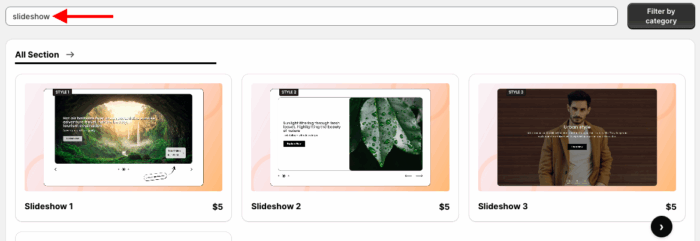
Choose your preferred slideshow option for purchase. Here, we will proceed with Slideshow 1.
Step 2: Click the Try for Free Button
Once you’ve selected the section, click Try for Free for a complimentary trial before purchasing.
You’ll be directed to the MIT demo store during the free trial. After purchasing the section, you can integrate it into your store’s theme.
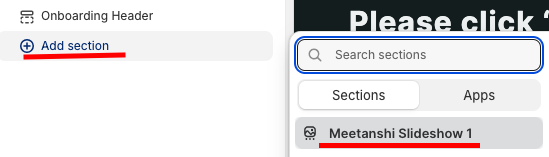
Then, from here, click the Add section and look for Meetanshi Slideshow 1.
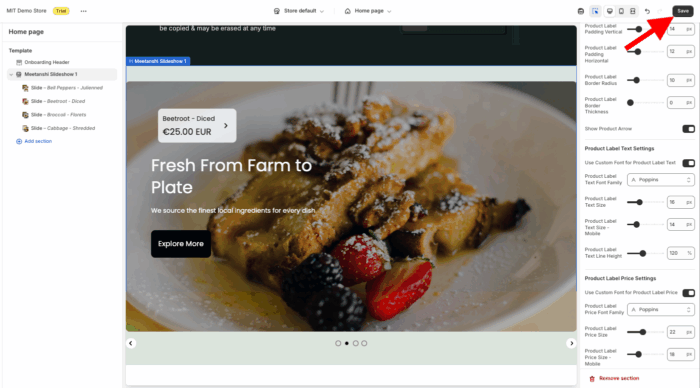
Step 3: Modify Slideshow Section
Here you get 60+ customization options, design every minor detail as you want. When you are done making changes, save them.
MIT Sections Pro: Designed to Do More
MIT Sections Pro is your key to effortless store design.
Forget about coding and time-consuming tasks; our app gives you instant access to a library of over 130 pre-designed, professional sections. This includes everything from image galleries and collection carousels to newsletters and testimonials.
- Enhance your store’s design with 130+ ready-to-use sections tailored for different needs
- Get started at zero cost while still enjoying advanced customization options
- Save time and money with a no-code setup that anyone can manage
- Deliver a smooth shopping experience with fast, theme-compatible sections
- Maintain full creative control, even with free templates
- Keep your store fresh by easily adding or swapping sections as your business grows
- Scale affordably with flexible pricing and a free trial to ensure the perfect fit
Your all-in-one solution to create a professional Shopify store
Install App Now