A “Shop the Look” section enhances the shopping experience and boosts cross-selling by allowing you to showcase complete outfits or curated product bundles.
In this blog, we’ll walk you through the steps to easily add a Shop the Look section on your Shopify store and maximize sales.
Methods to Add Shopify Shop the Look
Many store owners in retail add the section as a perfect cross-selling and upselling strategy. There are fundamentally two ways to add this feature to your store if your theme doesn’t support it.
- Using a custom code – You will need to write a Liquid/HTML/CSS code to create a custom section and manually integrate it into your theme. This method offers full control and custom design, but requires technical skills for setup and lots of time.
- Using a Shopify App – The apps provide ready-made, customizable Shop the Look sections that can be easily added to your store, usually with drag-and-drop options and no coding required. Apps allow fast setup, advanced features like product tagging and upsells, and ongoing support.
Add a Pre-made Shop the Look Section using the Shopify App
The MIT Sections Pro gives you plenty of options for sections and ease of use to have a high-level of shop the look section with customization of every detail and element.
Something like this.

The good thing is that no coding is required, and you get a free trial to check the features and preview.
So now let’s see the app working.
Step 1: Install the App and Choose your Desired Section
Install the MIT Sections Pro for free from the Shopify App Store. From the app dashboard, click the Browse sections and search for the Shop the look.
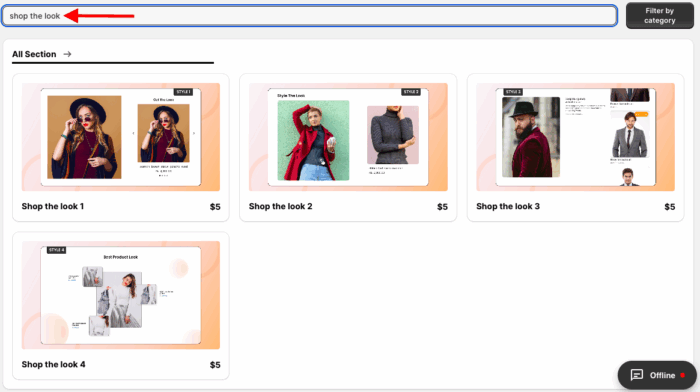
From here, select the one that fits with your brand. Here we will move forward with Shop the Look 4.
Step 2: Click the “Try for Free” Button
To preview this section and its appearance, click the Try for Free button before making a purchase.
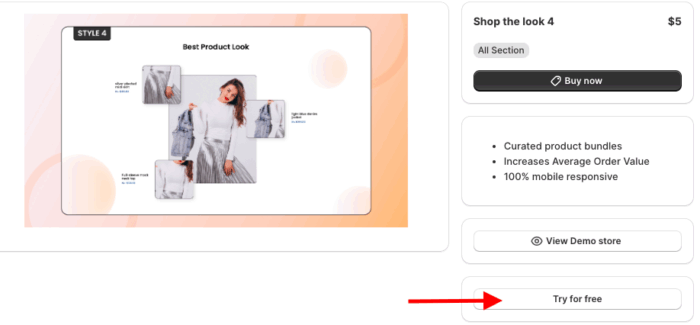
During your free trial, you’ll be directed to the MIT demo store. Once you’ve purchased the section, you can add it to your store’s theme.
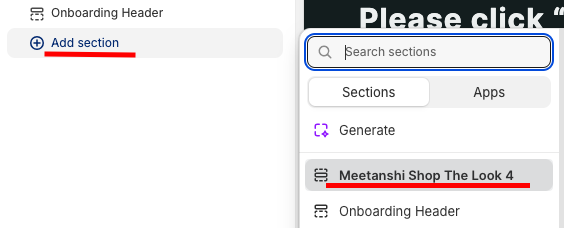
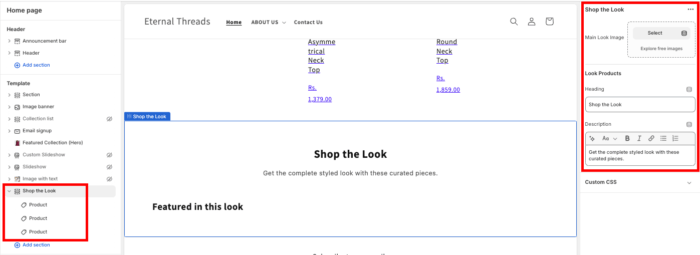
Step 3: Add the Section & Save
From here, click the Add section and select Meetanshi Shop the Look 4.
You are served with 50+ modification options to make the section yours.
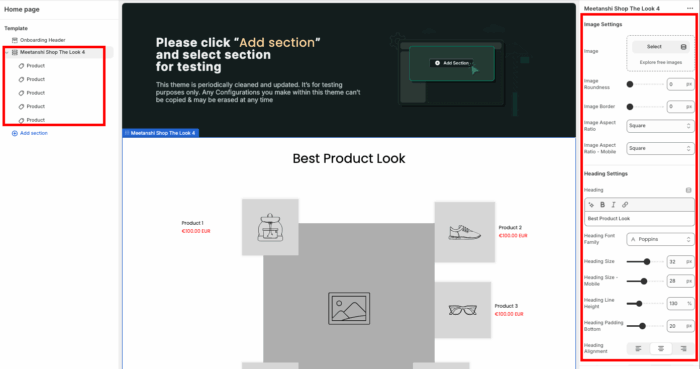
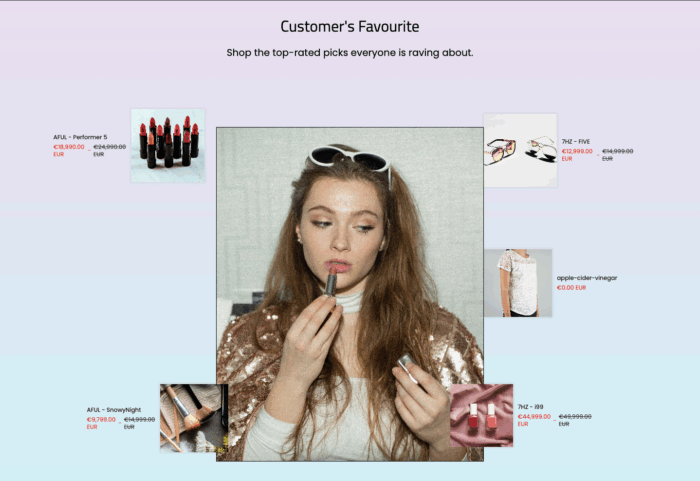
Once you are finished making the changes, save them. This is how beautiful it will be showcased.
How to Add the Shopify Shop the Look Section? (Custom Code)
Below are the steps provided along with the code to add a shop the look section.
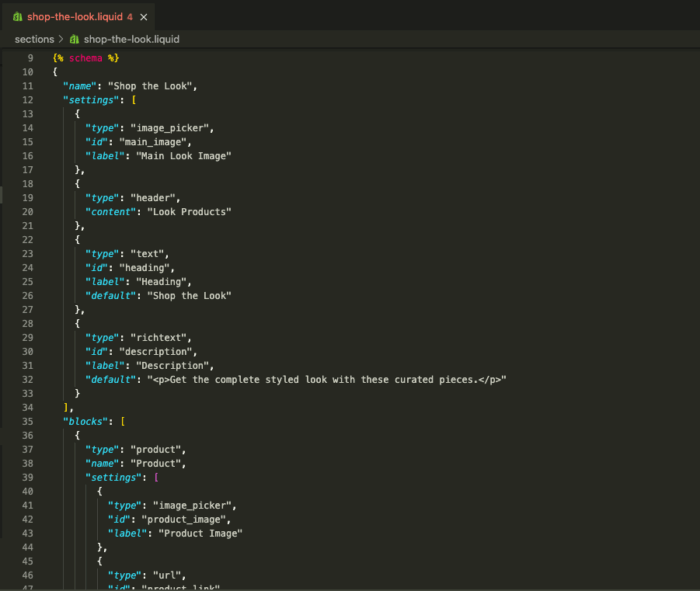
Step 1: Create the Section File
From your Shopify admin panel, go to Online store > Themes > …(three dots) and click on Edit code.
In the Sections directory, add a new section and name it as shop-the-look.liquid.
Step 2: Paste the Liquid Code
Paste the following code in the newly created shop-the-look.liquid section.
{% schema %}
{
  "name": "Shop the Look",
  "settings": [
    {
      "type": "image_picker",
      "id": "main_image",
      "label": "Main Look Image"
    },
    {
      "type": "header",
      "content": "Look Products"
    },
    {
      "type": "text",
      "id": "heading",
      "label": "Heading",
      "default": "Shop the Look"
    },
    {
      "type": "richtext",
      "id": "description",
      "label": "Description",
      "default": "<p>Get the complete styled look with these curated pieces.</p>"
    }
  ],
  "blocks": [
    {
      "type": "product",
      "name": "Product",
      "settings": [
        {
          "type": "image_picker",
          "id": "product_image",
          "label": "Product Image"
        },
        {
          "type": "url",
          "id": "product_link",
          "label": "Link to Product"
        },
        {
          "type": "text",
          "id": "product_title",
          "label": "Product Title (Manual)"
        },
        {
          "type": "text",
          "id": "product_price",
          "label": "Product Price (Manual)"
        }
      ]
    }
  ],
  "presets": [
    {
      "name": "Shop the Look",
      "category": "Image",
      "blocks": [
        {
          "type": "product"
        },
        {
          "type": "product"
        },
        {
          "type": "product"
        }
      ]
    }
  ]
}
{% endschema %}

<div class="shop-the-look-section">
  <style>
    .shop-the-look-section {
      text-align: center;
      padding: 40px 20px;
      font-family: -apple-system, BlinkMacSystemFont, 'Segoe UI', Roboto, Helvetica, Arial, sans-serif, 'Apple Color Emoji', 'Segoe UI Emoji', 'Segoe UI Symbol';
    }
    .shop-the-look-section h2 {
      font-size: 28px;
      font-weight: 700;
      margin-bottom: 10px;
    }
    .shop-the-look-section .description-text {
      font-size: 16px;
      color: #555;
      margin-bottom: 30px;
    }
    .shop-the-look-section .look-container {
      display: flex;
      flex-direction: column;
      align-items: center;
      gap: 30px;
    }
    @media (min-width: 768px) {
      .shop-the-look-section .look-container {
        flex-direction: row;
        text-align: left;
        align-items: flex-start;
      }
    }
    .shop-the-look-section .main-image-wrapper {
      flex: 1;
      max-width: 100%;
    }
    @media (min-width: 768px) {
      .shop-the-look-section .main-image-wrapper {
        flex: 2;
        max-width: 60%;
      }
    }
    .shop-the-look-section .main-image {
      width: 100%;
      height: auto;
      border-radius: 8px;
    }
    .shop-the-look-section .featured-products-wrapper {
      flex: 1;
      max-width: 100%;
    }
    @media (min-width: 768px) {
      .shop-the-look-section .featured-products-wrapper {
        flex: 1;
        max-width: 40%;
      }
    }
    .shop-the-look-section .featured-products-wrapper h3 {
      font-size: 24px;
      font-weight: 600;
      margin-bottom: 20px;
    }
    .shop-the-look-section .product-item {
      display: flex;
      align-items: center;
      text-decoration: none;
      color: inherit;
      border: 1px solid #e0e0e0;
      border-radius: 8px;
      padding: 15px;
      margin-bottom: 15px;
      transition: box-shadow 0.3s;
    }
    .shop-the-look-section .product-item:hover {
      box-shadow: 0 4px 12px rgba(0, 0, 0, 0.1);
    }
    .shop-the-look-section .product-image-wrapper {
      width: 80px;
      height: 80px;
      overflow: hidden;
      border-radius: 4px;
      margin-right: 15px;
    }
    .shop-the-look-section .product-image {
      width: 100%;
      height: 100%;
      object-fit: cover;
    }
    .shop-the-look-section .product-info {
      flex: 1;
      text-align: left;
    }
    .shop-the-look-section .product-info .product-title {
      font-size: 16px;
      font-weight: 600;
      margin-bottom: 5px;
    }
    .shop-the-look-section .product-info .product-price {
      font-size: 14px;
      color: #333;
    }
    .shop-the-look-section .product-button {
      background-color: #000;
      color: #fff;
      border: none;
      padding: 10px 20px;
      text-transform: uppercase;
      font-weight: 600;
      border-radius: 4px;
      transition: background-color 0.3s;
    }
    .shop-the-look-section .product-button:hover {
      background-color: #555;
    }
  </style>

  <div class="page-width">
    {%- if section.settings.heading != blank -%}
      <h2>{{ section.settings.heading }}</h2>
    {%- endif -%}

    {%- if section.settings.description != blank -%}
      <div class="description-text">
        {{ section.settings.description }}
      </div>
    {%- endif -%}

    <div class="look-container">
      {%- if section.settings.main_image != blank -%}
        <div class="main-image-wrapper">
          <img
            src="{{ section.settings.main_image | img_url: '1024x' }}"
            alt="{{ section.settings.main_image.alt }}"
            class="main-image"
            loading="lazy"
          >
        </div>
      {%- endif -%}

      <div class="featured-products-wrapper">
        <h3>Featured in this look</h3>
        {%- for block in section.blocks -%}
          {%- if block.type == 'product' and block.settings.product_link != blank -%}
            {%- liquid
              assign product_link_url = block.settings.product_link
              assign product_image = block.settings.product_image
              assign product_title = block.settings.product_title
              assign product_price = block.settings.product_price
            -%}
            <a href="{{ product_link_url }}" class="product-item">
              <div class="product-image-wrapper">
                {%- if product_image != blank -%}
                  <img
                    src="{{ product_image | img_url: '240x240' }}"
                    alt="{{ product_image.alt }}"
                    class="product-image"
                    loading="lazy"
                  >
                {%- else -%}
                  <div class="product-image-placeholder"></div>
                {%- endif -%}
              </div>
              <div class="product-info">
                <h3 class="product-title">{{ product_title }}</h3>
                <p class="product-price">{{ product_price }}</p>
                <button class="product-button">Shop now</button>
              </div>
            </a>
          {%- endif -%}
        {%- endfor -%}
      </div>
    </div>
  </div>
</div>
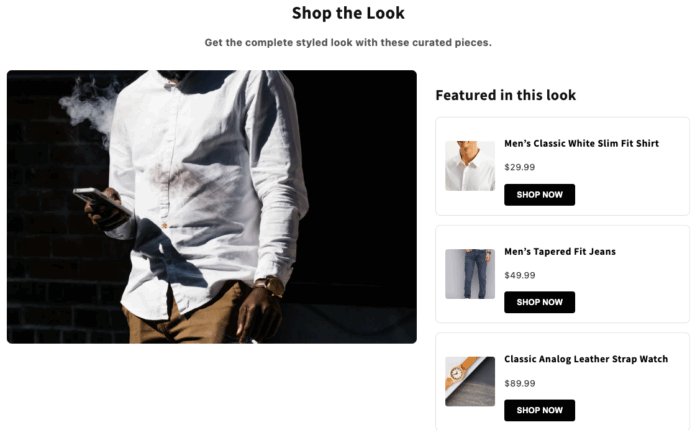
Step 3: Add a Section From the Theme Editor
Return to Online Store > Themes > Customize. Under Templates, click the Add section and choose your new Shop the look section to add it.
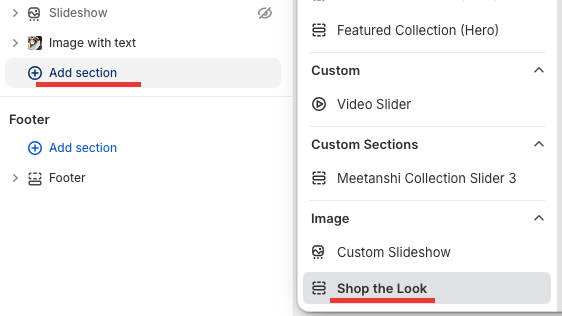
Then use the sidebar to add images and make other customizations.
Once you add the images and are done making the changes, save them.
And this is how it will look, basic and simple.
Shopify Sections App vs. Custom Code: What’s Right for You?
Using a Shopify Sections App or custom coding presents a key difference in ease of use.
Custom code can be technically challenging and, if not implemented correctly, may lead to errors, frustration, and ultimately an unsuccessful section.
In contrast, a Shopify Sections App like MIT Sections Pro makes advanced customization accessible to all, featuring editable sections with just a few clicks, high compatibility, a wide range of sections, and no coding required.
Why Choose Our Solution?
- Begin personalizing your store immediately without any initial investment
- Access a wide range of sections, including product comparison tables, banners, testimonials, and FAQs, to meet all your major storefront requirements
- Instantly add or swap sections on any page without the need for developers
- Our solution integrates seamlessly with all Shopify themes, ensuring your store maintains optimal speed for an excellent customer experience
- Evolve your store’s design as your business grows, ensuring the user interface (UI) aligns with your brand’s development
- Explore our demo to see how the app complements your store’s unique personality before committing
Your all-in-one solution to create a professional Shopify store
Install App Now