Your product page turns shoppers into customers.
With Shopify, you can easily customize your page using sections like reviews, FAQs, sliders, and more to make it more engaging and conversion-focused.
Here’s how you can add sections to a product page in Shopify, quickly with and without coding.
Default Shopify Sections for Product Page
Shopify offers a variety of default sections that can be added to product pages to enhance their appearance and functionality. These sections include options like:
| Default Shopify Sections | Helpful To |
| Featured collection and featured product | Showcase selected collections or highlight specific products to drive sales |
| Collection list | Display multiple collections to organize product categories |
| Rich text and image with text | Add detailed product descriptions or promotional content alongside images |
| Image banner and slideshow | Display attractive visuals or rotating banners to engage customers |
| Collage, multicolumn, and multirow | Create visually appealing layouts combining images and content to highlight product details |
| Collapsible content | Organize FAQs, shipping, or size guide sections neatly |
| Email signup and contact form | Capture leads or provide direct communication channels |
| Video and blog posts | Enhance storytelling with product videos or related articles |
| Custom liquid | Add custom-coded sections for additional functionality |
These default sections come with many limitations, such as:
- Follow preset layout and style options, restricting design originality
- Requires custom code to reflect unique presentation styles
- Using multiple media-heavy elements may impact page load times
- Available sections and customization controls differ across Shopify themes
- You cannot add sections to the gift card and checkout pages
How to Add Default Shopify Sections?
Here we will add a default section, a featured product section in Shopify using the in-built options. Here are the steps to do so:
Step 1: Head to the Theme Editor
Log in to your Shopify store. From your admin panel, go to Online store > Themes > Customize. This will open the Shopify theme editor.
Step 2: Add the Section to the Product Page
The theme editor opens the homepage by default. Navigate to the top drop-down and click Products > Default products.
Then, from the left sidebar, click Add section and use the search bar to find a specific section. In this case: Featured product
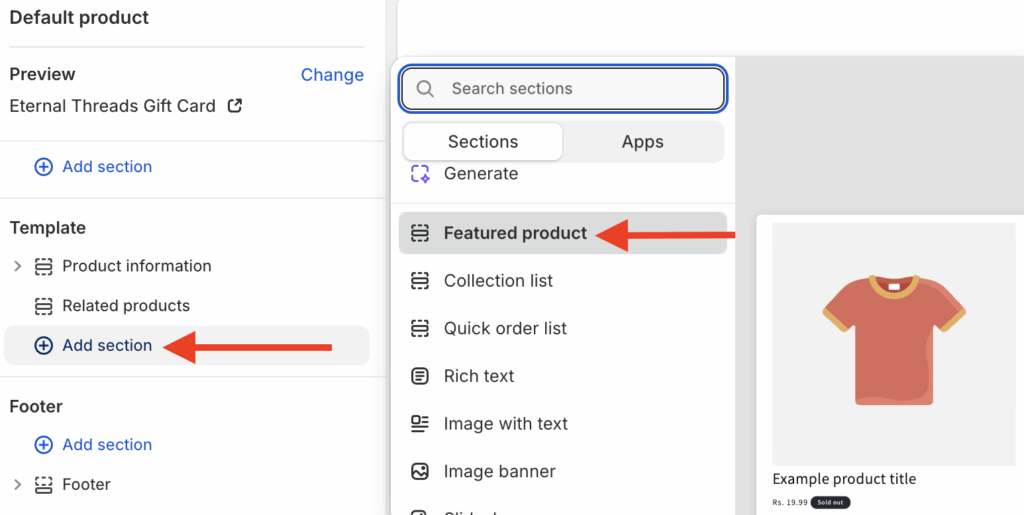
Every section will show a preview to get an idea of how the section looks. Like, you can see for this one on the extreme right.
Step 3: Customize the Section & Save
Now, select the section to access its customization options. Add your desired product and manage other settings to give it a look you like.
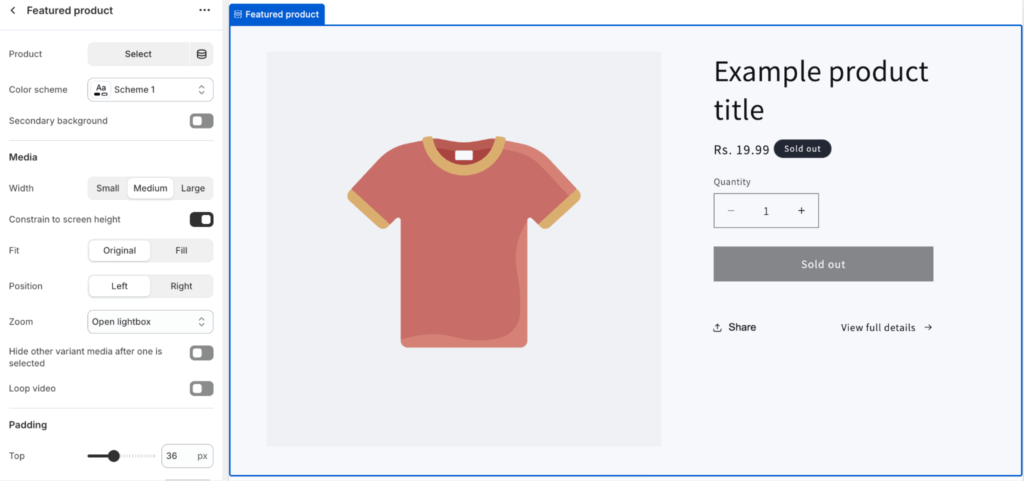
Once you are done, save the changes. You can add and change sections anytime without needing to edit code, giving you full control over its look and content.
Advanced Shopify Sections for Product Page
Advanced sections allow you to go beyond the default setup. These are some of the extraordinary sections you can add to your store to make it stand out from others.
| Sections | What It Does |
| About Us Section | Builds immediate customer trust before purchase by highlighting key brand signals in a concise, visual format. |
| Accordion Section | Efficiently compresses extensive information into collapsible blocks, freeing up space and improving access. |
| Instafeed Section | Shows a grid or slider of social feed content for real-life product views, connecting shoppers to social proof. |
| Scrolling Logos Section | Adds trust by showing logos of clients/partners, acting as animated social proof for shoppers. |
| Video with Text Section | Demonstrates product features or social proof with auto-playing video and text for space-efficient storytelling. |
| Video Slider | Provides a carousel of demo, review, or tutorial videos for easy browsing and rich product understanding. |
How to Add Advanced Shopify Sections?
There are two ways to add advanced Shopify sections:
- Using MIT Sections Pro app
- Adding custom code to the theme editor
First, let’s start with the app method.
Using MIT Sections Pro Shopify App
A simple and time-saving method to add advanced sections in your Shopify store without coding.
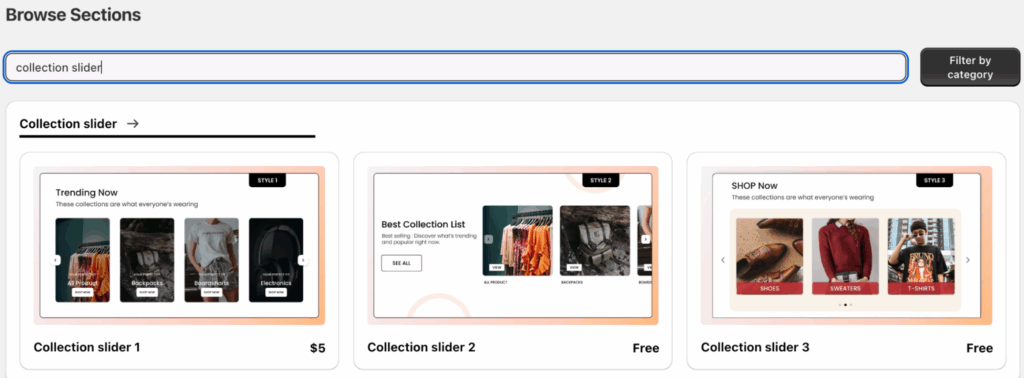
Step 1: Find Your Desired Collection
Install the MIT Sections Pro app. Then, from the app dashboard, click the Browse section and search for the section you want. For example, let’s see: Collection slider. Then, select the layout design you like
Step 2: Add the Section to Your Theme
We have selected the Collection Slide 2, which is totally free to use. Click on Get for Free > Apply to theme. This allows you to add this section to any theme of your choice.

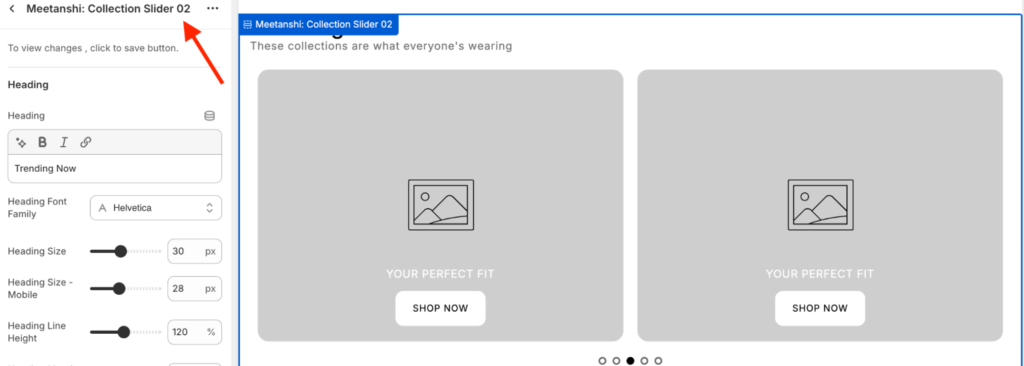
Now, click Customize theme and again select the theme. You will be redirected to the theme editor. Add the section to the theme from the sidebar by clicking Add section and selecting Meetanshi: Collection Slider 02.
Step 3: Customize and Save the Changes
Expand on the section to get 30+ customization options. Edit the section as you like and at last Save the changes.
This is how beautifully it will be showcased in the frontend.

Custom Code
This method requires technical skills. You will have to create a collection grid via Liquid code.
Step 1: Head to Code Editor
Go to Online store > Themes > …(three dots) > Edit code.
Step 2: Create a New Section
Add a new section and save it as simple-collection-grid.liquid. Then paste the following code into the newly created section and save it.
{% style %}
  .collection-grid-{{ section.id }} {
    padding: 30px 20px;
    background-color: {{ section.settings.section_background }};
  }
  .collections-heading-{{ section.id }} {
    font-size: 32px;
    color: {{ section.settings.heading_color }};
    text-align: center;
    margin-bottom: 10px;
  }
  .collections-text-{{ section.id }} {
    font-size: 16px;
    color: {{ section.settings.text_color }};
    text-align: center;
    margin-bottom: 40px;
  }
    .collection-list-wrapper-{{ section.id }} {
    display: grid;
    gap: 20px;
    margin: 0 auto;
    /* Uses the desktop column setting for ALL screens */
    grid-template-columns: repeat({{ section.settings.columns_desktop }}, 1fr);
  }
  /* Individual Collection Card Styling */
  .collection-card-{{ section.id }} {
    display: block;
    text-decoration: none;
    border-radius: 8px;
    overflow: hidden;
    position: relative;
  }
  .collection-card-{{ section.id }} img {
    display: block;
    width: 100%;
    height: 100%;
    object-fit: cover;
  }
  .card-content-{{ section.id }} {
    position: absolute;
    bottom: 0;
    width: 100%;
    padding: 15px;
    background: rgba(0, 0, 0, 0.4);
    color: #fff;
    text-align: center;
  }
  .card-title-{{ section.id }} {
    font-size: 18px;
    font-weight: bold;
    margin: 0;
  }
{% endstyle %}
<div class="collection-grid-{{ section.id }}">
  <div class="collections-heading-{{ section.id }}">
    {{ section.settings.heading }}
  </div>
  <div class="collections-text-{{ section.id }}">
    {{ section.settings.text }}
  </div>
  <div class="collection-list-wrapper-{{ section.id }}">
    {% for block in section.blocks %}
      {%- case block.type -%}
        {%- when 'collection' -%}
          {%- assign collection = block.settings.collection -%}

          {% if collection != blank %}
            <a
              href="{{ collection.url }}"
              class="collection-card-{{ section.id }}"
              {{ block.shopify_attributes }}
            >
              <div class="collection-image-wrapper">
                {% if block.settings.image != blank %}
                  {% assign collection_image = block.settings.image %}
                {% else %}
                  {% assign collection_image = collection.featured_image %}
                {% endif %}

                {% if collection_image != blank %}
                  <img
                    src="{{ collection_image | image_url }}"
                    alt="{{ collection.title }}"
                  >
                {% else %}
                  {{ 'image' | placeholder_svg_tag }}
                {% endif %}
              </div>

              <div class="card-content-{{ section.id }}">
                <p class="card-title-{{ section.id }}">
                  {% if block.settings.heading != blank %}
                    {{ block.settings.heading }}
                  {% else %}
                    {{ collection.title }}
                  {% endif %}
                </p>
                {% if block.settings.sub_heading != blank %}
                    <p style="font-size: 12px; margin: 5px 0 0 0;">{{ block.settings.sub_heading }}</p>
                {% endif %}
                {% if block.settings.button_text != blank %}
                    <span style="font-size: 11px; margin-top: 5px; display: block; opacity: 0.8;">{{ block.settings.button_text }}</span>
                {% endif %}
              </div>
            </a>
          {% endif %}
      {%- endcase -%}
    {% endfor %}
  </div>
</div>


{% schema %}
{
  "name": "Simple Collection Grid",
  "settings": [
    {
      "type": "header",
      "content": "Content"
    },
    {
      "type": "inline_richtext",
      "id": "heading",
      "label": "Heading",
      "default": "Featured Collections"
    },
    {
      "type": "inline_richtext",
      "id": "text",
      "label": "Description Text",
      "default": "Shop the trending categories now."
    },
    {
      "type": "header",
      "content": "Layout"
    },
    {
      "type": "range",
      "id": "columns_desktop",
      "label": "Columns on Desktop",
      "min": 2,
      "max": 5,
      "step": 1,
      "default": 4
    },
    {
      "type": "header",
      "content": "Colors"
    },
    {
      "type": "color",
      "id": "heading_color",
      "label": "Heading Color",
      "default": "#1a1a1a"
    },
    {
      "type": "color",
      "id": "text_color",
      "label": "Text Color",
      "default": "#555555"
    },
    {
      "type": "color",
      "id": "section_background",
      "label": "Background Color",
      "default": "#f9f9f9"
    }
  ],
  "blocks": [
    {
      "name": "Collection Card",
      "type": "collection",
      "settings": [
        {
          "type": "collection",
          "id": "collection",
          "label": "Select Collection"
        },
        {
          "type": "image_picker",
          "id": "image",
          "label": "Optional Image Override",
          "info": "Replaces the collection's default image."
        },
        {
          "type": "text",
          "id": "sub_heading",
          "label": "Sub-Heading"
        },
        {
          "type": "text",
          "id": "heading",
          "label": "Custom Card Title"
        },
        {
          "type": "text",
          "id": "button_text",
          "label": "Button/Link Text"
        }
      ]
    }
  ],
  "presets": [
    {
      "name": "Simple Collection Grid",
      "blocks": [
        { "type": "collection" },
        { "type": "collection" },
        { "type": "collection" },
        { "type": "collection" }
      ]
    }
  ]
}
{% endschema %}
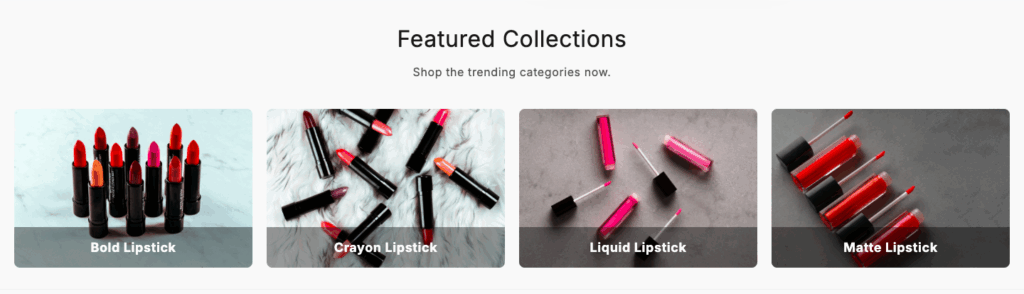
Step 3: Add the Section to the Frontend
- Navigate to Online stores > Themes > Customize.
- Click the Add section from the left sidebar and select the Simple collection grid.
- You can make edits from the sidebar, and once done, save them.
- And this is how it will look.
So here we finish up both the methods, choose the one that aligns with your business and the essentials you have.
How Do the Advanced Shopify Sections Help?
Integrating advanced Shopify sections offers a great shopping experience to the shoppers and ultimately boosts conversion rate and sales. Here are some merits it brings to your plate.
- Deeper customization and brand differentiation, helping your store stand out in the market
- Foster higher user engagement by making it easier to find relevant information and interact with the page
- Improve flexibility to tailor content for different audiences and products, driving repeat purchases and supporting business growth
Start Adding Sections in Shopify Now
So that’s the end of this blog. I hope it was helpful. Adding sections to a product page in Shopify is a small but productive move for your store. It gives you complete control over how your brand and products are presented.
Don’t let your brand be constrained by minimal settings; start experimenting with new layouts. It’s equally important to focus on broader growth strategies, something we’ve discussed in detail in how to grow your Shopify store and make sure your store is not just pretty, but profitable.
Your all-in-one solution to create a professional Shopify store
Install App Now